Introduction and Biomechanical Rationale
The posterior cruciate ligament (PCL) is the primary restraint to posterior tibial translation, providing approximately 95% of the total restraining force. Anatomically, the PCL consists of two functional bundles: the larger anterolateral (AL) bundle, which is tight in flexion, and the smaller posteromedial (PM) bundle, which is tight in extension.
The Single-Tunnel Posterior Cruciate Ligament Reconstruction is designed to anatomically recreate the dominant anterolateral bundle. By restoring the AL bundle, the surgeon re-establishes the primary restraint to posterior tibial subluxation during the functional arcs of knee flexion. This procedure is indicated for symptomatic chronic grade III PCL injuries, combined multiligamentous knee injuries, and acute grade III injuries with bony avulsions that are not amenable to primary repair.
This masterclass details the precise surgical technique, emphasizing the critical importance of tunnel trajectory to avoid the notorious "killer turn" (acute graft angulation leading to abrasion), the mandatory use of the posteromedial portal for neurovascular safety, and rigorous postoperative protocols.
Preoperative Planning and Patient Positioning
Meticulous patient positioning is the foundation of a successful PCL reconstruction. The procedure requires unhindered access to the posterior aspect of the knee and the ability to manipulate the limb through a full range of motion.
- Anesthesia and Setup: Place the patient in the supine position on the operating table. Administer general or regional anesthesia with a robust muscle relaxant to facilitate joint manipulation.
- Tourniquet Placement: Apply a pneumatic tourniquet high around the proximal thigh to maximize the working area around the knee.
- Limb Support: Utilize a padded lateral post to assist with valgus stress during the arthroscopic debridement and medial compartment visualization.
- Flexion Maintenance: Tape a 3-L saline bag to the operating table beneath the drapes. This serves as an excellent, stable foot bolster to help maintain the knee at 80 to 90 degrees of flexion during the critical stages of tunnel drilling and graft passage.
Surgical Pearl: Maintaining exactly 80 to 90 degrees of knee flexion during tibial tunnel drilling is critical. In this position, the popliteal neurovascular bundle falls posteriorly, maximizing the safety margin between the posterior tibial cortex and the popliteal artery.
Diagnostic Arthroscopy and Portal Placement
Perform a routine systematic arthroscopic examination of the knee. Address any associated intra-articular abnormalities, such as chondral defects or meniscal tears.
Surgical Warning: If a meniscal repair is performed concurrently, the sutures should be passed but tied only after the PCL reconstruction is completed. Tying them beforehand risks suture cutout or meniscal displacement during the rigorous manipulation required for PCL graft passage.
Establishing the Portals
- Standard Anterior Portals: Create standard anterolateral (AL) and anteromedial (AM) portals. The AM portal should be slightly larger than usual to accommodate the passage of large bone plugs.
- The Posteromedial (PM) Portal: This is a mandatory portal for PCL reconstruction.
- Pass the arthroscope through the intercondylar notch into the posteromedial compartment.
- Transilluminate the skin to identify the saphenous vein and its branches.
- Using an 18-gauge spinal needle under direct intra-articular visualization, localize the optimal trajectory just superior to the joint line and posterior to the medial collateral ligament (MCL).
- Make a vertical incision with a No. 11 blade, spreading the soft tissues with a hemostat to avoid neurovascular injury, and introduce a cannula.
Intercondylar Notch Preparation and Debridement
Adequate visualization of the PCL footprint is paramount. The native PCL footprint on the tibia extends distally over the "posterior flat spot" (facies posterior tibiae).
- Soft Tissue Clearance: Using the standard AL and AM portals, debride the soft tissue, ligamentum mucosum, and the remaining ruptured cruciate ligament from the intercondylar notch.
- Notchplasty: Perform an internal bony notchplasty using a motorized burr if the notch is stenotic. This prevents graft impingement during extension.
- Enhanced Visualization: Viewing the tibial attachment site is vastly improved by utilizing a 70-degree arthroscope in the AL portal. Alternatively, a 30-degree arthroscope can be placed directly through the newly established PM portal.
- Stump Removal: Use a full-radius resector to remove the remaining stump of the PCL. Specially designed back-cutting knives, angled curettes, and rasps are highly effective in removing remnants from the posterior tibial facet.
- Capsular Elevation: Elevate the posterior capsule from its attachment to the posterior flat spot on the tibia. Pass a curved curette or a periosteal elevator through the intercondylar notch or the PM portal. This step creates a safe recess for the guide pin and drill to exit without immediately engaging the posterior capsule and neurovascular structures.
Graft Selection and Preparation
The choice of graft depends on patient demands, surgeon preference, and the presence of multiligamentous injuries. Bone-patellar tendon-bone (BPTB) autografts and Achilles tendon allografts are the gold standards due to their robust biomechanical properties and bone-to-bone healing capabilities.
Option A: Achilles Tendon Allograft
- Contouring: Contour the calcaneal bone block to create a cylindrical bone plug measuring 11 mm in diameter and 20 mm in length.
- Tubularization: Place the tendinous portion of the graft under tension. Roll and tubularize the graft using a running absorbable suture (e.g., Vicryl).
- Whipstitching: Place a No. 5 non-absorbable tension suture in the distal 5 cm of the tendinous end using a running interlocking (Krackow) technique.
- Pre-Tensioning: Place the prepared graft on a graft tensioning board. Apply 10 lbs of tension for 15 minutes to allow for viscoelastic creep and stress relaxation prior to intra-articular fixation.
Option B: Patellar Tendon Autograft (Surgical Technique 51-22)
- Harvest: Make a 7-cm midline incision extending from the inferior pole of the patella to the tibial tuberosity. Harvest the central third of the patellar tendon (10 to 11 mm wide and approximately 25 mm long) along with 8-mm-thick bone plugs from the patella and tibia.
- Sizing: Contour the graft to pass smoothly through a 10- or 11-mm sizing cylinder.
- Shortening: The bone plug designated for the femoral tunnel should be shortened to approximately 20 mm. This facilitates easier intra-articular passage and maneuvering through the intercondylar notch.
Tibial Tunnel Preparation: The Critical Step
Creating the tibial tunnel is the most technically demanding and dangerous step of the procedure due to the proximity of the popliteal artery.
- Guide Placement: We recommend the Arthrex drill guide system. With the 70-degree arthroscope in the AL portal, insert the tibial guide through the AM portal and pass it through the intercondylar notch.
- Targeting the Footprint: Place the tip of the guide 10 to 12 mm below the joint line, directly in the center of the native PCL facet on the posterior tibia.
- Setting the Angle: Orient the drill guide at approximately 60 degrees relative to the articular surface of the tibia. The starting point should be just inferior and medial to the tibial tuberosity.
- Biomechanical Rationale: A more perpendicular angle creates an acute "killer turn" at the posterior tibia, which will abrade and eventually rupture the graft. Conversely, starting the tunnel too distally may cause the reamer to blow out the posterior tibial shelf.
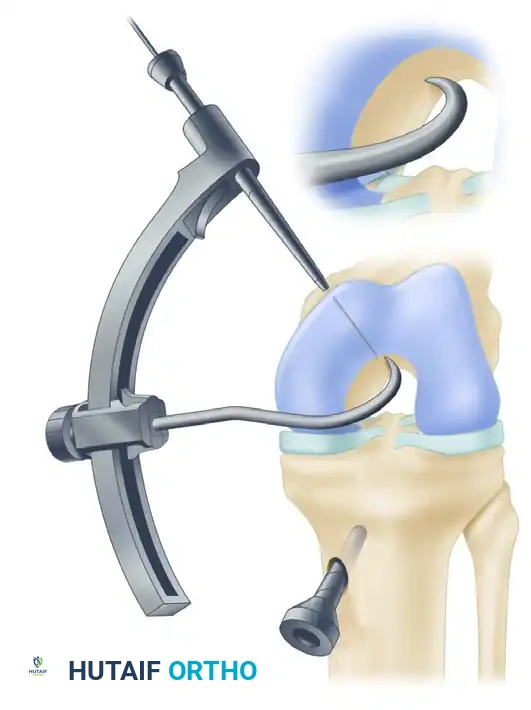
Arthrex Popliteal Drill Stop prevents advancement of the guide pin past the tip of the marking hook during drilling, ensuring neurovascular safety.
- Fluoroscopic Confirmation: The simultaneous use of lateral image intensification (fluoroscopy) and arthroscopy is mandatory to confirm the proper positioning of the drill guide before and during drilling.
- Pin Advancement: Calibrations on the tibial guide accurately measure the distance from the anterior tibial cortex to the posterior tip of the guide. Adjust the guide pin so that it protrudes from the drill exactly 1 cm less than the measured distance. This mechanical stop prevents catastrophic overdrilling.
- Tapping the Pin: Drill the pin until it reaches the 1 cm stop. Then, disconnect the drill and tap the pin in the final 1 cm with a mallet.
- Neurovascular Protection: While tapping the pin, place a curette through the PM portal over the posterior tibial cortex. This acts as a physical barrier to protect the neurovascular structures from inadvertent pin penetration. If adequate capsular elevation was performed, the guide pin will be clearly observed arthroscopically as it exits the posterior tibia at the physeal scar area.
- Reaming: Ream the tibial tunnel over the guide pin to the matched diameter of the graft (usually 10 or 11 mm).
Femoral Tunnel Preparation
The femoral tunnel must be placed at the anatomic physiometric point of the anterolateral bundle to ensure appropriate graft tension throughout the range of motion.
- Identifying the Physiometric Point: The optimal femoral starting point is located 8 mm proximal to the articular cartilage margin in the intercondylar notch. This corresponds to the 1-o’clock position on a right knee and the 11-o’clock position on a left knee.

- Guide Placement: Place the tip of the PCL femoral guide through the AM portal while viewing with the arthroscope in the AL portal.
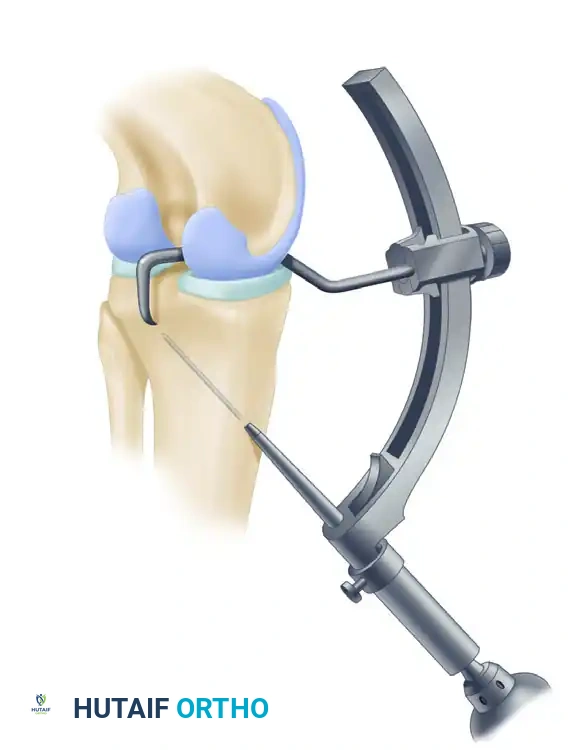
Millimeter markings on the Arthrex PCL Femoral Marking Hook allow precise determination of the distance of the femoral tunnel from the margin of the articular cartilage.
- Surgical Approach: Expose the medial femoral cortex through a 3-cm longitudinal incision. Elevate the vastus medialis obliquus (VMO) superiorly to expose the bone.
- Pin Insertion: Insert the guide pin midway between the articular margin of the medial femoral condyle and the medial epicondyle, directing it toward the intra-articular physiometric point.
- Reaming: Use the appropriate size reamer for the available graft. Ream from the outside-in, taking care to leave 1 to 2 mm of distal bone at the articular margin to prevent cortical blowout.
Graft Passage
Passing the graft through the acute angle of the posterior tibia (the "killer turn") requires patience and specialized instrumentation.
- Smoothing the Tunnel: Pass a Gore smoother or a specialized rasp through the tibial tunnel, into the joint, and pull it out through the central fat pad portal. Use this instrument to aggressively smooth the posterior aperture of the tibial tunnel and remove any remaining posterior soft-tissue remnants. Do not enlarge the tibial tunnel excessively.
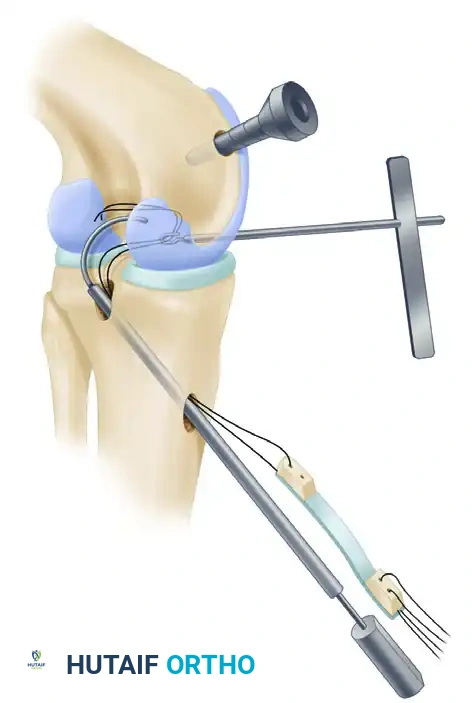
The Arthrex “Worm” Curving Suture Passer facilitates the smooth passing of graft sutures through the tibial tunnel, around the posterior tibia, and into the intercondylar notch.
- Suture Shuttle: Once the smoother passes without undue resistance, attach the graft traction sutures to the end of the smoother or suture passer.
- Pulling the Graft: Pull the graft sutures and the bone plug up through the tibial tunnel and into the joint.
- Troubleshooting: Extreme flexion of the knee sometimes aids the passage of the patellar bone plug from the posterior tibial aperture into the joint.
- Switching Stick Technique: Placing a switching stick through the PM portal allows the guide sutures to be redirected over the stick, acting as a pulley to assist in pulling the graft around the posterior tibial corner.
- Femoral Passage: Place a grasper through the femoral tunnel to retrieve the sutures. Use a probe or an Allis clamp through the AM portal to assist the graft into the femoral tunnel aperture.
- Orientation: Ensure the cancellous portion of the bone plug is oriented posteriorly. This reduces graft abrasion against the sharp anterior rim of the femoral tunnel.
Graft Fixation and Tensioning
Proper tensioning and rigid fixation are critical to prevent postoperative laxity.
- Femoral Fixation First: Before securing the tibia, ensure the femoral bone plug fits flush at the aperture of the femoral tunnel. Secure the femoral bone plug with a metal or bioabsorbable interference screw.
- Assessing Pistoning: Put the knee through a full range of motion while maintaining manual tension on the tibial end of the graft. Ensure there is no more than 3 mm of graft pistoning through the range of motion from 0 to 100 degrees.
- Correction: If excessive pistoning is encountered, the femoral tunnel placement is non-physiometric. Rasp the proximal wall of the femoral tunnel to adjust the effective origin point.
- Stress Relaxation: Maintain 15 to 20 lbs of manual graft tension and cycle the knee through a full range of motion for 20 cycles. This eliminates creep and allows stress relaxation of the graft.
- Tibial Fixation: Flex the knee to exactly 90 degrees. Apply an anterior drawer force to the tibia to restore the normal anatomic step-off (the medial tibial plateau should sit 1 cm anterior to the medial femoral condyle). While maintaining this anterior reduction and maximal graft tension, secure the graft in the tibial tunnel with an interference screw.
- Backup Fixation: If a soft tissue graft (e.g., Achilles tendon) is used in the tibial tunnel, backup fixation using a ligament button or a post-and-washer construct over the anterior tibial cortex is highly indicated to prevent slippage.
Postoperative Care and Rehabilitation
Rehabilitation following PCL reconstruction is inherently more conservative than ACL reconstruction to protect the graft from the posterior gravitational and muscular forces of the tibia.
- Immobilization: Immediately postoperatively, the knee is immobilized in full extension in a removable knee immobilizer or a dynamic PCL brace (which applies an anterior force to the posterior calf) for 4 weeks.
- Early Range of Motion: Early passive range-of-motion and isometric quadriceps exercises are encouraged to prevent arthrofibrosis. However, flexion is strictly limited to 90 degrees for the first 4 weeks to prevent excessive tension on the healing graft.
- Hamstring Precautions: Active hamstring contraction creates a posterior shear force on the tibia, directly stressing the PCL graft. Therefore, isolated hamstring strengthening is strictly prohibited for the first 3 months.
- Weight Bearing: Patients are typically kept toe-touch weight-bearing with crutches for the first 4 to 6 weeks, progressing to full weight-bearing as quadriceps control returns.
- Return to Play: Advanced strengthening and proprioceptive training begin at 4 to 6 months. During all motion and strengthening therapy, extreme care is taken to prevent posterior tibial stress. Return to competitive sports is generally allowed at 9 to 12 months, contingent upon the restoration of 90% quadriceps strength compared to the contralateral limb and the absence of posterior sag.
