Comprehensive Introduction and Patho-Epidemiology
The surgical management of severe, progressive neuromuscular spinal deformities represents one of the most formidable challenges in pediatric and adult orthopedic spine surgery. Among the myriad techniques developed to address these complex three-dimensional deformities, S-Rod fixation to the pelvis stands out as a masterclass in achieving robust, durable spinopelvic stability. This technique is paramount when the surgical objective necessitates a solid, unyielding foundation at the pelvis to support long-segment spinal correction superiorly. The overarching goal in these complex scenarios is not merely coronal or sagittal alignment, but the restoration of a level pelvis to facilitate balanced, pain-free sitting, prevent soft tissue breakdown, and optimize cardiopulmonary function.
Neuromuscular scoliosis, frequently encountered in patients with cerebral palsy (particularly Gross Motor Function Classification System levels IV and V), Duchenne muscular dystrophy, spinal muscular atrophy, and myelomeningocele, is characterized by its early onset, rapid progression, and relentless nature. Unlike adolescent idiopathic scoliosis, which often spares the lumbosacral junction, neuromuscular curves are typically long, sweeping, C-shaped deformities that obligatorily involve the pelvis, leading to profound pelvic obliquity. This obliquity results in unequal ischial weight-bearing, predisposing the patient to intractable decubitus ulcers, severe seating difficulties, and progressive truncal decompensation that can severely compromise diaphragmatic excursion and pulmonary reserve.
When the pelvis is not instrumented in these sweeping curves, the "crankshaft phenomenon" or distal adding-on can rapidly compromise the surgical outcome. The uninstrumented lumbosacral junction becomes the apex of mechanical stress, inevitably leading to rapid curve progression below the fusion mass, necessitating complex and morbid revision surgeries. Consequently, extending the fusion to the pelvis has become the gold standard in non-ambulatory neuromuscular patients with curves extending into the lower lumbar spine. However, achieving rigid pelvic fixation in the osteopenic, dysplastic bone characteristic of these patients has historically been a profound biomechanical conundrum.
While the Galveston technique and modern iliac or S2-alar-iliac (S2AI) screws have revolutionized pelvic fixation, they are not universally applicable. In patients with profound pelvic dysplasia, such as those with myelomeningocele, the osseous corridors required for large-diameter iliac screws may be absent, vertically oriented, or severely distorted. Here, the S-Rod technique—utilizing a contoured rod or S-hook that press-fits over the robust sacral ala—provides an indispensable alternative. By leveraging the cortical density of the sacral ala, the S-Rod construct bypasses the need for cancellous bone channels, offering unparalleled resistance to the cantilever forces exerted by a long spinal construct and providing a reliable foundation for massive deformity correction.
Detailed Surgical Anatomy and Biomechanics
Osteology of the Lumbosacral Junction and Pelvis
A profound understanding of lumbosacral osteology is the absolute prerequisite for safe and effective S-Rod fixation. The primary anchor point for this technique is the sacral ala, a lateral wing-like extension of the sacrum that articulates with the ilium to form the sacroiliac joint. In the pediatric and adolescent neuromuscular population, the sacral ala typically measures between 1.5 to 2.0 centimeters in anteroposterior depth and 2.0 to 3.0 centimeters in mediolateral width. Despite the severe osteopenia and dysplasia often seen in adjacent vertebral bodies, the sacral ala remarkably retains a dense cortical shell, making it an exceptional buttress for press-fit instrumentation.
The morphological variability of the sacral ala in neuromuscular conditions, particularly myelomeningocele, cannot be overstated. The lack of posterior elements and the altered mechanical loading during early development often result in a flattened, widened, or retroverted sacral ala. The S-Rod must be meticulously selected and contoured to intimately match this patient-specific morphology. The superior surface of the ala slopes anteriorly and laterally, a trajectory that must be respected when seating the S-hook to prevent lateral migration or superior slip-off during the application of massive distraction forces.
Furthermore, the relationship between the L5 transverse process, the sacral ala, and the iliac crest forms a tight osseous triangle that dictates the surgical approach. The working corridor is exceptionally narrow, bordered superiorly by the L5 transverse process, inferiorly by the sacral ala, and laterally by the medial wall of the iliac wing. Navigating this confined space requires precise, deliberate subperiosteal dissection to expose the bony landmarks without violating the adjacent neurovascular structures or inadvertently breaching the sacroiliac joint capsule, which could lead to postoperative pain, instability, or loss of fixation.
Neurovascular Topography
The lumbosacral junction is an unforgiving anatomical region fraught with critical neurovascular structures. The most significant neurological concern during S-Rod placement is the L5 nerve root. The L5 ventral ramus exits the L5-S1 neural foramen and courses obliquely—progressing from posterior to anterior and superior to inferior—directly anterior to the sacral ala. Crucially, immediately inferior to the L5 pedicle, the nerve root passes anterior to the ala, separated by a mere 1.5 centimeters of soft tissue and bone. This intimate proximity dictates that any instrument blindly inserted or plunged anterior to the sacral ala carries a catastrophic risk of L5 nerve root transection or traction injury, manifesting clinically as a profound and often irreversible foot drop.
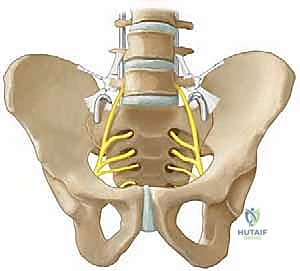
Beyond the L5 nerve root, the retroperitoneal space lies immediately anterior to the sacral ala. This space houses the common iliac vessels, which bifurcate into the internal and external iliac arteries and veins just anterior to the sacroiliac joint. The ureters also traverse this retroperitoneal fat pad, coursing inferiorly toward the bladder. A cortical breach anteriorly, or the overzealous use of pointed Hohmann retractors, can result in devastating vascular hemorrhage or unrecognized ureteral injury. Consequently, the surgical mantra in this region is strict adherence to posterior dissection and blunt, tactile exploration when assessing the anterior alar contour.
The lumbosacral plexus, formed by the ventral rami of L4 to S4, lies intimately against the anterior surface of the sacrum and the piriformis muscle. While the S-Rod technique primarily targets the superior aspect of the sacral ala, aberrant anatomy or excessive medial dissection can theoretically place the S1 nerve root at risk as it exits the anterior sacral foramen. Continuous intraoperative neuromonitoring, utilizing both Somatosensory Evoked Potentials (SSEPs) and Motor Evoked Potentials (MEPs), is therefore non-negotiable. This provides real-time feedback on the functional integrity of these vulnerable neural pathways during dissection, hardware placement, and the critical phases of deformity correction.
Ligamentous Architecture
The ligamentous stabilizers of the lumbosacral junction present both an anatomical barrier and a vital surgical landmark. The most critical structure in the context of S-Rod fixation is the ileotransverse ligament. This robust ligamentous band originates from the tip and inferior border of the L5 transverse process and inserts onto the superior and medial aspects of the iliac crest. It forms the superior boundary of the working corridor to the sacral ala and must be meticulously managed to achieve successful hardware placement.
Failure to adequately identify and completely release the ileotransverse ligament is a common pitfall that leads to suboptimal hardware seating. If the ligament is left intact, it acts as a soft-tissue interposition, preventing the S-Rod or S-hook from achieving a direct, flush press-fit against the cortical bone of the sacral ala. This incomplete seating significantly reduces the biomechanical stability of the construct, increasing the risk of hardware prominence, pseudarthrosis, and eventual loss of pelvic obliquity correction due to micromotion at the bone-implant interface.
In addition to the ileotransverse ligament, the iliolumbar ligament complex plays a role in stabilizing the L5 vertebra on the sacrum. While complete resection of the iliolumbar ligament is rarely necessary for S-Rod placement, its anterior band must be respected during the release of the ileotransverse ligament. The dissection must remain strictly subperiosteal and within the posterior compartment, utilizing electrocautery and Cobb elevators to sweep the ligamentous attachments off the bone without plunging into the psoas muscle or the retroperitoneal space anteriorly.
Biomechanics of Pelvic Fixation
The biomechanical rationale for S-Rod fixation is deeply rooted in the management of massive cantilever forces generated by long spinal constructs. In a non-ambulatory neuromuscular patient, the entire weight of the trunk is transferred through the spine to the pelvis during sitting. When a long fusion construct ends at the lower lumbar spine (e.g., L5), these forces concentrate at the lumbosacral junction, inevitably leading to implant failure, sacral fractures, or rapid progression of pelvic obliquity. Extending the fusion to the pelvis neutralizes these forces by creating a rigid, monolithic spinopelvic unit.
The S-Rod achieves this stability through a unique press-fit mechanism. Unlike pedicle or iliac screws, which rely on thread purchase within cancellous bone (which is often severely osteopenic in this population), the S-Rod relies on surface area contact and cortical compression. The U-shaped or S-shaped contour of the rod hooks over the dense cortical ridge of the sacral ala. When distraction is applied between the L4 pedicle screws and the S-Rod, the hardware is driven firmly into the alar bone, creating a highly stable, friction-locked interface that resists both flexion-extension and lateral bending forces.
This load-sharing mechanism is particularly advantageous in profoundly dysplastic pelves. In myelomeningocele, the iliac wings may be paper-thin, precluding the safe passage of an 8.0mm or 9.0mm iliac screw. The sacral ala, however, almost universally retains sufficient structural integrity to support an S-Rod. Furthermore, the S-Rod technique allows for excellent control of pelvic rotation and obliquity. By independently distracting or compressing the right and left S-Rods against the lower lumbar anchors, the surgeon can powerfully manipulate the pelvis in the coronal plane, effectively leveling the foundation for the spine above.
Exhaustive Indications and Contraindications
The decision to utilize S-Rod fixation over alternative pelvic anchoring techniques requires a nuanced understanding of patient-specific pathoanatomy, bone density, and the biomechanical demands of the specific deformity being addressed.
Patient Selection Criteria
The ideal candidate for S-Rod fixation is a non-ambulatory patient with a severe, progressive neuromuscular spinal deformity and concomitant pelvic obliquity. These patients typically present with Gross Motor Function Classification System (GMFCS) level IV or V cerebral palsy, advanced Duchenne muscular dystrophy, or severe spinal muscular atrophy. In these populations, the primary goal of surgery is to achieve a balanced, level pelvis that allows for stable, upright sitting in a custom-molded wheelchair, thereby preventing ischial decubitus ulcers, optimizing respiratory mechanics, and facilitating nursing care.
Myelomeningocele represents a highly specific and compelling indication for the S-Rod technique. Patients with lumbosacral myelomeningocele often exhibit profound pelvic dysplasia, characterized by absent posterior spinal elements, a widened spinal canal, and extremely narrow or vertically oriented iliac wings. Traditional iliac screws or S2AI screws are frequently contraindicated in these cases due to the lack of an adequate osseous corridor. The S-Rod, which relies on the relatively preserved cortical density of the sacral ala, provides a reliable and biomechanically sound alternative for achieving pelvic fixation in this challenging anatomical landscape.
Furthermore, the S-Rod technique is indicated in complex revision scenarios where previous pelvic fixation has failed. In revision surgery for lumbosacral pseudarthrosis, iliac screw pullout, or broken S2AI screws, the sacral ala often remains an intact and viable anchor point. The S-Rod can be utilized as a powerful salvage technique, bypassing the compromised, cavitated iliac bone and establishing a new, stable foundation for the revised spinal construct.
Absolute and Relative Contraindications
While highly versatile, S-Rod fixation is not without its limitations. Absolute contraindications include active, untreated local or systemic infection. Placing massive spinal hardware in the presence of bacteremia or a deep surgical site infection is a recipe for catastrophic failure, necessitating immediate hardware removal and prolonged antibiotic therapy. Additionally, a completely absent or traumatically destroyed sacral ala represents an absolute anatomical contraindication, as the technique relies entirely on this structure for its press-fit anchor.
Relative contraindications center primarily around ambulatory status. In ambulatory patients, rigid fixation to the pelvis significantly alters the biomechanics of the sacroiliac joint and the lumbar spine, potentially leading to an abnormal, energy-inefficient gait and accelerated adjacent segment degeneration. While S-Rods can technically be placed in ambulatory patients, alternative techniques that spare the sacroiliac joint, or shorter fusion constructs ending at L5, are generally preferred unless the pelvic obliquity is so severe that it entirely precludes walking.
Severe, unremitting osteopenia is another relative contraindication. While the S-Rod relies on cortical bone, extreme osteomalacia or metabolic bone disease can render even the sacral ala too fragile to withstand the distraction forces required for seating the hardware. In such cases, the surgeon must weigh the risk of intraoperative alar fracture against the necessity of pelvic fixation, potentially augmenting the construct with sublaminar wires, cement augmentation (off-label), or utilizing a hybrid fixation strategy.
| Category | Indications | Contraindications |
|---|---|---|
| Primary | Non-ambulatory neuromuscular scoliosis (CP, SMA, DMD) | Active local or systemic infection |
| Anatomical | Severe pelvic obliquity (>15 degrees) | Absent or traumatically destroyed sacral ala |
| Dysplastic | Myelomeningocele with narrow/absent iliac corridors | Ambulatory status (Relative - alters gait mechanics) |
| Revision | Salvage for failed iliac/S2AI screw fixation | Severe metabolic osteopenia (Relative - risk of alar fracture) |
Pre-Operative Planning, Templating, and Patient Positioning
Advanced Imaging Modalities
Meticulous preoperative planning is the absolute cornerstone of successful S-Rod fixation. The complex, three-dimensional nature of neuromuscular deformities demands a comprehensive, multi-modal imaging strategy. Standard full-length standing or supine anteroposterior (AP) and lateral radiographs are the mandatory starting point. These images provide a macroscopic view of the coronal and sagittal alignment, the magnitude of the pelvic obliquity, and the overall bone quality. On the lateral supine film, the surgeon must specifically identify the sacral slope and the sagittal profile of the lumbosacral junction.
However, plain radiographs are frequently insufficient for assessing the dysplastic pelvis. High-resolution computed tomography (CT) with 3D reconstructions is highly recommended, particularly in patients with myelomeningocele or severe congenital anomalies. The 3D CT allows for precise evaluation of the sacral ala's morphology, width, and depth. It helps the surgeon anticipate the required contour of the S-Rod and identify any osseous defects that might compromise the press-fit mechanism. Furthermore, CT imaging is invaluable for assessing the pedicle dimensions at L4 and L5, which will serve as the proximal counter-anchors for the pelvic distraction maneuver.
Magnetic Resonance Imaging (MRI) of the entire neuraxis is also critical in this patient population. Neuromuscular patients have a high incidence of intraspinal anomalies, such as tethered cord, syringomyelia, or diastematomyelia. Identifying these lesions preoperatively is essential to prevent catastrophic neurological injury during deformity correction. The MRI also provides detailed visualization of the soft tissues, including the psoas muscle and the exact trajectory of the lumbosacral plexus relative to the sacral ala.
Pre-Operative Templating and Implant Selection
Once the imaging has been thoroughly reviewed, the surgeon must engage in precise preoperative templating. This involves selecting the appropriate rod material, diameter, and contouring strategy. In neuromuscular deformity, 5.5mm or 6.0mm rods in either Titanium or Cobalt-Chrome are typically utilized, balancing the need for construct rigidity with the spatial constraints of the pediatric spine. Cobalt-Chrome is often preferred for the S-Rod segment due to its superior stiffness and resistance to notch sensitivity during aggressive contouring.
The surgeon must estimate the required dimensions of the S-hook. The distance from the L4 or L5 pedicle screw head to the superior ridge of the sacral ala is measured to determine the optimal length of the rod segment. The depth of the sacral ala dictates the radius of the "U" or "S" bend. Having a clear mental and physical template of the required implant shape drastically reduces intraoperative contouring time, minimizing blood loss and anesthetic exposure in these medically fragile patients.
Patient Positioning and Operating Room Setup
Patient positioning is a critical phase of the operation that demands meticulous attention to detail. Neuromuscular patients are often cachectic, with severe joint contractures and prominent bony landmarks that are highly susceptible to pressure necrosis. The patient is typically positioned prone on a Jackson spinal table or a Relton-Hall frame. The abdomen must be completely free from compression to avoid increasing intra-abdominal pressure, which would engorge the epidural venous plexus and lead to excessive intraoperative hemorrhage.
All bony prominences, particularly the anterior superior iliac spines, knees, and elbows, must be heavily padded with gel rolls or foam. The arms are positioned at 90-90 degrees to prevent brachial plexus traction injuries. Intraoperative neuromonitoring (SSEP and MEP) electrodes are placed prior to positioning, and baseline signals are obtained. The surgical field is prepped and draped widely, exposing the entire spine from the upper thoracic region down to the gluteal cleft, allowing for unhindered access to the lumbosacral junction and the posterior iliac crests.
Step-by-Step Surgical Approach and Fixation Technique
Soft Tissue Dissection and Exposure
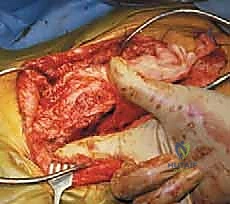
The surgical approach begins with a standard midline longitudinal incision, carried down through the subcutaneous tissues to the lumbodorsal fascia. In neuromuscular patients, the fascial layers are often attenuated, and the paraspinal musculature may be fibrotic or largely replaced by fat. Subperiosteal dissection is meticulously performed, exposing the spinous processes, laminae, and facet joints from the proximal fusion levels down to the sacrum.
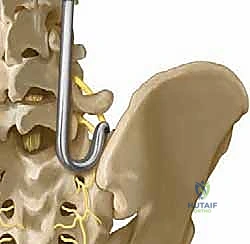
To expose the sacral ala, the dissection must proceed laterally from the L5-S1 facet joint. Using a combination of electrocautery and Cobb elevators, the surgeon sweeps the multifidus and erector spinae muscles laterally. The key anatomical landmark is the L5 transverse process. Once identified, the surgeon dissects inferiorly from the L5 transverse process to encounter the ileotransverse ligament. This ligament must be sharply incised or detached from the iliac crest and the L5 transverse process using a Bovie electrocautery, taking extreme care not to plunge anteriorly.
Releasing the ileotransverse ligament unveils the superior surface of the sacral ala. The surgeon then uses a blunt, curved elevator (such as a Penfield #1 or a specialized alar elevator) to gently palpate the anterior lip of the sacral ala. This step is critical; the elevator must remain in constant contact with the bone to avoid injuring the L5 nerve root or the iliac vessels lying immediately anterior to the ala. The soft tissues are gently swept away, creating a clean osseous bed for the S-Rod.
Preparation of the Sacral Ala
Once the sacral ala is adequately exposed, it must be prepared to receive the S-Rod. The superior cortical surface of the ala is often smooth and sloped. To prevent the S-Rod from migrating laterally or slipping off the ala during distraction, a small seating notch or trough may be created. This is accomplished using a high-speed burr or a small osteotome to decorticate a shallow groove along the superior-anterior ridge of the ala, corresponding to the planned trajectory of the rod.
This decortication serves a dual purpose: it provides a mechanical interlock for the S-Rod, preventing translation, and it exposes bleeding cancellous bone, which is essential for promoting a robust lumbosacral arthrodesis. During this preparation, the surgeon must remain hyper-vigilant of the L5 nerve root. The burr should be directed posteriorly, away from the anterior soft tissues, and a protective retractor or elevator should be maintained anterior to the ala at all times to shield the neurovascular structures from inadvertent injury.
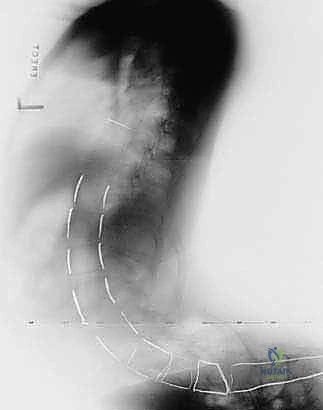
S-Rod Contouring and Placement
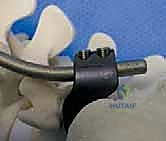
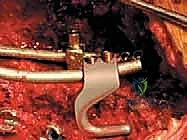
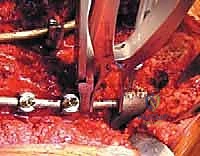
Contouring the S-Rod is an art form that requires spatial reasoning and precise execution. The rod must be bent to accommodate the lumbar lordosis, navigate the L5-S1 junction, and form a tight hook that intimately grasps the sacral ala. Using heavy-duty French benders, the surgeon first creates the distal "U" or "S" shape. The radius of this bend must perfectly match the anteroposterior depth of the patient's sacral ala, as determined during preoperative templating and intraoperative palpation.

The contoured rod is then introduced into the surgical field. The distal hook is carefully guided over the prepared notch on the sacral ala. The tip of the hook should sit flush against the anterior cortex of the ala, while the apex of the bend rests securely in the decorticated trough. The proximal portion of the rod is then aligned with the pedicle screws at L4 and L5. If the rod does not sit perfectly, it must be removed and re-contoured. Forcing a poorly contoured rod into the screw heads will introduce massive pre-load stresses into the construct, increasing the risk of immediate screw pullout or delayed rod fracture.
Distraction, Deformity Correction, and Final Seating
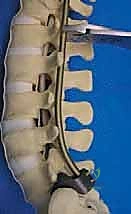
The defining biomechanical maneuver of the S-Rod technique is the application of distraction to seat the hardware and correct the pelvic obliquity. Once the S-Rod is loosely captured in the L4 and L5 pedicle screw heads, a distractor is placed between the screw head and the rod. As distraction is applied, the S-Rod is driven distally, forcefully impacting the hook onto the sacral ala. This creates the critical press-fit, friction-locked interface.
In the setting of pelvic obliquity, differential distraction is utilized. On the "high" side of the pelvis (the side that is elevated), compression is applied between the lumbar screws and the S-Rod to pull the pelvis superiorly. Conversely, on the "low" side of the pelvis, aggressive distraction is applied to push the pelvis inferiorly. This powerful push-pull mechanism leverages the rigid alar fixation to forcefully rotate the pelvis in the coronal plane, restoring a level foundation. Once the desired correction is achieved and the S-Rods are firmly seated bilaterally, the set screws are definitively torqued, locking the spinopelvic construct into a monolithic unit.
Complications, Incidence Rates, and Salvage Management
Intraoperative Complications
Despite meticulous technique, S-Rod fixation carries a distinct profile of intraoperative risks. The most feared complication is injury to the L5 nerve root. This typically occurs during the blind placement of elevators anterior to the sacral ala or if the S-Rod hook is contoured with an excessively long anterior limb that compresses the nerve against the sacrum. Clinically, this manifests as a sudden loss of MEP signals in the tibialis anterior and extensor hallucis longus. Immediate action is required: the rod must be removed, the anterior space explored bluntly, and the rod re-contoured with a shorter anterior limb.
Another significant intraoperative complication is fracture of the sacral ala. This is particularly common in patients with severe osteopenia or when excessive distraction force is applied during the seating maneuver. A sudden "pop" accompanied by a loss of resistance during distraction is pathognomonic for an alar fracture. If the fracture is non-displaced, the surgeon may accept the position but must augment the fixation. If the ala is completely destroyed, the S-Rod technique must be abandoned on that side in favor of a salvage strategy.
Vascular injury, while rare, is catastrophic. Plunging an instrument anterior to the ala can lacerate the internal iliac vein or artery. This results in rapid, massive hemorrhage that pools in the retroperitoneal space before becoming visible in the surgical field. Management requires immediate packing, potential extension of the incision for anterior access, and urgent consultation with a vascular surgeon.
Postoperative and Long-Term Complications
In the postoperative period, deep surgical site infection (DSSI) is a major concern, occurring in up to 10-15% of neuromuscular spine deformity cases due to poor patient nutrition, skin maceration, and the presence of fecal incontinence. Infections involving the S-Rod construct require aggressive surgical debridement, copious irrigation, and prolonged culture-directed intravenous antibiotics. Hardware removal is generally avoided unless the infection is intractable or the fusion mass has consolidated.


