Essential Guide to Femur Retrograde Intramedullary Nailing
Introduction & Epidemiology
Retrograde intramedullary nailing of the femur represents a well-established and critically important technique in the orthopedic surgeon's armamentarium for managing a spectrum of femoral fractures. Conceptually, retrograde femoral nailing is defined as any femoral nailing technique utilizing a distal entry point, typically originating from the condyles or an intercondylar, intra-articular starting point. For clarity within this guide, retrograde femoral nailing specifically refers to nails inserted via an intercondylar starting point, extending proximally through the femoral shaft to the proximal femur. In select distal femoral fracture scenarios, shorter nails, often termed supracondylar nails, can be employed using an identical distal entry point to achieve stable fixation of distal femoral metadiaphyseal injuries.
The prevalence of femoral shaft fractures varies by population, with bimodal peaks observed in young adults (high-energy trauma) and the elderly (low-energy falls into osteoporotic bone). Intramedullary nailing, whether antegrade or retrograde, is the gold standard for diaphyseal femoral fractures, offering load-sharing characteristics, rapid union rates, and early functional recovery. Retrograde nailing emerged as an alternative to antegrade nailing, particularly advantageous in situations where an antegrade approach is challenging or contraindicated due to associated injuries (e.g., ipsilateral hip, spine, or pelvis trauma), patient positioning difficulties, or specific fracture patterns involving the distal femur. The technique offers distinct advantages, particularly in the polytrauma patient, facilitating simultaneous management of ipsilateral lower extremity injuries and maintaining ease of airway and spinal access.
Surgical Anatomy & Biomechanics
The femoral shaft is characterized by its tubular configuration, particularly over its isthmic region, which represents the narrowest segment of the medullary canal. Distally, the shaft gradually flares, transitioning into the trapezoidal cross-section of the distal femur, which accommodates the condylar anatomy.
The precise entry point for the retrograde femoral nail is critical. It is consistently located at the distal end of the patellofemoral groove, positioned just anterior to the posterior cruciate ligament (PCL) insertion site. This anatomical landmark can be reliably identified both intraoperatively and radiographically.
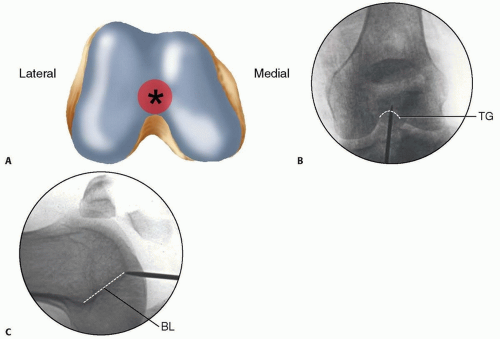
FIG 1
•
A.
Distal femoral anatomy highlighting the entry point.
B, C.
Radiographic views.
Radiographically, on the anteroposterior (AP) view, the entry point is located in the midline or slightly medial to the midline between the femoral condyles. On the lateral view, it is situated just anterior to Blumensaat's line as this line intersects the trochlear groove. This specific flat articular area of the intercondylar notch exhibits minimal to no contact with the patella until approximately 120 degrees of knee flexion, thereby theoretically minimizing iatrogenic patellofemoral chondral damage. However, careful technique is paramount to avoid cartilage injury during guidewire and reamer passage. Understanding the three-dimensional anatomy of the intercondylar notch and the distal femur is crucial to establishing a coaxial entry portal, ensuring proper nail trajectory up the femoral shaft.
Biomechanically, intramedullary nails function as load-sharing devices, transferring axial load across the fracture site while resisting bending, torsional, and compressive forces. Retrograde nails, by virtue of their distal insertion, provide excellent biomechanical stability for distal and middle third femoral shaft fractures. The distal locking screws are critical for controlling rotation and preventing shortening, particularly in comminuted or unstable fracture patterns. The intercondylar entry point often allows for a more direct, central placement within the distal metaphyseal segment, providing a favorable lever arm for load transfer. Nail design, including its radius of curvature, diameter, and locking options (static vs. dynamic), is selected to match the individual patient's anatomy and fracture characteristics, optimizing stability and promoting fracture union. Adequate reaming is essential to allow for a close fit between the nail and the endosteal surface, enhancing cortical contact and stability.
Indications & Contraindications
The decision to proceed with retrograde intramedullary nailing is predicated on a careful assessment of fracture morphology, associated injuries, patient comorbidities, and surgical feasibility.
Indications
Retrograde femoral nailing offers distinct advantages in specific clinical scenarios:
-
Polytrauma Patients:
- Ipsilateral Tibial Fractures (Floating Knee Injury): Facilitates simultaneous management of both tibia and femur fractures without requiring repositioning or separate surgical setups.
- Ipsilateral Acetabular, Pelvic, or Spinal Fractures: Allows for supine or semi-lithotomy positioning, which maintains spinal alignment and facilitates access to the pelvis or spine.
- Thoracic/Abdominal Trauma: Supine positioning is safer for patients with compromised pulmonary function or intra-abdominal injuries.
-
Distal Femoral Fractures:
- Supracondylar and Distal Diaphyseal Fractures: Offers a less invasive alternative to plating, particularly in osteoporotic bone, distributing stress over a longer segment.
- Fractures with Intra-articular Extension (Type C fractures): Can be used following anatomical reduction and lag screw fixation of articular fragments, providing robust diaphyseal fixation.
- Obesity: Patient positioning for antegrade nailing can be challenging in morbidly obese individuals, making the supine or semi-lithotomy retrograde approach more feasible.
- Proximal Ipsilateral Hip Pathology: Coexisting femoral neck, intertrochanteric, or subtrochanteric fractures, or a hip arthroplasty, preclude antegrade nailing.
- Pregnancy: Reduces radiation exposure to the abdomen due to the caudal positioning of the C-arm for distal entry.
- Pathological Fractures: Especially those involving the distal femur, where stable fixation is paramount.
- Failed Open Reduction and Internal Fixation (ORIF) with Plates: For nonunion requiring revision, a retrograde nail can be a salvage option.
Contraindications
While versatile, retrograde nailing is not without contraindications:
- Active Septic Arthritis of the Knee Joint: Absolute contraindication due to the risk of propagating infection into the medullary canal.
- Severe Pre-existing Knee Arthritis or Stiffness: May complicate knee flexion required for exposure or exacerbate existing symptoms due to hardware placement.
- Significant Articular Damage to the Intercondylar Notch or Patellofemoral Joint: Direct penetration through damaged cartilage or bone can worsen outcomes.
- Fractures Too Proximal for Adequate Distal Locking: If the fracture extends to the subtrochanteric region, achieving sufficient proximal locking without antegrade access may be difficult or impossible.
- Open Growth Plates in Skeletally Immature Patients: Relative contraindication due to the risk of growth disturbance or knee pain, though percutaneous techniques can sometimes mitigate this.
- Extremely Narrow Medullary Canal or Small Stature: May prevent the insertion of a sufficiently large nail for stability or lead to iatrogenic fracture during reaming.
- Severe Distal Metaphyseal Comminution: While some can be managed, extensive comminution may necessitate a locking plate for improved stability and anatomical reconstruction.
Operative vs. Non-Operative Considerations
| Feature | Operative Indications (Retrograde Nailing) | Non-Operative Indications (Generally Not for Femur Shaft Fractures) |
|---|---|---|
| Fracture Type | Most displaced femoral shaft fractures (AO/OTA 32-A/B/C), select distal femoral fractures (AO/OTA 33-A/C after articular reduction), pathological fractures. | Extremely rare for adult femoral shaft fractures due to high nonunion rates and poor functional outcomes. May be considered for very rare, undisplaced stress fractures (not applicable for typical trauma). For very young pediatric patients, flexible nails or casting might be considered, but generally not in the adult context for the target audience. |
| Associated Injuries | Polytrauma with ipsilateral hip/pelvis/spine/tibia injury, head injury (maintains supine position), pulmonary compromise. | No acute fracture. Elective cases requiring nail removal for symptomatic hardware (secondary procedure). |
| Patient Factors | Morbid obesity, pregnancy (minimizes radiation exposure). | Unfit for surgery due to extreme medical comorbidities where risks of anesthesia and surgery outweigh benefits (palliative care context for comfort, not functional restoration). |
| Functional Goal | Rapid mobilization, load-sharing, union, early return to function. | Not applicable for primary fracture treatment where functional recovery is a goal. |
Pre-Operative Planning & Patient Positioning
Meticulous pre-operative planning is paramount for successful retrograde femoral nailing, minimizing intraoperative complications and optimizing outcomes.
Pre-Operative Planning
-
Imaging Review:
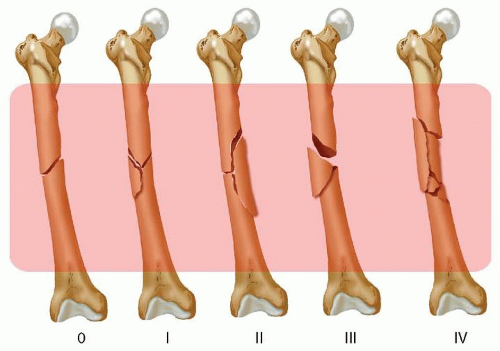
- Standard Radiographs: AP and lateral views of the entire femur (hip to knee) are essential to characterize the fracture pattern, comminution, and bone quality. Include traction views if possible to assess reducibility and length.
- Computed Tomography (CT) Scan: Indicated for complex intra-articular distal femoral fractures (AO/OTA 33C) to delineate articular involvement and plan reduction strategies. It can also help assess the medullary canal for appropriate nail size.
- Contralateral Femur X-rays: Useful for templating nail length and diameter, particularly in cases of severe comminution or deformity.
-
Nail Templating:
- Determine appropriate nail length by measuring the uninjured contralateral femur or using a radiopaque ruler on the fractured side. The nail should extend from the distal entry point to approximately 2-3 cm proximal to the lesser trochanter.
- Select the correct nail diameter based on the isthmic diameter, allowing for 1-2 mm of reaming. Over-reaming can weaken the cortex, while under-reaming may prevent adequate nail passage.
- Consider the radius of curvature of the nail, matching it as closely as possible to the anatomical curvature of the femur to prevent malunion or iatrogenic fracture.
-
Instrumentation and Implants:
- Ensure availability of all necessary instruments: guidewires, reamers (flexible vs. rigid), nail drivers, locking jigs, reduction clamps, and a range of nail lengths and diameters, including various locking screw options.
- Consider adjunctive reduction aids such as external fixators or femoral distractor.
- Antibiotic Prophylaxis: Administer intravenous broad-spectrum antibiotics within 60 minutes prior to incision, as per institutional guidelines.
Patient Positioning
The patient is typically positioned supine on a radiolucent operating table, allowing for unobstructed fluoroscopic imaging.
Alternatively, a semi-lithotomy position (hips flexed to 30-45 degrees, knees flexed to 90 degrees) with the foot in a boot stirrup provides optimal exposure of the intercondylar notch and allows for reduction maneuvers. A bolster placed beneath the ipsilateral knee can aid in achieving optimal knee flexion.
A traction table can be utilized for difficult reductions, particularly in comminuted or shortened fractures, providing controlled axial traction and rotational alignment.
C-arm setup:
The fluoroscopy unit (C-arm) should be positioned to allow for immediate AP and true lateral views of the distal femur and knee joint, as well as views of the fracture site and the proximal femur, without significant repositioning of the patient or the C-arm during the procedure. This typically involves positioning the C-arm perpendicular to the limb axis for AP views and rotating it 90 degrees for lateral views, ensuring the beam can traverse the entire femoral length. Maintaining sterility of the C-arm during draping is critical.
Detailed Surgical Approach / Technique
The surgical technique for retrograde femoral nailing demands precision, careful attention to anatomical landmarks, and meticulous fluoroscopic guidance.
1. Incision and Exposure
- Skin Incision: A 4-5 cm longitudinal skin incision is made over the intercondylar notch, typically beginning just proximal to the patella and extending distally. Alternatively, a medial or lateral parapatellar approach can be utilized.
- Arthrotomy: The approach involves either a medial or lateral parapatellar arthrotomy, or a midline approach splitting the patellar tendon. For the midline approach, a mini-arthrotomy of the knee joint is performed by longitudinally incising the patellar tendon. The patella is then gently retracted proximally.
- Identification of Entry Point: With the knee maximally flexed (ideally 90-110 degrees) and the patella retracted, the intercondylar notch is visualized. The crucial anatomical landmark for the entry point is the flat, often cartilage-deficient, area just anterior to the PCL insertion, at the distal end of the patellofemoral groove. Palpation can confirm this point.
2. Guide Wire Insertion and Entry Portal Creation
- Initial Entry: Under fluoroscopic guidance (true AP and lateral views of the distal femur), a starting awl or a bone awl/drill is used to penetrate the cortex at the identified entry point. The trajectory should be coaxial with the femoral shaft.
-
Guide Wire Placement:
A 3.0 mm flexible guidewire with a slightly curved tip is then advanced through the created portal. It is crucial to ensure the guidewire is centrally placed in both AP and lateral views, negotiating the intercondylar notch and advancing proximally into the medullary canal of the distal fragment. Correct trajectory is paramount to avoid eccentric reaming or iatrogenic fracture.
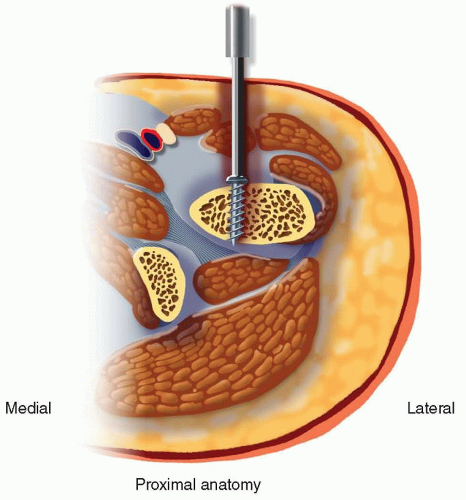
Depiction of guide wire placement and initial reaming. - Negotiating the Fracture Site: The guidewire is carefully advanced across the fracture site. This step may require gentle manipulation of the distal fragment, traction, or even temporary reduction clamps to achieve anatomical alignment. Once across, the guidewire is advanced to the desired depth in the proximal fragment (typically 2-3 cm distal to the lesser trochanter). Its position must be confirmed in AP and lateral fluoroscopic views.
3. Fracture Reduction
-
Achieving Alignment:
Before reaming and nailing, accurate fracture reduction is critical. This involves restoring length, alignment (varus/valgus, flexion/extension), and rotation.
- Traction: Manual traction or a femoral distractor can achieve length.
- Rotation: Clinically assessed by comparing the patella, foot, and greater trochanter orientation to the contralateral limb, and confirmed fluoroscopically (e.g., cortical step-off at fracture site, comparison of femoral neck anteversion).
- Angulation: Manipulated by external forces, joysticks (Schanz pins), or reduction clamps.
- Maintaining Reduction: Once reduced, the fracture can be held with provisional external fixators, pointed reduction clamps, or a femoral distractor while the guidewire is exchanged for a reaming guidewire.
4. Reaming
- Over-reaming Principle: Sequential reaming over the guidewire is performed to create a channel slightly larger than the chosen nail diameter (typically 1-2 mm larger). This removes the endosteal callus and compacts cortical bone, increasing the load-bearing capacity and promoting biologic activity.
- Reamer Progression: Start with small-diameter flexible reamers and gradually increase the size. Advance reamers slowly and with controlled pressure to avoid heat necrosis, fat embolism, or iatrogenic fracture. Irrigate frequently.
- Confirmation: Fluoroscopic images should confirm central reamer progression throughout the shaft.
5. Nail Insertion
- Nail Preparation: Attach the appropriate retrograde nail to the insertion handle.
- Insertion over Guidewire: The nail is carefully advanced over the guidewire into the prepared medullary canal. Use gentle impaction. Avoid excessive force, which can lead to iatrogenic fracture, especially at the fracture site or through intact bone at the proximal or distal ends.
-
Passage Through Fracture:
The nail acts as a reducing tool as it passes through the fracture. Close fluoroscopic monitoring is essential to ensure maintenance of reduction.
Illustrative representation of nail insertion and locking. - Final Positioning: The nail is advanced until its distal end is flush with or slightly recessed into the intercondylar entry portal, and its proximal end is positioned appropriately, typically 2-3 cm distal to the lesser trochanter. Confirm proper length, alignment, and rotation before locking.
6. Proximal Locking
- Purpose: Proximal locking screws prevent shortening and control rotation of the proximal fragment.
- Technique: A jig attached to the insertion handle guides the drilling and screw placement. Fluoroscopic confirmation of screw position relative to the nail and cortex is essential. Two screws are typically used for enhanced stability. Both static and dynamic locking options are available based on the nail system and fracture pattern. For spiral or long oblique fractures, interlocking screws near the fracture site are particularly important for rotational stability.
7. Distal Locking
- Purpose: Distal locking screws prevent shortening and control rotation of the distal fragment, critical for retrograde nails.
-
Technique:
Distal locking is generally performed freehand or with a less precise jig compared to proximal locking for antegrade nails.
- Freehand Technique: Requires careful fluoroscopic manipulation to achieve a "perfect circle" view of the nail hole. This involves angling the C-arm and rotating the leg until the desired locking hole appears as a perfect circle. A drill guide and sleeve are then used to drill through both cortices and the nail.
- Screw Selection: Typically, two distal locking screws are inserted. Ensure appropriate screw length, engaging both cortices without prominent protrusion.
- Confirmation: Final AP and lateral fluoroscopic views confirm the optimal position of all locking screws and overall reduction.
8. Final Checks, Irrigation, and Closure
- Stability Assessment: Assess the stability of the construct clinically and fluoroscopically.
- Wound Irrigation: Copiously irrigate the knee joint and soft tissues to remove bone debris and blood.
- Arthrotomy Closure: Close the arthrotomy meticulously (e.g., patellar tendon, retinaculum).
- Layered Closure: Close the subcutaneous tissues and skin in layers.
- Dressing: Apply a sterile dressing.
Complications & Management
Despite its effectiveness, retrograde femoral nailing is associated with a range of potential complications, demanding vigilance and appropriate management strategies.
Common Complications
| Complication | Incidence (Approximate Range) | Salvage Strategies / Management The average for adult femur shaft fractures is 2-5%. Actual incidence depends on the definition of infection (superficial vs. deep, CDC criteria) and operative factors. | Initial management: Debridement, irrigation, cultures, empiric broad-spectrum antibiotics. Consider retaining hardware if stable. If hardware is source, consider exchange nailing or staged removal and external fixator. For deep infection, debridement and culture-directed long-term IV antibiotics. |
|
Nonunion / Delayed Union
| 2-10% (higher in open fractures, comminuted patterns, poor biology, smoking, infection). | Revision surgery: Exchange nailing (larger diameter, different curvature), plate augmentation, bone grafting (autograft/allograft, biological adjuncts), dynamization (if statically locked). Address underlying issues (e.g., infection, nutrition). |
|
Knee Pain (Anterior Knee Pain)
| 10-30% | Conservative management (NSAIDs, PT). Hardware removal for symptomatic patients (typically 1-2 years post-op). Careful identification of etiology (patellofemoral impingement, entry point irritation, hardware prominence). |
|
Malunion
| 5-15% (rotational, angular, shortening) | Re-alignment osteotomy and internal fixation (plate or nail exchange) once union is achieved. De-rotation osteotomy. Consider revision if symptomatic. |
|
Other (Less Common)
|
Iatrogenic fracture:
Intraoperative, often due to forceful nail insertion or poor canal preparation.
Hardware prominence:
Due to implant size or suboptimal placement, often requiring removal.
Neurovascular injury:
Rare, but can result from guidewire perforation or direct trauma.
Knee stiffness:
Due to arthrofibrosis or immobilization.
Heterotopic ossification:
Particularly around the entry point.
Fat embolism syndrome:
Rare but serious, particularly with large-diameter reaming.
Compartment syndrome:
Rare.
DVT/PE:
Prophylaxis is critical. |
Revision surgery
to remove offending hardware, correct deformity, or address nonunion.
Aggressive physical therapy
for stiffness.
Medical management
for HO.
Prompt diagnosis and management
for compartment syndrome or neurovascular injury. |
|
Vascular Injury
| Rare (0.1-0.5%) | Intraoperative repair by vascular surgeon. Close monitoring for compartment syndrome. Careful attention to guidewire and reamer position. |
|
Cardiovascular/Pulmonary
| Rare, but can be catastrophic. |
Fat Embolism Syndrome:
Supportive care, mechanical ventilation.
DVT/PE:
Prophylactic anticoagulation, early ambulation, IVC filter if contraindication to anticoagulation. Medical management as indicated. |
|
Total Knee Arthroplasty (TKA) Complications
| Retrograde nailing has been implicated in causing persistent pain and limited function post-TKA, requiring special consideration for future Arthroplasty. |
For existing TKA:
Thorough investigation for any hardware issues or soft tissue impingement. If symptomatic, consideration of hardware removal after fracture healing.
For primary trauma surgery:
Discuss the implications for future TKA with the patient; entry point can sometimes hinder TKA component positioning. |
|
Iatrogenic fracture
| <1% (during guidewire/reamer/nail insertion) | Careful technique, appropriate reaming, correct nail selection. Managed with revision to a larger nail or plate fixation if necessary. |
|
Neuropathy / Pain Syndromes
| <1% (peripheral nerve injury, complex regional pain syndrome [CRPS]) | Prompt recognition, neurological evaluation, specific pain management strategies (medications, nerve blocks, physical therapy). CRPS requires multimodal management. |
|
Retaining Hardware |
~5%
(often due to minimal symptoms or patient preference) | Consider surgical removal if symptomatic, but often watchful waiting. Risks of surgery versus benefits. |
|
Recurrence
| <5% (fracture recurrence after union) | Evaluate for underlying bone pathology. Re-fixation with appropriate implants; possibly prophylactic nailing if high risk. |
Length Mismatch / Shortening:
Up to 10-15 mm is usually tolerated, but significant shortening can occur with poor reduction or unstable fixation. Corrected with revision surgery and possible lengthening osteotomy. |
|
Rotational Malunion
| 5-10% (more difficult to detect intraoperatively) | De-rotational osteotomy after union. Intraoperative clinical assessment and fluoroscopic landmarks (femoral neck anteversion, cortical step-off) are crucial. |
DVT/PE
| 1-3% (higher in trauma patients) | Prophylactic anticoagulation (LMWH, fondaparinux). Early mobilization. Mechanical compression devices. In cases of PE, medical management with anticoagulation, possible thrombolysis or embolectomy. |
|
Nerve Palsy
| <1% (peroneal nerve, saphenous nerve) | Careful surgical technique, avoidance of excessive traction. Symptomatic treatment, nerve blocks, physical therapy. Exploration and neurolysis if persistent and severe. |
|
Vascular Injury (cont.)
|
Arterial injury:
Damage to femoral artery, usually from guidewire perforation or direct trauma during nailing.
Venous injury:
Damage to femoral vein, less common, often less severe but can lead to significant bleeding. | Prompt vascular surgery consultation and repair. Intraoperative Doppler ultrasound for assessment. Consider temporary shunting for limb salvage. Vigilant monitoring for limb ischemia and compartment syndrome. |
Overall Success** | High (85-95%) for femur fractures with good fracture healing and functional recovery. | Goal is to achieve a stable, well-aligned union, allowing for rapid rehabilitation and return to function. |
Post-Operative Rehabilitation Protocols
Post-operative rehabilitation is critical for restoring knee function, optimizing weight-bearing capacity, and facilitating a safe return to pre-injury activities. The protocol should be tailored to the individual patient, considering fracture stability, bone quality, extent of soft tissue injury, and any concomitant injuries.
Phase 1: Immediate Post-Operative (Weeks 0-2)
- Goals: Control pain and swelling, protect the surgical site, initiate early knee range of motion (ROM), promote muscle activation.
-
Weight-Bearing (WB):
- Stable Fixation: Toe-touch weight-bearing (TTWB) or weight-bearing as tolerated (WBAT) with crutches/walker is generally initiated immediately, depending on fracture comminution and quality of reduction and fixation.
- Unstable Fractures/Poor Bone Quality: Protected weight-bearing (e.g., 25-50% body weight) may be necessary, with progression based on radiographic healing.
-
Range of Motion (ROM):
- Begin gentle active and passive knee ROM exercises immediately, within pain limits (CPM machine may be used). Target 0-90 degrees by the end of week 2.
- Ankle pumps and foot circles to prevent DVT.
-
Strengthening:
- Isometric quadriceps sets, gluteal sets.
- Straight leg raises (SLR) in supine position (non-weight bearing) if tolerated and without fracture distraction.
- Wound Care: Daily wound inspection, dressing changes. Staples/sutures typically removed at 10-14 days.
Phase 2: Early Healing & Progressive Mobility (Weeks 2-6)
- Goals: Improve knee ROM, advance weight-bearing, increase muscle strength, normalize gait pattern.
- Weight-Bearing: Progress from TTWB to partial weight-bearing (PWB) and then to full weight-bearing (FWB) as tolerated, guided by pain and radiographic signs of healing (callus formation). Use crutches/walker until a normalized, pain-free gait is achieved.
- Range of Motion (ROM): Continue active and passive knee ROM. Aim for 0-120 degrees flexion by week 6. Emphasis on terminal knee extension.
-
Strengthening:
- Progressive resisted exercises for quadriceps (e.g., short arc quads, leg press with light resistance) and hamstrings.
- Gluteal strengthening (e.g., hip abduction/adduction, bridges).
- Core stability exercises.
- Gait Training: Focus on proper gait mechanics, gradually weaning off assistive devices.
Phase 3: Advanced Strengthening & Functional Return (Weeks 6-12)
- Goals: Achieve full pain-free knee ROM, maximize strength, improve proprioception and balance, prepare for sport/activity-specific training.
- Weight-Bearing: Full weight-bearing should be established.
- Range of Motion (ROM): Aim for full knee flexion and extension.
-
Strengthening:
- Progress to higher resistance exercises, incorporating functional movements (e.g., step-ups, lunges, squats).
- Open and closed kinetic chain exercises.
- Plyometrics and agility drills for athletes (late in this phase, under supervision).
- Proprioception and Balance: Balance board, single-leg stance, unstable surface training.
- Cardiovascular: Non-impact activities (e.g., stationary cycling, swimming).
Phase 4: Return to Activity/Sport (Weeks 12+)
- Goals: Gradual and safe return to high-impact activities and sport.
-
Criteria for Return to Sport:
- Full knee ROM, symmetrical strength (typically >90% of contralateral limb).
- No pain or swelling.
- Good functional testing results (e.g., hop tests).
- Radiographic evidence of fracture union.
- Activity Progression: Gradual progression from low-impact to high-impact activities. Close communication with the rehabilitation team and the patient is crucial.
Considerations
- Pain Management: Aggressive pain management is essential to facilitate early rehabilitation.
- Patient Education: Patients must be educated on the importance of adherence to the protocol and warned about the risks of overactivity or non-compliance.
- Hardware Removal: Symptomatic hardware (e.g., distal locking screw irritation, knee pain at entry site) may necessitate removal after fracture union, typically 12-18 months post-operatively.
Summary of Key Literature / Guidelines
Retrograde intramedullary nailing has been extensively studied, with a robust body of literature supporting its efficacy and defining its role in femur fracture management.
-
Comparison to Antegrade Nailing: Numerous comparative studies and meta-analyses have evaluated retrograde versus antegrade nailing for femoral shaft fractures. The consensus suggests comparable union rates, complication rates (excluding entry site-specific issues), and functional outcomes for mid-diaphyseal fractures. However, retrograde nailing may offer specific advantages in polytrauma patients, those with ipsilateral hip/pelvic injuries, or morbidly obese individuals, as previously discussed. Some studies indicate a higher incidence of knee pain (anterior knee pain) with retrograde nailing, though this is often transient or resolves after hardware removal.
-
Knee Pain Etiology: Anterior knee pain post-retrograde nailing is a recognized complication, with reported incidences ranging from 10-50%. The etiology is multifactorial, including irritation from the nail's distal end or locking screws, patellofemoral cartilage damage during insertion, or heterotopic ossification. While many cases resolve with time or hardware removal, a subset can be persistent. Careful entry point selection and meticulous surgical technique are emphasized to minimize iatrogenic damage.
-
Distal Femur Fractures: Retrograde nails (including supracondylar variants) have shown excellent results for unstable distal femoral fractures, particularly in osteoporotic bone. They offer better stability than many plating constructs in challenging bone quality and allow for earlier weight-bearing. For intra-articular fractures, anatomical reduction of the articular surface with lag screws before nail insertion is paramount.
-
Floating Knee Injuries: Retrograde femoral nailing is a preferred method for ipsilateral femoral and tibial fractures (floating knee). It allows for stable fixation of both bones through a single surgical setup or sequential operations without extensive patient repositioning, simplifying anesthesia and reducing operative time. Outcomes are generally good, though the complexity of the injury itself predisposes to higher complication rates.
-
Role in Polytrauma: The ability to perform retrograde femoral nailing in the supine position makes it particularly valuable for polytrauma patients with associated head, chest, abdominal, or spinal injuries, where maintaining a stable supine position is crucial. It minimizes changes in patient physiology and facilitates access for other surgical teams.
-
Evolving Techniques: Advances in nail design, instrumentation (e.g., improved locking jigs), and fluoroscopic technology continue to refine the technique. Debates persist regarding optimal entry point (more central vs. slightly medial), reaming versus unreamed techniques (reaming generally preferred for diaphyseal fractures due to higher union rates and stronger constructs), and the role of dynamic locking.
In summary, retrograde intramedullary nailing of the femur is a versatile and effective procedure, particularly for specific fracture patterns and patient presentations. Surgeons must possess a thorough understanding of the relevant anatomy, meticulous surgical technique, and an awareness of potential complications and their management to optimize patient outcomes. Ongoing research continues to refine indications and techniques, further solidifying its critical role in orthopedic trauma care.
