Introduction to Osteochondral Lesions of the Talus
Osteochondral lesions of the talus (OLT), historically referred to as osteochondritis dissecans (OCD), represent a spectrum of pathologies involving the articular cartilage and subchondral bone of the talar dome. First described by Kappis in 1922 and later classified by Berndt and Harty, these lesions are predominantly traumatic in origin, frequently occurring in the setting of acute ankle sprains or chronic lateral ankle instability.
The management of OLTs requires a profound understanding of ankle biomechanics, precise preoperative imaging, and meticulous surgical execution. While asymptomatic or undisplaced lesions may respond to conservative measures, symptomatic, unstable, or cystic lesions necessitate surgical intervention. Arthroscopic debridement coupled with bone marrow stimulation (drilling or microfracture) remains the gold standard for primary lesions measuring less than 1.5 cm².
This comprehensive guide delineates the surgical principles, arthroscopic techniques, and concurrent stabilization procedures required to achieve optimal outcomes in the management of talar osteochondral defects.
Biomechanics and Pathoanatomy
The talus is a unique osseous structure; approximately 60% of its surface is covered by articular cartilage, and it is entirely devoid of muscular or tendinous attachments. This anatomical isolation renders its blood supply tenuous, relying heavily on the artery of the tarsal canal, the deltoid branches, and the sinus tarsi plexus.
Mechanism of Injury
Osteochondral lesions typically occur in two distinct anatomical zones, each associated with a specific mechanism of injury:
* Anterolateral Lesions: Typically shallow, wafer-shaped, and strictly traumatic. They occur secondary to an inversion and dorsiflexion force, causing the anterolateral talar dome to impact the fibula.
* Posteromedial Lesions: Often deeper, cup-shaped, and morphologically cystic. They result from an inversion and plantarflexion force, causing the posteromedial talus to impact the tibial plafond. While trauma is the primary etiology, microtrauma and localized ischemia also play significant roles in posteromedial pathology.
Clinical Pearl: Chronic lateral ankle instability is a major predisposing factor for OLTs. A thorough clinical examination, including anterior drawer and talar tilt tests, must be performed on all patients presenting with talar dome lesions. Failure to address concurrent ligamentous laxity (e.g., via a modified Broström-Gould procedure) will result in persistent shear forces across the tibiotalar joint, leading to premature failure of the cartilage repair.
Preoperative Evaluation and Imaging
Accurate preoperative templating is paramount. Standard weight-bearing radiographs (anteroposterior, lateral, and mortise views) may reveal subchondral lucencies or detached fragments but lack the sensitivity to evaluate cartilage integrity.
Advanced Imaging Modalities
- Magnetic Resonance Imaging (MRI): The modality of choice for evaluating the extent of cartilage damage, subchondral edema, and the presence of underlying cysts. MRI dictates the surgical approach by accurately sizing the lesion.
- Computed Tomography (CT) Arthrography: Highly sensitive for delineating the exact osseous morphology of the lesion and identifying loose bodies. It is particularly useful for preoperative planning of transmalleolar drilling trajectories.
Surgical Indications and Contraindications
Indications
- Symptomatic OLTs failing a minimum of 3 to 6 months of conservative management (immobilization, non-steroidal anti-inflammatory drugs, physical therapy).
- Acute, displaced osteochondral fractures.
- Lesions with subchondral cyst formation.
- Symptomatic lesions associated with chronic lateral ankle instability requiring concurrent ligamentous reconstruction.
Contraindications
- Active joint infection.
- Severe, end-stage tibiotalar osteoarthritis (Kellgren-Lawrence Grade III/IV).
- Uncorrected hindfoot malalignment (e.g., severe varus or valgus), which must be addressed via osteotomy prior to or concurrent with cartilage restoration.
Operating Room Setup and Patient Positioning
- Anesthesia: General or regional anesthesia is utilized. A popliteal block provides excellent postoperative analgesia.
- Positioning: The patient is placed supine on the operating table. A bump is placed under the ipsilateral hip to internally rotate the leg, bringing the ankle mortise into a neutral, upward-facing position.
- Tourniquet: A well-padded pneumatic tourniquet is applied to the proximal thigh.
- Distraction: Non-invasive ankle distraction is critical for visualizing the posterior aspect of the talar dome. A sterile distraction strap is applied over the hindfoot and attached to a tensioning device at the foot of the table.
Surgical Warning: Limit continuous joint distraction to less than 45–60 minutes to prevent neuropraxia, particularly of the superficial peroneal nerve (SPN) and deep peroneal nerve (DPN). Release traction periodically if prolonged arthroscopy is anticipated.
Arthroscopic Approach and Portal Placement
Standard ankle arthroscopy utilizes anterior portals. Posterior portals are reserved for far-posterior lesions inaccessible from the anterior approach.
Anterior Portals
The superficial anatomy must be meticulously mapped. The superficial peroneal nerve (SPN) and its branches (medial and intermediate dorsal cutaneous nerves) are identified and marked, often made visible by plantarflexing and inverting the fourth toe.
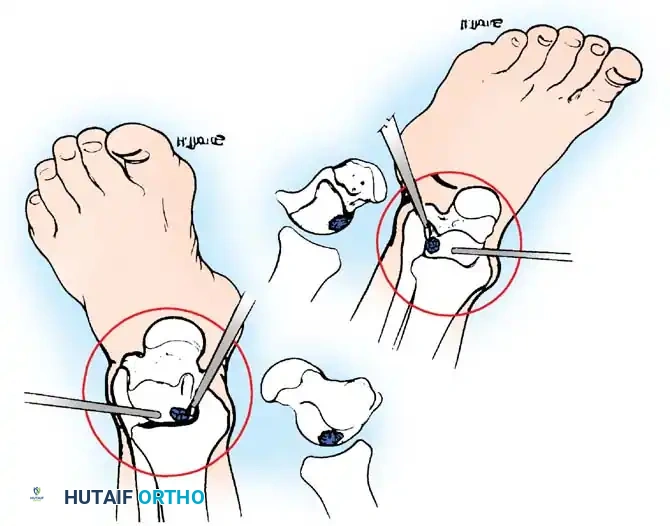
Fig. 42-48 Anterolateral (A) and anteromedial (B) portals for arthroscopic excision of osteochondritis dissecans of ankle. (Redrawn from Parisien JS: Diagnostic and surgical arthroscopy of the ankle: technique and indications, Bull Hosp Jt Dis 45:38, 1985.)
- Anteromedial Portal: Established first. Located just medial to the tibialis anterior tendon at the level of the joint line. A #11 blade is used to incise the skin only. A mosquito hemostat is used for blunt dissection down to the capsule to avoid injury to the saphenous vein and nerve.
- Anterolateral Portal: Established under direct intra-articular visualization. Located just lateral to the peroneus tertius tendon. Transillumination from the arthroscope helps identify and avoid the SPN branches.
Lesion Preparation and Debridement
Once the joint is accessed, a systematic diagnostic arthroscopy is performed. The articular surfaces, gutters, and syndesmosis are evaluated.
- Identification: The OLT is identified using a tactile probe. Unstable cartilage will exhibit a "ballotable" or softened feel compared to adjacent healthy hyaline cartilage.
- Excision: An arthroscopic elevator or curette is used to remove all loose, fibrillated, and unviable cartilage.
- Debridement: The lesion must be debrided to stable, vertical margins of healthy hyaline cartilage. This prevents shear forces from propagating further delamination.
- Curettage: The necrotic subchondral bone base is aggressively curetted until punctate bleeding bone is encountered. The removal of the sclerotic base is non-negotiable; failure to do so will prevent the ingress of mesenchymal stem cells.
Bone Marrow Stimulation: Drilling and Microfracture
The objective of bone marrow stimulation is to breach the subchondral bone plate, allowing marrow elements (mesenchymal stem cells, growth factors, and fibrin clot) to fill the defect and differentiate into fibrocartilage (Type I cartilage).
Antegrade vs. Retrograde Drilling
For anterior lesions, standard arthroscopic awls or K-wires can be introduced directly through the anterior portals to perforate the lesion. However, central and posterior lesions are often shielded by the tibial plafond, necessitating specialized approaches.
Transmalleolar Drilling Technique
For lesions inaccessible via standard anterior portals, a transmalleolar approach is highly effective. The goal is to drill multiple holes in the crater to promote vascularization. These holes can be drilled transmalleolarly under direct vision through the arthroscope or with image intensification.
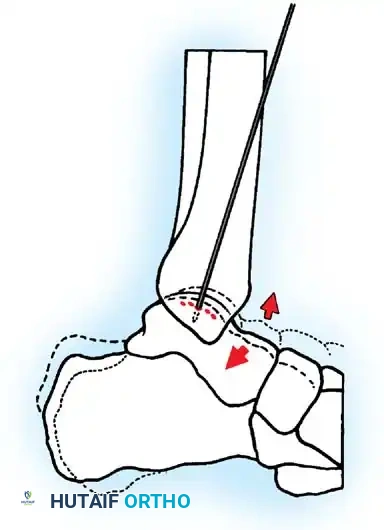
Fig. 42-49 Arthroscopic drilling of osteochondritis dissecans of talus. Single Kirschner wire through hole drilled in malleolus produces multiple holes in crater of talus when ankle is flexed at different degrees. (Redrawn from Guhl JF: New techniques for arthroscopic surgery of the ankle: preliminary report, Orthopedics 9:261, 1986.)
Step-by-Step Transmalleolar Drilling:
1. Targeting: An anterior cruciate ligament (ACL) or specialized ankle drill guide is introduced through the arthroscopic portal and placed precisely over the center of the talar defect.
2. Incision: A small stab incision is made over the medial or lateral malleolus, depending on the lesion's location.
3. Drilling: A 1.6-mm or 2.0-mm Kirschner wire (K-wire) is drilled through the malleolus, across the joint space, and into the talar defect.
4. Maximizing Perforations: Multiple holes can be drilled in the crater in the talus through one single hole drilled through the malleolus. This is achieved by keeping the K-wire trajectory constant while combining dorsiflexion and plantarflexion of the ankle (as illustrated in Fig. 42-49). This technique minimizes iatrogenic damage to the malleolar articular surface while maximizing the surface area of marrow stimulation within the talar defect.
5. Depth: The K-wire should penetrate approximately 10 to 15 mm into the subchondral bone to ensure adequate access to vascular marrow.
Alternative Drilling Techniques
To avoid the morbidity of a transmalleolar portal and potential iatrogenic damage to the tibial plafond, alternative methods have been developed. Bryant and Siegel described an arthroscopic technique that avoids a transmalleolar portal by using flexible meniscal repair needles or specialized curved microfracture awls. These instruments can navigate the convex surface of the talus, allowing for perpendicular penetration of the subchondral plate without violating the malleoli.
Management of Concurrent Lateral Ankle Instability
As extensively documented in the literature (Broström, Karlsson, Evans), chronic lateral ankle instability is inextricably linked to the pathogenesis and progression of OLTs. Addressing the cartilage defect while ignoring the ligamentous laxity is a recipe for surgical failure.
If preoperative clinical examination or stress radiography demonstrates mechanical instability (anterior drawer > 10mm, talar tilt > 9 degrees compared to the contralateral side), a lateral ligament reconstruction must be performed concurrently.
The Modified Broström-Gould Procedure
Following the conclusion of the arthroscopic portion of the case, the ankle is taken out of traction.
1. Incision: A curvilinear incision is made over the anterior border of the distal fibula.
2. Exposure: The extensor retinaculum is identified and mobilized. The attenuated anterior talofibular ligament (ATFL) and calcaneofibular ligament (CFL) are identified.
3. Repair: The ligaments are imbricated and repaired directly to the fibula using suture anchors.
4. Augmentation (Gould Modification): The inferior extensor retinaculum is mobilized and sutured over the repaired ligaments to the fibular periosteum. This reinforces the repair and helps limit subtalar inversion.
Postoperative Rehabilitation Protocol
The postoperative protocol must balance the need for cartilage protection with the prevention of joint stiffness.
- Phase I (Weeks 0-2): The patient is placed in a well-padded short leg splint in neutral dorsiflexion. Strict non-weight-bearing (NWB) status is maintained.
- Phase II (Weeks 2-6): Sutures are removed. The patient is transitioned to a controlled ankle motion (CAM) boot. NWB status is maintained to protect the fragile fibrin clot and developing fibrocartilage. Active and active-assisted range of motion (ROM) exercises (dorsiflexion and plantarflexion) are initiated to stimulate cartilage metaplasia. Inversion and eversion are restricted if a concurrent Broström procedure was performed.
- Phase III (Weeks 6-12): Progressive weight-bearing is initiated in the CAM boot, advancing to full weight-bearing by week 8. Physical therapy focuses on proprioception, peroneal strengthening, and Achilles stretching.
- Phase IV (Months 3-6): Transition to standard footwear with a lace-up ankle brace. Plyometric exercises and sport-specific drills are introduced. Return to high-impact sports is typically permitted between 4 to 6 months, contingent upon the resolution of symptoms and restoration of dynamic stability.
Complications and Pitfalls
While arthroscopic management of OLTs is highly successful, complications can occur and must be meticulously avoided:
- Neurological Injury: The most common complication of ankle arthroscopy is injury to the superficial peroneal nerve (SPN) or saphenous nerve during portal placement. Blunt dissection and the use of transillumination are mandatory.
- Iatrogenic Cartilage Damage: Scuffing of the tibial plafond or talar dome can occur during instrument insertion, particularly in tight joints. Adequate non-invasive distraction is essential.
- Incomplete Debridement: Failure to remove the sclerotic subchondral base will result in inadequate marrow stimulation, leading to non-healing of the defect and persistent pain.
- Malleolar Fracture: When performing transmalleolar drilling, multiple passes through the malleolus can create a stress riser. The technique of using a single malleolar hole while flexing/extending the ankle (Fig. 42-49) mitigates this risk.
Conclusion
The operative management of osteochondral lesions of the talus demands a rigorous, evidence-based approach. Arthroscopic debridement and bone marrow stimulation provide excellent clinical outcomes for appropriately selected lesions. Mastery of portal anatomy, precise execution of transmalleolar or retrograde drilling techniques, and the concurrent management of lateral ankle instability are the cornerstones of successful surgical intervention. Through meticulous technique and structured rehabilitation, orthopedic surgeons can reliably restore joint function and facilitate a return to high-level athletic activity.
