PATHOLOGY AND CLINICAL EVALUATION OF FOREFOOT HYPERKERATOTIC LESIONS
Before addressing the surgical correction of lesser toe deformities via proximal interphalangeal (PIP) joint arthrodesis, the orthopedic surgeon must possess a comprehensive understanding of the associated cutaneous manifestations. Forefoot deformities rarely present in isolation; they are frequently accompanied by painful hyperkeratotic lesions resulting from altered biomechanics, shear forces, and extrinsic pressure.
Etiology and Biomechanics of Corns (Helomata and Clavi)
Corns are localized, hyperkeratotic lesions occurring over bony prominences. Pathoanatomically, they represent a hypertrophic response of the stratum corneum (the outermost horny layer of the epidermis) to repetitive mechanical stress. Clinically and morphologically, corns are classified into distinct categories based on their location, moisture content, and underlying osseous pathology. Both primary types—hard and soft corns—are generated by the unyielding pressure of adjacent structures, whether intrinsic (adjacent osseous prominences) or extrinsic (restrictive footwear).
Hard Corns (Heloma Durum)
Hard corns are the most common dermatological manifestation of a rigid hammertoe deformity. The pathophysiology involves a "pincer" effect: the underlying phalangeal condyle exerts outward pressure against the skin, while an unyielding shoe toe box exerts inward pressure and friction.
Over time, this repetitive microtrauma leads to the development of a firm, dry, and exquisitely tender lesion. The classic presentation is located over the dorsolateral aspect of the PIP joint of the fifth toe, though they frequently occur over the dorsal PIP joints of the second, third, and fourth toes in the presence of hammertoe deformities.
Clinical Pearl: If a hard corn becomes acutely irritated, surrounding erythema, localized heat, and edema will be present. In chronic cases, an adventitial bursa may develop deep to the hyperkeratosis. If this bursa becomes inflamed or infected (bursitis), it can lead to a deep space infection or osteomyelitis of the underlying phalanx.
Diagnostic differentiation is critical. A hard corn must not be mistaken for a verruca vulgaris (wart). Paring the lesion with a scalpel will reveal a central translucent core of keratin in a corn, whereas a wart will exhibit punctate bleeding from vertically oriented capillary loops.
Soft Corns (Heloma Molle)
In contrast to the dry nature of a hard corn, a soft corn is typically interdigital. The term "interdigital corn" is anatomically more descriptive and clinically accurate. The macerated, soft appearance is secondary to the retention of moisture within the confined web space.
There are two primary anatomical variants of interdigital corns. The most prevalent type is located in the distal portion of the web space. Biomechanically, it occurs where the broad base of the distal phalanx of a shorter toe abuts the prominent head of the proximal phalanx of an adjacent longer toe. The constant friction between these two incongruent bony prominences leads to localized hyperkeratosis, which is subsequently softened by diaphoresis.
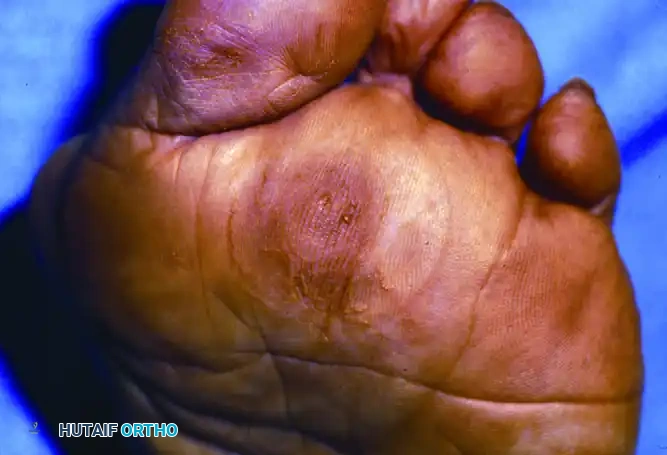
Intractable Plantar Keratoses (IPK)
Plantar hyperkeratotic lesions are highly prevalent, particularly in the geriatric population, causing significant pain, mobility impairment, and functional limitation. Epidemiological studies indicate that plantar hyperkeratotic lesions affect up to 60% of patients over the age of 70, with a higher predilection in females and those with concomitant hallux valgus or lesser toe deformities.
These lesions are typically located beneath a metatarsal head, most commonly of the lesser toes. Anatomically, they form just plantar to the prominent fibular side of the metatarsal head condyle, which projects further plantarward than the tibial side. If the lesion occurs beneath the first metatarsal head, it is almost exclusively located under the tibial sesamoid.
Mann and DuVries classically defined a plantar corn that fails to respond to conservative management (e.g., paring, offloading orthotics) as an intractable plantar keratosis (IPK), or a localized invaginated callus. They emphasized the importance of distinguishing between localized lesions (often requiring isolated metatarsal osteotomy or condylectomy) and diffuse lesions (often requiring broader offloading or pan-metatarsal head resections).
Surgical Warning: Correction of a hallux valgus deformity alone, without addressing the lesser metatarsals via osteotomy (e.g., Weil osteotomy), has been reported to improve painful plantar callosities under the lesser metatarsals by restoring the weight-bearing function of the first ray. However, isolated IPKs with severe underlying structural depression may still require direct surgical intervention.
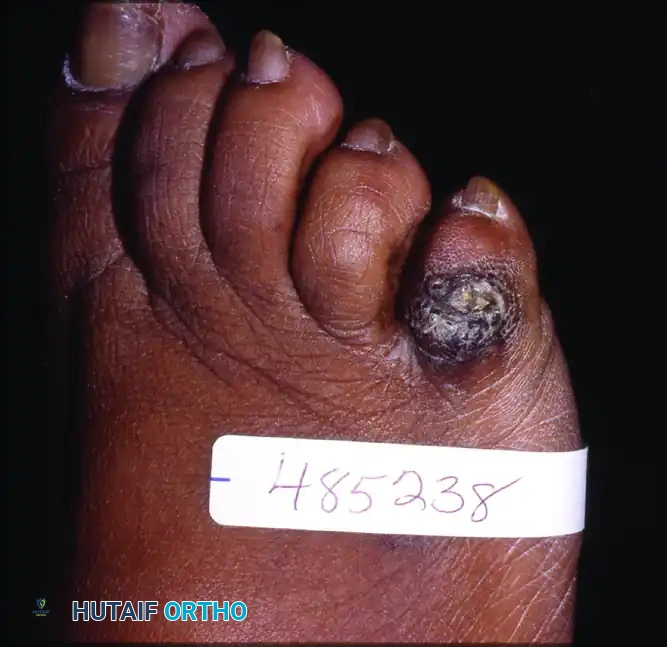
Neurovascular Corns
A rare but highly debilitating variant is the neurovascular corn. These lesions are exquisitely painful and are typically located beneath the first or fifth metatarsal head. Due to their appearance and the severe pain they elicit upon palpation, they are frequently misdiagnosed as plantar warts.
Diagnostic paring is essential. Gentle debridement of a neurovascular corn reveals poorly demarcated edges interspersed with blood vessels that lie parallel to the plantar surface of the foot. This horizontal vascular orientation is the pathognomonic differentiator from a plantar wart, which exhibits vertically oriented vessels that bleed in a punctate fashion when pared.
PROXIMAL INTERPHALANGEAL JOINT ARTHRODESIS WITH AN ABSORBABLE INTRAMEDULLARY PIN
When conservative measures (e.g., extra-depth footwear, silicone toe sleeves, crest pads) fail to alleviate the pain associated with rigid hammertoe deformities and their overlying hard corns, surgical intervention is indicated.
Proximal interphalangeal (PIP) joint arthrodesis remains the gold standard for rigid deformities. While traditional fixation utilizes percutaneous Kirschner wires (K-wires), the use of an absorbable intramedullary pin (as described by Konkel et al.) offers significant advantages. It eliminates the risk of pin tract infections, avoids the psychological distress of visible hardware, and negates the need for a secondary procedure or clinical visit for hardware removal.
Preoperative Planning and Templating
Standard weight-bearing anteroposterior, lateral, and oblique radiographs of the foot are mandatory. The surgeon must assess the length of the proximal and middle phalanges, the medullary canal diameter, and the presence of any concurrent metatarsophalangeal (MTP) joint subluxation or dislocation. The absorbable pin (typically composed of poly-L-lactic acid or a copolymer) must be appropriately sized; a 2.0-mm diameter is standard for lesser toes.
Anesthesia and Positioning
- The patient is placed in the supine position on the operating table.
- Mild to moderate intravenous sedation is administered.
- A comprehensive ankle block is performed using a long-acting local anesthetic (e.g., 0.5% bupivacaine) to ensure complete regional anesthesia and postoperative analgesia.
- An Esmarch bandage is applied tightly from the toes to the supramalleolar level to exsanguinate the foot, and it is secured at the ankle to serve as an ankle tourniquet, providing a bloodless surgical field.
Surgical Technique (Step-by-Step)
1. Approach and Exposure
Make a 2-cm dorsal longitudinal incision directly over the PIP joint of the affected toe. Deepen the dissection sharply through the subcutaneous tissue down to the extensor apparatus.
Carefully release the extensor hood, the dorsal joint capsule, the synovium, and the collateral ligaments to fully expose the articular surfaces of the PIP joint.
Surgical Pitfall: Do not cut or aggressively release the volar plate, and strictly avoid exposing or releasing the flexor digitorum longus (FDL) or brevis (FDB) tendons. Preserving the volar plate is critical to maintaining the plantar stability of the arthrodesis site and preventing postoperative hyperextension deformity.
2. Joint Resection
Utilize a mini-oscillating saw to resect the articular cartilage and subchondral bone from the distal aspect of the proximal phalanx. The saw blade must be oriented at a perfect right angle (orthogonal) to the longitudinal axis of the proximal phalanx. Remove the resected bone fragment from the surgical field.
Next, use the mini-oscillating saw to resect the cartilage and subchondral bone from the base of the middle phalanx, again ensuring the cut is at a right angle to the longitudinal axis of the middle phalanx. Remove this fragment.
3. Deformity Assessment and Bone Apposition
Manually appose the flat, bleeding cancellous bone ends of the proximal and middle phalanges. Assess the correction of the hammertoe deformity.
* If the PIP joint is easily corrected and the bone ends appose flush without soft tissue tension, no further resection is necessary.
* If the deformity is not easily corrected or tension persists, resect additional bone from the distal aspect of the proximal phalanx until tension-free correction is achieved.
Surgical Warning: Avoid excessive resection of the middle phalanx, as its medullary canal is short. Furthermore, avoid excessive overall bone resection to minimize the risk of creating a functionally short, floppy toe or an unstable construct that the absorbable pin cannot adequately bridge.
4. Intramedullary Preparation
Using a 2.0-mm drill bit, drill retrograde through the medullary canal of the middle phalanx and advance into the distal phalanx.
* Crucial Step: You must hold the distal phalanx perfectly straight and coaxially aligned with the longitudinal axis of the middle phalanx during this retrograde drilling.
* Take extreme care to avoid drilling through the distal tuft of the distal phalanx, which could cause distal tip pain or nail bed injury.
Following drilling, use a 2.0-mm smooth spike (or a slightly oversized smooth K-wire) to gently over-ream the drilled tracts proximally and distally. This slight over-reaming reduces insertion friction and allows for smooth seating of the absorbable rod.
5. Pin Preparation and Insertion
Carefully measure the total length of the drilled intramedullary tracts (proximal phalanx + middle/distal phalanx) using a standard depth gauge.
Cut the 2.0-mm absorbable pin to the exact calculated length. Bevel both cut ends of the pin using a scalpel or bone rongeur to eliminate sharp edges, which facilitates easier insertion and prevents the pin from catching on cancellous bone trabeculae.
Insert the prepared pin into the middle phalanx. While holding the distal phalanx straight in relation to the middle phalanx, slide the distal portion of the pin through the intramedullary canal of the middle phalanx and into the distal phalanx. Advance it until the distal interphalangeal (DIP) joint is straight and the pin is securely seated within the distal phalanx.
6. The "Bend and Curl" Technique for Proximal Fixation
With the distal segment secured, the proximal portion of the pin will be protruding from the base of the middle phalanx.
Use a moderate-sized needle holder or a sturdy hemostat to gently grasp the protruding pin. Carefully bend and curl the flexible absorbable pin until its proximal tip aligns with and enters the pre-drilled hole in the distal aspect of the proximal phalanx.
As the pin is advanced into the proximal phalanx, manually compress the toe to ensure the raw cancellous bone ends of the middle and proximal phalanges are tightly apposed. The inherent memory and elasticity of the absorbable pin will provide a degree of internal compression and rigid coaxial alignment.
7. Soft Tissue Balancing and Tourniquet Release
Release the toe and critically evaluate the resting position of the digit. Bring the foot and ankle into a simulated weight-bearing (standing) position by loading the plantar aspect of the foot.
- If the toe is hyperextended at the MTP joint: The extensor apparatus is too tight. Use a No. 11 scalpel blade to perform a percutaneous extensor tenotomy proximal to the MTP joint.
- If the toe remains flexed at the MTP joint: Do not perform a flexor tendon release. Instead, release the Esmarch ankle tourniquet before closure. The return of blood flow and the relaxation of ischemic muscle contracture will typically resolve residual flexion tension.
8. Closure and Dressing
Irrigate the wound thoroughly. Close the surgical site in anatomical layers:
* Use 3-0 Dexon (or equivalent absorbable braided suture) to repair the extensor hood and approximate the subcutaneous tissue.
* Use a 4-0 nylon running suture for definitive skin closure.
Apply a sterile, non-adherent soft dressing. Wrap the forefoot with a 4-inch elastic bandage (e.g., Coban or Ace wrap), ensuring the toe is splinted and held securely in the corrected, neutral position.
POSTOPERATIVE CARE AND REHABILITATION PROTOCOL
The success of a PIP joint arthrodesis relies heavily on strict adherence to the postoperative protocol to ensure osseous union and prevent hardware failure before the absorbable pin degrades.
Phase I: Immediate Postoperative (Weeks 0–2)
- Weight Bearing: The patient is permitted to weight-bear as tolerated, but strictly in a rigid, open-toe postoperative shoe. The rigid sole prevents MTP joint dorsiflexion and protects the arthrodesis site from shear forces.
- Elevation: The patient is strongly advised to elevate the foot above the level of the heart as much as possible for the first 48 to 72 hours to minimize edema and throbbing pain.
- Wound Care: The initial surgical dressings must remain clean, dry, and completely intact for the first 2 weeks. No showering or bathing of the foot is permitted.
Phase II: Subacute Healing (Weeks 2–6)
- Suture Removal: At the 10 to 14-day postoperative visit, the dressings are taken down, and the 4-0 nylon skin sutures are removed.
- Wound Support: Adhesive strips (e.g., Steri-Strips) are applied across the incision to reduce skin tension. A light, breathable dressing is applied until all eschars have resolved and the wound is fully epithelialized.
- Hygiene: Ten days after suture removal (approximately 3.5 weeks post-op), the patient is allowed to shower, provided the foot is air-dried immediately afterward. Soaking the foot, swimming, or tub baths are strictly prohibited for the first 6 weeks to prevent maceration and deep infection.
- Footwear: At 4 to 6 weeks, the patient may transition from the postoperative shoe to a wide, extra-depth comfort shoe (e.g., a diabetic-style or orthopedic walking shoe) that does not compress the toes.
Phase III: Return to Function (Weeks 6–14)
- Radiographic Assessment: At 6 weeks, radiographs should demonstrate early trabecular bridging across the arthrodesis site.
- Footwear Progression: Between 10 to 14 weeks, as clinical and radiographic union is confirmed, the patient is cleared to return to standard, unrestricted footwear.
- Pin Degradation: The surgeon should educate the patient that the absorbable pin will slowly hydrolyze over 6 to 12 months. Occasionally, a sterile, localized inflammatory response (sterile abscess) may occur as the polymer degrades, which is typically self-limiting but should be monitored to rule out infectious etiology.
