INTRODUCTION AND CLINICAL CONTEXT
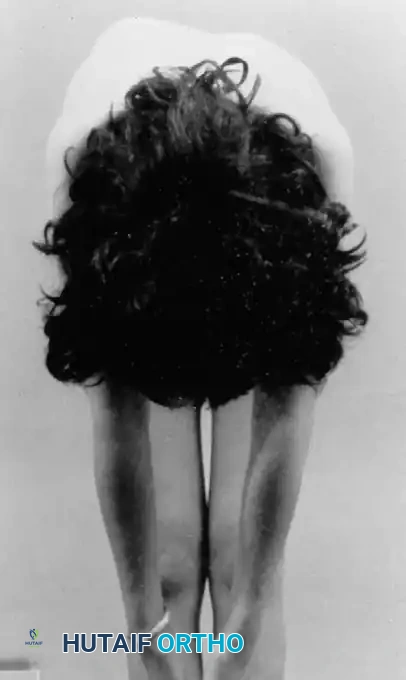
Of all the complex three-dimensional deformities caused by idiopathic scoliosis, the posterior rib prominence (rib hump) is frequently the patient’s primary clinical and psychological concern. The rib hump is a direct biomechanical consequence of the axial rotation of the apical thoracic vertebrae, which drives the ribs posteriorly on the convex side of the curve and anteriorly on the concave side.
Historically, when utilizing Harrington rod distraction techniques, posterior thoracoplasty was a routine adjunct because distraction alone provided minimal axial derotation. Today, with the advent of modern thoracic pedicle screw instrumentation and direct vertebral derotation (DVD) techniques, surgeons can achieve profound translation of the apex to the midline and substantial correction of the rotational deformity. Consequently, the necessity to perform a formal thoracoplasty has significantly decreased.
However, in cases of severe, rigid, or highly angular deformities, instrumentation alone may fail to fully eradicate the rib prominence. In these scenarios, resection of the convex ribs via a posterior thoracoplasty remains an invaluable technique to optimize the postoperative cosmetic result and alleviate the patient's psychological distress.
Pulmonary and Physiologic Considerations
The decision to perform a thoracoplasty must be weighed against its physiologic impact.
Clinical Pearl: Pulmonary Function Trajectory
Research by Chen et al. demonstrated that combining posterior spinal instrumentation with thoracoplasty leads to a significant, albeit transient, decrease in pulmonary function tests (PFTs) at 3 months postoperatively. This is primarily due to altered chest wall mechanics and pain-induced splinting. Fortunately, pulmonary function reliably returns to baseline normal values by 1 year postoperatively.
Surgeons must also counsel patients that the addition of a thoracoplasty significantly increases postoperative pain. It also elevates the risk of pleural effusion or pneumothorax, not infrequently requiring the insertion of a chest tube or therapeutic pleural aspiration.
PREOPERATIVE PLANNING AND TIMING
Timing of the Thoracoplasty: Pre- vs. Post-Instrumentation
A critical strategic decision is whether to perform the rib resection before or after the spinal instrumentation and correction.
- Pre-Instrumentation Thoracoplasty: Performing the resection prior to curve correction is technically easier as the anatomy is undisturbed. However, surgeons must anticipate the biomechanical shift: as the apex of the curve translates to the midline during rod reduction and derotation, the resected rib ends will separate, leaving a much larger gap than was apparent at the time of the original resection.
- Post-Instrumentation Thoracoplasty: Performing the procedure after spinal instrumentation allows for a highly accurate, real-time evaluation of the residual rib hump, ensuring that only the necessary amount of rib is resected. The primary disadvantage is increased blood loss, as the thoracoplasty is performed after the major midline spinal dissection has already caused systemic and local physiologic stress.
SURGICAL TECHNIQUE: STEP-BY-STEP APPROACH
Patient Positioning and Preparation
- Positioning: Position the patient prone on a specialized spinal frame (e.g., Jackson table or Relton-Hall frame) exactly as you would for a standard posterior spinal fusion for idiopathic scoliosis. Ensure the abdomen is free to minimize venous pressure and epidural bleeding.
- Draping: Prepare and drape the patient in a standard sterile fashion. For adequate lateral exposure of the rib prominence, it is imperative to place the lateral drapes at the posterolateral axillary line or wider.
Incision and Fascial Exposure
- Skin Incision: Make a routine midline longitudinal incision. While Steel described a separate parallel vertical incision centered directly over the rib hump, a single midline incision is vastly preferred for cosmetic reasons.
- Incision Extension: To adequately retract the thoracolumbar fascia laterally from the midline, the skin incision must be extended. For a right thoracic curve, extend the incision distally to approximately L2 or L3. Stopping the skin incision at T12 will fail to provide adequate lateral exposure. Proximally, carry the skin incision approximately 1/2 to 1 inch farther than the planned fusion levels.
Surgical Warning: Despite the slight increase in incision length, the single midline approach is much more cosmetically appealing than the two-incision technique. Modern instrumentation allows better translation of the apex, meaning less lateral rib resection is required compared to older techniques, making the midline approach highly feasible.
- Fascial Dissection: Outline the spinous processes and sharply incise the thoracolumbar fascia off the spinous processes.
- Elevation: In the L2-L3 region, carefully identify the very thin layer of the thoracolumbar fascia. Using a combination of sharp and blunt dissection, elevate this fascia off the underlying paravertebral muscle fascia. Work laterally and proximally simultaneously to develop a clean avascular plane. Sequentially incise the thoracolumbar fascia off the spinous processes, proceeding proximally.
Rib Identification and Periosteal Stripping
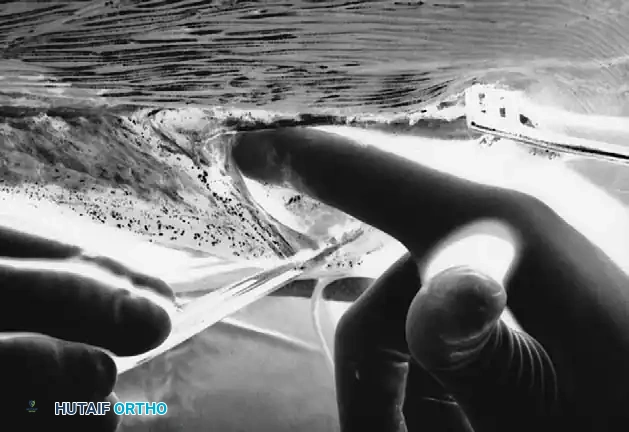
- Palpation and Marking: Once the fascia is retracted laterally, palpate the ribs starting precisely at the apex of the deformity. Mark the apical rib with electrocautery. Symmetrical resection is planned, working distally and proximally one rib at a time. Usually, between four and six ribs are outlined for resection.
- Muscle Incision: Make a midline incision into the paraspinal muscles medially to outline the ribs for the periosteal cut.

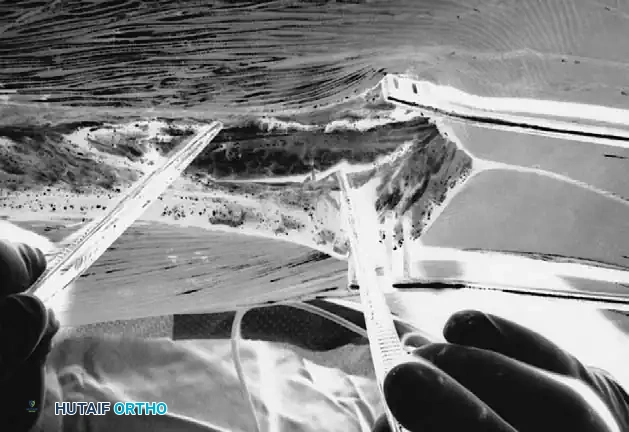
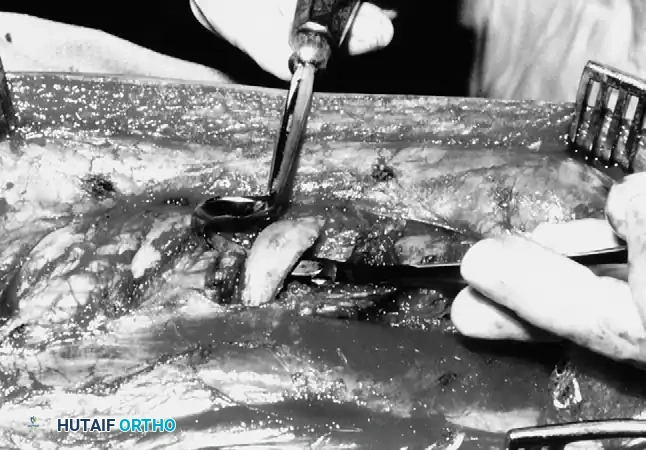
- Lateral Periosteal Stripping: Use a periosteal elevator to strip the periosteum off the superficial surface of the rib out to the lateral edge.
Surgical Pitfall: The elevator must strictly be pulled toward the surgeon and never pushed. Pushing the elevator risks sudden advancement off the rib edge, leading to inadvertent penetration of the parietal pleura.
- Inferior Edge Stripping: Once the superficial periosteum is stripped to the side, use the elevator to carefully strip the periosteum and intercostal muscle attachments around the inferior edge of the rib.
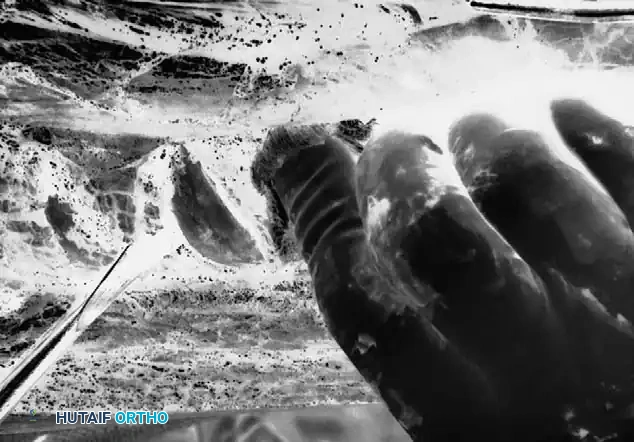
- Anterior Stripping (The Danger Zone): With a curved Cobb elevator, strip the periosteum from the anterior (deep) aspect of the rib in a medial to lateral direction. This is the step where the pleura is most vulnerable and most likely to be entered. Keep the instrument firmly applied to the bone.
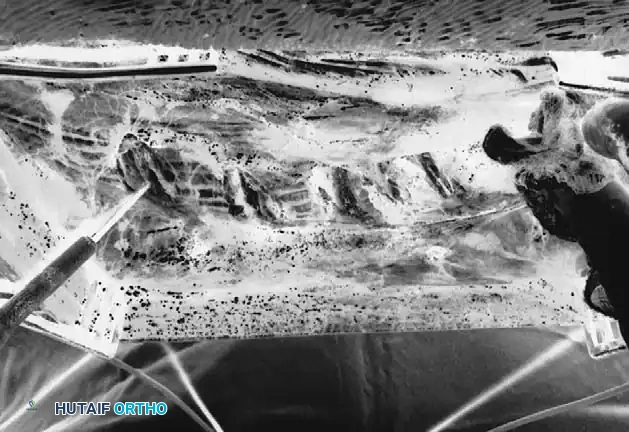
Rib Resection and Hemostasis
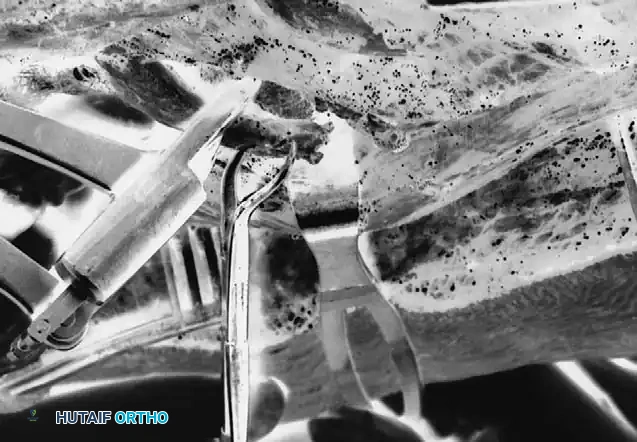
- Retractor Placement: Once the anterior aspect of the rib has been safely stripped, pass a Doyen rib retractor circumferentially from medial to lateral around the exposed rib to protect the underlying pleura.
- Medial Cut: Identify the most medial attachment of the rib to the transverse process. Pass a heavy rib cutter around the rib, pushing it as far medially as possible. Secure the rib segment with a towel clip or Kocher clamp. This prevents the sharp end of the rib from plunging downward through the pleura the moment it is cut. Cut the rib medially, keeping the blades of the cutter as parallel to the floor as possible to avoid leaving a sharp, downward-pointing spike.
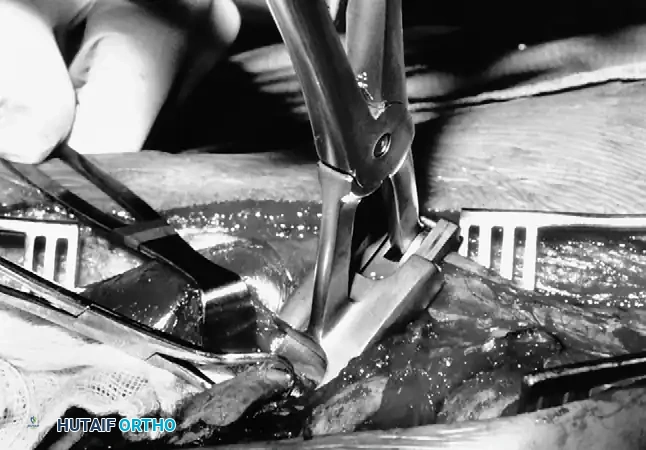
- Lateral Cut and Resection Limits: Make the lateral cut. For a standard rib resection in a patient with a 55-degree right thoracic curve, approximately 2 cm of rib should be cut initially at the apex.

Clinical Pearl: Resection Limits
Take care not to resect too much rib initially; additional bone can always be removed if necessary. Resecting too much rib will cause an unsightly postoperative rib concavity. Maximum limits: Never resect more than six ribs total, and never resect more than 8 cm in length from any single rib.
- Hemostasis: Apply bone wax generously to the bleeding cancellous ends of the cut ribs. Pack Gelfoam tightly into the empty periosteal bed to control oozing from the periosteum and intercostal vessels.
- Sequential Resection: Cut the additional outlined ribs in an identical fashion, moving proximally and distally from the apex, progressively removing shorter segments of rib to create a smooth contour.
- Pleural Integrity Check: Once the resection is complete, lift the edges of the wound. Using a pitcher (do not use pressurized irrigation), pour warm sterile saline into the wound until the rib beds are submerged. Instruct the anesthesiologist to perform a sustained Valsalva maneuver (positive pressure ventilation) to look for air bubbles, which indicate a leak in the parietal pleura.
- Closure and Grafting: Place a closed-suction drain directly over the resected rib bed. Close the thoracolumbar fascia with a running absorbable suture, starting at the distal aspect of the wound. Finally, use a rongeur or bone mill to cut the removed segments of rib into small pieces; this provides excellent autogenous bone graft to augment the spinal arthrodesis.
POSTOPERATIVE MANAGEMENT
Rigorous postoperative care is essential to prevent respiratory complications and ensure proper chest wall healing.
Immobilization and Chest Wall Protection
After skin closure and sterile dressing application, a protective plaster shell must be applied over the rib resection area. This shell is absolutely essential to:
1. Prevent a postoperative flail chest.
2. Minimize paradoxical motion of the cut ribs on top of the pleura.
3. Reduce the possibility of a massive pleural effusion.
The shell is constructed of plaster with foam padding underneath to protect the skin. The mold is fabricated while the patient is still prone on the operating table to ensure a perfect contour, but to prevent thermal injury (plaster burn), it is not applied until the patient is supine in the recovery room.
Radiographic Evaluation and Bracing
A stat portable chest radiograph is obtained in the recovery room to rule out a pneumothorax. Once cleared, the shell is applied and secured with 6-inch elastic wraps. Alternatively, the posterior shell of a custom-molded Thoracolumbosacral Orthosis (TLSO) made preoperatively can be utilized.
The patient’s back is formally examined 2 days postoperatively.
* Minimal Gap: If there is no evidence of a flail chest and the palpable rib resection gap measures less than the width of the palm of the hand, no prolonged postoperative immobilization is required.
* Large Gap / Flail Chest: If there is a larger gap or clinical signs of a flail chest, a postoperative rib protector (such as the posterolateral half of a TLSO) is fitted. This protector must be worn continuously for 3 months. Alternatively, a full TLSO brace can be utilized for the first 3 months to protect the chest cage while the ribs regenerate within their periosteal sleeves.
COMPLICATIONS AND PITFALLS
1. Pleural Tears and Pneumothorax
During the deep periosteal stripping, a hole may inadvertently be made in the parietal pleura.
Surgical Warning: Management of Pleural Tears
Do not attempt to primarily repair the friable pleura. Suturing the pleura directly will almost certainly tear the tissue further, enlarging the defect.
Instead, the hole in the rib bed should be gently packed with Gelfoam. The overlying intercostal muscles should then be closed with a running suture from the most medial to the lateral aspect. As the final sutures are being tightened, have the anesthesiologist fully expand the patient’s lung, expressing as much air from the pleural cavity as possible before the final knot is tied. The primary purpose of closing this hole is to prevent postoperative hematoma from seeping into the pleural cavity.
An expanding tension pneumothorax is exceedingly rare because only the parietal pleura is violated, leaving the visceral pleura intact. Suction drains are used routinely in the wound bed. Statistically, less than 50% of patients with intraoperative pleural holes will require a formal chest tube. Daily semi-erect and lateral decubitus chest radiographs must be obtained for 3 days.
2. Pleural Effusion
On occasion, even without a documented pleural hole, a reactive pleural effusion may develop due to localized inflammation and altered lymphatic drainage. The strict use of a protective shell postoperatively minimizes this complication. If fluid accumulation persists and the patient becomes symptomatic (dyspnea, hypoxia), a therapeutic thoracentesis is indicated. If the effusion rapidly reaccumulates and a second thoracentesis becomes necessary, a formal chest tube should be inserted.
3. Rib Concavity (Over-Resection)
Resection of too much rib will cause a visible and palpable rib concavity, replacing a convex deformity with a concave one. This complication is entirely preventable. The surgical maxim is: It is always better to resect too little rib than too much. Adhere strictly to the limits of a maximum of six ribs, and never more than 8 cm in length per rib. If a long, sweeping rib deformity requires resection of more than six ribs, the risk of causing a concavity is unacceptably high. In such severe cases, it is safer to perform a staged, second procedure later than to risk a permanent iatrogenic concavity.
4. Residual Rib Prominence (Under-Resection)
The most common technical error leading to patient dissatisfaction is residual rib prominence. This occurs when the surgeon fails to resect enough ribs, or more commonly, fails to resect the ribs far enough medially (to the transverse process). This risk must be carefully balanced against the risk of causing a concavity. Meticulous preoperative planning and intraoperative palpation are required to achieve the optimal aesthetic contour.
