INTRODUCTION AND PATHOANATOMY
Posterior ankle impingement (PAI) syndrome is a clinical disorder characterized by acute or chronic pain at the posterior aspect of the ankle, exacerbated by forced plantar flexion. This condition is classically observed in athletes who subject their ankles to repetitive extreme plantar flexion, such as ballet dancers (en pointe or demi-pointe positions), elite soccer players, and gymnasts. The pathoanatomy typically involves a "nutcracker effect," where bony or soft tissue structures become compressed between the posterior lip of the tibia and the calcaneus during plantar flexion.
The primary anatomical culprits include an enlarged posterior process of the talus (Stieda process), an unfused os trigonum, or hypertrophic soft tissues such as the posterior joint capsule, the posterior talofibular ligament (PTFL), or the flexor hallucis longus (FHL) tenosynovium. When conservative management—comprising rest, nonsteroidal anti-inflammatory drugs (NSAIDs), targeted physiotherapy, and image-guided corticosteroid injections—fails to provide durable relief, surgical intervention is indicated.
Arthroscopic posterior débridement has superseded open techniques as the gold standard, offering equivalent clinical outcomes with significantly reduced morbidity, diminished postoperative pain, and an accelerated return to high-level sports.
SURGICAL ANATOMY AND BIOMECHANICS
A profound understanding of the posterior ankle anatomy is non-negotiable for safe arthroscopic navigation. The posterior compartment is densely packed with critical neurovascular and tendinous structures.
- The Flexor Hallucis Longus (FHL): The FHL tendon is the most critical intraoperative landmark. It serves as the "guardian" of the medial neurovascular bundle. All bony and soft tissue resections must remain lateral to the FHL tendon.
- The Neurovascular Bundle: Located posteromedially, the tibial nerve and the posterior tibial artery and vein lie immediately medial to the FHL tendon. Plunging instruments medial to the FHL carries a catastrophic risk of neurovascular injury.
- The Sural Nerve: Located posterolaterally, the sural nerve courses adjacent to the small saphenous vein, crossing the lateral border of the Achilles tendon. It is at risk during the establishment of the posterolateral portal.
Surgical Warning: The FHL tendon is your absolute medial limit. Never direct a shaver, burr, or curette medial to the FHL tendon belly or sheath during posterior ankle arthroscopy. Violation of this boundary places the tibial nerve and posterior tibial artery in imminent danger.
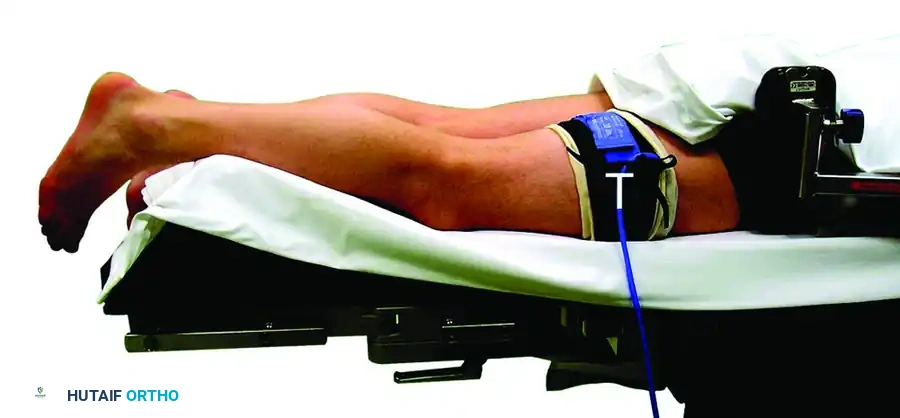
PATIENT POSITIONING AND ANESTHESIA
Optimal patient positioning is critical for adequate visualization and safe portal placement. The procedure is typically performed under general or regional anesthesia.
- Prone Positioning: Place the patient in the prone position on the operating table.
- Leg Support: Place a well-padded support (such as a foam block or a rolled blanket) under the distal tibia/lower leg. This elevates the leg and allows the foot to hang freely over the edge of the bed.
- Tourniquet: Apply a well-padded pneumatic tourniquet to the proximal thigh or proximal calf to ensure a bloodless surgical field.
- Foot Position: Maintain the foot in a strictly neutral position with respect to dorsiflexion/plantar flexion and varus/valgus.
Clinical Pearl: Keeping the foot in a neutral position is the safest posture to avoid neurovascular damage. Plantar flexion relaxes the posterior structures, allowing the neurovascular bundle to fall closer to the joint space and portal trajectories, whereas neutral positioning keeps these structures under appropriate tension and safely displaced from the working area.
PORTAL PLACEMENT: THE TWO-PORTAL TECHNIQUE
The posterior arthroscopic approach relies on a standard two-portal technique: the posterolateral and posteromedial portals. Precise establishment of these portals is the most critical step of the procedure.
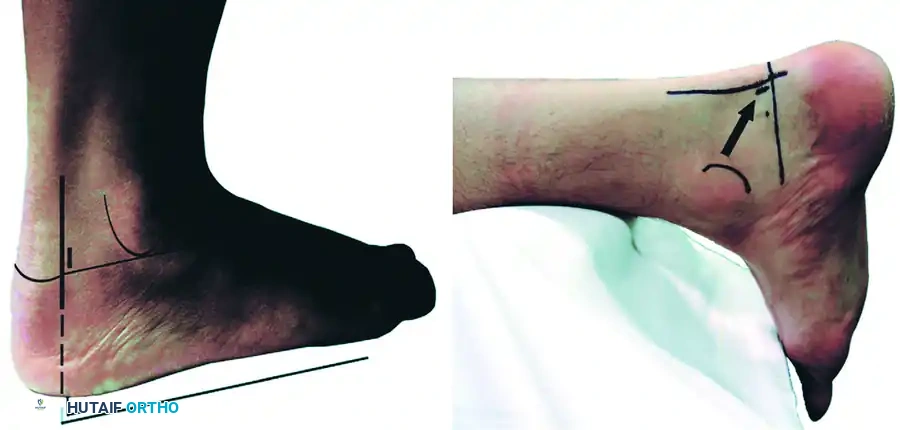
1. The Posterolateral Portal (Viewing Portal)
Make the posterolateral portal first. Identify the tip of the lateral malleolus and the lateral border of the Achilles tendon. The portal is placed just superior to a line drawn from the tip of the lateral malleolus to the Achilles tendon, positioned just lateral to the tendon itself.
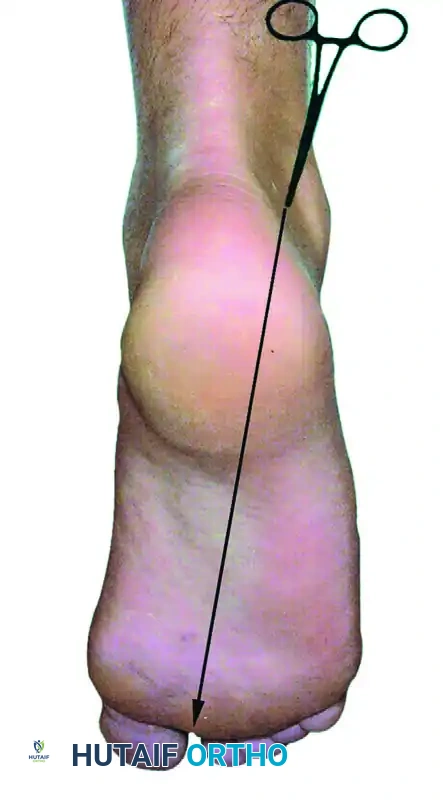
Make a superficial vertical skin incision using a #11 blade, taking care to incise only the dermis to avoid injuring the underlying sural nerve. Insert a blunt hemostat or a blunt arthroscopic trocar through the skin incision. Aim the instrument anteriorly, directing it along a line pointing toward the first web space of the forefoot. Advance the hemostat bluntly until it firmly hits the posterior bony aspect of the talus or tibia.
2. The Posteromedial Portal (Working Portal)
The posteromedial portal is established at the exact same horizontal level as the posterolateral portal, but positioned just medial to the medial border of the Achilles tendon.
Make a superficial skin incision. Insert a blunt hemostat through the incision, directing it laterally to contact the shaft of the arthroscope (which is already seated in the posterolateral portal) at a 90-degree angle.

Once the hemostat makes tactile metal-on-metal contact with the arthroscope shaft, slide the hemostat anteriorly down the shaft until it hits the bone and enters the arthroscopic field of view. This "sliding" technique ensures the instrument bypasses the posteromedial neurovascular bundle safely. If desired, or if the anatomy is distorted, utilize intraoperative fluoroscopy to confirm the appropriate placement of the instruments before introducing motorized shavers.
SURGICAL TECHNIQUE: POSTERIOR DÉBRIDEMENT AND OS TRIGONUM EXCISION
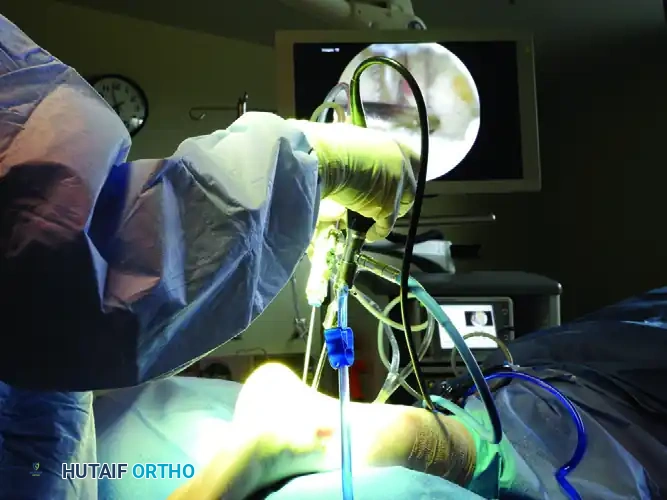
With both portals established, the arthroscope is typically maintained in the posterolateral portal, while working instruments are introduced via the posteromedial portal. The portals can be interchanged as needed for optimal visualization and access.
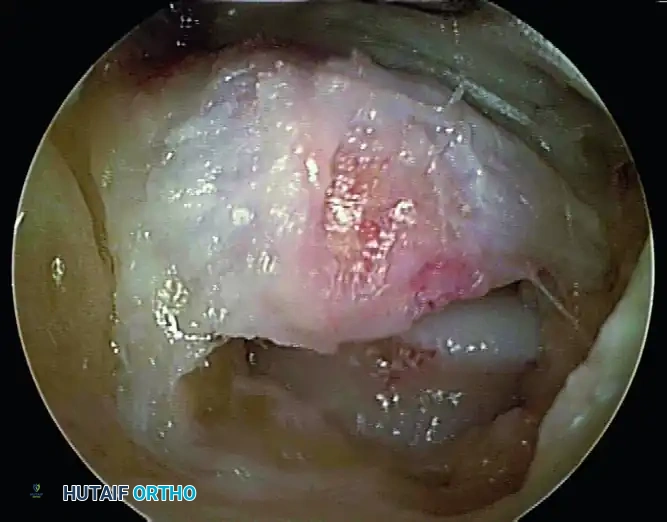
Step 1: Soft Tissue Clearance and Capsulectomy
Introduce a 4.0-mm or 4.5-mm full-radius arthroscopic shaver into the posteromedial portal. Begin by resecting the adipose tissue and the posterior subtalar capsule to clear the visual field.
Step 2: Identification of the FHL Tendon
Before any bony resection occurs, the flexor hallucis longus (FHL) tendon must be positively identified. Use the shaver or a radiofrequency wand to carefully clear the soft tissue overlying the FHL muscle belly and tendon. The FHL will be seen gliding dynamically if the great toe is passively flexed and extended by an assistant.
Pitfall: Failure to identify the FHL early in the procedure leads to spatial disorientation. The FHL is the medial boundary; all pathology to be resected (os trigonum, Stieda process) lies lateral to this structure.
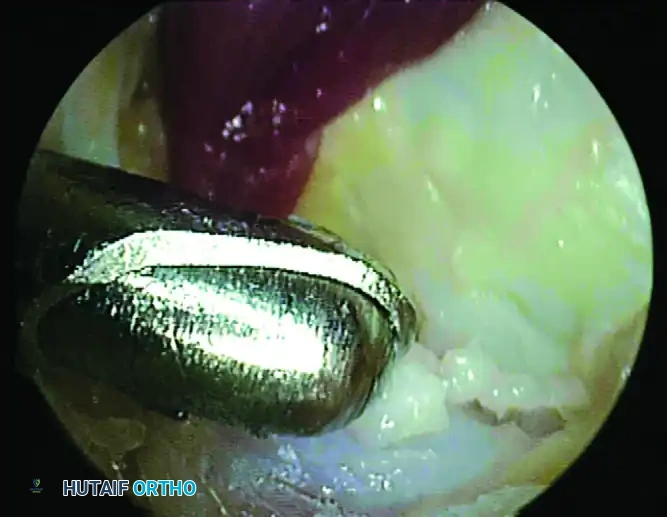
Step 3: Excision of the Os Trigonum / Stieda Process
Once the FHL is protected, direct attention to the bony impingement. To mobilize and remove the os trigonum, you must systematically detach its soft tissue tethers:
1. Partially detach the posterior talofibular ligament (PTFL).
2. Release the posterior talocalcaneal ligament.
3. Release the flexor retinaculum to fully expose the bony fragment.
Use an arthroscopic grasper to assess the mobility of the os trigonum. If it is fused (a Stieda process), use an arthroscopic burr or an osteotome to resect the prominent bone until it is flush with the posterior talar body. If it is a separate ossicle, use a combination of a shaver, radiofrequency wand, and grasper to shell it out of its soft tissue envelope. Extract the fragment through the portal; if the fragment is large, the portal skin incision may need to be slightly enlarged.
Step 4: Dynamic Assessment
Following resection, perform a dynamic arthroscopic examination. Passively dorsiflex and forcefully plantarflex the ankle while visualizing the posterior compartment. Ensure there is no residual impingement between the posterior tibia and the calcaneus.
ADJUNCTIVE PROCEDURES: ARTHROSCOPIC ANKLE ARTHRODESIS
In cases where posterior ankle impingement is accompanied by end-stage tibiotalar osteoarthritis, isolated débridement will not yield satisfactory results. In such scenarios, the procedure may be converted to or combined with an arthroscopic ankle arthrodesis.
If distraction is needed to access the joint space, a transcalcaneal traction pin can be hooked to a noninvasive or invasive traction device. Once standard anterolateral and anteromedial portals have been established (or utilizing the posterior portals for a posterior approach to fusion), the joint is systematically prepared.
- Cartilage Removal: Curettes and motorized shavers are used to aggressively remove all remaining articular cartilage from the tibial plafond and the talar dome.
- Subchondral Bone Preparation: An arthroscopic burr is then used to abrade the subchondral bone, exposing bleeding cancellous bone to optimize the fusion bed. Complete joint preparation can be time-consuming and tedious, but care should be taken to be thorough and complete.
- Fixation: Percutaneous 6.5-mm or 7.0-mm cannulated screws are placed across the joint in a compressive configuration with the help of intraoperative fluoroscopy.
Evidence-Based Note: A Grade B recommendation (fair evidence) exists for arthroscopic arthrodesis of ankles without deformity of more than 15 degrees. There is incomplete evidence for its use in ankles with greater deformity. However, fusion rates are similar to those with open ankle arthrodesis, and multiple studies have reported shorter times to fusion and less soft-tissue morbidity. Results may be less optimal in patients with severe deformity, though experienced surgeons have successfully performed arthroscopic arthrodesis in patients with more than 15 degrees of deformity with good results.
POSTOPERATIVE PROTOCOL AND REHABILITATION
The postoperative rehabilitation following isolated arthroscopic posterior débridement is generally rapid, aiming for early mobilization to prevent capsular scarring and stiffness.
- Weeks 0-2: The patient is placed in a bulky compressive dressing or a removable controlled ankle motion (CAM) boot. Weight-bearing as tolerated is permitted immediately or within the first few days, depending on patient comfort and the extent of the resection. Early active range of motion (ROM) exercises, particularly dorsiflexion and plantar flexion, are initiated to prevent FHL tethering.
- Weeks 2-4: Sutures are removed at 10 to 14 days. Physical therapy intensifies, focusing on proprioception, peroneal strengthening, and Achilles stretching.
- Weeks 4-6: Sport-specific training begins. Elite athletes are often cleared to return to full training.
(Note: If an arthroscopic arthrodesis was performed, the protocol shifts to strict non-weight-bearing in a cast for 6-8 weeks until radiographic union is observed).
CLINICAL OUTCOMES AND COMPLICATIONS
Outcomes
The clinical outcomes for arthroscopic posterior débridement are highly favorable. Good and excellent outcomes have been reported in 91% to 100% of patients undergoing this procedure. The minimally invasive nature of the surgery allows for rapid rehabilitation. For example, posterior débridement enabled a cohort of 27 elite professional soccer players to return to full training at an average of just 5 weeks, resulting in a significant reduction in pain and restoration of performance. While outcomes after arthroscopic and open posterior débridement are statistically similar in the long term, an earlier return to sports is definitively possible with arthroscopic treatment.
Complications
Despite its high success rate, the procedure is not without risks. Complication rates range from 4% to 20% for isolated débridement.
* Neurological Injury: The most common complications include neurological symptoms affecting the tibial nerve (medial) and sural nerve (lateral). These are often transient neuropraxias secondary to portal placement or aggressive retraction, but permanent injury can occur if anatomical boundaries are violated.
* Infection: Superficial portal site infections or deep joint space infections are rare but possible.
* Deformity/Stiffness: Minimal deformity or postoperative stiffness can occur, particularly if early range of motion is not instituted.
For arthroscopic arthrodesis, while functional results are generally good, the overall complication rate can be as high as 55%, though the vast majority of these complications are minor (e.g., prominent hardware requiring later removal, superficial wound issues).
CONCLUSION
Arthroscopic posterior débridement is a highly effective, reproducible, and safe procedure for the management of posterior ankle impingement and os trigonum syndrome. Mastery of the prone two-portal technique, rigorous respect for the FHL tendon as the medial safety boundary, and meticulous soft tissue and bony resection are the cornerstones of success. When executed correctly, this procedure offers athletes a rapid and reliable return to their pre-injury level of function.
