PERINEURIAL (FASCICULAR) NEURORRHAPHY AND INTERFASCICULAR GRAFTING
The reconstruction of peripheral nerve injuries remains one of the most technically demanding challenges in operative orthopaedics and microsurgery. While primary end-to-end repair (epiperineurial neurorrhaphy) is the gold standard for acute, sharp transections with minimal gap, the secondary repair of nerve injuries is frequently complicated by nerve retraction, neuroma formation, and significant segmental defects.
Experimental and clinical evidence unequivocally demonstrates that tension across a nerve repair site is the single most detrimental biomechanical factor affecting functional outcomes. Tension induces intraneural ischemia, disrupts the microvascular blood-nerve barrier, and stimulates aggressive intraneural fibrosis, effectively blocking axonal regeneration. To circumvent tension at the coaptation site, Hanno Millesi pioneered the technique of interfascicular nerve grafting. By utilizing multiple cutaneous nerve grafts, this technique allows for the precise, tension-free alignment of corresponding fascicles between the proximal and distal nerve stumps.
When executed with rigorous microsurgical principles, interfascicular grafting has been utilized successfully to bridge massive nerve gaps exceeding 20 cm, restoring critical motor and sensory function in otherwise devastating injuries.
INDICATIONS AND CLINICAL APPLICATIONS
Interfascicular nerve grafting requires advanced microsurgical experience, specialized instrumentation, and meticulous preoperative planning. It is particularly applicable to three major reconstructive challenges:
- Bridging Segmental Defects: The primary indication is the reconstruction of nerve gaps following segmental injury, delayed presentation, or neuroma resection where a primary neurorrhaphy cannot be performed without tension.
- Nerve Transfers (Neurotization): Grafting is frequently employed to bridge the distance in nerve transfer surgery, such as routing an intercostal nerve to the distal brachial plexus (e.g., musculocutaneous nerve) in severe avulsion injuries.
- Free Functional Muscle Transfers and Neurovascular Flaps: Nerve grafts are essential for providing innervation to free muscle grafts (e.g., gracilis transfer for facial palsy or brachial plexus reconstruction) and for connecting the neural components of free neurovascular flaps to local recipient nerves.
Clinical Pearl: Vascularized nerve grafts (e.g., vascularized ulnar or sural nerve grafts) have been proposed for massive defects in scarred beds. However, they do not currently have wide clinical application, as long-term comparative studies suggest their functional results are generally no better than those achieved with a meticulously performed, well-vascularized conventional free interfascicular graft.
SURGICAL ANATOMY AND BIOMECHANICS
Understanding the internal topography of peripheral nerves is paramount. A peripheral nerve is not a homogenous cable but a complex, dynamic structure composed of fascicles (bundles of axons) surrounded by perineurium, which are in turn grouped together and protected by the internal and external epineurium.
In the proximal segments of major nerves (e.g., the sciatic or proximal median nerve), fascicular topography is highly plexiform, with fascicles frequently dividing and merging. Distally, the topography becomes more parallel and distinct, segregating into specific motor and sensory groups. The goal of interfascicular grafting is to map these groups and bridge them accurately, minimizing axonal misdirection (cross-innervation).
SURGICAL TECHNIQUE: INTERFASCICULAR NERVE GRAFTING (MILLESI, MODIFIED)
The following technique outlines the modified Millesi approach for interfascicular nerve grafting, commonly applied to major nerve defects in the upper extremity (e.g., median or ulnar nerve in the forearm).
Step 1: Exposure and Preparation of the Nerve Stumps
- Positioning and Hemostasis: Position the patient supine with the affected limb on a radiolucent hand table. Dissect the injured nerve in a strictly bloodless field achieved with a pneumatic tourniquet.
- Incision: Utilize extensile, Brunner-type zigzag or longitudinal incisions that cross flexion creases obliquely. This allows extensive exposure of the proximal neuroma and the distal glioma (scarred distal stump) without risking postoperative scar contracture over the repair site.
- Initial Dissection: Identify the nerve in virgin, unscarred tissue both proximally and distally before tracing it toward the zone of injury.
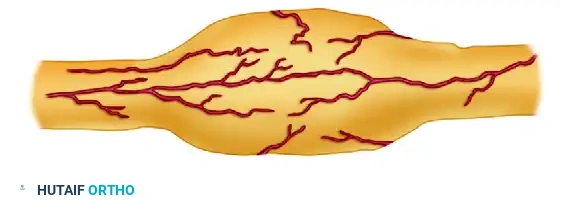
Figure 1: External appearance of the neuroma-in-continuity or end-bulb neuroma prior to resection.
Step 2: Epineurectomy and Neuroma Resection
- Proximal Preparation: Incise the external epineurium proximal to the neuroma in normal-appearing tissue. Carefully dissect proximally toward the scarred distal stump, peeling back the epineurium to expose the underlying fascicular bundles.
- Distal Preparation: Repeat this process on the distal stump. The distal stump often presents as a glioma—a disorganized mass of Schwann cells and fibrotic tissue lacking viable axons.
- Resection: Resect the neuroma and glioma sequentially until healthy, pouting fascicles ("mushrooming" effect) are visualized under the operating microscope.
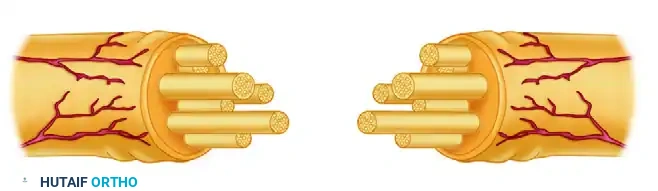
Figure 2: Neuroma and epineurium excised to expose fascicles of different lengths, depending on the extent of their involvement in the scar tissue.
Step 3: Fascicular Mapping and Step-Cutting
- Fascicular Dissection: Identify the major fascicle groups and follow them longitudinally to the point where they become obscured by intraneural scarring.
- Step-Cutting: Transect the fascicle groups at different levels depending on the extent of scar involvement.
- Use sharp microscissors for thin fascicle groups.
- Use a diamond knife or a fresh neurosurgical blade for thicker fascicle groups to prevent crushing the delicate perineurium.
- This differential transection results in a "step-cutting" geometry. Step-cutting prevents the nerve grafts from clumping together, distributes the bulk of the coaptation sites, and minimizes cross-scarring between adjacent grafts.
- Topographical Matching: If possible, expose the distal stump distally to the point where it divides into its final terminal branches (e.g., motor branch of the median nerve vs. digital sensory branches). Follow these fascicle groups proximally back to the glioma end to accurately identify and map the motor and sensory fibers.
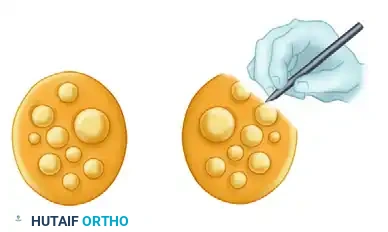
Figure 3: After dissection of the scar, the cut ends of the nerve are held in alignment, demonstrating the matching of corresponding proximal and distal fascicles prior to graft interposition.
Step 4: Graft Harvesting and Preparation
- Tourniquet Deflation: Once both ends of the nerve have been meticulously prepared, mapped, and the exact length of the required nerve graft is measured, deflate the tourniquet. Absolute hemostasis must be achieved before graft inset to prevent hematoma formation, which acts as a physical barrier to regenerating axons and promotes fibrosis.
- Donor Selection: The sural nerve is the workhorse donor for interfascicular grafting, providing up to 30-40 cm of graft material with minimal donor site morbidity (lateral foot numbness). Other options include the medial antebrachial cutaneous nerve or the lateral antebrachial cutaneous nerve.
- Graft Sectioning: Cut the harvested nerve into segments approximately 10% to 15% longer than the measured defect to account for graft shrinkage and to ensure absolute tension-free coaptation, even during joint mobilization.
Step 5: Microsurgical Coaptation
- Graft Inset: Place the nerve grafts between the corresponding proximal and distal fascicular groups. Ensure the grafts are reversed in orientation (distal end of the graft sutured to the proximal nerve stump) to minimize axonal escape through small branching points in the cutaneous graft.
- Suturing: Perform the coaptation using 9-0 or 10-0 monofilament nylon sutures under high-power microscopic magnification. Place sutures strictly through the perineurium or the interfascicular epineurium. Usually, only one or two sutures per graft are required to maintain alignment.
- Fibrin Glue (Optional Adjunct): Fibrin tissue adhesive may be applied to augment the repair, reducing the number of required sutures and minimizing foreign body reaction, provided it does not interpose between the axonal interfaces.
Surgical Warning: Never attempt to close a nerve gap under tension by acutely flexing adjacent joints (e.g., extreme wrist or elbow flexion) if the gap exceeds 2-3 cm. While this may allow primary approximation, the subsequent postoperative joint extension will inevitably stretch the repair, causing catastrophic intraneural ischemia and failure of regeneration.
POSTOPERATIVE PROTOCOL AND REHABILITATION
The postoperative management of an interfascicular nerve graft is as critical as the microsurgical execution. The rehabilitation protocol is phased to protect the delicate coaptation sites while progressively restoring joint mobility and facilitating sensory and motor reeducation.
Phase 1: Strict Immobilization (Weeks 0 to 3)
- Splinting: Immediately postoperatively, a bulky, non-compressive plaster splint is applied. For nerve repairs in the hand, wrist, or forearm, the splint is usually placed on the dorsum of the limb to immobilize the involved joints in a neutral, tension-free position.
- Movement Restrictions: The initial postoperative splinting is strictly maintained for 3 weeks. This period allows the fibrin clot at the coaptation site to organize and early collagen cross-linking to secure the graft. The patient is allowed minimal active movement of the finger joints strictly within the physical limits of the splint to prevent tendon adhesions.
- Wound Care: The surgical wound is inspected, and skin sutures are removed between the first 7 to 14 days, depending on the healing status.
Phase 2: Gradual Mobilization (Weeks 3 to 8)
- Splint Modification: After the first 3 weeks, the rigid plaster splint is changed.
- Gradual Extension: If the wrist was immobilized in slight flexion (e.g., for a median or ulnar nerve repair), it is gradually extended. The joint is brought first to a neutral position, and then to slight extension over the next 3 to 4 weeks. This gradual stretching prevents traction injury to the newly vascularizing nerve graft while positioning the wrist for effective finger and thumb biomechanics.
- Transition to Orthotics: Between 4 to 8 weeks postoperatively, custom-molded, removable thermoplastic splints are utilized in reliable patients to allow for controlled hygiene and supervised therapy sessions.
Phase 3: Contracture Prevention and Strengthening (Weeks 6 to 12)
- Joint Maintenance: Six to 12 weeks after surgery, careful attention must be paid to the avoidance of fixed joint contractures, which can severely compromise ultimate hand function even if nerve regeneration is successful.
- Web Space Stretching: The patient is instructed to passively stretch the thumb web space. If an adduction contracture begins to develop, a removable thumb web-spacer splint is immediately applied.
- Claw Deformity Management: In patients with intrinsic paralysis (e.g., ulnar nerve injury), passive stretching of the fingers is mandatory to prevent metacarpophalangeal (MCP) joint extension contractures and proximal interphalangeal (PIP) joint flexion contractures. If these "claw" deformities become troublesome or interfere with function, a removable MCP extension-blocking splint (lumbrical bar) is highly effective in redirecting extrinsic extensor force to extend the PIP joints.
- Strengthening: Eight to 12 weeks after surgery, progressive strengthening exercises for the innervated and recovering musculature are initiated.
Phase 4: Sensory Reeducation and Monitoring
- Clinical Evaluation: Clinical evaluations of motor and sensory return are conducted monthly. The surgeon should track the advancing Tinel sign, which progresses at approximately 1 mm per day (or 1 inch per month) after an initial latent period.
- Sensory Reeducation: When the advancing Tinel sign reaches the target end-organs, and the appreciation of constant touch, moving touch, and vibratory perception (using 30 Hz and 256 Hz tuning forks) have progressed, formal sensory reeducation is initiated.
- The Dellon, Curtis, and Edgerton Protocol: This structured reeducation program helps the brain reinterpret the altered neural signals arriving from the misdirected axons. It begins with early-phase reeducation (distinguishing moving vs. constant touch) and progresses to late-phase reeducation (tactile gnosis, object identification, and spatial orientation), maximizing the functional utility of the regenerated nerve.
COMPLICATIONS AND PITFALLS
- Graft Failure and Ischemia: Occurs if the graft bed is heavily scarred and avascular. Nerve grafts rely on plasmatic imbibition for the first 3-5 days before neovascularization occurs. A poor soft-tissue bed will lead to central graft necrosis.
- Neuroma-in-Continuity: Can develop at the proximal coaptation site if tension is present, or if scar tissue infiltrates the repair. This presents as a halted Tinel sign and localized pain.
- Joint Stiffness: Prolonged immobilization beyond the recommended 3 weeks can lead to irreversible capsular contractures, particularly in the PIP joints of the hand. A delicate balance between protecting the nerve repair and mobilizing the joints must be maintained.
