INTRODUCTION TO PERINEURIAL NEURORRHAPHY
Peripheral nerve injuries present a profound reconstructive challenge to the orthopedic and hand surgeon. The ultimate goal of any nerve repair is the restoration of maximal motor and sensory function through the precise realignment of axonal pathways. While epineurial repair remains the standard for many acute nerve lacerations, perineurial (fascicular) neurorrhaphy offers a highly targeted microsurgical approach. By directly coapting individual fascicles or grouped fascicles (interfascicular repair), the surgeon minimizes axonal misdirection—a critical factor when repairing mixed motor and sensory nerves.
To perform perineurial neurorrhaphy successfully, the surgeon must possess advanced microsurgical proficiency. This includes mastery of the operating microscope, an intimate understanding of intraneural topography, and the ability to manipulate delicate 9-0 or 10-0 monofilament sutures with atraumatic precision.
SURGICAL ANATOMY AND BIOMECHANICS
A thorough comprehension of peripheral nerve microanatomy is non-negotiable for fascicular repair.
Microanatomy of the Peripheral Nerve
- Mesoneurium: The loose areolar tissue surrounding the nerve, allowing for longitudinal excursion (nerve gliding) during joint movement.
- Epineurium: Divided into the epifascicular epineurium (the outer sheath providing structural integrity) and the interfascicular epineurium (the connective tissue packing between fascicles).
- Perineurium: A dense, lamellated connective tissue sheath enclosing individual fascicles. It provides the primary tensile strength of the nerve and acts as the blood-nerve barrier. This is the structural layer engaged during fascicular neurorrhaphy.
- Endoneurium: The delicate matrix surrounding individual axons and their Schwann cells within the fascicle.
Biomechanics of Nerve Repair
Tension is the absolute enemy of nerve regeneration. Excessive tension across a neurorrhaphy site compromises the intraneural microcirculation, leading to ischemia, fibroblast proliferation, and subsequent neuroma-in-continuity formation. The perineurium, while robust enough to hold a 10-0 suture, will tear if subjected to undue longitudinal stress. Therefore, perineurial neurorrhaphy must only be performed when a tension-free coaptation can be achieved; otherwise, nerve grafting is strictly indicated.
💡 Clinical Pearl: The Tension Threshold
A repair is generally considered "tension-free" if the nerve ends can be approximated using an 8-0 epineurial suture without the suture tearing through the tissue, and without the need to acutely flex adjacent joints beyond physiological resting postures.
INDICATIONS AND CONTRAINDICATIONS
Indications
- Mixed Peripheral Nerves: Nerves with distinct motor and sensory fascicular groups (e.g., the median nerve at the wrist, the ulnar nerve in the distal forearm, or the sciatic nerve).
- Partial Nerve Transections: Where only specific fascicles are injured, and an epineurial repair would necessitate the transection of intact, functioning fascicles.
- Distal Nerve Injuries: Where the fascicular topography is highly segregated and easily identifiable.
- Secondary Nerve Reconstructions: Following neuroma excision where fascicular anatomy can be meticulously dissected.
Contraindications
- Severe Crush or Avulsion Injuries: Where the zone of injury is extensive and fascicular architecture is destroyed over a long segment.
- Significant Gap: If a tension-free repair cannot be achieved, fascicular repair is contraindicated. Interfascicular nerve grafting must be utilized instead.
- Oligofascicular Nerves without Distinct Topography: In purely motor or purely sensory nerves where fascicular alignment does not significantly alter outcomes compared to epineurial repair.
PREOPERATIVE PLANNING AND POSITIONING
Equipment and Instrumentation
- Operating Microscope: High-quality optics with foot-pedal zoom and focus capabilities. Magnification ranges from 10x to 40x are required.
- Microsurgical Instruments: Jeweler’s forceps (straight and curved), Castroviejo needle holders, microscissors (adventitial and straight), and a micro-nerve hook.
- Suture Material: 9-0 or 10-0 non-absorbable monofilament (e.g., Nylon) on a spatulated or taper-point micro-needle.
- Background Material: A blue or green silicone background material to enhance visual contrast and prevent sutures from adhering to underlying soft tissues.
Patient Positioning
The patient is positioned supine or prone depending on the nerve involved. The extremity is prepped and draped widely to allow for extensile exposures. A pneumatic tourniquet is applied to provide a bloodless surgical field, which is critical for identifying microvascular landmarks on the epineurium.
🚨 Surgical Warning: Tourniquet Time
Strict adherence to tourniquet time limits (typically 90-120 minutes) is vital. Prolonged ischemia can compound the existing nerve injury and delay Wallerian degeneration and subsequent regeneration. Deflate the tourniquet and achieve meticulous hemostasis prior to final nerve coaptation.
STEP-BY-STEP SURGICAL TECHNIQUE
Step 1: Exposure and Preparation of the Nerve Ends
Expose the nerve injury through an extensile longitudinal incision, incorporating the traumatic wound if present. Always identify the normal nerve proximally and distally in virgin tissue planes before tracing it toward the zone of injury.
Resect the traumatized ends of the nerve. Using a fresh scalpel blade (No. 11 or 15) or specialized nerve-cutting scissors, sharply resect the proximal and distal stumps until healthy, "pouting" fasciculi are visualized. The presence of punctate bleeding from the cut ends (after tourniquet deflation) confirms adequate resection to viable tissue.
Step 2: Topographical Alignment and Mapping
Place the nerve ends in proper rotation. This is the most critical step in preventing axonal mismatch.
* Vascular Landmarks: Align the longitudinal epineurial blood vessels.
* Fascicular Size and Shape: Match the cross-sectional topography. Motor fascicles often differ in size and grouping from sensory fascicles.
Using high magnification, attempt to identify corresponding groups of fasciculi in the proximal and distal nerve stumps.
💡 Clinical Pearl: Fascicular Mapping
It is highly helpful at this point to diagram the arrangement of the fascicular groups on sterile paper (often fashioned from the inner glove wrapper or suture packaging). This "map" serves as a visual reference during the complex coaptation phase.
Step 3: Transfixation of Nerve Ends
To maintain rotational alignment and relieve tension during the delicate fascicular suturing, transfix the nerve ends to the adjacent soft tissues or underlying muscle bed using straight stainless steel needles (e.g., 25-gauge hypodermic needles). This stabilizes the nerve stumps, preventing them from retracting or rotating out of the microscopic field.
Step 4: Epineurial Dissection
Incise the epifascicular epineurium longitudinally, both proximally and distally, for a distance of 5 to 10 mm from the cut ends. Carefully peel back the epineurium to expose the underlying fasciculi. Excision of a small cuff of the redundant epineurium may be necessary to prevent it from interposing between the fascicles during repair.
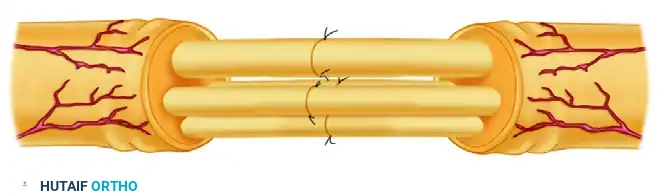
Step 5: Fascicular Coaptation
Approximate the corresponding fasciculi individually or in groups. Where the nerve is composed of multiple small fasciculi (polyfascicular), it is often more practical and biologically sound to approximate several fasciculi as a single group (group fascicular repair) rather than suturing every single micro-fascicle, which introduces excessive foreign body material.
Begin by passing the 10-0 nylon suture through the perineurium of the proximal fascicle. The bite should be approximately 1 to 2 mm from the cut edge, engaging only the perineurium and avoiding the delicate endoneurial contents.
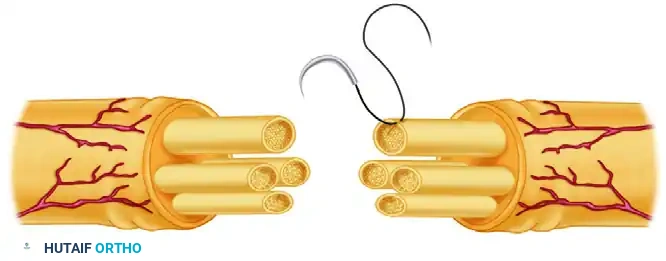
Carefully draw the suture through, ensuring it does not tangle. Next, pass the needle through the corresponding distal fascicle from inside to outside, maintaining the exact topographical alignment.
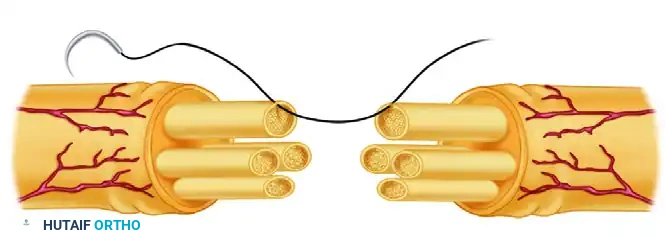
Tie the suture using a microsurgical instrument tie. The knot must be tied with just enough tension to approximate the fascicular ends without causing them to buckle or overlap. Typically, two to three interrupted 9-0 or 10-0 nylon sutures are required per fascicle or fascicular group to achieve a secure, gap-free coaptation.
Step 6: Epineurial Management
Once all fasciculi have been matched and approximated, the surgeon must decide how to manage the epineurium.
* Closure: If desired, the epineurium can be loosely closed over the repair site with a few interrupted 8-0 or 9-0 nylon sutures. This can provide additional mechanical stability.
* Omission of Closure: If the fascicular neurorrhaphy is highly secure and there is absolutely no tension on the repair, it is often preferable to omit the epineurial closure. Leaving the epineurium open decreases the amount of foreign body (suture) and reduces the risk of constrictive epineurial fibrosis, which can choke the regenerating axons.
Step 7: Hemostasis and Wound Closure
Ensure absolute hemostasis before closing the wound. Hematoma formation at the repair site will lead to severe scarring and failure of nerve regeneration. Close the soft tissues in layers, ensuring that the nerve repair is covered by a healthy, well-vascularized soft tissue bed (e.g., muscle belly). Avoid placing the repair directly under the skin incision.
POSTOPERATIVE PROTOCOL AND REHABILITATION
The success of a perineurial neurorrhaphy relies heavily on a disciplined, phased postoperative rehabilitation program.
Phase 1: Immobilization and Protection (Weeks 0-3)
- The extremity is immobilized in a custom orthosis or cast.
- The adjacent joints are positioned to minimize tension on the repair site (e.g., slight wrist and elbow flexion for a median nerve repair).
- Strict elevation is maintained to reduce edema.
Phase 2: Early Mobilization and Nerve Gliding (Weeks 3-6)
- The rigid splint is transitioned to a removable orthosis.
- Gentle, supervised active and active-assisted range of motion (ROM) is initiated.
- Nerve Gliding Exercises: These are critical to prevent the nerve from adhering to the surrounding scar tissue. Gliding must be introduced cautiously to avoid stretching the immature repair.
Phase 3: Strengthening and Sensory Re-education (Weeks 6 and Beyond)
- Progressive strengthening of the reinnervated musculature begins once clinical or electromyographic (EMG) evidence of motor recovery is noted.
- Sensory Re-education: As the advancing Tinel's sign progresses distally and protective sensation returns, formal sensory re-education protocols are initiated to help the brain reinterpret the altered afferent signals.
- Recovery is slow; axons regenerate at a rate of approximately 1 mm per day (or 1 inch per month). Patients must be counseled that maximal functional recovery may take 12 to 24 months, depending on the level of the injury.
COMPLICATIONS AND PITFALLS
- Tension at the Repair Site: The most common cause of failure. If the repair is under tension, ischemia and scar formation will block axonal crossing. Always default to a nerve graft if tension is present.
- Fascicular Mismatch: Incorrect rotational alignment leads to motor axons growing down sensory endoneurial tubes (and vice versa), resulting in poor functional recovery. Meticulous mapping is essential.
- Neuroma-in-Continuity: Caused by escaping axons at the repair site due to gapping, poor coaptation, or excessive scar tissue. This may require secondary exploration and neurolysis or revision grafting.
- Suture Granuloma: Excessive use of suture material or taking bites that are too large can incite a foreign body reaction. Use the minimum number of sutures necessary to achieve coaptation.
CONCLUSION
Perineurial (fascicular) neurorrhaphy represents the pinnacle of precision in peripheral nerve reconstruction. By respecting the intricate microanatomy of the nerve and adhering to strict microsurgical principles—namely, tension-free coaptation, accurate topographical alignment, and atraumatic tissue handling—the orthopedic surgeon can optimize the biological environment for axonal regeneration. While technically demanding, mastering this technique is essential for maximizing functional outcomes in complex peripheral nerve injuries.
