INTRODUCTION TO PELVIC RING DISRUPTIONS AND RESUSCITATION
Severe pelvic ring disruptions represent some of the most challenging and life-threatening injuries encountered in orthopedic trauma. High-energy blunt trauma often results in catastrophic disruption of the osteoligamentous pelvic ring, leading to massive retroperitoneal hemorrhage. The primary source of this bleeding is typically the presacral venous plexus and cancellous bone surfaces, though arterial injuries occur in approximately 10% of cases.
In the hemodynamically unstable patient, rapid mechanical stabilization of the pelvic volume is paramount. The Ganz Pelvic Clamp (or C-clamp) is a highly effective, life-saving resuscitation tool designed to apply direct compression across the posterior pelvic ring. By reducing the posterior diastasis, the clamp decreases pelvic volume, promotes the tamponade effect within the retroperitoneal space, and stabilizes the fracture fragments to facilitate clot formation.
Clinical Pearl: The pelvic clamp is specifically indicated for rotationally and vertically unstable pelvic fractures (Tile Type C / Young-Burgess APC-III or VS) with posterior ring disruption and hemodynamic instability. It is generally contraindicated in the presence of comminuted iliac wing fractures, as the pins require intact bone to achieve purchase and apply compression.
BIOMECHANICS OF THE PELVIC CLAMP
The biomechanical principle of the pelvic clamp relies on the application of a transverse compressive force directly across the sacroiliac (SI) joints or sacral fractures. Unlike anterior external fixators, which primarily stabilize the anterior ring and may inadvertently open the posterior ring if applied improperly, the C-clamp directly addresses the posterior pathology.
The pins are inserted into the dense bone of the posterior ilium (the gluteus medius pillar), allowing for the transmission of significant compressive forces. This direct posterior compression effectively closes the SI joint diastasis or sacral fracture, restoring the anatomical volume of the true pelvis and providing sufficient stability to allow for patient mobilization, nursing care, and concomitant life-saving procedures (e.g., laparotomy).
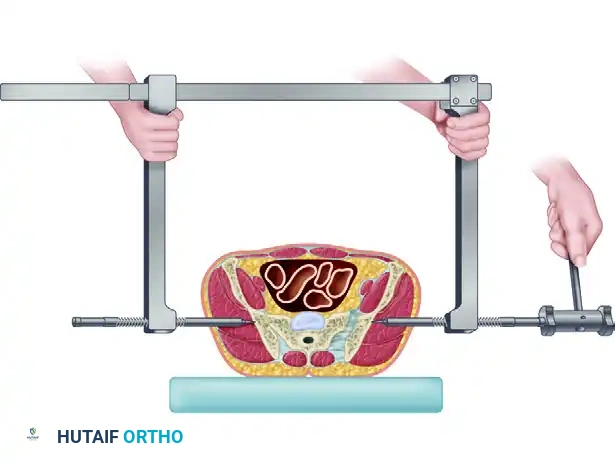
SURGICAL TECHNIQUE: APPLICATION OF THE GANZ PELVIC CLAMP
The application of the Ganz pelvic clamp must be executed rapidly and accurately. Familiarity with the anatomical landmarks is critical to avoid iatrogenic injury to the superior gluteal neurovascular bundle and the sciatic nerve.
Patient Positioning and Landmark Identification
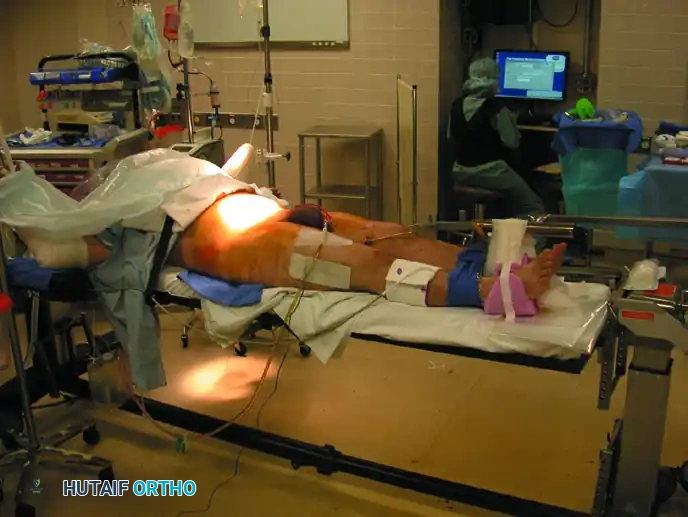
- Positioning: The patient is placed in the supine position on a radiolucent trauma bay stretcher or operating table. Ensure that the entire pelvis, lower abdomen, and bilateral lower extremities are accessible.
- Palpation: Carefully palpate the posterior superior iliac spine (PSIS) and the anterior superior iliac spine (ASIS).
- Trajectory Line: Draw an imaginary line connecting the PSIS and the ASIS.
- Entry Point: The optimal entry point for the Steinmann pins is located on this imaginary line, exactly 3 to 4 fingerbreadths anterolateral to the PSIS.
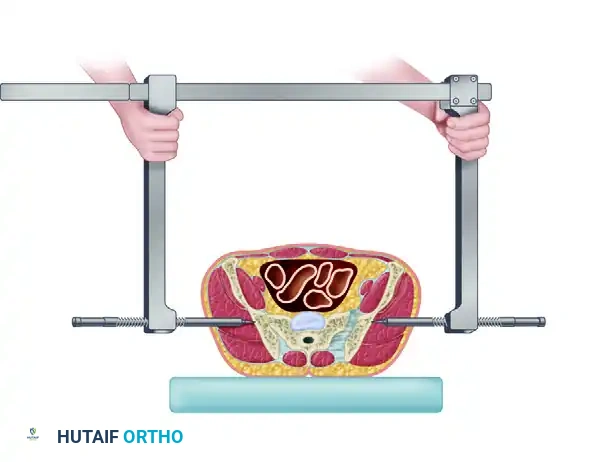
Surgical Warning: Do not make the entry point too distal or inferior to this designated zone. Placing the pins too distally endangers the superior gluteal vessels and the sciatic nerve as they exit the greater sciatic notch.
Pin Insertion and Frame Assembly
- Incision: Make a generous stab wound through the skin and fascia over each identified entry point. Use blunt dissection (e.g., with a hemostat) down to the outer table of the ilium to sweep away muscle tissue and protect neurovascular structures.
- Pin Placement: Insert the specialized Steinmann pins through the incisions until they contact the bone.
- Frame Assembly: Slide the side arms of the pelvic clamp over the pins. Ensure that the side arms can slide freely along the crossbar without binding.
- Seating the Pins: Once the pins are in contact with the correct anatomical location on the ilium, use a surgical mallet to drive the pins approximately 1 cm into the dense cancellous bone of the ilium. This ensures adequate purchase to withstand high compressive forces.
Applying Compression and Reduction Maneuvers
- Initial Contact: Slide the two side arms medially toward one another until the ends of the threaded bolts (which slide over the pins) come into direct contact with the bone.
- Compression: Drive the threaded bolts inward using the provided wrench. This action applies direct, powerful compression to the unstable hemipelvis, closing the posterior diastasis and stabilizing the posterior pelvic ring.
- Correcting Cranial Displacement: If the hemipelvis is vertically displaced (cranial migration), apply strong longitudinal traction to the ipsilateral leg before and during the application of compression.
- Correcting Dorsal Displacement: To correct posterior (dorsal) displacement of the hemipelvis, apply manual anterior traction using a T-handle attached to a Schanz pin placed percutaneously into the ASIS.
- Radiographic Confirmation: Check the reduction maneuvers radiographically using fluoroscopy (AP, Inlet, and Outlet views). If the patient is in extremis and requires immediate transfer to the OR for other procedures, obtain radiographs as soon as clinically feasible.
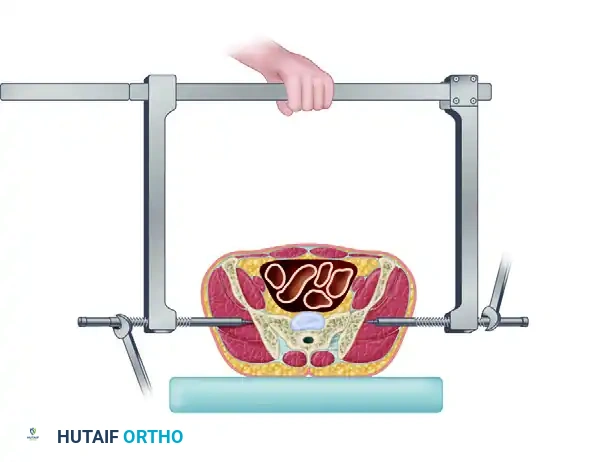
Advanced Configurations and Concomitant Procedures
- Oblique Configuration: The device can be applied in an oblique configuration by placing the Steinmann pin on the side of the stable hemipelvis into the ASIS, while the pin on the unstable side remains posterior. When tightened, this creates an anteriorly directed force vector on the unstable side, aiding in the reduction of a severely posteriorly displaced hemipelvis.
- Adjusting for Access: Once the clamp is secured, it may obstruct access to the abdomen or lower extremities.
- If an exploratory laparotomy is required, rotate the crossbar around the fixed axis of the Steinmann pins distally so that it rests over the patient's thighs.
- If a surgical procedure on the proximal femur or groin is required, rotate the crossbar cephalad so that it rests over the abdomen.
Post-Application Hemorrhage Control
If hemodynamic instability and hemorrhage are not controlled following the application of the pelvic clamp (or an anterior external fixator), immediate angiographic evaluation is indicated.
- Angioembolization: In approximately 10% of patients, a major arterial injury (e.g., superior gluteal, internal pudendal, or obturator artery) can be identified and treated effectively with selective embolization.
- Retroperitoneal Packing: As described by Osborn et al., preperitoneal pelvic packing should be strongly considered as an adjunct or alternative to angiography, particularly in centers where interventional radiology is not immediately available, or for patients requiring concurrent laparotomy.
Clinical Pearl: Leave the pelvic clamp in place until definitive internal fixation can be performed. The clamp should only be removed once the posterior fracture has been surgically exposed and provisional reduction clamps or pins are securely in place.
THE RECONSTRUCTIVE PHASE: DEFINITIVE MANAGEMENT
Once the patient has been adequately resuscitated and optimized, the focus shifts from life-saving provisional stabilization to definitive reconstructive surgery. The goal of the reconstructive phase is to restore the anatomical alignment of the pelvic ring, ensuring long-term biomechanical stability, minimizing pain, and maximizing functional outcomes.
Indications for Operative vs. Nonoperative Management
Nonoperative Management:
Stable, nondisplaced pelvic fractures—such as Tile Type A, or Young and Burgess Lateral Compression I (LC-I) and Anteroposterior Compression I (APC-I)—do not typically require operative stabilization. These injuries can be adequately managed with early mobilization, weight-bearing as tolerated, and multimodal analgesics.
Operative Management:
Historical studies evaluating the nonoperative treatment of displaced pelvic fractures (Tile Types B and C) using traction or pelvic slings demonstrated highly disappointing results. Nearly half of these patients suffered from moderate to severe chronic pain, significant limb-length discrepancies, and unacceptable rotational deformities, particularly those with displaced sacral fractures and sacroiliac dislocations.
Consequently, modern orthopedic trauma protocols advocate for a highly aggressive operative approach for unstable injuries. Operative reduction and stabilization are strictly indicated for:
- Rotationally unstable but vertically stable fractures (Tile Type B, Young and Burgess APC-II) with a pubic symphysis diastasis exceeding 2.5 cm.
- Pubic rami fractures with greater than 2 cm of displacement.
- Any rotationally unstable pelvic injury resulting in a limb-length discrepancy of more than 1.5 cm.
- Unacceptable pelvic rotational deformity.
- All vertically unstable injuries (Tile Type C, Young and Burgess VS).
Modalities of Anterior Fixation
Operative treatment of the anterior pelvic ring can be accomplished via several modalities:
1. Anterior External Fixation: Widely described for the definitive treatment of Tile Type B (APC-II) injuries. Normal function is generally maintained if an adequate reduction (< 1 cm displacement) is achieved. This method is particularly useful in patients with severe associated genitourinary or gastrointestinal injuries, significant contamination, or compromised soft tissue envelopes (e.g., Morel-Lavallée lesions) that preclude open anterior plating.
2. Retrograde Pubic Ramus Screws: Placed percutaneously or via an open technique. While minimally invasive, literature reports a 15% rate of loss of reduction, particularly in osteoporotic elderly patients or when screws are placed in a retrograde fashion without adequate fluoroscopic visualization.
3. Open Reduction and Internal Fixation (ORIF): The mainstay of definitive treatment for APC-II or APC-III injuries is ORIF of the pubic symphysis, provided the patient's clinical condition and soft tissues allow.
SURGICAL TECHNIQUE: ANTERIOR INTERNAL FIXATION (ORIF OF PUBIC SYMPHYSIS)
Anterior internal fixation provides superior biomechanical stability compared to external fixation and allows for direct anatomical reduction of the pubic symphysis. Tornetta, Dickson, and Matta reported excellent clinical outcomes, with 96% of patients experiencing no pain or pain only with strenuous activity following anterior plating of rotationally unstable, vertically stable fractures.
Patient Positioning and Preparation
- Positioning: The patient is placed supine on a radiolucent table. A Foley catheter is inserted to decompress the bladder and aid in identifying the urethra during dissection.
- Draping: The abdomen, pelvis, and bilateral thighs are prepped and draped widely to allow for extensile approaches if necessary.
Clinical Pearl: Matta and other leading pelvic surgeons do not consider the presence of a suprapubic catheter to be an absolute contraindication to anterior internal fixation. Early primary repair of bladder injuries is advocated to prevent contamination of the pelvic fracture hematoma. Meticulous surgical technique and isolation of the hardware can yield zero infection rates even in the presence of suprapubic catheters.
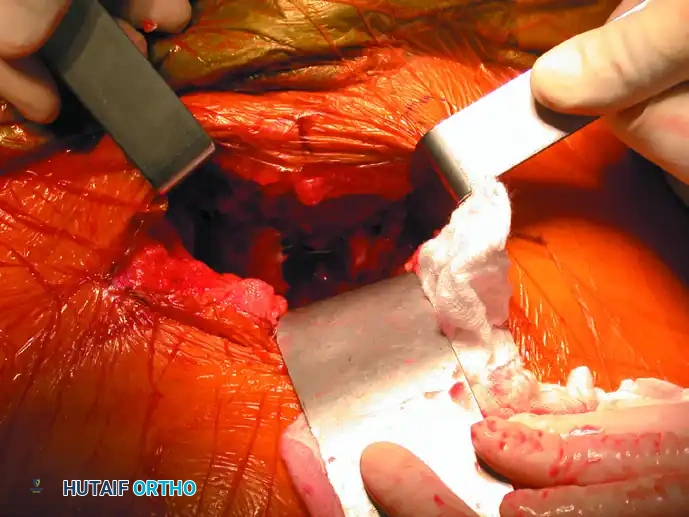
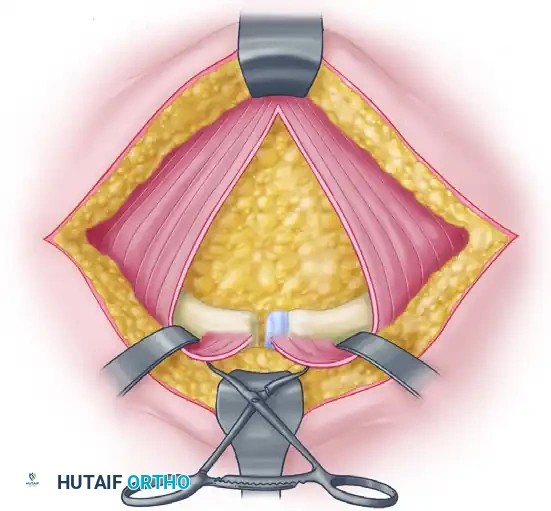
Surgical Approach (Pfannenstiel)
- Incision: A transverse Pfannenstiel incision is made approximately 2 cm superior to the pubic symphysis.
- Dissection: The subcutaneous tissues are divided to expose the rectus abdominis fascia. The fascia is incised longitudinally in the midline (linea alba).
- Retraction: The rectus abdominis muscles are gently retracted laterally. Care must be taken to protect the spermatic cord or round ligament. A self-retaining retractor is placed to maintain exposure of the retropubic space (Space of Retzius).
Reduction Techniques
- Debridement: The disrupted pubic symphysis is debrided of interposed soft tissue, hematoma, and the torn symphyseal disc to allow for anatomical bony apposition.
- Provisional Reduction: A Jungbluth or Weber pointed reduction clamp is applied. The tines of the clamp are placed into pre-drilled holes on the superior pubic rami or directly onto the bone anterior to the rectus muscle insertions.
- Compression: The clamp is tightened to reduce the symphyseal diastasis anatomically.
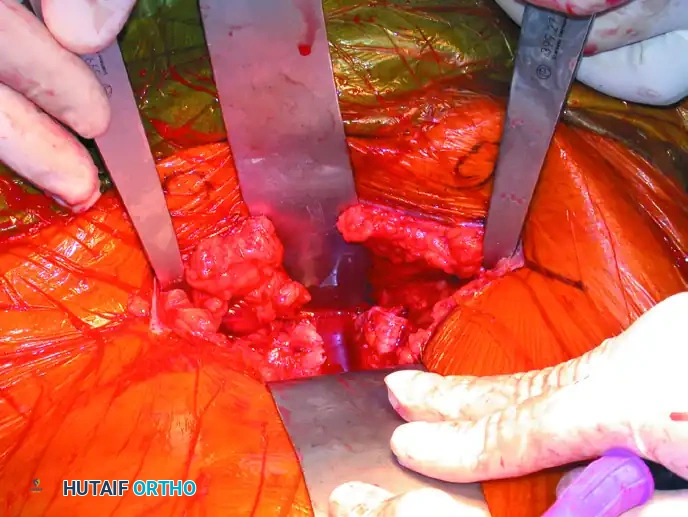
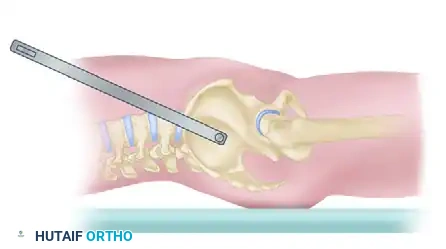
Plate Fixation
- Implant Selection: A single four-hole or six-hole 3.5-mm pelvic reconstruction plate is the implant of choice.
- Surgical Warning: Two-hole plates have demonstrated unacceptably high failure rates due to insufficient biomechanical leverage and pull-out strength, and their use is strongly discouraged.
- Contouring: The plate is carefully contoured to match the superior surface of the pubic rami.
- Fixation: The plate is secured with fully threaded 3.5-mm cortical screws. Ensure that the screws do not penetrate the hip joint or the obturator neurovascular bundle.
- Double Plating: In severe Type C injuries where posterior fixation is contraindicated due to posterior soft tissue degloving or contamination, Tile advocates for double plating of the symphysis (one superior plate and one anterior plate) to maximize anterior construct rigidity.
Closure and Postoperative Protocol
- Closure: The rectus fascia is closed meticulously with heavy, non-absorbable or slowly absorbable sutures to prevent postoperative hernias. The subcutaneous tissue and skin are closed in layers.
- Postoperative Care: Deep vein thrombosis (DVT) prophylaxis is initiated as soon as bleeding risk permits. Patients with isolated anterior ring fixation for APC-II injuries may be allowed protected weight-bearing, whereas those with combined anterior and posterior ring injuries (Type C) are typically restricted to touch-down weight-bearing on the affected side for 8 to 12 weeks to prevent hardware failure and loss of reduction.
By mastering both the acute application of the Ganz pelvic clamp and the definitive techniques of anterior internal fixation, the orthopedic surgeon can effectively navigate the complex continuum of care required for severe pelvic ring disruptions, ultimately saving lives and restoring function.
