Introduction to Onychocryptosis
Onychocryptosis, commonly referred to as an ingrown toenail, is a pervasive and debilitating condition frequently encountered in orthopaedic and podiatric practice. It predominantly affects the hallux and is characterized by the painful impingement of the lateral or medial nail plate into the adjacent paronychial soft tissues.
The operative treatment of ingrown toenails is fundamentally based on two distinct viewpoints of etiology:
1. The Nail is the Offender: This paradigm posits that an abnormally wide or excessively curved nail plate (e.g., pincer nail deformity) mechanically traumatizes the nail fold. Treatment under this philosophy requires the removal of all or part of the nail plate along with the corresponding germinal matrix to prevent recurrence.
2. The Soft Parts are Offended: This viewpoint suggests that hypertrophic, redundant soft tissue—often exacerbated by constrictive footwear or biomechanical abnormalities—engulfs a structurally normal nail. In this view, the nail folds are the primary offender, and surgical procedures are utilized to remove or debulk the hypertrophic paronychial soft tissue (e.g., the Vandenbos procedure).
Understanding these dual paradigms is critical for the orthopaedic surgeon, as procedure selection must be tailored to the patient's specific pathoanatomy to minimize recurrence and optimize functional outcomes.
Clinical Staging and Pathoanatomy
The management algorithm for onychocryptosis is heavily dictated by the clinical stage of the disease. The condition progresses through a well-defined continuum of inflammation, infection, and chronic fibrotic changes.
Stage I: The Inflammatory Stage
In the initial stage, the patient presents with mild erythema, slight edema, and pain with pressure applied to the lateral nail fold. The skin remains intact, and there is no purulent drainage. Conservative management is highly effective at this stage.
Stage II: The Abscess Stage
Stage II is a direct clinical advancement of Stage I and represents an acute localized infection. The erythema, edema, hyperhidrosis, and tenderness increase significantly. The inflamed paronychial nail fold hypertrophies and bulges over the rigid nail plate edge, acting as a mechanical barrier to healing.
At this juncture, drainage begins. At first, the drainage manifests as a thin, sticky, serous secretion. However, because of the abundance of microorganisms normally present on the pedal skin flora (predominantly Staphylococcus aureus and various Gram-negative bacilli), secondary bacterial infection rapidly follows. The drainage subsequently becomes frankly purulent and often emits a fetid odor. Walking becomes exceedingly difficult, and standard shoe wear is almost impossible due to extreme contact hypersensitivity.
Clinical Pearl: It is possible to treat Stage II nonoperatively in compliant patients. The initial protocol involves removing all mechanical pressure from the toe, including constrictive hosiery. The patient is instructed to soak the foot for 10 to 15 minutes in warm water (often with magnesium sulfate) four or five times a day.
During this acute abscess phase, the purulent drainage must be cultured, and bacterial sensitivities determined. A broad-spectrum oral antibiotic should be initiated empirically and tailored once culture results are finalized.
When the swelling recedes and the acute inflammation is controlled, the localized tenderness should decrease. At this point, the use of a mechanical barrier beneath the distal nail corner (as described in Stage I management) can be started.
Surgical Warning: Mechanical elevation or splinting must not be utilized if the purulent drainage has not stopped and the acute inflammation has not significantly decreased, as introducing a foreign body into an active abscess cavity will exacerbate the infection.
Stage III: The Granulation Stage
If Stage II is left untreated, chronic inflammation leads to the formation of epithelialized granulation tissue over the nail plate. This hypertrophic tissue prevents the nail from growing out normally and requires formal surgical excision.
Non-Operative and Semi-Operative Modalities
For patients in Stage I or resolving Stage II, several highly effective, minimally invasive techniques can be employed to alter the trajectory of the nail plate and decompress the paronychium. Cited advantages of splinting and orthonyxia techniques over formal operative treatment include significantly less postoperative morbidity, a shorter time to functional recovery, and superior cosmetic results.
Gutter Splinting Technique
The gutter splint technique involves the insertion of a sterile, longitudinally slit plastic tube (often fashioned from intravenous tubing) between the lateral nail margin and the inflamed paronychial fold.
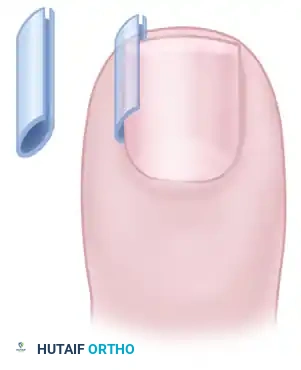
FIGURE 87-3: Gutter splint for treatment of ingrown toenail. The splint acts as a physical barrier, protecting the soft tissue from the sharp edge of the nail plate.
Technique:
1. Administer a digital ring block using 1% plain lidocaine to ensure patient comfort.
2. Gently elevate the offending lateral edge of the nail plate using a periosteal elevator or a flat spatula.
3. Measure and cut a piece of sterile vinyl IV tubing to the length of the lateral nail margin.
4. Slit the tubing longitudinally to create a "gutter."
5. Slide the gutter over the lateral edge of the nail plate, ensuring it extends proximally beneath the eponychium and distally beyond the hyponychium.
6. Secure the splint in place using cyanoacrylate adhesive or a secure steri-strip dressing.
7. The splint is left in place for 4 to 6 weeks until the nail has grown past the distal paronychial fold.
Orthonyxia (Nail Bracing)
Orthonyxia is a biomechanical intervention that utilizes tensioned devices to gradually correct the transverse overcurvature of the nail plate. It is highly effective for pincer nail deformities and recurrent onychocryptosis.
The devices consist of two hooks placed on the lateral and medial sides of the nail plate.
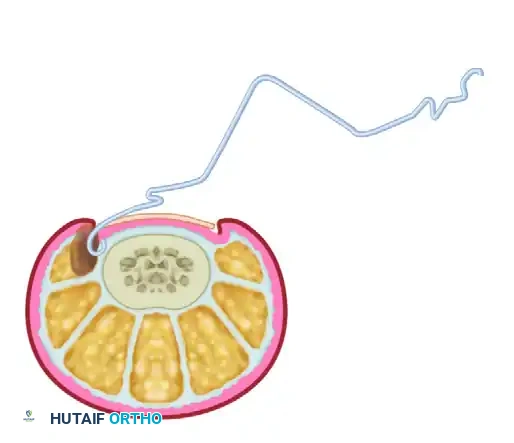
FIGURE 87-4 (A): Orthonyxia uses hooks placed on the sides of the nail. The hook engages the lateral margin of the nail plate without penetrating the sterile matrix.
Once the hooks are securely engaged, they are connected over the dorsal surface of the nail plate under tension. This tension is achieved using a central wire loop, "superelastic" nickel-titanium (Nitinol) wire, or shape-memory alloy segments.
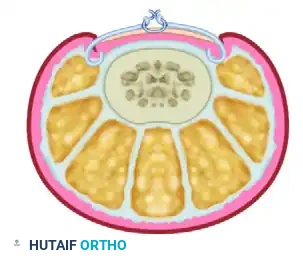
FIGURE 87-4 (B): The hooks are connected under tension. The continuous upward force gradually flattens the nail plate, relieving pressure on the paronychial folds.
Biomechanics and Outcomes:
The shape-memory wire exerts a continuous, low-grade tensile force that counteracts the pathological curvature of the nail. Correction of the nail deformity has been reported to occur within 3 weeks in most patients. Because the nail matrix is not surgically ablated, the anatomical integrity of the nail unit is preserved, making this an excellent option for patients prioritizing cosmesis or those with vascular comorbidities precluding formal surgery.
Formal Operative Management
When conservative measures fail, or when a patient presents with advanced Stage II or Stage III disease with significant granulation tissue, formal operative intervention is indicated. The gold standard procedure is the Partial Nail Avulsion with Chemical Matrixectomy (Winograd Technique variant).
Preoperative Preparation and Positioning
- Patient Positioning: The patient is placed in the supine position. The affected foot is extended over the edge of the operating table.
- Anesthesia: A digital ring block is performed at the base of the hallux. Inject 3 to 5 mL of 1% or 2% Lidocaine without epinephrine (or 0.5% Bupivacaine for prolonged postoperative analgesia) into the subcutaneous tissues surrounding the four digital nerves. Allow 10 to 15 minutes for complete anesthetic effect.
- Exsanguination and Tourniquet: Exsanguinate the digit by elevating it and wrapping it tightly with an Esmarch bandage or a sterile Penrose drain from distal to proximal. Secure the Penrose drain at the base of the digit with a hemostat to serve as a digital tourniquet. A bloodless field is absolute paramount for visualizing the germinal matrix.
- Preparation: The foot is prepped and draped in a standard sterile fashion using chlorhexidine or povidone-iodine.
Surgical Technique: Partial Nail Avulsion and Matrixectomy
This approach addresses the "nail as the offender" paradigm by permanently narrowing the nail plate.
Step 1: Nail Plate Separation
* Introduce a flat periosteal elevator or a Freer elevator beneath the eponychium (cuticle) on the affected side to separate the eponychium from the dorsal surface of the nail plate.
* Advance the elevator longitudinally beneath the nail plate to separate it from the underlying sterile matrix and the proximal germinal matrix. This must be done smoothly to avoid lacerating the highly vascular nail bed.
Step 2: Nail Plate Resection
* Utilize an English anvil nail splitter or heavy straight scissors to make a longitudinal cut through the nail plate. The cut should be placed approximately 3 to 4 mm from the lateral paronychial fold, ensuring the entire offending curvature is included.
* The cut must extend completely under the eponychium to the proximal edge of the nail root.
* Grasp the sectioned piece of nail with a straight hemostat. Apply a gentle, rolling motion toward the midline of the toe to avulse the nail fragment without tearing the proximal matrix.
Step 3: Debridement of Granulation Tissue
* If hypertrophic granulation tissue is present (late Stage II or Stage III), sharply excise it using a #15 scalpel blade or aggressively curette the tissue until healthy paronychial margins are established.
Step 4: Chemical Matrixectomy
* To prevent recurrence, the lateral horn of the germinal matrix must be destroyed.
* Thoroughly dry the surgical field using sterile cotton-tipped applicators. Blood will neutralize the chemical agent, leading to procedure failure.
* Apply 88% aqueous phenol to the matrix using a small cotton-tipped applicator. Insert the applicator under the eponychium and rotate it vigorously against the lateral matrix horn and the lateral nail fold.
* Apply the phenol for three consecutive cycles of 30 to 45 seconds each.
* Alternative: 10% Sodium Hydroxide can be used for 1 to 2 minutes, which some studies suggest causes less postoperative tissue necrosis.
Step 5: Neutralization and Closure
* Irrigate the area copiously with 70% isopropyl alcohol to neutralize the phenol, followed by sterile saline.
* Release the digital tourniquet and ensure adequate perfusion returns to the digit.
* Apply a non-adherent dressing (e.g., Adaptic or Xeroform), followed by sterile gauze and a compressive cohesive bandage.
Surgical Alternative: Soft Tissue Resection (Vandenbos Procedure)
In cases where the nail is structurally normal but the soft tissues are massively hypertrophied (the "soft parts are offended" paradigm), a Vandenbos procedure may be indicated.
- Technique: An elliptical incision is made encompassing the hypertrophic lateral nail fold. The incision is carried deep to the periosteum of the distal phalanx, completely excising the redundant soft tissue. The nail plate is left entirely intact. The wound is typically left open to heal by secondary intention, which results in a tightened, scarred lateral fold that pulls away from the nail plate.
Postoperative Protocol and Rehabilitation
Meticulous postoperative care is essential to prevent infection and ensure optimal healing following operative management of onychocryptosis.
- Immediate Postoperative Care: The patient is instructed to keep the foot elevated above the level of the heart for the first 24 to 48 hours to minimize edema and throbbing pain. Weight-bearing is permitted as tolerated in a rigid, open-toed postoperative shoe.
- Analgesia: Pain is typically well-managed with over-the-counter NSAIDs (e.g., Ibuprofen) or Acetaminophen. The prolonged effect of the Bupivacaine digital block significantly aids in immediate postoperative comfort.
- Wound Care: The initial bulky compressive dressing should remain intact and dry for 48 hours. After 48 hours, the patient removes the dressing and begins daily warm water and Epsom salt soaks (15 minutes, twice daily).
- Topical Therapy: Following each soak, the patient should apply a thin layer of topical antibiotic ointment (e.g., Mupirocin or Bacitracin) and cover the wound with a simple adhesive bandage.
- Healing Timeline: Chemical matrixectomy wounds typically exhibit mild serous drainage for 2 to 4 weeks as the chemically ablated tissue sloughs. Complete epithelialization occurs by 4 to 6 weeks.
- Follow-Up: Patients are typically reviewed in the clinic at 1 week to assess for signs of secondary infection and at 6 weeks to confirm complete healing and absence of recurrence.
Complications and Recurrence
When performed correctly, partial nail avulsion with chemical matrixectomy carries a recurrence rate of less than 5%. Potential complications include:
* Recurrence: Usually due to inadequate exsanguination during the procedure (blood neutralizing the phenol) or failure to completely avulse the proximal nail spicule.
* Infection: Postoperative cellulitis requires prompt initiation of oral antibiotics.
* Epidermal Inclusion Cyst: Can occur if fragments of the germinal matrix are left behind in the soft tissue.
* Chemical Burn: Excessive application of phenol without proper neutralization can lead to extensive necrosis of the paronychium and delayed wound healing.
By strictly adhering to the biomechanical principles of the nail unit and carefully selecting between conservative orthonyxia, splinting, or formal surgical matrixectomy, the orthopaedic surgeon can reliably eradicate the pathology and restore pain-free function to the patient.
