INTRODUCTION AND BIOMECHANICAL RATIONALE
The Achilles tendon is the largest and strongest tendon in the human body, capable of withstanding forces up to 10 times body weight during athletic activities. Despite its robust macroscopic structure, it is highly susceptible to rupture, particularly in the hypovascular "watershed" zone located 2 to 6 cm proximal to its calcaneal insertion.
While the management of acute Achilles tendon ruptures remains a topic of debate between operative and nonoperative protocols, open surgical repair is frequently indicated for young, active patients, high-level athletes, and individuals with delayed presentations or large gap defects. Open repair provides superior biomechanical construct stiffness, allows for precise anatomical restoration of the musculotendinous resting length, and historically demonstrates a statistically significant reduction in rerupture rates compared to conservative management.
This comprehensive guide details three foundational open surgical techniques: the primary end-to-end repair utilizing the Krackow locking stitch, the Lindholm gastrocnemius aponeurosis turndown flap for augmentation, and the Lynn plantaris tendon fanning technique.
SURGICAL ANATOMY AND VASCULAR CONSIDERATIONS
A profound understanding of the posterior ankle anatomy is paramount to executing a successful open repair while minimizing iatrogenic complications.
- Vascular Supply: The Achilles tendon lacks a true synovial sheath; instead, it is enveloped by a highly vascularized paratenon. The intrinsic blood supply is derived from the musculotendinous junction proximally and the osseous insertion distally. The mid-substance relies heavily on the extrinsic segmental vessels from the paratenon, supplied by the posterior tibial and peroneal arteries. Surgical dissection must meticulously preserve the paratenon to prevent tendon necrosis and delayed healing.
- Neural Anatomy: The sural nerve and lesser saphenous vein course along the posterolateral aspect of the calf. The nerve crosses the lateral border of the Achilles tendon approximately 9.8 cm (range, 7-13 cm) proximal to the calcaneal insertion. Consequently, surgical incisions are universally biased toward the posteromedial aspect to mitigate the risk of sural nerve entrapment or transection.
Clinical Pearl: The paratenon is the biological lifeline of the healing Achilles tendon. When performing the surgical approach, always elevate the skin, subcutaneous tissue, and paratenon as a single, full-thickness fasciocutaneous flap. "Skiving" through the subcutaneous fat devascularizes the skin edges and exponentially increases the risk of postoperative wound dehiscence and deep infection.
PREOPERATIVE PLANNING AND PATIENT POSITIONING
- Anesthesia: The procedure is typically performed under general anesthesia or regional anesthesia (spinal/epidural) combined with a popliteal sciatic nerve block for postoperative analgesia.
- Positioning: The patient is placed in the prone position on a radiolucent operating table. Chest rolls and pelvic supports are utilized to ensure adequate ventilation and prevent abdominal compression.
- Tourniquet: A well-padded pneumatic tourniquet is applied to the proximal thigh. Exsanguination is performed via elevation or an Esmarch bandage, and the tourniquet is inflated to 250–300 mm Hg.
- Preparation: The entire lower extremity from the toes to the mid-thigh is prepped and draped in a standard sterile fashion. The contralateral limb should be accessible for intraoperative comparison of resting equinus tension (the Matles test).
SURGICAL TECHNIQUE: OPEN REPAIR (KRACKOW ET AL.)
The Krackow locking stitch is the gold standard for tendon grasping. Its biomechanical superiority lies in its ability to convert longitudinal tension into transverse compression, securely gripping the longitudinal collagen bundles of the tendon without pulling through.
Incision and Dissection
- With the patient prone, palpate the tendon defect. Make a longitudinal posteromedial incision approximately 10 cm long.
- The incision should be placed about 1 cm medial to the palpable medial border of the tendon. Crucially, the distal extent of the incision must end proximal to where the shoe counter strikes the heel to prevent painful postoperative shoe-wear irritation.
- Sharply dissect through the skin and subcutaneous tissues directly down to the paratenon (tendon sheath).
- Incise the paratenon longitudinally. Reflect the tendon sheath contiguously with the subcutaneous tissue as a single, full-thickness flap. This technique is vital to minimize subcutaneous dissection and preserve the delicate vascular plexus supplying the skin edges.
Tendon Preparation and Core Suture Placement
- Identify the ruptured ends of the tendon. Hematoma and fibrinous debris within the defect should be meticulously irrigated and debrided to expose healthy, parallel collagen fibers.
- Approximate the ruptured ends of the tendon.
- Place a continuous locking suture (Krackow technique) along the medial and lateral borders of both the proximal and distal tendon stumps.
- Material Selection: The original text describes using a 2-0 nonabsorbable suture.
Surgical Warning: While historical texts reference 2-0 nonabsorbable sutures for the core repair, contemporary orthopedic practice heavily favors the use of #2 or #5 ultra-high-molecular-weight polyethylene (UHMWPE) braided sutures (e.g., FiberWire, Orthocord). These modern materials provide vastly superior tensile strength and resistance to elongation, allowing for more aggressive early rehabilitation protocols.
Repair Validation and Closure
- With the knee flexed to 90 degrees and the ankle held in resting gravity equinus (typically 15 to 20 degrees of plantarflexion to match the contralateral side), tie the core sutures securely.
- Check the repair for stability after the sutures are tied by gently ranging the ankle. The repair should move as a single, cohesive unit without gapping at the repair site.
- Close the peritenon (paratenon) and subcutaneous tissues meticulously with 4-0 absorbable sutures (e.g., Vicryl or Monocryl). A watertight closure of the paratenon is essential to prevent adhesions between the tendon and the overlying skin, and to restore the gliding mechanism.
- Close the skin using a non-strangulating technique (e.g., 3-0 nylon vertical mattress sutures or a subcuticular closure).
- Apply a sterile, non-adherent dressing. Immobilize the extremity in a posterior splint or a short-leg cast with the foot in gravity equinus to eliminate tension on the repair.
SURGICAL TECHNIQUE: GASTROCNEMIUS FLAP AUGMENTATION (LINDHOLM)
The Lindholm technique is an augmentation strategy utilized when the tendon ends are severely frayed, in cases of delayed presentation (chronic ruptures with a gap), or when the primary repair is deemed biomechanically tenuous. It utilizes vascularized turndown flaps from the proximal gastrocnemius aponeurosis to bridge defects and reinforce the repair site.
Incision and Exposure
- With the patient prone, make a posterior curvilinear incision extending from the midcalf down to the calcaneus. The curvilinear nature helps prevent scar contracture across the joint line.
- Incise the deep fascia in the midline to expose the tendon rupture and the proximal gastrocnemius-soleus complex.
- Thoroughly débride the ragged, necrotic ends of the tendon until healthy tissue is reached.
Primary Apposition
- Appose the tendon ends using a box-type mattress suture. The original technique advocates for heavy nonabsorbable suture material or surgical wire, supplemented by fine interrupted sutures at the epitenon level to tidy the repair site.
Flap Harvesting and Mobilization
- Move proximally to the gastrocnemius aponeurosis. Fashion two parallel fascial flaps from the proximal tendon and aponeurosis.
- Each flap should be approximately 1 cm wide and 7 to 8 cm long.
- Critical Step: Leave these flaps attached distally at a point exactly 3 cm proximal to the site of the rupture. This preserves their distal vascular tether.
Flap Inset and Closure
- Twist each flap 180 degrees on its own axis.
- Biomechanical Rationale: Twisting the flap ensures that its smooth, external (anterior) surface lies next to the subcutaneous tissue as it is turned distally over the rupture. This significantly reduces the risk of postoperative adhesions between the augmented tendon and the overlying skin.
- Turn the flaps distally over the rupture site. Suture each flap securely to the distal stump of the Achilles tendon and to one another, ensuring they completely cover and reinforce the site of rupture.
- Close the wound in layers, being exceptionally careful to approximate the tendon sheath (paratenon) over the site of repair to restore the gliding layer.
SURGICAL TECHNIQUE: PLANTARIS TENDON AUGMENTATION (LYNN)
The Lynn technique utilizes the plantaris tendon—a vestigial structure present in approximately 90% of the population—as an autologous biological membrane. This technique is highly advantageous as it provides robust biological augmentation without compromising the structural integrity of the gastrocnemius aponeurosis.
Plantaris Harvest and Preparation
- Following the primary suturing of the ruptured Achilles tendon (using the Krackow or similar core technique), identify the plantaris tendon. It is typically found running along the medial border of the Achilles tendon.
- Divide the plantaris tendon distally near its insertion on the calcaneus, maximizing the length of the harvested graft.
- Using smooth forceps and a scalpel, carefully tease and fan out the tubular plantaris tendon to form a broad, flat biological membrane.

Figure 48-17A: Lynn technique for repairing a fresh rupture of the Achilles tendon. The ruptured Achilles tendon has been primarily sutured. The plantaris tendon has been divided distally and is being meticulously fanned out to form a broad autologous membrane.
Membrane Application
- Place the fanned-out plantaris membrane directly over the primary Achilles tendon repair site.
- Suture the membrane in place circumferentially using fine absorbable or nonabsorbable sutures (e.g., 3-0 or 4-0).
- This membrane acts as a biological shield, reinforcing the repair, providing a scaffold for cellular ingrowth, and preventing adhesions to the overlying paratenon and skin.
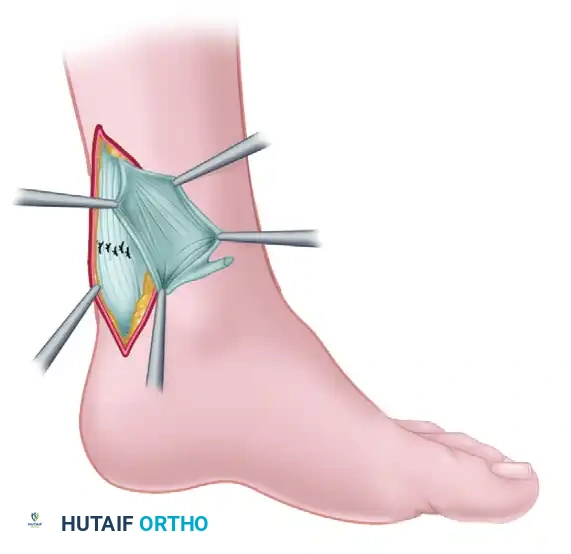
Figure 48-17B: The fanned-out plantaris tendon has been placed over the primary repair of the Achilles tendon and sutured securely in place, providing biological augmentation and a smooth gliding surface.
POSTOPERATIVE REHABILITATION PROTOCOL
The success of an open Achilles tendon repair is as dependent on the postoperative rehabilitation protocol as it is on the surgical execution. Modern protocols favor early functional rehabilitation to stimulate collagen cross-linking and prevent joint stiffness.
- Phase I: Maximum Protection (Weeks 0–2)
- The patient is strictly non-weight-bearing (NWB) on crutches.
- The limb is immobilized in a posterior splint or short-leg cast in 20 degrees of plantarflexion (gravity equinus).
- Strict elevation is mandated to control edema and protect the fragile skin incision.
- Phase II: Early Mobilization (Weeks 2–6)
- At 2 weeks, sutures are removed.
- The patient is transitioned to a controlled ankle motion (CAM) boot with 2 to 3 heel wedges (approximately 20-30 degrees of plantarflexion).
- Weight-bearing is progressively advanced as tolerated in the boot.
- Active plantarflexion and active-assisted dorsiflexion to neutral (0 degrees) are initiated out of the boot. Passive dorsiflexion is strictly prohibited to prevent stretching the repair.
- Phase III: Strengthening (Weeks 6–12)
- Heel wedges are sequentially removed (one every 1-2 weeks) until the foot is neutral in the CAM boot.
- Transition to regular footwear with a small silicone heel lift by week 8.
- Initiate progressive resistance exercises, focusing heavily on eccentric gastrocnemius-soleus strengthening.
- Proprioceptive training (BAPS board, single-leg stance) is commenced.
- Phase IV: Return to Sport (Months 4–6+)
- Progression to dynamic activities (jogging, plyometrics, cutting).
- Return to competitive sports is typically permitted when the patient achieves >90% limb symmetry index on functional testing (e.g., single-leg heel raise endurance, hop testing) and demonstrates no apprehension.
COMPLICATIONS AND AVOIDANCE STRATEGIES
- Wound Dehiscence and Infection: The posterior ankle has tenuous vascularity. Avoid excessive subcutaneous undermining. Always close the paratenon. If skin necrosis occurs, aggressive debridement and early involvement of plastic surgery for local rotational flaps or free tissue transfer may be required.
- Sural Nerve Injury: Manifests as numbness or painful neuromas along the lateral border of the foot. Strictly adhere to a posteromedial incision and avoid blind clamping of bleeding vessels in the posterolateral subcutaneous tissues.
- Rerupture: Occurs in 2-5% of open repairs. Usually the result of patient non-compliance, premature removal of heel wedges, or an aggressive unassisted dorsiflexion event. Emphasize patient education regarding the timeline of biological tendon healing.
- Tendon Elongation: Over-lengthening of the Achilles tendon results in a permanent decrease in plantarflexion push-off power. Always tension the repair with the knee flexed and the ankle in equinus, matching the resting tension of the contralateral limb.
