Introduction and Rationale
The open repair of acute Achilles tendon ruptures remains the definitive "gold standard" of operative treatment, particularly for high-demand, athletic individuals. Historically, open surgical intervention has consistently demonstrated a significantly lower rate of rerupture compared to nonoperative management, alongside a higher rate of return to pre-injury sports levels. Furthermore, the advent of modern, meticulous surgical techniques and accelerated functional rehabilitation protocols has drastically decreased the complication rates previously associated with open procedures, such as wound dehiscence and infection.
Advocates of the open repair approach emphasize that Achilles tendon injuries rarely present as clean, transverse lacerations. Instead, they frequently manifest as complex, obliquely oriented, "mop-end" tears with significant fraying and intratendinous degeneration. These complex rupture patterns cannot be adequately visualized, debrided, apposed, and repaired with percutaneous or minimally invasive techniques. Open repair allows for direct anatomical restoration of the musculotendinous unit, precise tensioning, and the application of augmentation techniques when tissue quality is compromised.
Surgical Anatomy and Biomechanics
A profound understanding of the Achilles tendon's anatomy and vascularity is paramount for successful surgical outcomes. The Achilles tendon is the largest and strongest tendon in the human body, formed by the confluence of the gastrocnemius and soleus muscles.
Crucially, the Achilles tendon lacks a true synovial sheath; instead, it is enveloped by a highly vascularized paratenon. This paratenon is responsible for supplying the majority of the extrinsic blood flow to the tendon. The intrinsic blood supply is derived from the musculotendinous junction proximally and the osteotendinous insertion at the calcaneus distally.
Surgical Warning: The region approximately 2 to 6 cm proximal to the calcaneal insertion represents a vascular "watershed" area. This zone relies heavily on the paratenon for perfusion and is the most frequent site of spontaneous rupture. Meticulous preservation and anatomical closure of the paratenon are non-negotiable steps to ensure adequate postoperative healing and prevent adhesion formation.
Preoperative Planning and Patient Positioning
Preoperative evaluation should include a thorough clinical examination (e.g., a positive Thompson test, palpable gap) and, if necessary, advanced imaging such as ultrasonography or magnetic resonance imaging (MRI) to delineate the extent of the rupture and the degree of tendon retraction.
- Anesthesia: The procedure is typically performed under general anesthesia or regional anesthesia (spinal or popliteal block), depending on patient comorbidities and anesthesiologist preference.
- Positioning: The patient is positioned prone on the operating table.
- Padding and Tourniquet: All bony prominences must be meticulously padded. A thigh tourniquet is applied to provide a bloodless surgical field.
- Limb Placement: The affected lower extremity is prepped and draped in a standard sterile fashion. The foot should be allowed to rest over the edge of the operating table, or a bolster should be placed beneath the distal tibia to allow for unrestricted intraoperative manipulation of the ankle joint, which is critical for assessing resting tendon tension.
Step-by-Step Surgical Technique
Incision and Superficial Dissection
With the patient prone and the tourniquet inflated, the surgical approach begins.
- Incision Placement: Make a posteromedial longitudinal incision, approximately 10 to 15 cm in length. The incision should be placed about 1 cm medial to the palpable medial border of the Achilles tendon. It should end just proximal to where the shoe counter strikes the heel to prevent postoperative friction.
- Rationale for Posteromedial Approach: The skin incision must be off-center (medial) to prevent later irritation by footwear directly over the tendon in the midline. Furthermore, a medial approach safely avoids the sural nerve and the lesser saphenous vein, which course along the posterolateral aspect of the ankle.
- Dissection: Carry the incision sharply through the skin and subcutaneous tissues. It is imperative to create full-thickness fasciocutaneous flaps.
- Paratenon Exposure: Incise the tendon sheath (paratenon) longitudinally. Reflect the paratenon together with the subcutaneous tissue as a single layer.
Clinical Pearl: Minimize subcutaneous dissection between the skin and the paratenon. Stripping the subcutaneous tissue compromises the delicate vascular plexus supplying the skin edges, significantly increasing the risk of postoperative wound necrosis and infection.
Tendon Preparation and Core Suture Placement
Once the paratenon is reflected, the ruptured ends of the Achilles tendon are exposed. The hematoma is evacuated, and the frayed, degenerative "mop-ends" of the tendon are carefully debrided to healthy, viable collagenous tissue.
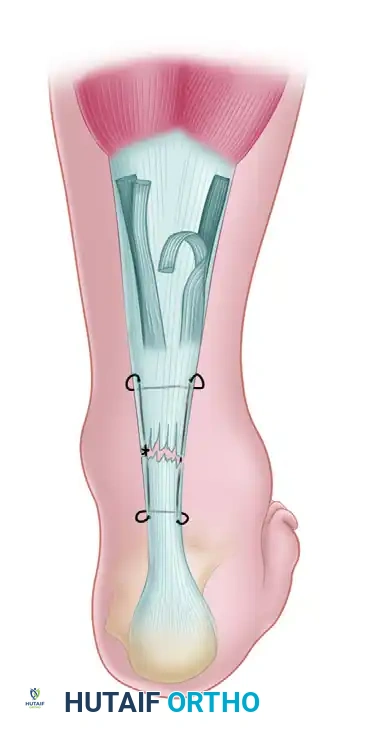
- Suture Selection: Approximate the ruptured ends of the tendon using a heavy, No. 5 nonabsorbable tension suture (e.g., braided polyester or ultra-high-molecular-weight polyethylene).
- Core Suture Technique: A modified Kessler stitch or a multi-strand Krackow locking stitch is utilized. The suture should be passed through the proximal and distal stumps approximately 2.5 cm from the rupture site to ensure adequate purchase in healthy tendon substance. The Krackow technique is particularly favored in modern orthopaedics as its locking loops prevent the suture from pulling out of the longitudinally oriented collagen fibers under tension.
- Tensioning and Approximation: To tie the core suture, the foot must be placed in the correct physiological position. Plantar flex the foot 0 to 5 degrees and flex the knee 15 degrees. This position mimics the resting tension of the gastrocnemius-soleus complex. Approximate the ends of the tendon by tying the tension suture securely.
- Peripheral Epitenon Repair: After the core tension is established, place the frayed ends of the tendon in as nearly normal a position as possible. Repair the peripheral rupture site with multiple 2-0 absorbable sutures (e.g., Vicryl) anteriorly and posteriorly to smooth the repair site and improve the gliding surface.
Augmentation Techniques
In cases of delayed presentation, severe tendinosis, or poor tissue quality, the primary repair may require biological augmentation to provide additional mechanical strength and a scaffold for healing.
Plantaris Tendon Augmentation (Lynn Technique)
The plantaris tendon, present in approximately 90% of individuals, serves as an excellent autograft for augmenting the Achilles repair.
- Harvesting: Identify the plantaris tendon, which lies medial and deep to the proximal Achilles tendon. Use a standard tendon stripper to harvest the plantaris tendon, releasing it as far proximally as possible at its muscle belly. Lay the harvested graft aside in a saline-moistened sponge.
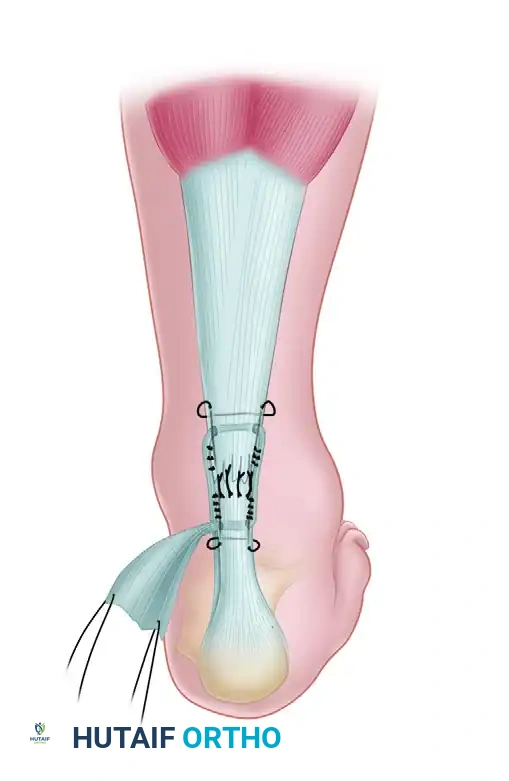
- Weaving the Graft: Place the previously harvested plantaris tendon in a large fascial needle. Pass it circumferentially through the Achilles tendon, first through the posterior aspect and then through the anterior part of the tendon, approximately 2 cm proximal and distal to the rupture site. This weaving technique acts as a biological internal splint.

- Securing the Graft: Use multiple 2-0 absorbable sutures to tack the plantaris tendon securely to the Achilles tendon. As described by Lynn, the distal portion of the plantaris tendon is usually broad and long enough to be fanned out and tacked over the posterior aspect of the repair, providing a smooth, robust biological shield over the primary suture line.
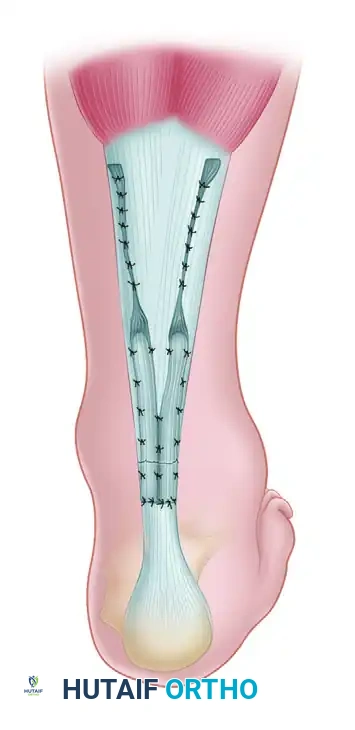
Gastrocnemius Fascial Flap (Lindholm Technique)
If the plantaris tendon is absent or insufficient, or if a larger defect exists, the Lindholm technique utilizing gastrocnemius fascial turn-down flaps is an excellent alternative.
- Flap Creation: Two parallel strips of fascia, approximately 1 to 1.5 cm wide and 7 to 8 cm long, are sharply dissected from the proximal gastrocnemius aponeurosis. These flaps are left attached distally, just proximal to the rupture site.
- Flap Rotation: The fascial flaps are then turned down 180 degrees to bridge the rupture site.

- Flap Fixation: The turned-down flaps are sutured to the distal Achilles stump and to each other across the midline using interrupted 2-0 absorbable sutures. This technique not only reinforces the repair biomechanically but also brings healthy, vascularized tissue into the watershed zone to promote healing.
Closure and Immobilization
Meticulous closure is as critical as the tendon repair itself.
- Paratenon Closure: Close the fascial sheath (paratenon) meticulously over the repaired tendon using 2-0 or 3-0 absorbable sutures. A watertight closure of the paratenon is vital to restore the gliding mechanism, prevent adherence of the tendon to the overlying skin, and re-establish the extrinsic blood supply.
- Superficial Closure: Close the subcutaneous tissues with 2-0 or 3-0 absorbable sutures, ensuring the knots are buried. Close the skin with nonabsorbable monofilament sutures or surgical staples, depending on surgeon preference and skin edge viability.
- Dressing and Casting: Apply a sterile, non-adherent dressing. Immobilize the limb in a short-leg cast or a rigid posterior slab with the foot in gravity equinus (approximately 20 to 30 degrees of plantar flexion) to remove all tension from the repair site.
Postoperative Protocol and Accelerated Rehabilitation
Historically, Achilles tendon repairs were immobilized in rigid casts for up to 8 weeks. However, contemporary evidence strongly supports accelerated functional rehabilitation. Controlled, early mobilization stimulates mechanotransduction, promoting tenocyte proliferation, parallel collagen fiber realignment, and ultimately, a stronger tendon with a lower risk of elongation.
The following protocol represents a modern, evidence-based approach to postoperative rehabilitation:
Phase 1: Maximum Protection (0 to 2 Weeks)
- Immobilization: The patient is placed in a posterior slab or splint in gravity equinus immediately postoperatively.
- Weight Bearing: Strict non–weight bearing (NWB) with the use of crutches.
- Goals: Wound healing, edema control, and pain management.
Phase 2: Early Mobilization (2 to 4 Weeks)
- Immobilization: Transition to an Aircast walking boot equipped with a 2-cm heel lift to maintain slight plantar flexion and protect the repair.
- Weight Bearing: Protected weight bearing with crutches.
- Range of Motion (ROM): Initiate active plantar flexion and active dorsiflexion to neutral only. Inversion and eversion exercises are permitted below neutral. Passive dorsiflexion is strictly prohibited.
- Therapy Modalities: Modalities to control swelling (cryotherapy). Incision mobilization modalities (e.g., gentle friction massage, ultrasound) may be initiated if deemed necessary by the physical therapist to prevent scar tethering.
- Conditioning: Knee and hip exercises with no ankle involvement (e.g., straight leg raises). Non–weight-bearing cardiovascular exercises (e.g., stationary bicycling with the uninjured leg, deep-water running). Hydrotherapy may begin once the incision is fully healed and watertight.
Phase 3: Progressive Weight Bearing (4 to 6 Weeks)
- Immobilization: Continue use of the Aircast walking boot with the 2-cm heel lift.
- Weight Bearing: Progress to weight bearing as tolerated (WBAT) while in the boot.
- Therapy: Continue active ROM and proximal joint strengthening. Patients are required to wear the boot while sleeping to prevent sudden passive dorsiflexion during rest.
Phase 4: Strengthening and Proprioception (6 to 8 Weeks)
- Immobilization: Remove the heel lift from the boot. The foot is now at neutral within the orthosis.
- Weight Bearing: Full weight bearing as tolerated in the boot.
- ROM: Slowly initiate gentle, controlled dorsiflexion stretching.
- Strengthening: Begin graduated resistance exercises, incorporating both open and closed kinetic chain functional activities.
- Proprioception: Initiate proprioceptive and gait training (e.g., weight-shifting, balance board in boot).
- Conditioning: Cardiovascular exercises including WBAT activities (e.g., bilateral stationary bicycling, elliptical machine, walking on a treadmill).
Phase 5: Weaning and Advanced Function (8 to 12 Weeks)
- Immobilization: Gradually wean off the walking boot. Transition to supportive athletic footwear, potentially with a small, temporary silicone heel cup.
- Assistive Devices: Return to crutches or a cane temporarily during the weaning phase if gait mechanics are poor, then gradually discontinue.
- Therapy: Continue to aggressively progress range of motion, isotonic and isokinetic strength, and proprioception. Emphasize eccentric strengthening of the gastrocnemius-soleus complex, which is critical for tendon remodeling.
Phase 6: Return to Sport (> 12 Weeks)
- Goals: Retrain strength, power, and muscular endurance.
- Advanced Exercises: Increase dynamic weight-bearing exercises. Introduce plyometric training (e.g., jumping, bounding) once baseline strength is achieved (typically >80% of the contralateral limb).
- Sport-Specific Training: Begin cutting, pivoting, and sport-specific drills. Full return to competitive sports is generally anticipated between 6 to 9 months postoperatively, contingent upon passing functional criteria and isokinetic strength testing.
Clinical Pearl: Throughout the rehabilitation process, the physical therapist must closely monitor the resting tension of the Achilles tendon. If the patient develops excessive passive dorsiflexion compared to the contralateral side, rehabilitation must be slowed to prevent permanent elongation of the repair, which leads to a devastating loss of push-off power.
