Introduction to Open Anterior Acromioplasty
Open anterior acromioplasty remains a cornerstone procedure in operative orthopedics, primarily indicated for the surgical management of refractory subacromial impingement syndrome and as an essential adjunct during open rotator cuff repairs. Originally popularized by Charles Neer in 1972, the procedure aims to alter the morphology of the coracoacromial arch, thereby expanding the subacromial space and eliminating mechanical friction against the rotator cuff tendons.
While arthroscopic techniques have gained immense popularity, the open approach remains highly relevant, particularly for massive, retracted rotator cuff tears requiring open mobilization, revision surgeries, or cases involving severe heterotopic ossification and complex acromial morphology. Mastery of this technique requires a profound understanding of shoulder biomechanics, precise soft-tissue handling, and meticulous osseous resection to prevent devastating complications such as anterior deltoid detachment.
Pathoanatomy and Biomechanics
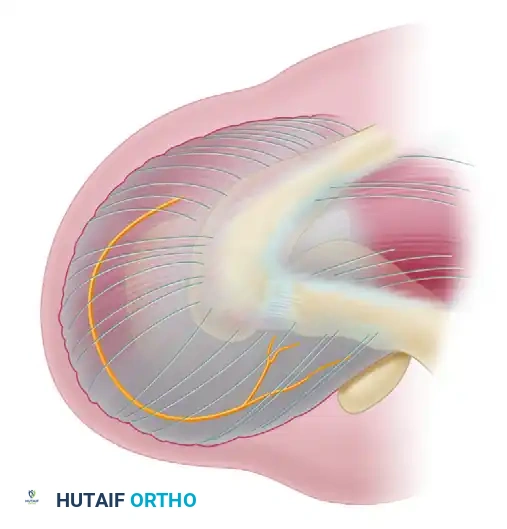
The subacromial space is defined superiorly by the coracoacromial arch—comprising the acromion, the coracoid process, and the coracoacromial (CA) ligament—and inferiorly by the humeral head and the superior aspect of the rotator cuff.
Impingement typically occurs when the rotator cuff tendons (most commonly the supraspinatus) and the subacromial bursa are compressed against the anteroinferior aspect of the acromion and the CA ligament during shoulder elevation and internal rotation.
Acromial Morphology
Acromial shape plays a critical role in the pathogenesis of impingement. Bigliani and Morrison classified acromial morphology into three distinct types based on sagittal plane imaging:
* Type I (Flat): Minimal risk of impingement.
* Type II (Curved): Parallel to the humeral head, moderate risk of impingement.
* Type III (Hooked): Features an anterior hook that significantly narrows the subacromial space, highly associated with full-thickness rotator cuff tears.
The primary objective of an anterior acromioplasty is to convert a Type II or Type III acromion into a Type I (flat) morphology, thereby increasing the clearance for the rotator cuff during dynamic overhead motion.
Preoperative Evaluation and Imaging
A thorough preoperative assessment is mandatory to differentiate primary subacromial impingement from secondary impingement (e.g., glenohumeral instability, scapular dyskinesia) or intrinsic rotator cuff tendinopathy.
Radiographic Assessment
Standard radiographic evaluation should include:
* True Anteroposterior (Grashey) View: Assesses glenohumeral joint space and superior migration of the humeral head (indicative of massive cuff tears).
* Scapular Y View: Evaluates acromial morphology and anterior/posterior humeral head translation.
* Supraspinatus Outlet View: The definitive view for assessing the Bigliani acromial type and identifying subacromial spurring.
* Axillary Lateral View: Essential for evaluating the acromioclavicular (AC) joint and identifying os acromiale.
Advanced Imaging (MRI)
Magnetic Resonance Imaging (MRI) is the gold standard for evaluating the integrity of the rotator cuff and the degree of muscle degeneration.
Clinical Pearl: The duration of rotator cuff disease directly correlates with the extent of fatty degeneration. Moderate supraspinatus fatty infiltration typically appears an average of 3 years after symptom onset, while severe infiltration appears at an average of 5 years. Early operative intervention—when tears are small and muscle degeneration is minimal—yields significantly superior functional outcomes.
Goutallier Classification of Fatty Infiltration:
* Stage 0: Normal muscle, no fat.
* Stage 1: Some fatty streaks.
* Stage 2: Less fat than muscle.
* Stage 3: Equal amounts of fat and muscle.
* Stage 4: More fat than muscle.
Surgical Anatomy and The Axillary Nerve
A profound respect for the axillary nerve is paramount during the open approach. The axillary nerve branches from the posterior cord of the brachial plexus, traverses the quadrangular space, and courses circumferentially around the surgical neck of the humerus.
It innervates the deltoid and teres minor muscles. The nerve runs approximately 5 to 7 cm distal to the lateral border of the acromion. Therefore, any deltoid-splitting incision must be strictly limited to 5 cm or less distal to the acromial border to prevent catastrophic iatrogenic denervation of the anterior deltoid.
Step-by-Step Surgical Technique
1. Patient Positioning and Anesthesia
The procedure is typically performed with the patient in the beach-chair position, flexed to approximately 45 to 60 degrees. This position allows for excellent visualization of the anterior acromion and facilitates dynamic intraoperative testing of shoulder range of motion. An interscalene regional nerve block combined with general anesthesia is highly recommended to optimize postoperative pain control and minimize intraoperative bleeding through controlled hypotension.
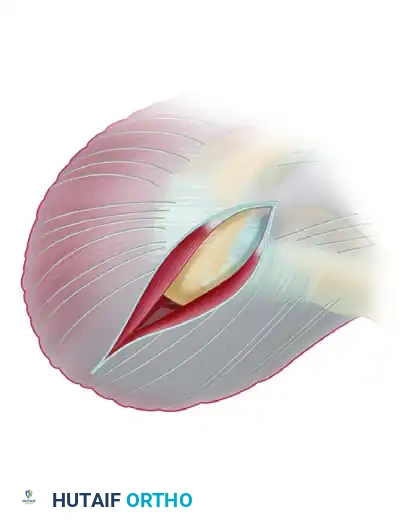
2. Surgical Approach and Incision
- Center the incision over the anterolateral corner of the acromion.
- Extend the incision medially over the superior surface of the acromion toward the AC joint, and distally down the lateral aspect of the arm for approximately 4 to 5 cm.
- Sharply incise the skin and subcutaneous tissues down to the deltoid fascia.
Surgical Warning: When splitting the deltoid muscle fibers distally, strictly adhere to the 5 cm rule. Place a stay suture at the inferior apex of the deltoid split to prevent inadvertent distal propagation of the split during retraction, which could compromise the axillary nerve.
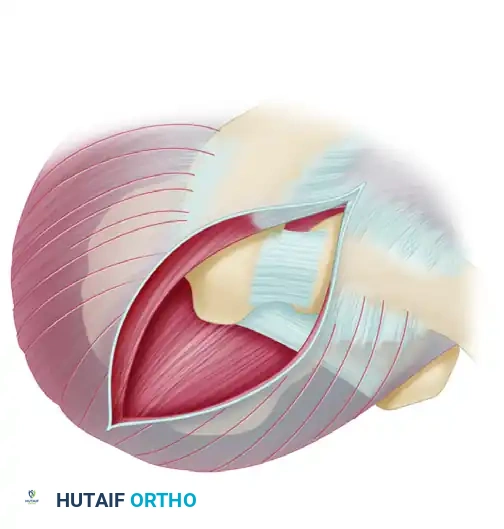
3. Deltoid Elevation and Exposure
The management of the deltoid origin is the most critical soft-tissue step of the procedure. The deltoid can either be left attached (deltoid-splitting approach) or detached from the anterior acromion. For a formal open acromioplasty, elevating a robust deltoid flap is often necessary.
- Elevate a continuous flap of the anterior deltoid origin, maintaining its continuity with the superior acromial periosteum and the trapezius insertion.
- Carry this elevation approximately 2 cm onto the superior acromial surface.
- Extend the dissection medially as far as the AC joint. The anterior capsule of the AC joint is usually included within this flap.
- Extend the elevation 1 cm along the lateral border of the acromion.
Clinical Pearl: Use electrocautery with a fine Bovie needle to elevate the periosteum. This technique ensures a thicker, more robust tissue flap compared to sharp dissection with a scalpel. A secure, thick cuff of tissue is absolutely mandatory for later closure; failure to achieve a secure deltoid repair will result in a disastrous loss of active forward elevation.
4. Coracoacromial Ligament and Bursa Resection
- Once the anterior limb of the deltoid elevation is complete, identify the coracoacromial (CA) ligament spanning from the coracoid process to the anteroinferior acromion.
- Resect the CA ligament using electrocautery. The acromial branch of the thoracoacromial artery is contained within this ligament; using electrocautery ensures immediate hemostasis.
- With the subacromial space exposed, perform a thorough subacromial bursectomy. Remove all adhesions and hypertrophic bursal tissue from the undersurface of the acromion and the superficial surface of the rotator cuff.
Differentiating Bursa from Rotator Cuff:
The hypertrophied bursa can be remarkably thick and is easily mistaken for the rotator cuff tendon.
* Bursa: Unilaminar appearance, continuous with the acromial undersurface.
* Rotator Cuff: Multilaminar appearance. As demonstrated by Clark and Harryman, the rotator cuff tendons consist of five distinct histological layers with complex interdigitations.
5. The Acromioplasty Osteotomy
The goal of the osteotomy is to remove the anterior hook and flatten the undersurface of the acromion.
- Use a curved, blunt Hohmann or a malleable retractor placed in the subacromial space to depress the humeral head and physically shield the underlying rotator cuff tendons from the saw blade.
- Identify the portion of the acromion that projects anterior to the anterior border of the clavicle.
- Using an oscillating saw, begin the osteotomy at the anterosuperior aspect of the acromion.
- Direct the cut posteriorly and inferiorly, exiting through the junction of the anterior and middle thirds of the acromion. The cut should encompass the entire anterior acromion from medial to lateral.
Surgical Warning: An oscillating saw is strongly preferred over an osteotome. Osteotomes offer less control and carry a significant risk of propagating an unintended fracture line into the posterior acromion or the scapular spine.
- Following the primary resection, use a motorized burr or a coarse rasp to smooth any remaining rough osseous edges on the acromial undersurface, ensuring a perfectly flat, Type I morphology.
6. Management of the Acromioclavicular (AC) Joint
- Palpate the undersurface of the AC joint. Inferior osteophytes from the AC joint can cause secondary impingement on the supraspinatus muscle belly.
- Remove any inferior bony spurs with a rongeur or burr.
- Distal Clavicle Excision: If preoperative radiographs and clinical symptoms indicate severe, symptomatic AC joint osteoarthritis, a distal clavicle excision (Mumford procedure) may be performed concomitantly.
- Resect the distal 1.0 to 1.5 cm of the lateral clavicle.
- Crucial Constraint: Do not extend the clavicular resection beyond 1.5 cm. Excessive resection violates the coracoclavicular (CC) ligaments (conoid and trapezoid), leading to iatrogenic distal clavicle instability.
- Leave the superior AC joint capsule intact to facilitate robust deltoid repair in this region.
7. Rotator Cuff Inspection and Management
Before closure, the entire rotator cuff must be meticulously inspected.
* Internally and externally rotate the arm to visualize the entire bursal surface of the supraspinatus and infraspinatus.
* The area just proximal to the supraspinatus insertion on the greater tuberosity is the most common site for tears. Palpate this critical zone for thinning, which may indicate a concealed articular-sided partial-thickness tear.
Classification of Rotator Cuff Tears:
* Cofield Classification (by size): Small (<1 cm), Medium (1-3 cm), Large (3-5 cm), Massive (>5 cm).
* Partial-Thickness Tears: Can be articular-sided, bursal-sided, or intratendinous. Clinical studies indicate that articular-sided tears constitute up to 91% of partial tears in young, overhead athletes. We recommend classifying partial tears based on depth (less than or greater than 50% of tendon thickness) to guide treatment. Tears >50% generally warrant completion and formal repair.
* If severe degeneration or a full-thickness tear is identified, proceed with a formal rotator cuff repair, securing the tendon to a bleeding bone trough on the greater tuberosity using suture anchors or a transosseous equivalent technique.
8. Irrigation and Deltoid Closure
- Copiously irrigate the subacromial space with sterile saline to remove all bone debris, which can act as a nidus for heterotopic ossification.
- Deltoid Reattachment: The repair of the deltoid to the acromion is the most critical step of the closure.
- If a robust periosteal sleeve was maintained, a side-to-side repair with heavy non-absorbable sutures (e.g., #2 FiberWire or Ethibond) may be sufficient.
- Preferred Method: We highly recommend repairing the deltoid directly to the acromion through transosseous drill holes. Pass heavy, non-absorbable sutures through 2.0 mm drill holes placed 1 cm posterior to the anterior edge of the resected acromion. Tie these securely over the deltoid fascia.
- Close the subcutaneous tissue and skin in a routine, layered fashion.
Postoperative Rehabilitation Protocol
A well-structured rehabilitation program is vital to prevent stiffness while protecting the deltoid repair.
- Phase 1 (Weeks 0-1): The arm is supported in a clinical sling. Pendulum exercises are initiated on postoperative day 1 to prevent adhesive capsulitis.
- Phase 2 (Weeks 1-3): Passive range of motion (ROM) exercises are introduced, focusing on passive abduction, forward elevation, and internal/external rotation. The sling is gradually discarded as patient comfort allows.
- Phase 3 (Weeks 3-6): Active-assisted and active ROM exercises are initiated.
- Phase 4 (Weeks 6+): Progressive isotonic strengthening of the rotator cuff and periscapular stabilizers begins. Heavy lifting and overhead sports are restricted until 3 to 4 months postoperatively.
Complications and Pitfalls
While generally safe, open anterior acromioplasty carries specific risks that the orthopedic surgeon must meticulously avoid.
1. Loss of Anterior Deltoid Function
Without question, the most devastating complication is the loss of anterior deltoid function. This results in profound weakness in forward elevation and a cosmetically apparent defect. It is caused by either:
* Axillary Nerve Injury: Due to splitting the deltoid further than 5 cm distal to the acromion.
* Failed Deltoid Repair: Due to inadequate tissue flaps or failure to use transosseous drill holes. Very little can be done surgically to salvage a chronically detached, retracted deltoid muscle.
2. Acromial Fracture
Aggressive osteotomies, particularly those utilizing an osteotome rather than an oscillating saw, can propagate fractures into the posterior acromion or scapular spine. Over-resection of the acromion can also weaken the bone, leading to postoperative stress fractures.
3. General Surgical Complications
Other potential complications include superficial or deep surgical site infections, seroma or hematoma formation, synovial fistulas, long head of the biceps tendon rupture, pulmonary embolism, and Complex Regional Pain Syndrome (CRPS).
Furthermore, poor patient motivation or non-compliance with the structured rehabilitation program frequently leads to clinical failure characterized by persistent pain and profound glenohumeral stiffness.
