INTRODUCTION TO THUMB KINEMATICS AND PARALYSIS
The human thumb is a biomechanical marvel, responsible for approximately 40% to 50% of overall hand function. Its unique spatial orientation allows for complex prehension, primarily driven by the synergistic actions of opposition and adduction. When peripheral nerve injuries—specifically median and ulnar nerve palsies—compromise the intrinsic musculature of the thenar web, the resulting functional deficit is profound. Patients lose the ability to perform power pinch, precision handling, and grasp, leading to severe occupational and daily living limitations.
Surgical restoration of these functions requires a deep understanding of thumb kinematics, precise vector mechanics, and meticulous soft-tissue handling. This masterclass details the premier tendon and muscle transfer techniques utilized to restore thumb opposition (via the Abductor Digiti Quinti transfer) and thumb adduction (via FDS, Brachioradialis, or ECRB transfers).
Biomechanics of the Thumb Ray
To accurately reconstruct thumb motion, the surgeon must first understand the planes of movement relative to the palm.
As illustrated in the biomechanical model above:
* Adduction and Abduction: Occur in a plane perpendicular to the palm.
* Flexion and Extension: Occur in a plane parallel to the palmar surface.
* Pronation and Supination: Represent rotation of the thumb around its longitudinal axis.
* Opposition: A complex, multi-planar composite movement consisting of abduction, flexion, and pronation of the first metacarpal, coupled with flexion and abduction of the proximal phalanx and extension of the distal phalanx.
When the adductor pollicis is paralyzed (typically due to ulnar nerve palsy), the biomechanical balance is disrupted. The patient attempts to compensate during power pinch by utilizing extrinsic muscles.
This compensatory mechanism manifests clinically as two classic signs:
1. Froment Sign: The interphalangeal (IP) joint of the thumb becomes hyperflexed as the flexor pollicis longus (FPL) attempts to substitute for the adductor pollicis to produce pulp pinch.
2. Jeanne Sign: The metacarpophalangeal (MCP) joint becomes hyperextended secondary to unbalanced extensor forces (EPL and EPB) acting without the stabilizing volar flexion moment normally provided by the intrinsic muscles.

Clinical Pearl: The presence of a severe Jeanne sign indicates profound intrinsic minus status at the MCP joint. When planning an adductor transfer, the surgeon must ensure the transfer vector provides a stabilizing flexion moment at the MCP joint to prevent persistent hyperextension during pinch.
MUSCLE TRANSFER (ABDUCTOR DIGITI QUINTI) TO RESTORE OPPOSITION
When standard motor units (such as the FDS or EIP) are unavailable due to multi-nerve trauma, brachial plexus injury, or when they must be preserved for other reconstructive priorities, the Abductor Digiti Quinti (ADQ) muscle transfer, originally described by Littler and Cooley, is an elegant and highly effective solution.
Rationale and Advantages
The ADQ is an exceptional substitute for the paralyzed abductor pollicis brevis (APB) for several reasons:
* Biomechanical Match: Its muscle mass, cross-sectional area, and excursion are remarkably similar to those of the APB.
* Vector Efficiency: Unlike many other opposition transfers, the ADQ transfer does not require the creation of a fascial or ligamentous pulley. Its anatomical origin on the pisiform provides an ideal direct line of pull toward the thumb MCP joint.
* Cosmesis: The bulk of the transferred ADQ muscle belly fills the hollow space left by the wasted thenar muscles, significantly improving the aesthetic appearance of the paralyzed hand.
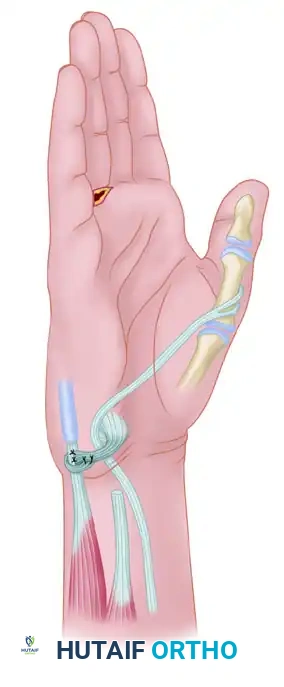
Surgical Technique: Littler and Cooley ADQ Transfer
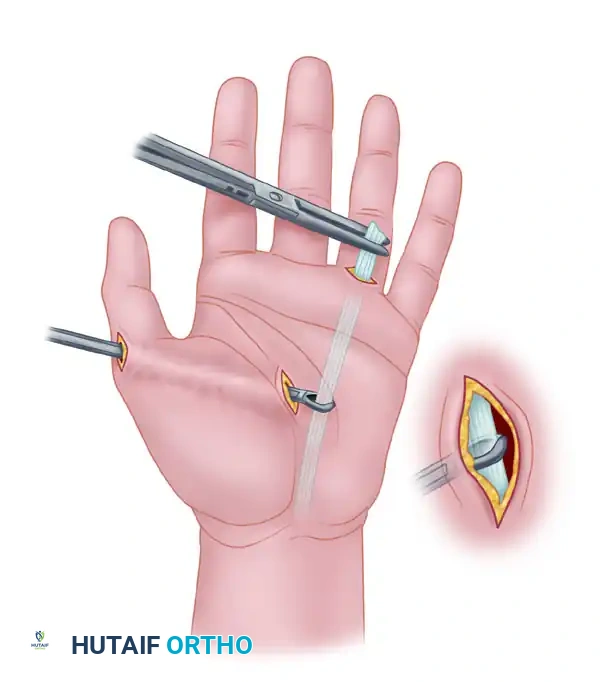
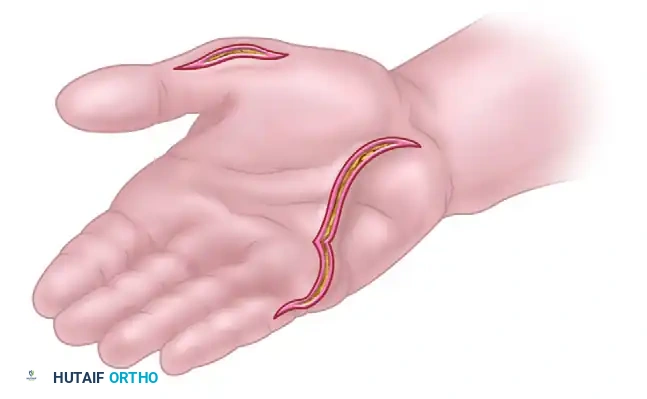
1. Incision and Exposure
Make a curved palmar incision along the radial border of the abductor digiti quinti muscle belly. This incision should extend from the proximal side of the pisiform, coursing distally to the ulnar border of the little finger.
2. Distal Mobilization
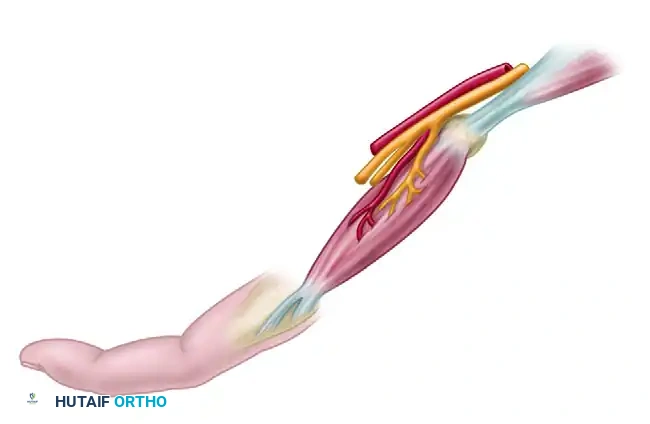
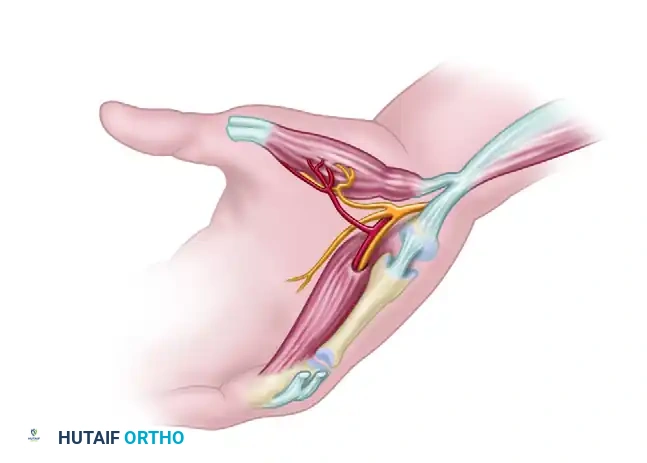
Identify and free both tendinous insertions of the ADQ muscle. The muscle has a bifurcated insertion: one slip attaches to the extensor expansion of the little finger, and the other attaches to the base of the proximal phalanx.
3. Neurovascular Isolation
Carefully lift the muscle from its fascial compartment. The critical step here is the identification and preservation of its neurovascular bundle, which enters the muscle on its deep, proximal surface.
Isolate the bundle with extreme care. The venous drainage is particularly fragile; venous congestion is a primary cause of transfer failure.
4. Proximal Release
Free the origin of the muscle from the pisiform bone. Crucial Step: Retain the muscle's origin on the flexor carpi ulnaris (FCU) tendon. This retained attachment preserves the proximal blood supply and provides a stable anchor point for the transfer.
5. Subcutaneous Tunneling
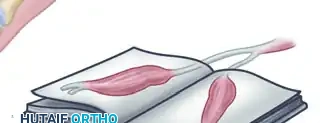
Make a second curved incision on the radial border of the thenar eminence. Using blunt dissection, create a wide subcutaneous pocket across the palm to receive the transferred muscle belly. The tunnel must be capacious to prevent any compression of the muscle or its pedicle.
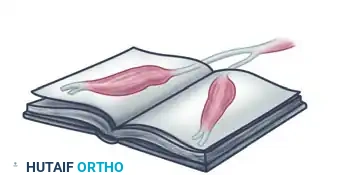
6. Muscle Transposition
Fold the mobilized ADQ muscle over approximately 170 degrees. Littler famously described this maneuver as turning the muscle "like a page of a book."
Pass the folded muscle subcutaneously through the prepared palmar pocket to the thumb.
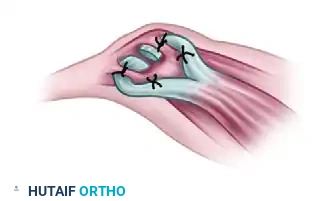
7. Insertion and Tensioning
Suture the two tendinous insertions of the ADQ to the insertion footprint of the abductor pollicis brevis. Tension should be set with the thumb in full palmar abduction and opposition, and the wrist in neutral to slight flexion.
Surgical Warning: Throughout the transposition and suturing process, continuously verify that the neurovascular pedicle is neither kinked, stretched, nor compressed. Undue tension will lead to ischemic necrosis of the transferred muscle.
8. Closure and Immobilization
Close the skin without tension. Apply a carefully formed, lightly compressive dressing. Immobilize the hand in a volar plaster splint, holding the thumb in maximum abduction and opposition, with the wrist in slight flexion to relieve tension on the transfer.
RESTORATION OF ADDUCTION OF THE THUMB
Isolated loss of thumb adduction severely compromises key pinch strength. While opposition transfers (like the ADQ or FDS to APB) restore the spatial positioning of the thumb, they do not provide the sheer power required for forceful adduction against the index finger.
If adduction alone is absent (as in an isolated ulnar nerve palsy), restoring thumb abduction is unnecessary. However, the adductor transfer should ideally be combined with a procedure to restore index finger abduction (e.g., ECRB to first dorsal interosseous) to provide a stable post for the thumb to pinch against.
Surgical Options for Adductor Restoration
Several robust transfers have been devised to restore adduction. The choice depends on available donor motors and the specific vector required.
1. The Boyes Transfer (Brachioradialis or ECRB)
If a strong, expendable wrist motor is available, the brachioradialis or one of the radial wrist extensors (ECRL or ECRB) can be utilized. Because these muscles lack sufficient excursion to reach the thumb directly, they must be lengthened by a free tendon graft (often palmaris longus or plantaris).
The lengthened tendon is routed palmarward through the third interosseous space and carried across the palm to be inserted into the tendon of the adductor pollicis. This provides a direct, transverse line of pull that perfectly mimics the transverse head of the adductor pollicis.
2. The Brand Transfer
Another alternative utilizes the extensor carpi radialis brevis (ECRB) routed dorsally and then through the intermetacarpal space to provide an adduction vector.
3. The Royle-Thompson / Groves & Goldner Transfer (FDS Routing)
If both adduction and opposition are absent (combined median and ulnar palsy), a single tendon transfer can be modified to restore both. By locating the pulley more distally (using the transverse carpal ligament or palmar fascia rather than the pisiform), the transfer vector provides both opposition and adduction.
The technique described by Groves and Goldner utilizes the Flexor Digitorum Sublimis (FDS) of the ring finger, combined with an FCU to ECU transfer to stabilize the wrist.
Surgical Technique: FDS Transfer for Adduction (Groves & Goldner)
1. Incisions and Exposure
Make two incisions at the wrist: one volar and one ulnar.
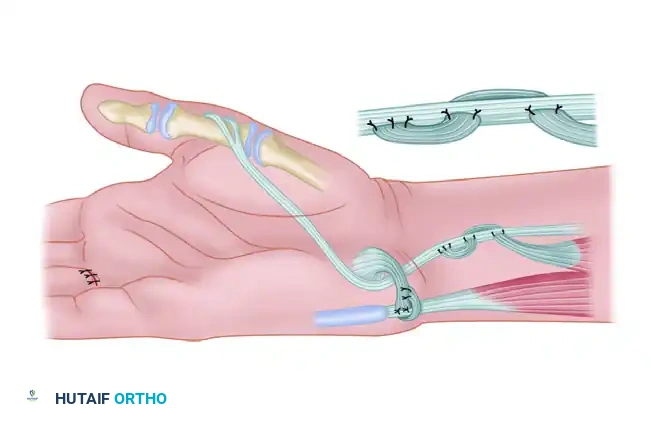
Through the volar incision, expose the FDS tendon to the ring finger and the FCU tendon. Through the ulnar incision, expose the extensor carpi ulnaris (ECU).
2. Wrist Stabilization (Optional but Recommended)
Divide the FCU tendon approximately 4 cm proximal to its insertion on the pisiform. Suture the free end of the distal segment to the ECU. This tenodesis prevents radial deviation of the wrist during forceful pinch.
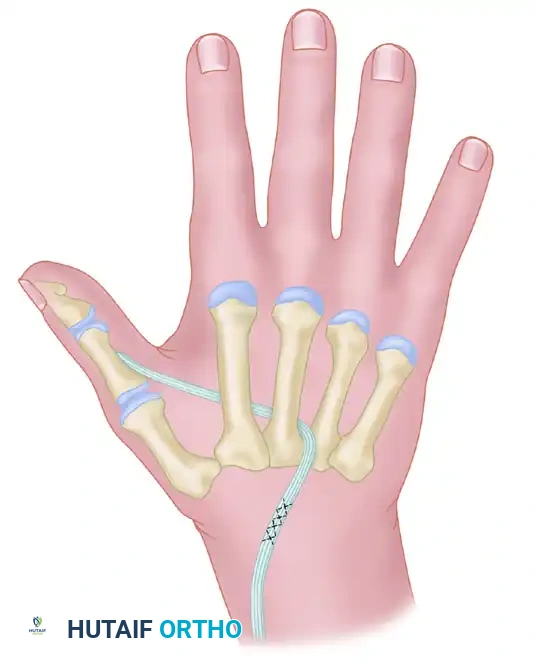
3. FDS Harvest
Expose the FDS tendon to the ring finger through a transverse incision at the proximal flexor crease of the digit. Divide its two slips just proximal to Camper's chiasm.
4. Proximal Delivery and Routing
Draw the divided FDS tendon proximally into the volar wrist wound.
Thread the tendon through a constructed pulley (often a window in the transverse carpal ligament or palmar fascia) to direct its vector transversely across the palm. Pass it through the subcutaneous tissue to the metacarpophalangeal joint of the thumb.
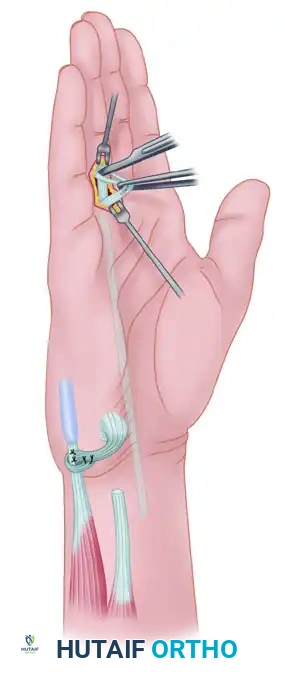
5. Distal Fixation
Secure the two slips of the transferred FDS tendon to the base of the proximal phalanx of the thumb.
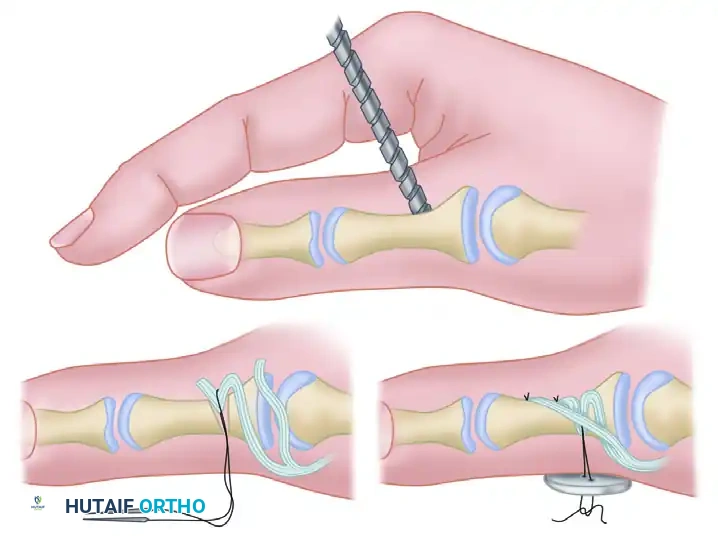
To achieve rigid fixation, drill a hole through the proximal phalanx in an ulnar-to-radial direction. Enlarge the hole on the ulnar side to accept the loop of one tendon slip. Secure this slip with a pull-out suture over a button on the radial side.
6. Tensioning and Proximal Suture
After the transfer has been secured to the thumb phalanx, adjust the tension. The thumb should rest in a posture of adduction and slight flexion. Finally, suture the proximal segment of the previously divided FCU tendon to the transferred FDS tendon to augment motor power.
Pitfall: Failure to adequately tension the FDS transfer will result in a lag during active adduction. The tendon must be woven and sutured under moderate tension with the wrist in neutral and the thumb fully adducted against the index metacarpal.
POSTOPERATIVE PROTOCOL AND REHABILITATION
The success of any tendon or muscle transfer in the hand relies heavily on a disciplined, phased postoperative rehabilitation program.
Phase I: Immobilization (Weeks 0-4)
* The hand and wrist are immobilized in a custom thermoplastic splint or cast.
* For opposition transfers (ADQ): The wrist is held in 10-15 degrees of flexion, with the thumb in maximum palmar abduction and opposition.
* For adduction transfers (Boyes/FDS): The wrist is held in neutral, with the thumb adducted against the radial border of the index finger.
* Strict elevation is maintained to minimize edema, which can compromise the microvascular circulation of the transferred muscle.
Phase II: Early Active Motion (Weeks 4-6)
* The rigid cast is removed, and a removable protective splint is fabricated.
* The patient begins gravity-eliminated, active range of motion (AROM) exercises.
* Motor Re-education: This is the most critical phase. The patient must be taught to fire the donor muscle to achieve the new desired movement. For example, in an FDS ring finger transfer, the patient is instructed to "flex the ring finger" to initiate thumb adduction. Biofeedback and mirror therapy are highly effective adjuncts.
* Passive stretching of the transfer is strictly prohibited.
Phase III: Strengthening and Integration (Weeks 6-12)
* The protective splint is gradually weaned during the day.
* Progressive resistance exercises are initiated.
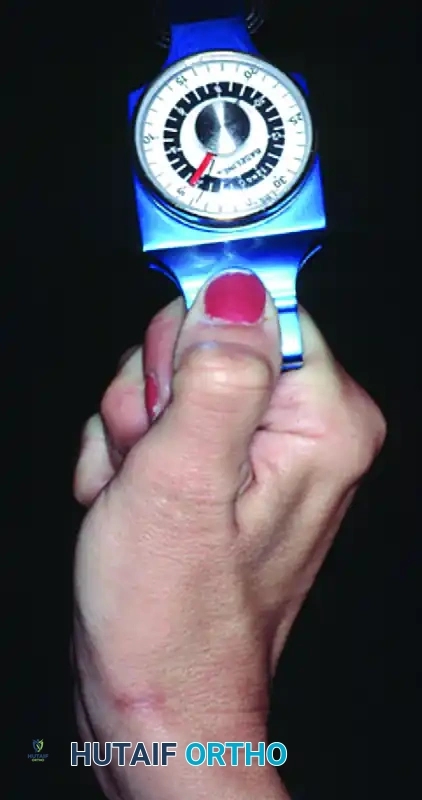
* Pinch meters and putty are used to build key pinch and tip pinch strength.
* Patients are monitored for the recurrence of Froment or Jeanne signs, which may indicate stretching or failure of the transfer.
* Full unrestricted activity is typically permitted by 12 weeks postoperatively, provided that dynamic stability and strength have been adequately restored.
By adhering to these precise biomechanical principles and meticulous surgical techniques, the orthopedic surgeon can reliably restore functional prehension, significantly improving the quality of life for patients suffering from devastating intrinsic hand paralysis.
===END===
