POSTOPERATIVE MONITORING IN MICROVASCULAR SURGERY
The survival of replanted digits and vascularized free tissue transfers hinges on meticulous, continuous postoperative monitoring. The primary objective is the early detection of vascular compromise—either arterial inflow occlusion or venous outflow obstruction—before irreversible ischemic necrosis occurs. Currently available monitoring techniques encompass a broad spectrum of technologies, including ultrasound and laser Doppler scanning, digital plethysmography, radioisotope clearance assays, fluorescein perfusion monitoring, transcutaneous oxygen tension monitoring, and photoplethysmography.
Despite the advent of complex technological modalities, continuous temperature monitoring remains the most widely utilized, reliable, and simplest method for assessing the perfusion status of replanted digits and vascularized free flaps.
Continuous Temperature Monitoring Protocols
The physiological basis of temperature monitoring relies on the direct correlation between capillary perfusion and surface skin temperature. To establish an accurate hemodynamic profile, a standardized three-probe system is strictly required:
- Probe 1 (Target): Secured directly to the replanted digit or the skin paddle of the free flap.
- Probe 2 (Control): Placed on an adjacent, non-operated digit or a contralateral corresponding anatomical site to serve as a physiological baseline.
- Probe 3 (Ambient): Positioned on the external bandage to monitor the ambient room temperature, which can artificially skew surface readings.
Normative Values and Ischemic Thresholds:
The normal digital temperature in a well-perfused extremity ranges from 30°C to 35°C. In a successful replantation or free flap, the target tissue temperature should consistently remain within 2°C to 3°C of the control digit.
🚨 SURGICAL WARNING: The 30°C Threshold
If the absolute temperature of the replanted digit or flap decreases to less than 30°C, or if the differential between the target and control exceeds 3°C, thrombosis on the arterial or venous side is highly probable. Immediate reexploration of the anastomoses must be considered to salvage the tissue.
Clinical Assessment of Ischemia
Mechanical and electronic monitoring devices are adjuncts to, not replacements for, rigorous clinical examination. If sufficient clinical signs of ischemia accompany the indications of a mechanical monitoring device, the patient must be returned to the surgical suite immediately for exploration of the anastomoses.
Clinical Indicators of Arterial Thrombosis (Inflow Failure):
* The flap or digit appears pale or stark white.
* Capillary refill is completely absent.
* Tissue turgor is decreased (flaccid).
* Pinprick Test: Puncturing the flap with a No. 11 blade yields no bright red bleeding.
Clinical Indicators of Venous Thrombosis (Outflow Failure):
* The flap appears cyanotic, violaceous, and congested.
* Capillary refill is excessively brisk (less than 1 second) initially, progressing to absent as congestion worsens.
* Tissue turgor is significantly increased (swollen and tense).
* Pinprick Test: Puncturing the flap yields a rapid, dark, deep purple ooze.
Surgical Salvage and Reexploration
Time is the most critical variable in flap salvage. Once thrombosis is identified, the patient is returned to the operating room.
Arterial Thrombosis Protocol:
If arterial thrombosis is identified, the arterial anastomosis and at least one venous anastomosis must be excised. Excising the venous anastomosis prevents the "no-reflow" phenomenon and allows for the assessment of capillary perfusion across the flap once the arterial anastomosis is revised. The arterial repair is repeated, and the flap is observed for hyperemic flush.
Venous Thrombosis Protocol:
If venous thrombosis is the primary pathology, excising the venous anastomosis is the first step. The surgeon must allow free bleeding from the flap for several minutes. This controlled exsanguination clears microvascular thrombi and metabolic byproducts (lactic acid, potassium) from the congested capillary beds. Satisfactory flap perfusion and adequate back-bleeding must be confirmed before repeating the venous repair.
💡 CLINICAL PEARL: Vessel Tension and Torsion
If vessel torsion or tension is found to have caused thrombosis over a segment of the vessel, primary re-anastomosis will inevitably fail. Interpositional vein grafting (e.g., reversed saphenous vein graft) is strictly required to bridge the defect without tension and salvage the flap.
Postoperative Mobilization
Mobilization of the reconstructed part is commensurate with the recipient site requirements and the nature of the transferred tissue.
* Soft Tissue Cover: If a simple fasciocutaneous or cutaneous flap has been provided, mobilization can commence as soon as wound healing and edema permit, typically within 7 to 10 days.
* Vascularized Bone or Muscle: If vascularized bone (e.g., free fibula) or functioning free muscle has been transferred, mobilization is dictated by the requirements of osseous union or tendon repair protocols.
* Free Muscle Transfers: Patients with free muscle transfers (e.g., gracilis or latissimus dorsi) routinely return to the operating room at 2 to 3 days for planned reevaluation, necessary debridement, and split-thickness skin grafting over the muscle belly.
THE FREE GROIN FLAP (ILIOFEMORAL FLAP)
The iliofemoral pedicle flap, originally popularized by McGregor and Jackson, has a storied history in reconstructive surgery, particularly for the upper extremity. Following the landmark 1973 report by Daniel and Taylor describing its successful use as a microvascular free flap, it became a workhorse for complex coverage problems across the head, neck, trunk, and extremities.
Indications and Applications
While its use in hand reconstruction is well-documented, the free groin flap is particularly suited for coverage of massive defects around the elbow. In the lower extremity, it is highly beneficial for the coverage of the exposed tibia and complex soft tissue avulsions in the foot, especially over the heel pad. Furthermore, in composite defects requiring structural support, the underlying iliac crest can be harvested in continuity with the groin flap, utilizing either the superficial circumflex iliac artery (SCIA) or the deep circumflex iliac artery (DCIA).
Biomechanical Advantages and Disadvantages
Advantages:
* Potentially massive skin paddle size, capable of covering extensive defects.
* Location in an anatomical region with sparse hair distribution.
* Minimal donor site morbidity, with primary closure often possible even for large flaps, leaving a concealed scar.
* Presence of multiple arterial and venous systems allowing for versatile design.
* The potential for incorporating vascularized bone (iliac crest) with the overlying skin.
Disadvantages:
* Excessive flap thickness, particularly in obese patients, requiring secondary debulking procedures.
* Poor color matching for head, neck, and distal extremity reconstruction.
* A notoriously short and unpredictable vascular pedicle.
* High technical difficulty in the dissection of the small-caliber vessels.
* Lack of satisfactory sensory innervation (non-sensate flap).
* Risk of pedicle damage from previous surgical procedures in the inguinal region (e.g., herniorrhaphy).
Primarily due to its short and highly variable vascular pedicle, the free groin flap has lost some of its initial popularity, often being superseded by the anterolateral thigh (ALT) or radial forearm free flaps.
VASCULAR ANATOMY OF THE GROIN FLAP
A profound understanding of the inguinal vascular anatomy is mandatory for the safe harvest of the groin flap. The iliofemoral flap receives its principal arterial supply from the superficial circumflex iliac artery (SCIA), which branches directly from the femoral artery.
Arterial Variations and Patterns
Anatomical studies reveal immense variability in the arterial supply, with the superficial inferior epigastric artery (SIEA) frequently contributing significantly to the flap's hemodynamics. The diameters of these source vessels are typically diminutive, ranging from 1.1 to 1.4 mm, demanding advanced microsurgical proficiency.
Taylor and Daniel classified the origins of the SCIA and SIEA into distinct patterns based on their relationship to the femoral artery (FA):
1. Common Origin (48%): The SCIA and SIEA arise from a single common trunk off the femoral artery.
2. Compensatory SCIA (35%): A large, dominant SCIA is present with a completely absent SIEA.
3. Separate Origins (17%): The SCIA and SIEA arise as distinct, separate branches from the femoral artery.
4. Non-Femoral Origins: Occasionally, these arteries arise from the profunda femoris or other regional vessels. These relationships are symmetrical bilaterally in only about one-third of patients.
Visualizing the Vascular Variations
The following anatomical diagrams illustrate the interrelated origins of the superficial circumflex iliac (SCIA) and superficial inferior epigastric (SIEA) arteries from the femoral artery (FA) or other parent arteries.

Figure 1: Demonstration of a common trunk origin branching from the anterior aspect of the femoral artery.
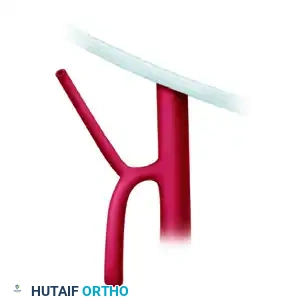
Figure 2: Variation showing early bifurcation of the common trunk into the SCIA and SIEA.

Figure 3: Separate origins of the SCIA and SIEA directly from the femoral artery.
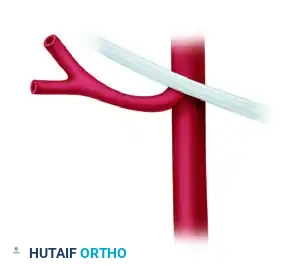
Figure 4: A dominant SCIA with an absent or hypoplastic SIEA.
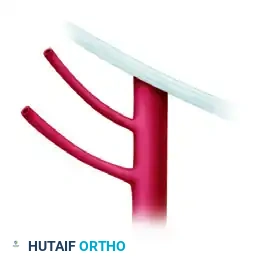
Figure 5: Complex branching pattern involving the profunda femoris system.
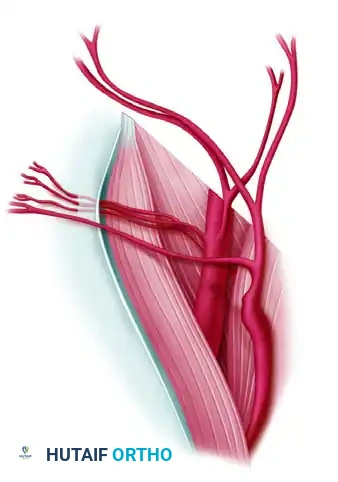
Figure 6: High origin of the superficial vessels near the inguinal ligament.

Figure 7: Wide separation between the origins of the SCIA and SIEA.
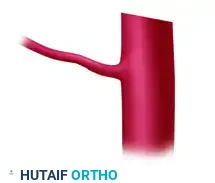
Figure 8: Intricate collateral network between the superficial inguinal vessels.
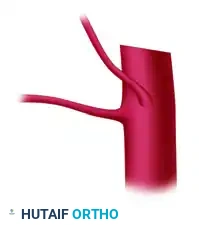
Figure 9: Variation demonstrating a robust SIEA dominating the vascular territory.
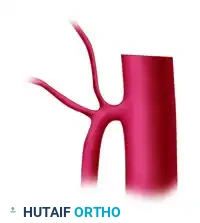
Figure 10: Atypical origin of the SCIA from a parent vessel other than the main femoral artery.
Course of the Superficial Circumflex Iliac Artery (SCIA)
The SCIA passes from its origin superficial to the femoral nerve. It remains in a subfascial plane until it reaches the medial border of the sartorius muscle. At the lateral border of the sartorius, it pierces the deep fascia, transitioning into the subcutaneous tissue to supply the robust dermal-subdermal plexus lateral to the anterior superior iliac spine (ASIS).
The vascular axis of the SCIA begins approximately 5 cm inferior to the inguinal ligament and is generally oriented parallel to the inguinal ligament, pointing toward the ASIS and the inferior angle of the scapula. This axis must dictate the central design of the skin paddle.
Venous Drainage
The flap is drained through two primary venous systems:
1. Superficial Inferior Epigastric Vein (SIEV): This is the most constant and reliable venous drainage pathway.
2. Superficial Circumflex Iliac Vein (SCIV): This vein is highly variable in its presence and caliber.
These veins may enter the femoral vein separately, usually on its anterior surface, or they may converge to join at the saphenous bulb.
💡 CLINICAL PEARL: Osteocutaneous Flap Considerations
If the iliac crest is to be included in the flap, it may be supplied sufficiently by the overlying skin and superficial circulation (SCIA) in small grafts. However, Taylor, Townsend, and Corlett have definitively shown the critical importance of the osseous circulation derived from the deep circumflex iliac vessels (DCIA) for larger structural bone grafts. Dissection of the DCIA requires a deeper, more complex inguinal approach.
SURGICAL TECHNIQUE: FREE GROIN FLAP HARVEST
Meticulous preoperative planning and precise execution are required to safely harvest the groin flap given its variable anatomy.
Preoperative Preparation and Positioning
🔪 Surgical Technique 63-13: Positioning and Preparation
- Patient Positioning: Position the patient supine on the operating table. Place a generous rolled towel or sandbag beneath the ipsilateral buttock to elevate the hip. This maneuver opens the inguinal region and facilitates access to the lateral aspect of the flap.
- Surgical Field Preparation: Prepare and drape the skin extensively to allow surgical access to the following landmarks:
- Superiorly: The inferior costal margin.
- Medially: The pubic tubercle and midline.
- Distally: The circumferential thigh and knee.
- Posteriorly: The flank.
- Dynamic Positioning: Having the entire thigh within the sterile surgical field is critical. It allows for easy abduction and external rotation of the hip during pedicle exposure, and subsequent hip flexion to relieve tension during donor site closure.
Flap Design and Incision
- Landmark Identification: Palpate and mark the anterior superior iliac spine (ASIS), the pubic tubercle, and the inguinal ligament connecting them.
- Axis Marking: Draw the vascular axis of the SCIA, starting 5 cm inferior to the inguinal ligament over the femoral artery pulse, extending laterally parallel to the inguinal ligament toward the ASIS.
- Skin Paddle Design: Design an elliptical skin paddle centered over this axis. The medial tip of the ellipse should lie over the femoral triangle, while the lateral extent can safely reach past the ASIS into the flank, depending on the required defect size.
Flap Elevation
- Lateral Dissection: Begin the incision at the lateral, superior, and inferior margins of the flap. Elevate the flap from lateral to medial in a plane deep to the subcutaneous fat, directly over the deep fascia of the external oblique and gluteus medius muscles.
- Sartorius Identification: As the dissection proceeds medially over the ASIS, identify the fascia of the sartorius muscle. The dissection plane must transition to include the deep fascia over the sartorius to protect the SCIA, which emerges through the fascia at the muscle's lateral border.
- Medial Dissection: Incise the medial border of the flap carefully. Identify the superficial venous system (SIEV and SCIV) in the subcutaneous tissue. Trace these veins proximally toward the saphenous bulb, preserving their length.
Pedicle Dissection
- Arterial Identification: Carefully dissect the fibrofatty tissue over the femoral triangle. Identify the origin of the SCIA (and SIEA, if present) from the anterior aspect of the femoral artery.
- Nerve Protection: The lateral femoral cutaneous nerve often crosses the operative field near the ASIS; it should be identified and preserved if it does not tether the flap. The femoral nerve lies deep to the SCIA and must be protected during pedicle skeletonization.
- Pedicle Isolation: Skeletonize the SCIA and the chosen venous drainage down to their junctions with the femoral vessels. Obtain the maximum possible pedicle length, though the surgeon must anticipate a short pedicle (often 2 to 4 cm).
- Flap Detachment: Once the recipient site is fully prepared and recipient vessels are isolated, ligate and divide the SCIA and the venous pedicle. Transfer the flap immediately to the recipient site.
Donor Site Closure
- Hemostasis: Achieve meticulous hemostasis in the groin to prevent postoperative hematoma, which can compress the femoral nerve.
- Hip Flexion: Flex the hip to 30-45 degrees to relieve tension on the inguinal skin margins.
- Primary Closure: Undermine the superior and inferior skin edges as needed. Close the defect primarily in layers over a closed suction drain. If the defect is excessively wide (typically >10-12 cm), a split-thickness skin graft may be required, though this is cosmetically suboptimal and should be avoided if possible.
- Postoperative Care: Maintain the patient in a slightly flexed hip position ("beach chair" position) for 5 to 7 days postoperatively to prevent wound dehiscence.
