Introduction & Epidemiology
Tibial shaft fractures represent the most frequently encountered long bone fractures, accounting for approximately 15% of all adult fractures. These injuries commonly result from high-energy mechanisms such as motor vehicle accidents or falls from height, though low-energy rotational forces can also lead to spiral patterns. The biomechanical demands on the tibia, coupled with its relatively thin soft tissue envelope, render it susceptible to open injuries, with incidence rates ranging from 20% to 30%.
The evolution of tibial shaft fracture management has progressed significantly from closed reduction and cast immobilization to the contemporary standard of care: intramedullary nailing (IMN). IMN offers a biologically friendly, load-sharing osteosynthesis that minimizes soft tissue stripping, preserves periosteal blood supply, and facilitates early functional rehabilitation. This minimally invasive approach has been shown to reduce rates of malunion and nonunion compared to external fixation or plate osteosynthesis for appropriate fracture patterns, while allowing for more predictable return to function.
The principles of IMN for tibial shaft fractures focus on achieving relative stability, promoting secondary bone healing, and maintaining anatomical alignment. This comprehensive guide reviews the critical aspects of mastering the minimally invasive approach for tibial nailing, from pre-operative planning and meticulous surgical technique to managing potential complications and implementing structured rehabilitation protocols.
Surgical Anatomy & Biomechanics
Successful tibial nailing hinges upon a thorough understanding of the unique surgical anatomy and biomechanical considerations of the tibia.
Surgical Anatomy
- Tibia Morphology: The tibial shaft exhibits a distinct change in cross-sectional morphology along its length. Proximally, it is triangular, becoming more rounded in the mid-diaphysis, and transitioning to a rectangular shape distally. The medullary canal follows this general contour, presenting challenges for nail fit and potential for cortical impingement if not adequately reamed or if the nail design is unsuitable. The apex of the anterior bow of the tibia is typically located approximately 3 cm distal to the tibial tuberosity, influencing the trajectory of the nail entry point.
-
Soft Tissue Envelope:
The tibia is largely subcutaneous, particularly along its anterior and medial surfaces. This thin soft tissue coverage renders it vulnerable to direct trauma and compromise, which significantly impacts surgical planning and post-operative wound healing. The four fascial compartments—anterior, lateral, deep posterior, and superficial posterior—house critical neurovascular structures.
- Anterior Compartment: Contains the deep peroneal nerve and anterior tibial artery/vein.
- Lateral Compartment: Contains the superficial peroneal nerve.
- Deep Posterior Compartment: Contains the tibial nerve and posterior tibial artery/vein.
- Popliteal Fossa: Posterior to the knee joint, the popliteal artery and vein, along with the tibial and common peroneal nerves, are superficial and susceptible to injury, particularly during patient positioning or with uncontrolled traction.
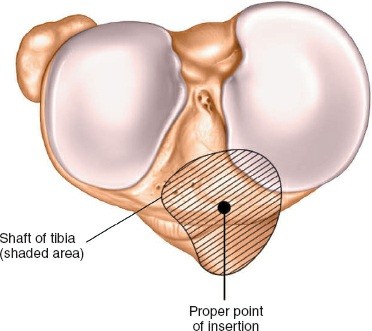
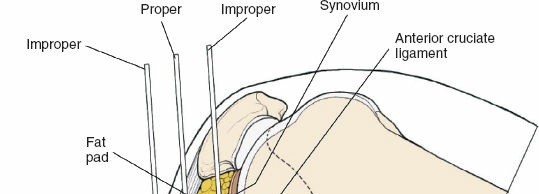
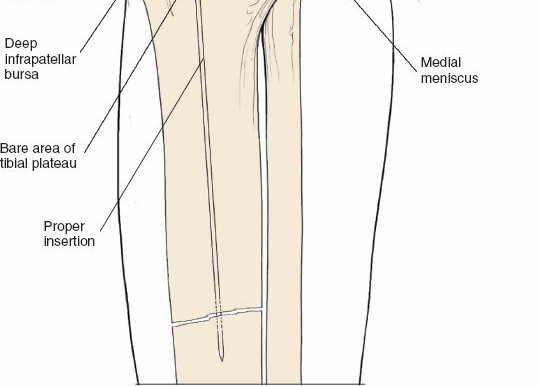
- Proximal Tibia: The preferred entry point for tibial nails lies in the proximal tibia, typically between the anterior tibial spine and the lateral edge of the patellar tendon. The infrapatellar fat pad (Hoffa's fat pad) must be navigated. Careful attention to the articular surface is paramount to avoid iatrogenic damage to the tibial plateau. The patellar tendon can be split or approached paratendinously, with long-term studies showing no significant difference in knee pain.
- Distal Tibia: The distal metaphysis accommodates locking screws. Understanding the syndesmotic anatomy and maintaining its integrity is vital, especially for fractures extending close to the ankle joint. Avoid placing screws that impinge on the tibiofibular clear space.
Biomechanics
- Load-Sharing Osteosynthesis: Intramedullary nails function as load-sharing devices, accepting a portion of the physiologic load, thus shielding the fracture fragments from excessive stress. This principle stands in contrast to load-bearing constructs (e.g., plates), which bear the majority of the load and can lead to stress shielding. Load sharing stimulates callus formation and promotes secondary bone healing.
- Axial Stability: Axial stability is conferred by the nail's fit within the medullary canal and the locking screws. Static locking provides full axial and rotational stability, suitable for unstable or comminuted fractures. Dynamic locking, achieved by placing screws in elongated slots, allows for controlled axial micromotion, which can theoretically stimulate healing in some fracture patterns but risks shortening.
- Rotational Control: Rotational stability is primarily achieved through distal and proximal locking screws. Without adequate locking, IMN provides little to no rotational stability, leading to potential malrotation.
-
Reaming vs. Unreamed Nailing:
- Reamed Nailing: Allows for insertion of a larger diameter nail, improving mechanical stability, increasing contact with the endosteal surface, and potentially accelerating union rates by introducing osteogenic cells and growth factors into the fracture site via the reaming debris. However, it carries a theoretical risk of heat necrosis and fat embolism.
- Unreamed Nailing: Preserves endosteal blood supply, potentially reducing the risk of fat embolism, and is preferred in situations with compromised vascularity or significant polytrauma. However, unreamed nails are typically smaller in diameter, offering less stability and potentially slower union rates. Current evidence generally favors reamed nailing for most diaphyseal fractures.
Indications & Contraindications
Indications for Tibial Intramedullary Nailing
The minimally invasive approach for tibial nailing is a versatile technique applicable to a broad spectrum of tibial shaft pathologies.
-
Fresh Tibial Shaft Fractures:
- Transverse, oblique, spiral, and comminuted fractures of the tibial diaphysis (AO/OTA 42-A, 42-B, 42-C).
- Segmental tibial shaft fractures.
- Open tibial shaft fractures (Gustilo-Anderson Type I, II, IIIA) following appropriate debridement and irrigation. For Type IIIB/IIIC, delayed nailing after soft tissue coverage or staged fixation with external fixator may be considered.
- Polytrauma patients with associated injuries, where early definitive stabilization is crucial.
- Floating knee injuries (tibial and femoral shaft fractures).
-
Pathologic Tibial Shaft Fractures:
- Fractures through neoplastic lesions (primary or metastatic) for pain relief and stabilization.
- Prophylactic nailing for impending pathologic fractures.
-
Delayed Union and Nonunion of Tibial Shaft Fractures:
- Hypertrophic, oligotrophic, and atrophic nonunions, often augmented with dynamization, exchange nailing, or bone grafting.
-
Malunion Correction:
- Corrective osteotomies with subsequent IMN for established angular or rotational malunions.
-
Tibial Stress Fractures:
- For cases refractory to non-operative management, particularly in athletes.
-
Proximal and Distal Metaphyseal Extension:
- Specific nail designs (e.g., those with multiple proximal/distal locking options, or polyaxial locking) allow for stable fixation of fractures extending into the metaphysis, respecting intra-articular boundaries.
Contraindications
Absolute Contraindications:
*
Active Infection:
Uncontrolled systemic or localized infection around the fracture site, which precludes implant insertion. Exceptions may include meticulously debrided Gustilo-Anderson Type III open fractures undergoing staged management.
*
Severely Compromised Soft Tissue Envelope:
Extensive soft tissue loss or severe burns that make safe surgical exposure and closure impossible without significant risk of implant exposure or infection.
*
Non-reducible Fractures:
Fractures that cannot be anatomically or functionally reduced, even with adjunctive techniques, may require alternative fixation methods.
Relative Contraindications:
*
Extreme Osteoporosis:
Poor bone quality may compromise locking screw purchase and lead to cutout.
*
Very Wide Medullary Canal:
A canal significantly wider than the largest available nail may lead to insufficient nail-bone contact and reduced stability.
*
Significant Intra-Articular Extension:
Fractures with substantial involvement of the knee or ankle joint surface often require precise anatomical reduction and rigid internal fixation with plates and screws to restore articular congruity. However, combined IMN and plate fixation (e.g., for proximal or distal tibial fractures with metaphyseal involvement) may be considered.
*
Pediatric Fractures:
Growth plate violation is a significant concern in skeletally immature patients. Flexible nailing or external fixation are often preferred options.
Operative vs. Non-Operative Indications
| Indication Type | Operative Management (Intramedullary Nailing) | Non-Operative Management (Casting, Bracing) |
|---|---|---|
| Fracture Pattern | Displaced, unstable, comminuted, segmental, spiral, oblique, transverse | Undisplaced or minimally displaced (<5-10mm displacement, <5-10° angulation) |
| Soft Tissue | Open fractures (Gustilo I, II, IIIA) after debridement; Closed fractures | Closed fractures with intact soft tissue envelope, no skin compromise |
| Patient Factors | Polytrauma, concomitant injuries, need for early mobilization, pathologic fx | Stable patient, good compliance, low functional demand |
| Healing Status | Delayed union, nonunion, malunion requiring correction | Stable hairline fractures, stable stress fractures |
| Location | Mid-diaphyseal, proximal/distal metadiaphyseal with suitable nail designs | Select stable metaphyseal fractures without articular involvement |
Pre-Operative Planning & Patient Positioning
Meticulous pre-operative planning is the cornerstone of a successful outcome in tibial nailing, encompassing patient evaluation, implant selection, and surgical setup.
Pre-Operative Planning
- Clinical Assessment: Thorough history and physical examination, focusing on neurovascular status, soft tissue integrity, and associated injuries. For open fractures, a Gustilo-Anderson classification is crucial.
-
Radiographic Evaluation:
- Plain Radiographs: AP and lateral views of the entire tibia, including the knee and ankle joints, are essential to assess fracture morphology, comminution, and rule out articular extension. Oblique views can provide additional information.
- CT Scan: Indicated for complex fracture patterns, articular involvement, or when planning corrective osteotomies to precisely delineate anatomy.
-
Templating:
- Use contralateral limb radiographs or scaled images to estimate appropriate nail length and diameter. The length is typically measured from the knee joint line to the tip of the medial malleolus, subtracting 1-2 cm.
- Diameter is determined by the narrowest part of the medullary canal. Over-reaming typically allows for a nail 1-2 mm larger than the narrowest canal diameter.
- Pre-planning proximal and distal locking screw trajectories helps anticipate potential challenges.
-
Operating Room Setup:
- Ensure a radiolucent operating table.
- C-arm fluoroscopy unit must be readily available and positioned to allow unobstructed AP and lateral views of the entire tibia. The C-arm should be draped or operated by sterile personnel.
- All necessary instruments: fracture reduction tools (traction, joysticks, pointed reduction clamps), reamers (flexible and rigid), guide wires, targeting jigs for the chosen nail system, and a full range of nail lengths and diameters.
- Consider a tourniquet if soft tissue compromise or extensive bleeding is anticipated, though its routine use is debated due to potential impacts on revascularization.
- Anesthesia and Prophylaxis: Standard general or regional anesthesia. Administer pre-operative intravenous antibiotics according to institutional protocols, especially for open fractures.
Patient Positioning
Two primary positions are utilized for tibial nailing, each with distinct advantages and disadvantages. The choice depends on surgeon preference, fracture pattern, and available resources.
-
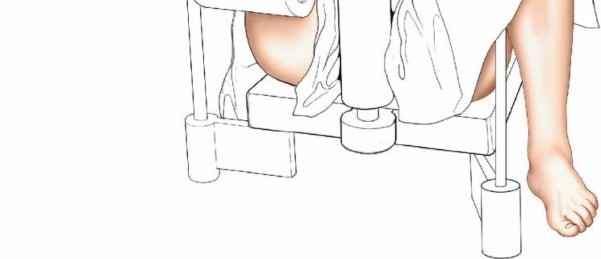
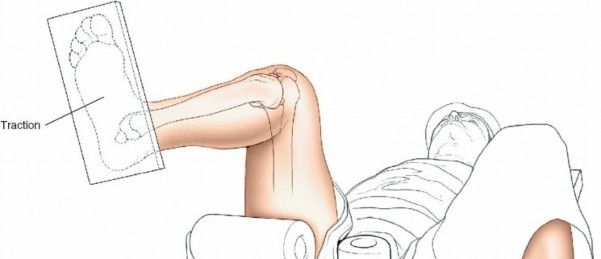
Supine on a Traction Table:
- Setup: The patient is placed supine on a radiolucent operating table. The affected hip is flexed to approximately 60 degrees. A support is strategically placed behind the posterior aspect of the distal thigh to allow the knee to flex freely. Crucially, care must be taken to position this support well away from the popliteal fossa to avoid compression of the popliteal artery and vein, which can lead to neurovascular compromise or compartment syndrome. The knee is then flexed to 100 to 120 degrees. Traction is applied by strapping the patient's foot to the sole plate of the traction apparatus.
-
Advantages:
- Provides superior control over fracture reduction, particularly for comminuted or highly unstable patterns, allowing for precise length and alignment restoration.
- Facilitates easier distal locking as the limb is rigidly held.
- Frees up surgical assistants, who are not required to hold the leg.
-
Disadvantages:
- Potential for pressure injuries in the popliteal fossa if support is misplaced.
- Risk of compartment syndrome due to prolonged traction.
- Can restrict access to the proximal tibia for very high entry points if knee flexion is insufficient.
-
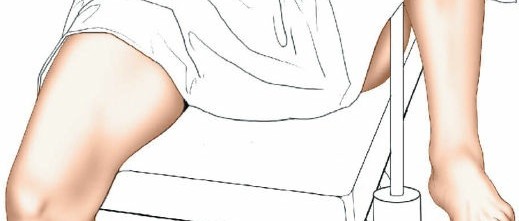
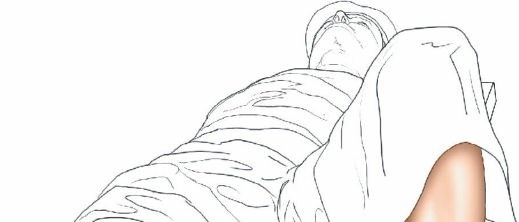
Supine with a Free Leg:
- Setup: The patient is placed supine on a radiolucent operating table with the affected leg positioned freely, often draped over a sterile bolster or supported by an assistant. The knee is fully flexed.
-
Advantages:
- Allows for greater knee flexion, which can make nail insertion easier, especially for fractures requiring a more anterior or higher entry point.
- Avoids the potential complications associated with a traction table (e.g., popliteal fossa pressure).
- Offers greater flexibility for intraoperative adjustments of limb position.
-
Disadvantages:
- Fracture reduction can be more challenging and may require more manual assistance or adjunctive reduction tools.
- Distal locking can be more cumbersome due to limb mobility.
- Requires a dedicated assistant to maintain leg position throughout the procedure.
For both positions, ensuring adequate C-arm access for AP and lateral fluoroscopic images of the entire tibia, knee, and ankle is paramount. The C-arm should be oriented perpendicular to the operating table to minimize parallax distortion.
Detailed Surgical Approach / Technique
The minimally invasive approach to tibial nailing adheres to principles of biological fixation, minimizing soft tissue disruption while achieving stable internal fixation. Constant fluoroscopic guidance is essential at every stage.
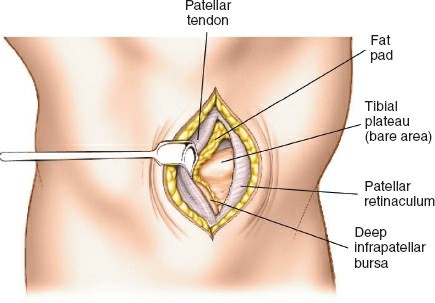
Incision and Entry Point
-
Incision:
A short, vertical incision (typically 2-3 cm) is made over the proximal tibia. This is commonly a midline incision, but some surgeons prefer a parapatellar approach.
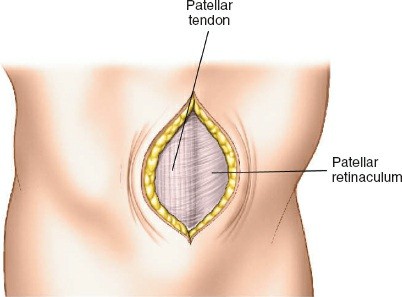
The incision should be adequate to allow clear access to the entry point and accommodate the targeting jig. The patellar tendon can be carefully split longitudinally or approached paramedially (medial or lateral to the tendon). -
Entry Point Determination:
The ideal entry point is crucial for proper nail alignment and preventing iatrogenic damage. It is typically located on the anterior cortex of the tibia, just medial to the lateral edge of the patellar tendon, distal to the articular surface of the tibial plateau.
- Fluoroscopic Guidance: Use an Awl or K-wire under AP and lateral fluoroscopy to confirm the entry point. The AP view should show the wire positioned to align with the central axis of the medullary canal. The lateral view should show the wire in line with the anterior cortex, avoiding a posterior entry which can damage the posterior cortex and lead to malalignment.
- Patellar Tendon Protection: Ensure the entry reamer or awl does not scrape the posterior aspect of the patella or damage the articular cartilage.
-
Once the entry point is accurately localized, a cannulated awl or bone awl is used to open the cortical bone.
A K-wire is then passed into the medullary canal.
Guide Wire Insertion and Medullary Reaming
-
Guide Wire Insertion:
A ball-tipped guide wire is carefully advanced down the medullary canal, across the fracture site, and into the distal tibial epiphysis.
-
Fracture Reduction:
Achieving and maintaining reduction during guide wire passage is paramount. This may involve traction, rotation, or manual manipulation. If closed reduction is difficult, percutaneous joysticks, pointed reduction clamps, or a temporary external fixator can aid in alignment.
Fluoroscopy (AP and lateral) is used to confirm the guide wire's position centrally in both planes at the fracture site and distally. Avoid eccentric placement, which can lead to iatrogenic fracture or malreduction.
-
Fracture Reduction:
Achieving and maintaining reduction during guide wire passage is paramount. This may involve traction, rotation, or manual manipulation. If closed reduction is difficult, percutaneous joysticks, pointed reduction clamps, or a temporary external fixator can aid in alignment.
-
Reaming (if indicated):
- Technique: Sequential reaming begins with a reamer typically 1-2 mm smaller than the chosen nail diameter, gradually increasing in 0.5 mm increments. The canal should be over-reamed by 0.5-1.5 mm larger than the intended nail diameter.
- Precautions: Ream slowly and intermittently to minimize heat generation. Ensure adequate irrigation to cool the bone and clear debris. Avoid forcing reamers, especially at the fracture site, to prevent iatrogenic fracture or propagation.
Nail Insertion
- Nail Selection: Based on pre-operative templating and intraoperative assessment of the reamed canal, select the appropriate nail length and diameter.
-
Insertion:
The chosen intramedullary nail is attached to its targeting jig. The nail is then carefully advanced over the guide wire into the prepared medullary canal. Gentle, controlled force should be used.
Fluoroscopy is continuously used to monitor nail progression and ensure it passes smoothly across the fracture site. Any resistance should prompt reassessment of reduction and guide wire position. -
Final Seating:
The nail is advanced until its proximal end is flush with or slightly recessed below the articular surface of the tibial plateau. Excessive prominence can lead to anterior knee pain.
After nail insertion, confirm final fracture reduction and alignment in all planes. Remove the guide wire.
Proximal Locking
-
Jig Attachment:
The nail's targeting jig is used to guide the proximal locking screws.
Ensure the jig is securely seated and properly aligned with the nail. -
Screw Placement:
Under fluoroscopic guidance, make a small incision through the skin and soft tissues aligned with the jig's targeting sleeves. Use a drill guide to drill through both cortices of the tibia and the nail's locking holes.

Measure the screw length accurately and insert the appropriate locking screws. Typically, two screws are used for static locking to prevent rotation and maintain length. Dynamic locking can be achieved by placing a screw in an elongated hole, allowing for some axial micromotion.
Distal Locking
Distal locking is crucial for providing rotational stability and preventing fracture shortening or lengthening. This step often presents the most technical challenge.
-
Fluoroscopic Guidance:
Distal locking is performed under stringent fluoroscopic control. The "perfect circle" technique is commonly employed, where the C-arm is positioned to achieve a perfectly circular image of the nail's distal locking holes in the AP view. This ensures the drill bit is perpendicular to the nail and tibia.
Oblique views may also be helpful for trajectory confirmation. -
Incision and Drilling:
Small stab incisions are made at the projected screw entry points. A soft tissue protector and drill guide are used. Carefully drill through the anterior cortex, the nail, and the posterior cortex.

Measure the screw length and insert the appropriate locking screws. For most tibial shaft fractures, two distal locking screws provide sufficient stability (one anterior-posterior and one medial-lateral).
Final Checks and Closure
-
Final Radiographs:
Obtain final AP and lateral radiographs of the entire tibia, knee, and ankle to confirm:
- Accurate fracture reduction and alignment (AP, lateral, rotational).
- Correct nail position within the medullary canal.
-
Proper placement of all proximal and distal locking screws.
-
Wound Closure:
Thoroughly irrigate the surgical sites. Close the incisions in layers, paying meticulous attention to skin closure.
Apply a sterile dressing.
Complications & Management
Despite its effectiveness, tibial intramedullary nailing is associated with a range of potential complications. Early recognition and appropriate management are critical for optimizing patient outcomes.
Common Complications and Management Strategies
| Complication | Incidence (Approximate) | Salvage/Management Strategies |
|---|---|---|
| Nonunion/Delayed Union | 5-20% | Delayed Union (>3 months without radiographic progression): Dynamization (remove one locking screw to allow micromotion), protected weight-bearing. Nonunion (>6-9 months without healing): Exchange nailing (larger diameter nail, often reamed), bone grafting (autograft/allograft), biologics (PRP, BMPs), electrical stimulation. |
| Malunion | 5-15% | Rotational Malunion: Early (within weeks) - re-nailing with de-rotation. Late - corrective osteotomy and re-fixation (plate or new nail). Angular Malunion: Corrective osteotomy and re-fixation. Length Malunion: Lengthening osteotomy (for shortening), shortening osteotomy (for lengthening, rare). |
| Infection | 1-5% (higher in open fx) | Superficial: Oral antibiotics, local wound care. Deep (periprosthetic): Surgical debridement and irrigation, IV antibiotics, implant retention (if stable and early) vs. nail removal, external fixation, or staged reconstruction. |
| Compartment Syndrome | 1-10% | Early Recognition: Clinical suspicion (pain out of proportion, pallor, paresthesia, pulselessness, paralysis), intracompartmental pressure measurement. Management: Emergent four-compartment fasciotomy. |
| Anterior Knee Pain | 10-50% | Often related to prominent nail or proximal locking screws. Management: Symptomatic treatment, hardware removal (typically after fracture union, 12-18 months post-op). |
| Nail Breakage | Rare (<1%) | Typically indicative of nonunion. Management: Nail removal, exchange nailing (with bone graft if necessary), or revision fixation with a plate. |
| Locking Screw Failure | 1-5% | Breakage, pullout, migration. Management: Hardware removal, revision locking with longer/larger screws or alternative trajectory, dynamic conversion (if appropriate), re-evaluate for nonunion. |
| Iatrogenic Fracture | Rare (<1%) | Caused by forceful guide wire insertion, reaming, or nail insertion. Management: Extend nail length, add supplementary fixation, revise nail. |
| Neurovascular Injury | Rare (<1%) | Prevention: Meticulous technique, careful guide wire/reamer advancement, avoiding popliteal fossa pressure. Management: Prompt recognition, surgical exploration, repair by vascular/neurosurgeon. |
| Fat Embolism Syndrome | Rare (<1%) | Prevention: Slow, controlled reaming, adequate hydration. Management: Supportive care (ventilatory support, hemodynamic stabilization). |
| Refracture Post-Removal | 1-5% | Occurs after hardware removal, especially if removed too early or bone healing is incomplete. Management: Re-fixation, typically with IMN. Prevention: Ensure complete radiographic union and cortical hypertrophy prior to nail removal. |
Post-Operative Rehabilitation Protocols
A structured and progressive post-operative rehabilitation protocol is critical for maximizing functional recovery and ensuring a timely return to activity following tibial intramedullary nailing. The specific protocol must be tailored to the individual patient, considering fracture stability, bone quality, comminution, and surgeon preference regarding weight-bearing status.
Immediate Post-Operative Phase (Days 0-7)
- Pain Management: Aggressive multi-modal analgesia is crucial to facilitate early mobilization.
- Wound Care: Maintain clean, dry dressings; monitor for signs of infection or wound complications. Suture removal typically at 10-14 days.
-
Weight Bearing:
- Stable Fractures (transverse, short oblique): Touch-down weight-bearing (TDWB) or weight-bearing as tolerated (WBAT) with crutches/walker, respecting pain.
- Unstable/Comminuted/Open Fractures: Non-weight-bearing (NWB) or TDWB, progressing cautiously based on radiographic healing and clinical assessment.
-
Range of Motion (ROM):
- Ankle: Active and passive ROM exercises (dorsiflexion, plantarflexion, inversion, eversion) to prevent stiffness and DVT.
- Knee: Gentle active and passive ROM exercises, aiming for 0-90 degrees flexion within the first week, respecting pain and swelling.
- Muscle Activation: Isometric quadriceps and gluteal sets to maintain muscle tone.
- Edema Control: Elevation of the extremity, compression stockings.
- DVT Prophylaxis: As per institutional guidelines, typically chemical prophylaxis until fully mobile.
Early Mobilization Phase (Weeks 1-6)
-
Weight Bearing Progression:
- Gradual progression from TDWB to partial weight-bearing (PWB) and eventually full weight-bearing (FWB) as pain allows and radiographic signs of early callus formation are evident. This is often guided by a combination of clinical pain at the fracture site and early radiographic bridging callus.
- ROM: Continue active and passive knee and ankle ROM exercises, aiming for full functional ROM. Address any stiffness aggressively.
-
Strengthening:
- Initiate isotonic strengthening exercises for quadriceps, hamstrings, and calf muscles.
- Focus on hip strengthening to improve gait mechanics.
- Gait Training: Progression from walker to crutches, then a single crutch, emphasizing a normal gait pattern.
- Proprioception: Begin seated balance exercises.
Intermediate Phase (Weeks 6-12)
- Weight Bearing: Most patients should be FWB by this stage, provided there is adequate clinical and radiographic healing (bridging callus, non-tender to palpation).
- Strengthening: Advance strengthening program to include closed-chain exercises (e.g., mini-squats, lunges), heel raises, and balance exercises. Focus on endurance and power.
- Flexibility: Continue stretching to maintain full ROM in the knee and ankle.
- Cardiovascular Fitness: Introduce low-impact activities like stationary cycling or swimming.
- Functional Training: Begin incorporating exercises that mimic daily activities.
Advanced Phase & Return to Activity (Months 3-6+)
- Full Functional Recovery: Continue to progress strength, endurance, and proprioceptive training.
- Sport-Specific Training: For athletes, gradually introduce sport-specific drills, plyometrics, and agility training.
- Return to High-Impact Activities: Clearance for return to high-impact sports is typically granted only after complete radiographic union, absence of pain, and restoration of muscle strength and proprioception to near-normal levels, often around 6-12 months post-surgery.
- Hardware Removal: Elective hardware removal may be considered 12-18 months post-union if the patient experiences persistent symptoms (e.g., anterior knee pain from nail prominence, locking screw irritation). Removal should only occur after robust cortical remodeling and complete fracture union to minimize the risk of refracture.
Criteria for Progression:
Progression through rehabilitation phases is guided by:
*
Clinical Healing:
Minimal to no pain at the fracture site, absence of tenderness to palpation, and stable limb on examination.
*
Radiographic Healing:
Evidence of bridging callus in at least three cortices on AP and lateral views, progressive cortical consolidation, and blurring of fracture lines.
*
Functional Milestones:
Achievement of specific ROM, strength, and weight-bearing goals.
Summary of Key Literature / Guidelines
Intramedullary nailing has become the gold standard for the treatment of most tibial shaft fractures, supported by a substantial body of evidence and consensus guidelines from major orthopedic societies.
- Efficacy of IMN: Numerous meta-analyses and systematic reviews consistently demonstrate the superiority of IMN over external fixation or plate osteosynthesis for most tibial shaft fractures in terms of union rates, time to union, and lower rates of malunion and nonunion. IMN offers superior mechanical stability and allows for earlier weight-bearing and functional rehabilitation.
- Reamed vs. Unreamed Nailing: The debate regarding reamed versus unreamed nailing has largely been settled for closed tibial shaft fractures. Most studies, including randomized controlled trials, indicate that reamed nailing leads to higher union rates and faster time to union compared to unreamed nailing, particularly for diaphyseal fractures. This is attributed to the ability to insert a larger diameter nail, increasing stability, and the osteogenic potential of reaming debris. While unreamed nailing was historically advocated for open fractures or polytrauma due to theoretical concerns of fat embolism and further endosteal damage, the benefits of reamed nailing often outweigh these risks even in many open fracture settings (Gustilo I, II, IIIA) following meticulous debridement.
- Open Fractures: For open tibial shaft fractures, early aggressive debridement and irrigation, followed by definitive IMN within 6-8 hours (or 24 hours in some protocols) has shown favorable outcomes. For Gustilo-Anderson Type IIIB and IIIC fractures with extensive soft tissue loss, a staged approach involving initial external fixation and soft tissue coverage (e.g., flap surgery) followed by delayed IMN is often preferred.
- Proximal and Distal Extension: While IMN is primarily for diaphyseal fractures, advancements in nail design, including nails with multiple proximal and distal locking options, smaller nail diameters for metaphyseal fit, and polyaxial locking capabilities, have expanded the indications to include some proximal and distal tibial metaphyseal fractures without significant intra-articular involvement. However, careful consideration of articular extension and stability is critical.
- Reduction Quality: Achieving and maintaining an anatomical or near-anatomical reduction is paramount. Studies highlight that malreduction, particularly rotational or angular deformities, significantly impacts functional outcomes and may necessitate revision surgery. Indirect reduction techniques with careful fluoroscopic assessment are preferred to minimize soft tissue stripping.
- Nail Entry Point: The choice of entry portal (patellar tendon splitting vs. paratendinous) continues to be debated. While earlier concerns focused on anterior knee pain, recent literature suggests that both approaches can yield comparable functional outcomes and anterior knee pain incidence when performed meticulously. The specific nail design and surgeon's familiarity often guide this choice.
- Locking Configurations: Static locking (at least two proximal and two distal screws) provides maximal stability and is indicated for comminuted, unstable, or segmental fractures. Dynamic locking, which allows for controlled axial micromotion, may be considered for simple, stable fracture patterns once early callus is formed, to potentially stimulate healing, though its routine benefit is not universally supported.
Current guidelines from organizations such as the American Academy of Orthopaedic Surgeons (AAOS) and the Orthopaedic Trauma Association (OTA) emphasize IMN as the preferred treatment modality for most displaced adult tibial shaft fractures, underscoring the importance of meticulous surgical technique, appropriate implant selection, and comprehensive post-operative management to optimize patient outcomes.
Clinical & Radiographic Imaging