INTRODUCTION TO MIDSHAFT CLAVICULAR MALUNIONS
Historically, fractures of the clavicular midshaft were managed nonoperatively with the expectation of high union rates and acceptable functional outcomes, regardless of the final anatomical alignment. However, contemporary orthopedic literature and advanced biomechanical analyses have definitively demonstrated that significant displacement and shortening of the clavicle can lead to a highly symptomatic malunion.
A malunited clavicle—typically characterized by shortening, inferior displacement, and anterior rotation of the distal fragment—profoundly alters the resting position and kinematic function of the shoulder girdle. Patients frequently present with chronic pain, rapid fatigability, weakness in overhead activities, scapular dyskinesia, and occasionally, secondary thoracic outlet syndrome due to diminished costoclavicular space.
Surgical intervention via corrective osteotomy and rigid plate fixation is indicated for patients with symptomatic malunions, particularly when clavicular shortening exceeds 1.5 to 2.0 centimeters. The primary goals of operative management are the restoration of anatomical length, correction of rotational deformity, and the establishment of absolute stability to facilitate primary bone healing.
PREOPERATIVE PLANNING AND BIOMECHANICAL CONSIDERATIONS
Meticulous preoperative planning is the cornerstone of a successful clavicular osteotomy. The surgeon must accurately quantify the degree of deformity to determine the surgical strategy, particularly regarding the necessity of structural bone grafting.
Clinical and Radiographic Assessment
Determine the exact amount of length to be gained by comparing the injured side to the contralateral, uninjured shoulder. Clinically, this is measured from the sternoclavicular (SC) joint to the acromioclavicular (AC) joint. Radiographically, standardized bilateral anteroposterior (AP), 15-degree cephalic tilt, and 30-degree caudal tilt views are required. A computed tomography (CT) scan with 3D reconstructions is highly recommended to fully appreciate the complex, multiplanar nature of the malunion, especially the rotational component.
Clinical Pearl: Compare the clinical shortening to the observed radiographic shortening. If the clinical shortening is substantially greater than the radiographic shortening, it indicates absolute bone loss or severe remodeling. In these instances, a structural intercalary bone graft (typically harvested from the iliac crest) will be required to compensate for the defect and restore length without placing excessive tension on the neurovascular bundle.
PATIENT POSITIONING AND ANESTHESIA
Optimal patient positioning is critical for adequate surgical exposure, intraoperative fluoroscopy, and potential bone graft harvesting.
- Anesthesia: Administer general endotracheal anesthesia. A preoperative interscalene regional block may be utilized for postoperative pain control, provided a baseline neurological examination has been documented.
- Positioning: Place the patient in a modified "beach chair" (semisitting) position at approximately 30 to 45 degrees of elevation.
- Scapular Protraction: Place a small bump or pad vertically behind the medial border of the involved shoulder blade. This protracts the shoulder girdle, bringing the clavicle forward and opening the operative field.
- Arm Positioning: The involved upper extremity should be tucked into the side or placed on a specialized arm board that allows for intraoperative manipulation. The arm must be draped free to allow for traction and rotational adjustments during the reduction phase.
- Graft Site Preparation: Routinely prep and drape the contralateral or ipsilateral anterior iliac crest in the event that an intercalary structural autograft or cancellous bone graft is required.
SURGICAL APPROACH AND SOFT TISSUE DISSECTION
The surgical approach must balance adequate exposure of the malunion with the preservation of soft tissue envelopes necessary for hardware coverage and biological healing.
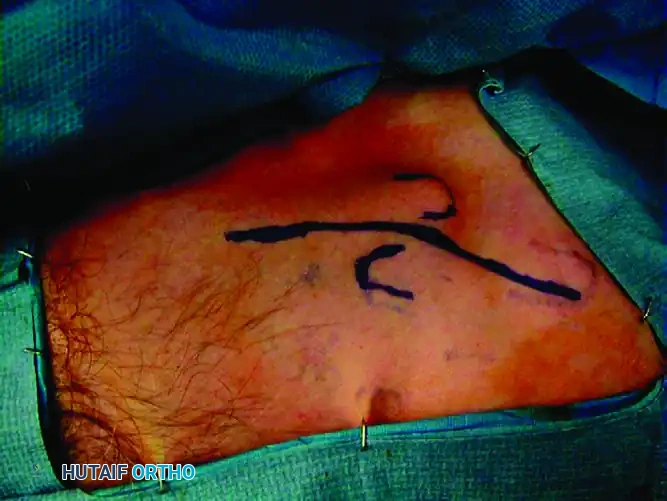
Incision and Flap Creation
Make an oblique or slightly curvilinear incision along the superior surface of the clavicle, centered directly over the palpable malunion mass.
Raise the skin and subcutaneous tissue as a single, full-thickness flap. It is imperative to identify and, if possible, protect the branches of the supraclavicular nerve to prevent postoperative numbness or painful neuroma formation over the anterior chest wall.
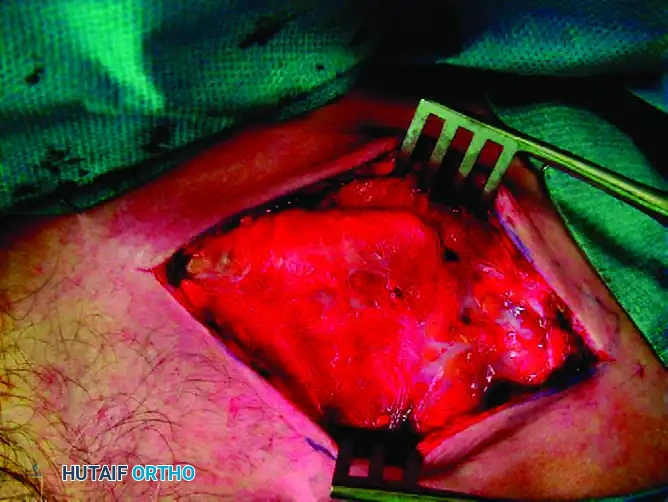
Identify the underlying myofascial layer, comprising the trapezius fascia superiorly and the deltopectoral fascia inferiorly.
Surgical Warning: This myofascial layer must be raised as contiguous, robust flaps. Preservation of this tissue is non-negotiable, as it is required to achieve a secure, two-layered closure over the plate at the conclusion of the procedure. Failure to close this layer adequately can lead to hardware prominence, wound dehiscence, and deep infection.
THE CORRECTIVE OSTEOTOMY
The objective of the osteotomy is to mobilize the malunited fragments, recreate the original fracture plane, and allow for the restoration of normal anatomy.
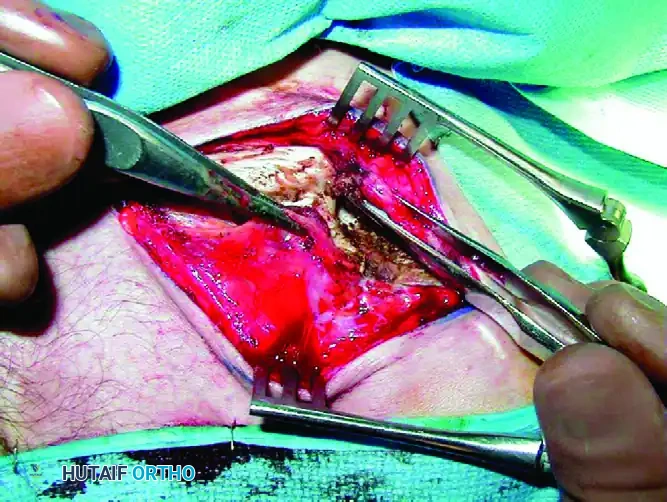
Identifying the Malunion and Planning the Cut
Carefully expose the malunion site. In most patients, the original proximal and distal fragments can still be delineated despite callus formation. The proximal fragment is typically elevated by the sternocleidomastoid muscle, while the distal fragment is depressed and rotated anteriorly by the weight of the arm and the pull of the pectoralis major.
Plan the corrective osteotomy. If the malunion is extensively remodeled, an oblique sliding osteotomy may be necessary to maximize the surface area for healing while allowing for length restoration.
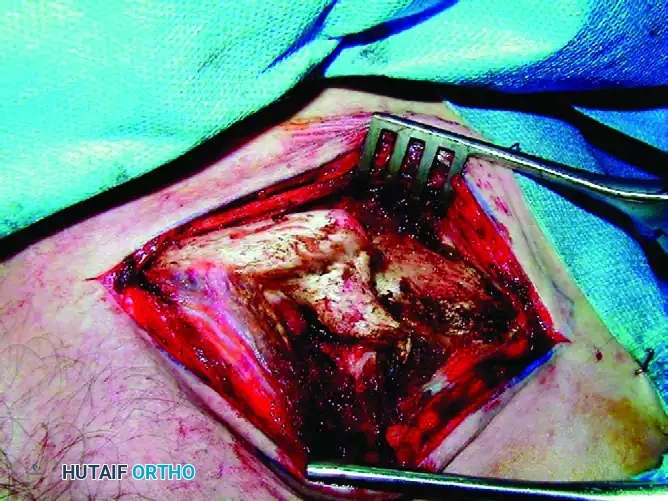
Executing the Osteotomy
Before completing the osteotomy, make a small, transverse notch with the saw in both the proximal and distal fragments. This provides a fixed reference point to accurately measure the degree of lengthening achieved after reduction.
Utilize a combination of sharp osteotomes and a microsagittal saw to meticulously re-create the original fracture line.
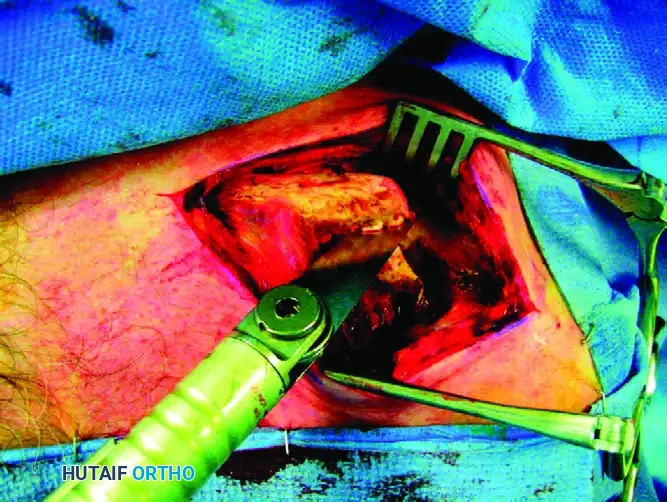
Surgical Warning: The microsagittal saw must be cooled continually with chilled saline irrigation throughout the cutting process to prevent thermal necrosis of the bone, which can lead to nonunion. Furthermore, extreme caution must be exercised to avoid plunging the saw blade or osteotomes inferiorly, as the subclavian vessels and brachial plexus lie directly deep to the middle third of the clavicle. Make no attempt to routinely explore or decompress the brachial plexus unless specifically indicated by preoperative neurological deficits and planned in conjunction with a peripheral nerve specialist.
DEFORMITY CORRECTION AND MEDULLARY PREPARATION
Once the osteotomy is complete and the fragments are mobilized, the focus shifts to biological preparation and anatomical reduction.
Reestablishing the Medullary Canal
Malunited fragments often have sclerotic, obliterated medullary canals. Reestablish the medullary canal in both the proximal and distal fragments using a 3.5-mm drill bit. This step is vital for restoring endosteal blood flow and providing access for osteoprogenitor cells to reach the osteotomy site.
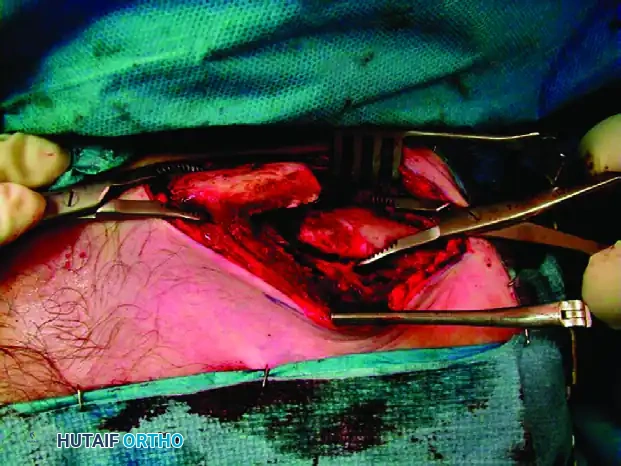
Anatomical Reduction and Rotational Correction
Hold the proximal and distal fragments with pointed reduction forceps. Apply lateral traction to the arm to restore length.
Correcting the rotational deformity is often the most challenging aspect of the procedure. The distal fragment is typically rotated anteriorly. To correct this malrotation, redirect the flat superior surface of the distal fragment superiorly, rotating it until it perfectly matches the corresponding superior surface of the proximal fragment.
Maintain the reduction with minimal soft tissue stripping. Excessive periosteal stripping will devascularize the bone and increase the risk of nonunion. Once anatomical length and rotation are achieved, temporarily fix the osteotomy site with a 2.0-mm Kirschner wire (K-wire).
INTERNAL FIXATION STRATEGY
Rigid internal fixation is required to counteract the complex deforming forces acting on the clavicle.
Plate Selection and Contouring
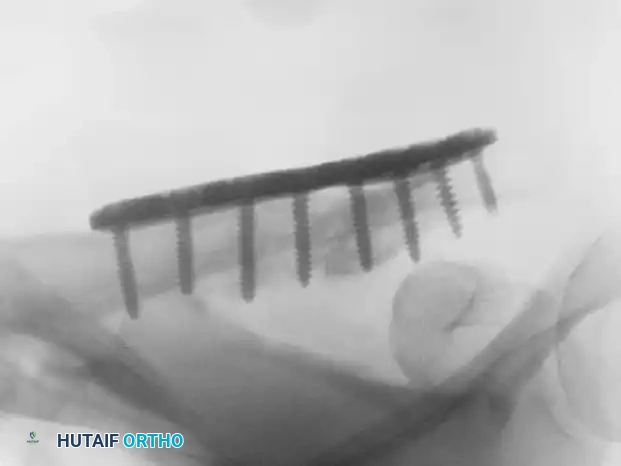
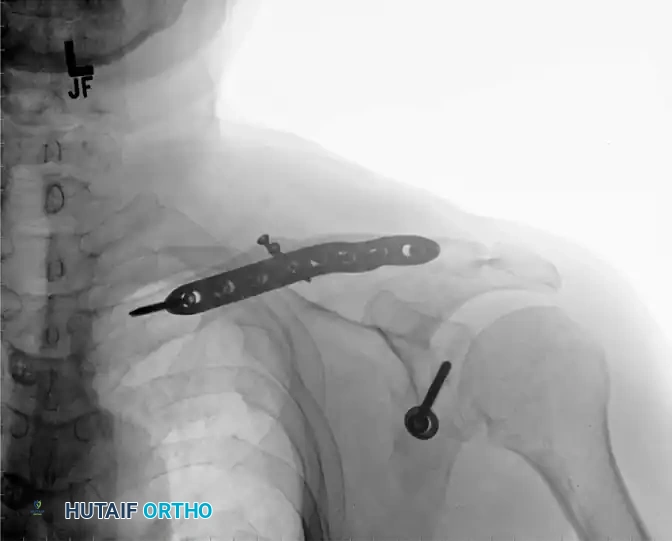
Select a 3.5-mm Limited Contact Dynamic Compression Plate (LC-DCP) or a pre-contoured anatomical locking plate. The plate must be of sufficient length to allow for a minimum of three bicortical screws (six cortices) on each side of the osteotomy. Typically, a plate with a minimum of six holes (range, 6 to 10 holes) is required.
If using a standard LC-DCP, it must be meticulously contoured to match the complex S-shaped anatomy of the superior clavicle.
Clinical Pearl: The use of modern, pre-contoured anatomical clavicle plates significantly reduces operative time by eliminating the need for extensive intraoperative bending. Furthermore, their low-profile anatomical shape minimizes hardware prominence, particularly at the medial aspect. A straight plate that is inadequately contoured will tend to project anteriorly, causing severe soft tissue irritation and necessitating future removal.
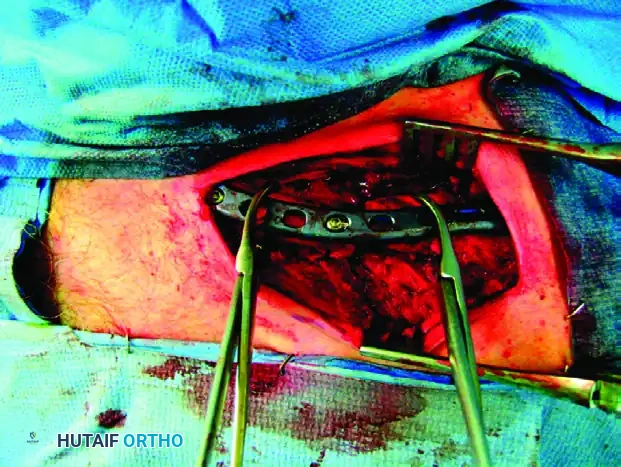
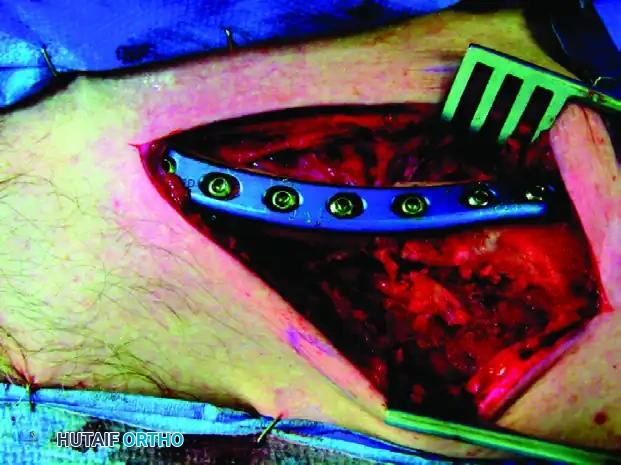
Plate Application
Apply the plate to the superior surface of the clavicle. Because the corrective osteotomy is typically transverse or short oblique, the plate should be applied in compression mode.
Utilize eccentric drilling in the holes adjacent to the osteotomy to generate dynamic axial compression across the osteotomy site. Ensure all screws are bicortical, taking care not to plunge the drill bit dangerously deep into the neurovascular structures beneath the clavicle.
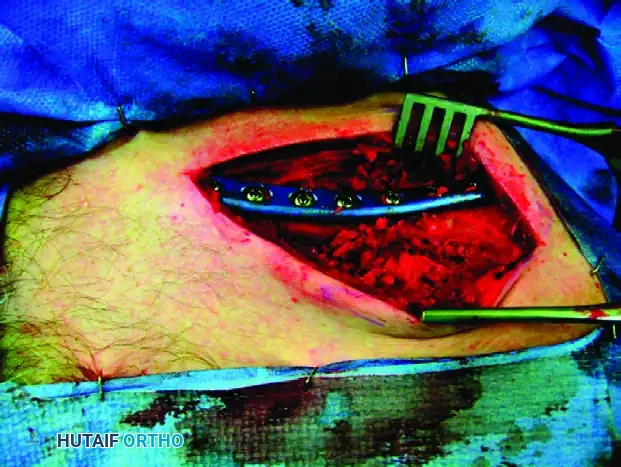
BONE GRAFTING AND BIOLOGICAL AUGMENTATION
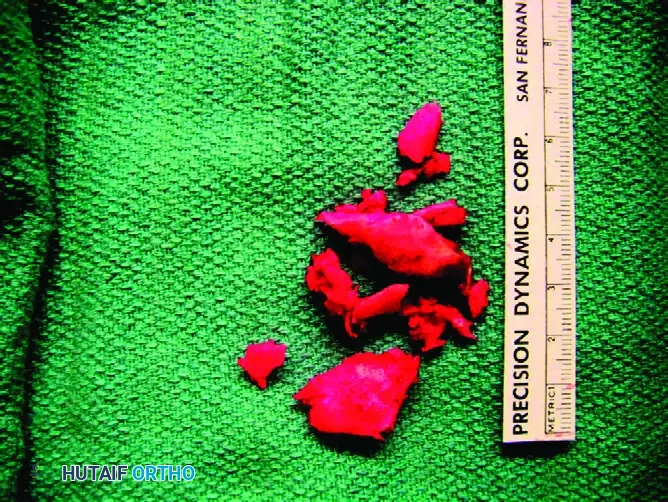
Even with perfect reduction and rigid compression, the osteotomy site benefits from biological augmentation, particularly if there is any cortical comminution or minor bone loss following the resection of the sclerotic malunion edges.
Smooth the bone ends with a rongeur. Collect the resected callus and any local bone debris.
Pack this morselized autograft tightly around the osteotomy site to stimulate osteogenesis. If an intercalary gap exists due to absolute bone loss, the previously harvested iliac crest structural graft should be contoured and slotted into the defect prior to final plate compression.
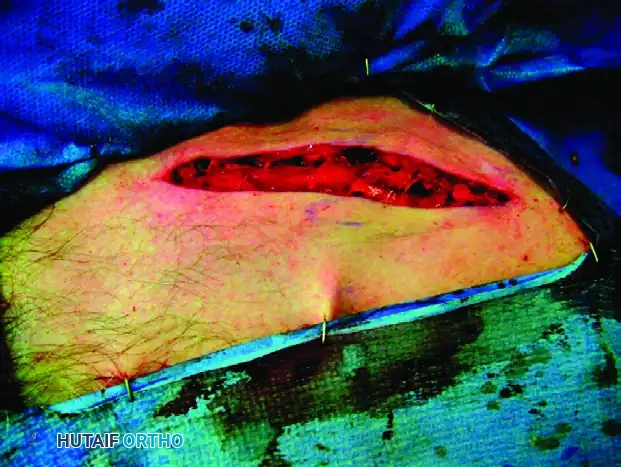
WOUND CLOSURE
A meticulous, layered closure is critical to prevent hardware exposure and infection.
- Myofascial Layer: Close the contiguous flaps of the trapezius and deltopectoral fascia over the plate using robust, No. 1 absorbable sutures. This layer provides the primary soft tissue coverage for the hardware.
- Subcutaneous Tissue: Approximate the subcutaneous fat and dermal layers using No. 2-0 absorbable sutures to reduce tension on the skin edges.
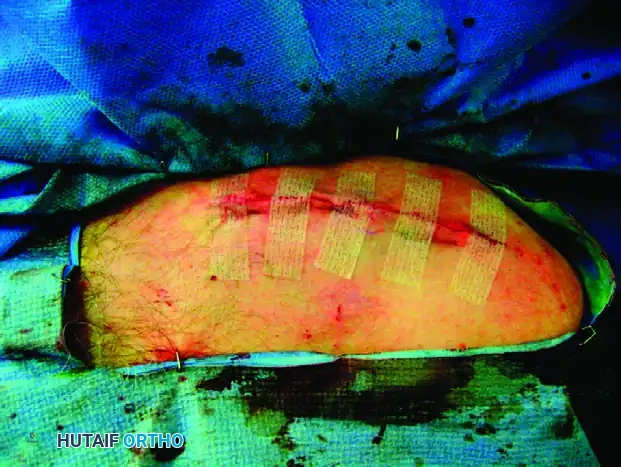
- Skin: Close the skin with surgical clips or a running subcuticular stitch, depending on surgeon preference and skin quality.
Apply a sterile, non-adherent dressing and place the patient's arm in a conventional shoulder sling before extubation.
POSTOPERATIVE CARE AND REHABILITATION
The postoperative rehabilitation protocol must balance the need for early mobilization to prevent adhesive capsulitis with the necessity of protecting the osteotomy site until osseous union occurs.
Phase I: Immediate Postoperative (0 to 2 Weeks)
- The patient's arm is maintained in a conventional sling.
- Pendulum exercises are initiated immediately postoperatively to maintain glenohumeral joint mobility.
- Active range of motion of the elbow, wrist, and hand is encouraged.
Phase II: Early Mobilization (2 to 4 Weeks)
- At 2 weeks, sutures or clips are removed.
- Active-assisted range of motion exercises for the shoulder are initiated. Elevation is typically limited to 90 degrees to prevent excessive rotational forces on the clavicle.
Phase III: Active Motion (4 to 6 Weeks)
- At 4 weeks, standard AP and clavicle-specific radiographs are obtained.

- If radiographs demonstrate maintenance of reduction and early signs of callus formation without hardware failure, the patient is completely weaned from the sling.
- Full active and passive range of motion exercises are initiated.
Phase IV: Strengthening and Return to Activity (6 to 8+ Weeks)
- Resisted exercises and progressive strengthening activities are strictly withheld until definitive radiographic union is observed.

- Union is typically achieved between 6 to 8 weeks postoperatively. Once bridging trabeculae are confirmed across the osteotomy site, the patient may gradually return to heavy lifting, manual labor, and contact sports.
