INTRODUCTION TO MICROVASCULAR SURGERY IN ORTHOPAEDICS
Microvascular anastomosis is a cornerstone of modern reconstructive orthopaedic surgery. The ability to reliably restore blood flow to severed or transferred tissues has revolutionized the management of complex extremity trauma, tumor resections, and congenital deformities. Whether performing a digital replantation, a free fibula transfer for a massive bone defect, or an anterolateral thigh (ALT) flap for soft tissue coverage, the orthopaedic microsurgeon must execute vascular anastomoses with absolute precision.
The fundamental goal of microvascular surgery is the tension-free, intima-to-intima coaptation of vessels, typically ranging from 0.5 mm to 3.0 mm in diameter. Success is dictated by strict adherence to biomechanical and physiological principles: minimizing endothelial trauma, preventing the introduction of thrombogenic adventitia into the lumen, and maintaining a highly controlled, spasm-free local environment.
This comprehensive guide details the operative execution of both end-to-end and end-to-side microvascular anastomoses, expanding upon foundational techniques to provide a textbook-level masterclass for orthopaedic residents, fellows, and practicing consultants.
PREOPERATIVE PREPARATION AND ERGONOMICS
Microsurgery is as much an exercise in physiological control and ergonomics as it is in surgical skill. The surgeon must eliminate physiological tremors and visual fatigue to operate effectively at high magnification.
Ergonomic Optimization
- Seating and Posture: The surgeon and assistant must be seated comfortably in adjustable microsurgical chairs with adequate lumbar and arm support. The elbows should rest securely on the operative table to isolate fine motor movements to the wrists and fingers.
- Microscope Positioning: The operating microscope must be positioned so that the surgeon’s neck remains in a neutral posture. For vessels less than 2 mm in diameter, an operating microscope is mandatory. Loupe magnification (e.g., 4.5× to 6.0×) may be acceptable for larger vessels (e.g., major vessels of the forearm or lower leg), but the microscope provides superior illumination and variable magnification (up to 40×) critical for intimal inspection.
- Instrumentation: Specialized microsurgical instruments—including jeweler’s forceps, microscissors (straight and curved), vessel dilators, and double-clamp approximators (Acland clamps)—must be meticulously maintained. Magnetized or damaged instruments will severely compromise the procedure.
💡 Clinical Pearl: Tremor Control
Avoid caffeine and strenuous physical exertion (such as heavy retracting or lifting) for at least 12 hours prior to a planned microsurgical case. Ensure the operative field is elevated to the level of the surgeon's lower chest to prevent shoulder fatigue, which translates into distal hand tremors.
SURGICAL TECHNIQUE 63-1: MICROVASCULAR ANASTOMOSIS (END-TO-END)
The end-to-end anastomosis is the workhorse technique for replantation and the majority of free tissue transfers. It is biomechanically superior in terms of laminar flow, provided there is no significant size mismatch between the donor and recipient vessels.
Step 1: Vessel Exposure and Mobilization
- Initial Dissection: Expose the selected vessel by careful dissection under magnification. Utilize the operating microscope for the dissection of any vessels less than 2 mm in diameter.
- Connective Tissue Clearance: Using fine jeweler’s forceps and microscissors, carefully remove the loose connective tissue surrounding the vessel.
- Mobilization: Mobilize each end of the vessel proximally and distally. The goal is to obtain adequate length so that the anastomosis can be performed with minimal or no tension. Tension is a primary cause of anastomotic failure, leading to intimal tearing and subsequent thrombosis.
- Branch Management: Cauterize tethering side branches with bipolar electrocautery. Ensure the bipolar tips are clean and set to a low wattage (e.g., 10-15 watts) to prevent thermal necrosis from spreading to the main vessel wall. Continue mobilization until the vessel ends can be easily approximated.
Step 2: Field Preparation and Adventitial Stripping
- Background Contrast: Place a contrasting colored rubber or plastic sheet (typically blue, green, or yellow) behind the vessel. This isolates the vessel from the surrounding bloody field, reduces eye fatigue, and makes the fine translucent edges of the vessel wall and the fine monofilament suture (usually 8-0 to 10-0 nylon) much easier to see.
- Irrigation: Frequently irrigate the operative field with heparinized lactated Ringer solution (typically 100 units of heparin per 1 mL of solution). This prevents the formation of microthrombi on the exposed endothelium.
- Adventitial Excision: Remove sufficient adventitia from the vessel ends to expose all layers of the vessel wall. The adventitia is highly thrombogenic; if it is dragged into the lumen by the suture, it will initiate the coagulation cascade and cause immediate thrombosis.
- Technique: Adventitia can be removed by careful circumferential trimming or by applying traction to the adventitia and transecting it in a manner similar to circumcision. Magnification of 6× to 10× is usually sufficient for this dissection.
- Intimal Inspection: After the adventitia has been trimmed, continue to irrigate the field intermittently. Increase the magnification to 25× or 40× to inspect the vascular intima. Resect the vessel wall back until the cut ends appear completely normal, with no evidence of crush injury, red streaking (intramural hematoma), or intimal separation.
⚠️ Surgical Warning: The Zone of Injury
In trauma cases, the zone of intimal injury often extends far beyond the macroscopic soft tissue damage. Never hesitate to resect further back to healthy intima. It is better to interpose a reversed vein graft than to attempt a primary anastomosis on traumatized endothelium.
Step 3: Vessel Dilation and Approximation
- Approximation: Appose the vessel ends using a double-clamp approximator. Ensure the vessel is not twisted.
- Dilation: Vessels can be dilated gently by inserting the tips of jeweler’s forceps or specially designed micro-dilators. The walls of the vessels can be grasped gently, but rough manipulation of the intima must be strictly avoided.
- Spasm Management: To overcome vascular spasm, apply topical vasodilators such as 2% lidocaine (without epinephrine) or papaverine directly to the vessel adventitia.
Step 4: The Suturing Sequence (120-Degree Triangulation Technique)
The goal of suturing is to achieve full-thickness, intima-to-intima coaptation without causing vascular constriction. Interrupted sutures are the gold standard. While some animal models (e.g., Chen et al.) have shown that continuous suture techniques reduce anastomosis time with similar patency rates in larger vessels, interrupted sutures remain the safest and most reliable method in orthopaedic microsurgery.
- Initial Sutures: Place the first two sutures approximately 120 degrees apart on the vessel’s circumference. Place each suture through the full thickness of the vessel wall. Leave the ends of these sutures long; they will be used as traction sutures.
- Posterior Wall Exposure: Rotate the clamp approximators to expose the posterior vessel wall. The 120-degree placement ensures that the posterior wall falls away, preventing the catastrophic error of catching the back wall with the needle.
- Third Suture: Place a stitch 120 degrees from the initial two stitches, effectively triangulating the vessel.
- Completion: Place additional stitches in the remaining spaces to complete the anastomosis. Arteries 1 mm in diameter usually require 5 to 8 stitches, whereas veins (which have thinner walls and are more prone to collapsing) usually require 7 to 10 stitches.
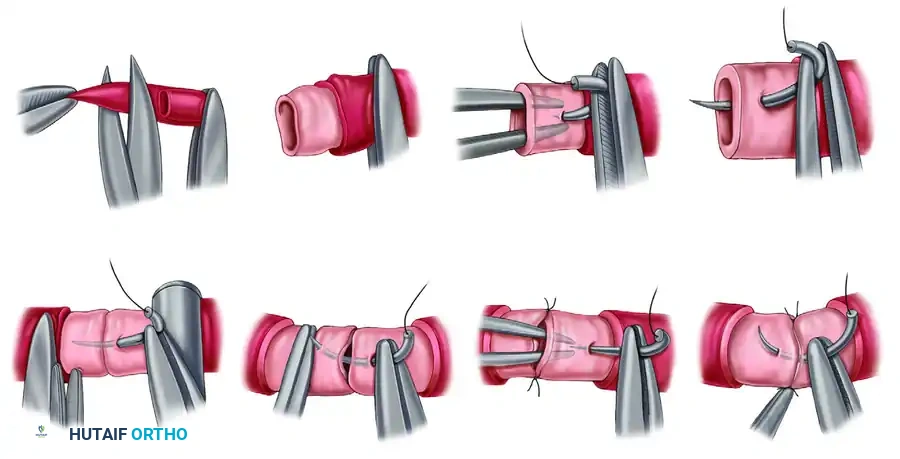
FIGURE 63-2 Microvascular anastomosis, basic steps. A, Adventitial excision. Traction is applied to adventitia, and it is excised sufficiently to avoid intrusion into vascular lumen. B, Appearance of vessel end after adventitial excision. C, Placement of initial suture. Forceps may be used as counterpressor agents without internal damage. D, Needle is passed through full thickness of vessel wall some distance from cut edge that is slightly greater than thickness of vessel wall. E, Passage of needle through opposite end of vessel is accomplished at similar distance from cut edge. F, Forceps, used as counterpressor agents, assist in passage of needle through opposite end of vessel. G and H, After completion of initial sutures, vessel is stabilized, allowing completion of even anastomosis. SEE TECHNIQUE 63-1.
Step 5: Clamp Removal and Hemostasis
- Clamp Release Sequence: After the completion of the vascular anastomosis, remove the clamp downstream from the anastomosis first. This allows back-bleeding to fill the vessel and tests the integrity of the suture line under low pressure. Next, remove the clamp that is upstream to restore full pulsatile arterial flow.
- Managing Leaks: Minimal bleeding between stitches is of no concern and will typically stop with gentle pressure and time. However, excessive or pulsatile bleeding should be rapidly controlled by the reapplication of clamps or the inflation of a pneumatic tourniquet. Place additional interrupted stitches in the areas of leakage, remove the clamps again, and deflate the tourniquet.
- Clot Management: Small platelet clots around the outside of the anastomosis are to be expected. Avoid occlusion of the anastomosis by continuously irrigating with a heparinized solution or by gentle milking of the vessel.
Step 6: Patency Assessment (The Empty-and-Refill Test)
After bleeding has stopped from the suture line, you must objectively assess the patency of the anastomosis.
1. Occlude a segment of the vessel with two pairs of jeweler's forceps just distal to the anastomosis.
2. Keep the proximal forceps closed, and gently strip the blood from the segment from proximal to distal using the second pair of forceps.
3. Keep the distal forceps closed to prevent retrograde flow, and release the proximal forceps.
4. Interpretation: Rapid, instantaneous filling of the emptied segment indicates a patent, successful anastomosis. Sluggish filling or failure to fill indicates thrombosis or a technical error (e.g., back-walling, intimal flap), necessitating immediate takedown and revision of the anastomosis.
The final suture line should be even. There should be no anastomotic stenosis, no dilation proximally, and no stenosis distally. Once confirmed, close the soft tissue over the vessels as soon as possible to avoid desiccation of the vessel wall.
SURGICAL TECHNIQUE 63-2: MICROVASCULAR ANASTOMOSIS (END-TO-SIDE)
Indications and Biomechanics
The end-to-side anastomosis is indicated when there is a significant size mismatch between the donor and recipient vessels (e.g., a 1 mm flap artery to a 4 mm recipient artery) or when the recipient vessel is a major axial artery (e.g., the radial or posterior tibial artery) that cannot be sacrificed without compromising distal limb perfusion.
Biomechanically, end-to-side anastomoses are subject to different flow dynamics. The angle of incidence affects turbulence; an angle of 45 degrees is generally preferred to minimize turbulent flow and reduce the risk of intimal hyperplasia and subsequent thrombosis.
Step 1: Vessel Preparation
- Dissection: Dissect and mobilize the vessels as described in Technique 63-1. Ensure the recipient vessel is completely freed from surrounding fascial attachments to allow it to be elevated slightly for the arteriotomy.
- Recipient Arteriotomy: Apply double Acland clamps to the recipient vessel. Carefully excise a small longitudinal elliptical portion of the recipient vessel wall using specialized microscissors. The size of the ellipse should perfectly match the diameter of the beveled donor vessel. Avoid simply making a slit, as this can lead to a stricture; a true ellipse must be removed.
- Donor Vessel Beveling: Cut the end of the donor vessel (the vessel that is to be attached to the recipient) at an angle of about 45 degrees. This increases the cross-sectional area of the anastomosis, reducing the risk of stenosis and improving laminar flow.
Step 2: Suturing Sequence
- Anchoring Sutures: Begin the anastomosis by placing sutures at the proximal (heel) and distal (toe) ends of the ellipse. These are the most critical sutures for ensuring a watertight seal at the apices.
- Traction: Leave the suture ends long for traction.
- Wall Completion: Complete the anastomosis by placing interrupted sutures evenly along the opening between the traction sutures. Suture the back wall first if the vessel cannot be easily rotated, working from the inside out on the donor and outside in on the recipient, or vice versa, ensuring the knots remain on the extraluminal surface.
- Flow Restoration: Release the occluding clamps (downstream first, then upstream) or release the tourniquet, and assess patency and flow using the empty-and-refill test described previously.
💡 Clinical Pearl: The "Heel and Toe" Technique
When performing an end-to-side anastomosis, the "heel" (proximal apex) is notoriously prone to leaking and is the hardest to visualize once the side walls are sutured. Take extra care to ensure full-thickness bites at the heel, and consider placing one or two adjacent sutures before tying the main heel knot to ensure perfect visualization.
POSTOPERATIVE PROTOCOLS AND MONITORING
The success of a microvascular anastomosis does not end in the operating room. The first 48 to 72 hours postoperatively are critical, as this is the window during which the vast majority of microvascular thromboses occur.
Systemic and Local Management
- Temperature Control: The patient's room must be kept warm (typically above 75°F / 24°C) to prevent peripheral vasoconstriction. The reconstructed extremity should be kept elevated to promote venous drainage but not so high as to compromise arterial inflow.
- Hydration and Hemodynamics: Maintain euvolemia. A high cardiac output state ensures adequate perfusion pressure across the anastomosis. Avoid vasopressors if at all possible, as they induce severe peripheral vasospasm.
- Antithrombotic Therapy: Protocols vary by institution, but many surgeons utilize a daily aspirin (81 mg or 325 mg) to inhibit platelet aggregation. In cases of crush injury or revised anastomoses, a continuous intravenous heparin infusion or low-molecular-weight heparin (LMWH) may be indicated, balancing the risk of flap hematoma against the risk of thrombosis.
Flap and Replant Monitoring
- Clinical Assessment: The gold standard remains clinical observation. Assess the tissue for color, capillary refill time (normal is 1-2 seconds), tissue turgor, and temperature.
- Arterial Insufficiency: Pale, cool, empty tissue with absent capillary refill.
- Venous Congestion: Blue/purple, swollen, warm tissue with brisk (<1 second) capillary refill and dark blood on pinprick.
- Technological Adjuncts: Surface Doppler ultrasonography is routinely used to mark and monitor the perforator or axial vessels. Implantable Doppler probes (e.g., Cook-Swartz probes) placed directly on the efferent vein during surgery provide continuous auditory monitoring and are highly sensitive to early venous thrombosis.
Salvage Protocols
If vascular compromise is suspected, time is tissue. Immediate return to the operating room is mandatory. Do not delay for imaging studies if the clinical picture indicates thrombosis. Upon re-exploration, the anastomosis must be excised, the vessels flushed with heparinized saline and thrombolytics (e.g., tPA or urokinase) if necessary, and the anastomosis revised, often requiring an interpositional vein graft to bridge the newly created defect without tension.
By adhering to these rigorous standards of preparation, execution, and postoperative care, the orthopaedic microsurgeon can achieve high success rates in complex microvascular reconstructions, ultimately preserving limb function and improving patient quality of life.
===EOF===
