P ITFALLS
- Neuropathic Charcot joints may present with large bony defects. Knee arthroplasty is fraught with complications, especially early loosening, in patients with this condition.
Metal Augments
Indications
1. Tibial bony defects
2. Femoral bony defects
3. Flexion instability
4. Femoral component rotational malalignment
Examination/Imaging
Controversies
1. The tibial augment may be flat or wedged. A flat augment allows for the distribution of force parallel to the joint line, whereas a wedged augment preserves more bone.
5. Augments may be used in primary or revision arthroplasty. Examination of a knee should include an examination of medial-lateral and flexion-extension stability.
6. Standard anteroposterior and lateral radiographs should be of high quality to determine the nature and size of the bony defects.
Treatment Options
1. Ignore the defect.
2. Extra cement to fill a void
3. Bulk allograft
4. Impaction grafting
5. Metaphyseal cone augmentation
6. Custom device
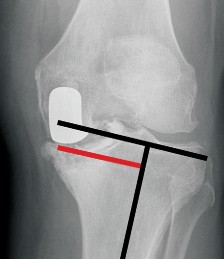
1. In Figure 1, anteroposterior (Fig. 1A) and lateral (Fig. 1B) radiographs show a failed unicondylar replacement.
2. The visible medial defect requires hemi-augmentation or wedge augmentation (Fig. 1C).
Surgical Anatomy
7. Defects of the proximal tibia and distal femur are described as contained or noncontained.
8. In primary cases, defects may occur from extreme wear and bony erosion. An example is a medial defect in a patient who is extremely overweight or in a patient with severe erosions of the bone from rheumatoid arthritis.
9. In revision cases, defects of the femur may occur from polyethylene wear and osteolysis (Fig. 2), from infection, or from removal of well-fixed implants. Removal of failed unicondylar replacements typically produces a large tibial defect.
10. An internally rotated femoral component causes femoral maltracking. A posterior augment may be placed on the lateral condyle to improve external rotation of the component. Femoral rotation is determined by the transepicondylar axis and Whiteside’s line.
11. The flexion-extension gap balance determines the need for distal femoral and proximal tibial augmentation. Augments should be used to balance the gaps.


421
### Metal Augments
A B
Hemi augment Wedge Augment
C


 FIGURE 1 FIGURE 2 422
### Metal Augments
FIGURE 1 FIGURE 2 422
### Metal Augments
Positioning
1. The standard positioning for knee replacement surgery is used.
P EARLS
- A high-speed burr is useful for débriding the bone in a controlled fashion.
P ITFALLS
-
The extensive exposure of the knee in a revision situation can put the patellar tendon insertion at risk. A prophylactic suture may help the surgeon to avoid avulsion.
Portals/Exposures - Exposure is through a medial parapatellar arthrotomy used for revision knee surgery.
- The bony defects must be débrided fully and exposed. All fibrous tissue must be removed.
-
A quadriceps snip is helpful for exposing a stiff knee.
Procedure 1: Augmentation of Bony Defects
Step 1: Tibial Hemi-augmentation or
Wedge Augmentation
P EARLS
- Remove as little bone as possible.
P ITFALLS
- Intramedullary guides are important for success and allow for easy use of a stemmed component.
- Offset stems help considerably.
- Using an intramedullary guide, the minimum resection should be measured on the proximal tibia. The size of the defect then can be ascertained.
- The revision tibial cutting jig allows for sizing of the defect. Tibial cutting jigs in revision systems have slots for 5-, 10-, or 15-mm augments.
- A feeler gauge should be used to determine which augment will be used. In Figure 3, the revision tibial cutting jig is used, and a feeler gauge measures a 15-mm medial defect (arrow).
- Separate jigs are available to make cuts for wedged augments (Fig. 4).
Step 2: Femoral Augmentation for
Bone Loss
Controversies
1. The shape of the tibial augment (Fig. 5) is controversial.
2. Making a step cut will put the hemi-augment at 90° to the mechanical axis (Fig. 6). Although this shape is mechanically sounder, good results have been seen with angled or wedge-shaped augments, which remove less bone.
9. Femoral augments may be placed on the distal or the posterior surface of the implant.
1. Augmentation can be very helpful in obtaining equal flexion and extension gap balance.
2. In revision cases, augments may be used to build
up deficient bone so that the correctly sized implant can be placed in the correct location.
10. Augments placed on the distal surface act to decrease the extension gap, whereas those placed posteriorly decrease the flexion gap.
11. The tibial tray should be placed first. The distal-most femoral bone cut then is made using an intramedullary guide.


 423
### Metal Augments
FIGURE 3 FIGURE 4
423
### Metal Augments
FIGURE 3 FIGURE 4


---
FIGURE 5 FIGURE 6
## P EARLS
1.
In revision surgery, placing the tibial component first allows for determination of the flexion-extension gap.
12. A trial femoral component then is placed. The trial may have slots to allow for bone cuts for augments to be made. In Figure 7A, the 5-mm distal augment in this patient is too small, so the slot in the femoral guide is used to make the cut for the 10-mm augment (Fig. 7A and 7B).
Instrumentation/ Implantation
1. Femoral trial components have slots that are useful for making bone cuts for augments.

---
424
### Metal Augments
A
Distal femur
Bone cut
Augment

B

---
FIGURE 7 C 425
## P EARLS
1.
Place a large amount of bone cement around the augments and metaphyseal portion of the stem to fill voids.
P ITFALLS
- In some systems, the posterior and distal femoral augments must be placed in a specific order.
Metal Augments
- The femur then is sized in flexion and, if needed, posterior augments may be placed to allow for placement of the correctly sized implant (Fig. 7C).
Step 3: Final Components
- After the correctly sized augments have been selected and tried, the final implant must be assembled.
- Manufacturers have different mechanisms for attaching augments to the femoral (Fig. 8A) or tibial (Fig. 8B) component.
- In older knee revision systems, augments must be cemented onto the component. A clamp should be applied during cementation.
-
Newer systems use a small screw that attaches the augment to the tibial baseplate or femoral component (Fig. 9).


A B

---
FIGURE 8 FIGURE 9
Instrumentation/ Implantation
1. The use of a tapered augment gives a better fit on the tibia.

---
426
Controversies
1. Augments typically are cemented onto the host bone.
2. Newer designs using trabecular metal are available that may be cemented onto host bone or considered for uncemented use with potential bony ingrowth.
Metal Augments FIGURE 10 1. Cement should be used around the augments and the metaphysis of the implant to attach them to the bone (Fig. 10). The stem may be cemented or uncemented, depending on the surgeon’s choice.
Procedure 2: Posterior Augments for Flexion Instability
2. Patients with flexion instability have a larger flexion gap than extension gap, which may provoke symptomatic effusions, pain, or dislocation.
3. To solve this problem, the flexion gap (Fig. 11A, arrow) must be made smaller without changing the extension gap. This goal is accomplished by upsizing the femoral component (Fig. 11B).
4. The use of bilateral posterior femoral augments allows for placement of a larger femoral component (Fig. 12, arrow).

---
FIGURE 11 A 427
### Metal Augments
Flexion Extension Upsized femoral component
Augment


B Flexion Instability
P EARLS
- A larger sized femoral component may avoid the use of a constrained or hinged implant.
-
Know the differences in sizes of implant so that the correctly sized augment is used. In Figure 13, the upsized component is exactly
5 mm larger (double-headed arrow), which corresponds to the smallest augment. The difference between sizes depends on the size of implant and the manufacturer. FIGURE 11, cont’d

---
FIGURE 12 FIGURE 13 428
## P EARLS
1.
A lateral posterior wedge may be used to rotate externally an internally rotated femoral component.
P ITFALLS
- Checking patellar tracking with the tourniquet inflated may lead to unnecessary lateral releases.
Metal Augments
Procedure 3: Posterior Augmentation to Change Femoral Component Rotation
5. The femoral component must be placed correctly in a small amount of external rotation for proper patellar tracking. If cuts that are internally rotated exist, a posterior augment may be used on the lateral femoral portion of the component to force the component into external rotation (Fig. 14A).
Instrumentation/ Implantation
1. Use both the transepicondylar axis and Whiteside’s line to determine the rotational alignment of the femoral cut.
2. Using the epicondylar axis, the femoral component is rotated internally (Fig. 14B).
3. The posterior augment is attached to the lateral side of the implant (Fig. 14C).
4. In Figure 14D, the rotation has been improved and now matches the epicondylar axis.
P ITFALLS
-
Be careful with the insertion of the tibial tendon because the bone may be compromised.
Medial epicondyle
Dislocated
patella
Lateral epicondyle

A Internally rotated femoral component

B
FIGURE 14


---
429
### Metal Augments
C D
FIGURE 14, cont’d
Procedure 4: Complete Tibial Augmentation
1. If there is a large amount of tibial bone loss, a complete tibial augment may be helpful in raising the joint line.
2. A smaller polyethylene insert may be used, which may be valuable if the largest size insert is too small to match the flexion-extension gaps.
3. In the example in Figure 15, the tibial cut is located at the level of the tendon insertion, indicating substantial tibial bone loss. A complete tibial augment allows for the use of a 17-mm polyethylene insert (Fig. 16).


---
FIGURE 15 FIGURE 16 430
Metal Augments
Postoperative Care and Expected Outcomes
1. Patients with small defects treated with augmentation and a stemmed component may be allowed to bear weight as tolerated after surgery.
2. For patients with larger defects, where implant stability is of concern, weight bearing may be limited for 6 weeks after surgery.
