INTRODUCTION TO HUMERAL SHAFT FIXATION
While the majority of humeral shaft fractures can be managed successfully with nonoperative modalities such as functional bracing (Sarmiento principles), surgical intervention is mandated in specific clinical scenarios. Absolute indications for operative management include open fractures, vascular injuries requiring repair, compartment syndrome, and floating elbow variants. Relative indications encompass polytrauma, bilateral humeral fractures, pathologic fractures, unacceptable alignment following closed reduction, and body habitus precluding effective bracing.
When surgical intervention is elected, the orthopedic surgeon must choose between open reduction and internal fixation (ORIF) via plate osteosynthesis and intramedullary (IM) nailing. Both modalities offer distinct biomechanical advantages and unique complication profiles. This comprehensive guide details the surgical execution of the modified posterior (triceps-reflecting) approach for ORIF, followed by an evidence-based analysis of intramedullary nailing techniques.
OPEN REDUCTION AND INTERNAL FIXATION: MODIFIED POSTERIOR APPROACH (TRICEPS-REFLECTING)
The posterior approach to the humerus provides unparalleled exposure to the middle and distal thirds of the humeral shaft. The modified triceps-reflecting technique minimizes direct muscle trauma compared to traditional triceps-splitting approaches, offering an extensile window while protecting the radial nerve.
Preoperative Planning and Patient Positioning
Meticulous preoperative planning is essential. High-quality orthogonal radiographs must be templated to determine plate length, ensuring a minimum of three to four bicortical screws (six to eight cortices) in both the proximal and distal fracture fragments.
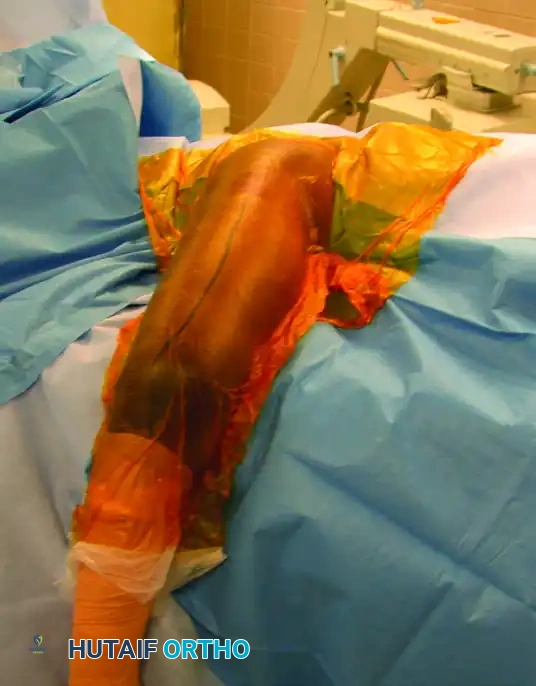
- Positioning: Place the patient in the lateral decubitus position on a radiolucent table. Ensure all bony prominences are heavily padded. Use a beanbag for stabilization.
- Arm Position: The operative arm is draped free and rested over a sterile padded bar or Mayo stand, allowing the elbow to flex to 90 degrees. This position relaxes the triceps and facilitates reduction.
- Preparation: Use a wide proximal preparation and drape to allow for the application of a sterile tourniquet high on the brachium.
🚨 Surgical Warning: Tourniquet Application
If a sterile tourniquet is utilized, ensure it is placed as proximally as possible to avoid tethering the triceps or compressing the radial nerve against the proximal humerus during the dissection.
Surgical Anatomy and Superficial Dissection
- Make a longitudinal incision extending from the distal edge of the tourniquet to the tip of the olecranon, remaining strictly in line with the long axis of the humerus.
- Carry the dissection sharply through the subcutaneous tissues down to the triceps fascia. Maintain meticulous hemostasis.
- Incise the triceps fascia longitudinally. Carry the dissection laterally, elevating the fasciocutaneous flaps to expose the lateral intermuscular septum.
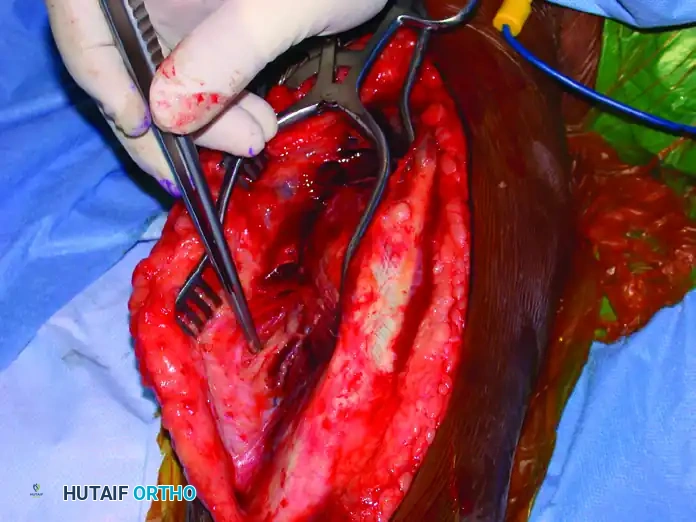
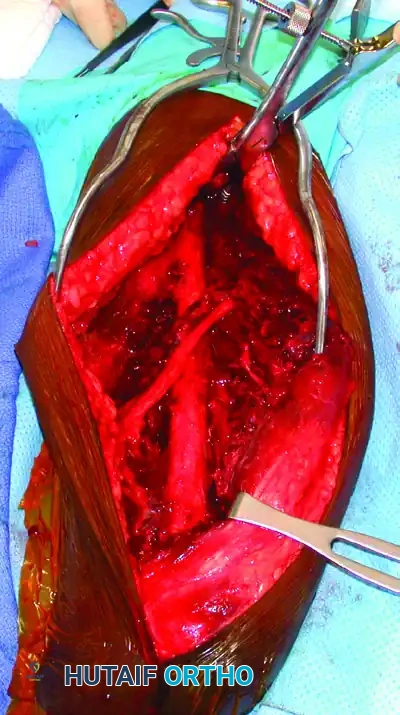
Identification and Mobilization of the Radial Nerve
The most critical step in the posterior approach is the safe identification and mobilization of the radial nerve. Iatrogenic radial nerve palsy is a devastating complication that must be avoided through systematic anatomic dissection.
- The Roadmap: Identify the lower lateral brachial cutaneous nerve within the subcutaneous tissue or superficial fascia. Follow this nerve proximally; it reliably leads directly to the radial nerve as it pierces the lateral intermuscular septum from the posterior to the anterior compartment.
- This intersection typically occurs at the level of the tourniquet. Once the radial nerve is definitively identified, release the tourniquet to minimize ischemic neuropraxia and allow for accurate assessment of hemostasis.
- Dissect the triceps muscle proximally off the intermuscular septum.
💎 Clinical Pearl: Radial Nerve Mobilization
Do not merely identify the radial nerve; mobilize it extensively. Free the nerve proximally, distally, anteriorly, and posteriorly. Incise the lateral intermuscular septum for at least 3 cm to prevent kinking or tethering of the nerve during fracture reduction and plate application.
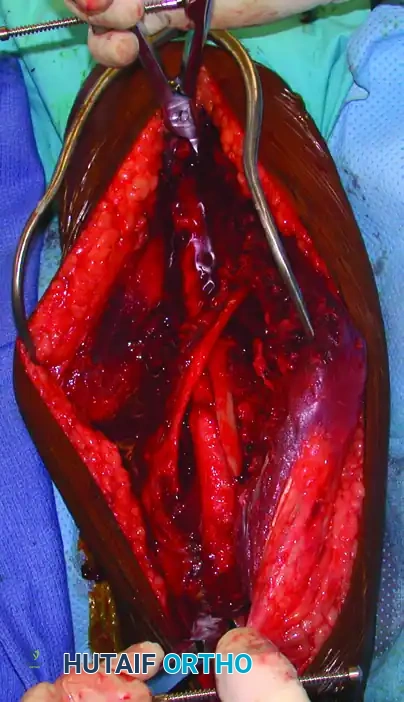
Deep Dissection and Fracture Exposure
- With the radial nerve protected (often using a vessel loop, though care must be taken not to apply excessive traction), incise the triceps off the periosteum to expose the humeral shaft.
- Biomechanical Imperative: Preserve as much of the periosteum as possible. Excessive periosteal stripping devascularizes the fracture fragments, significantly increasing the risk of nonunion.
- Proximally, if additional exposure is required, reflect the posterior border of the deltoid anteriorly.
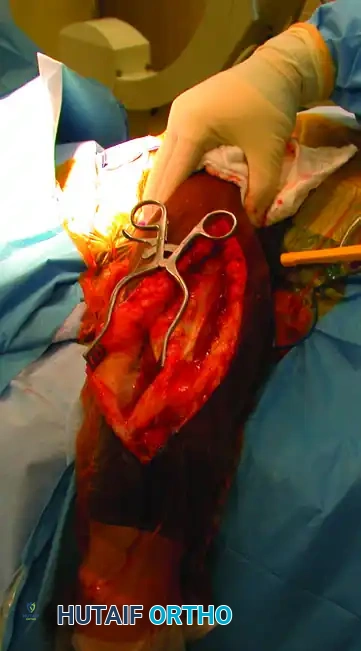
Fracture Reduction and Provisional Fixation
- Place a single bone clamp (e.g., a pointed reduction forceps or Verbrugge clamp) on the proximal and distal fragments. Ensure these clamps are placed far away from the fracture site to control the fragments and simultaneously reflect the triceps.
- Avoid Circumferential Stripping: Never pass clamps circumferentially around the bone if it requires stripping intact soft tissue attachments.
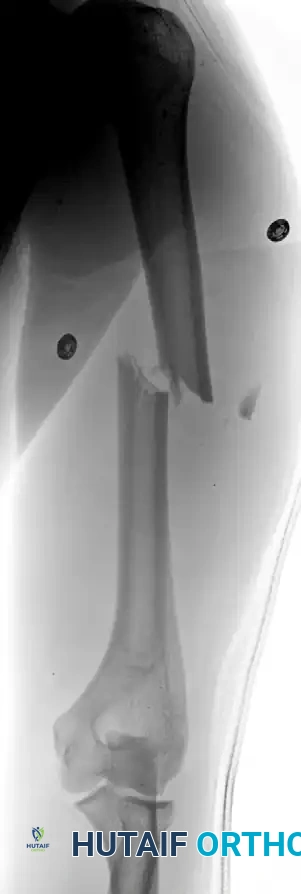
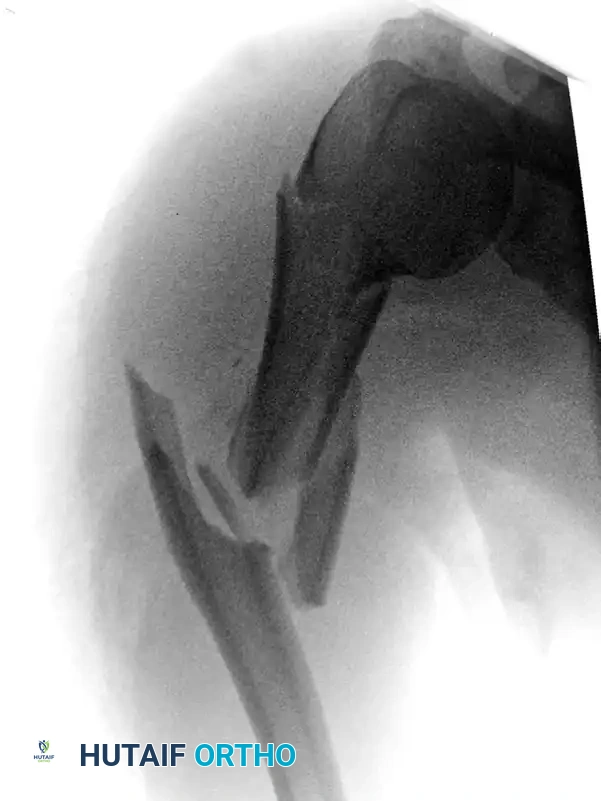
- After meticulous débridement of the fracture site, achieve anatomic reduction.
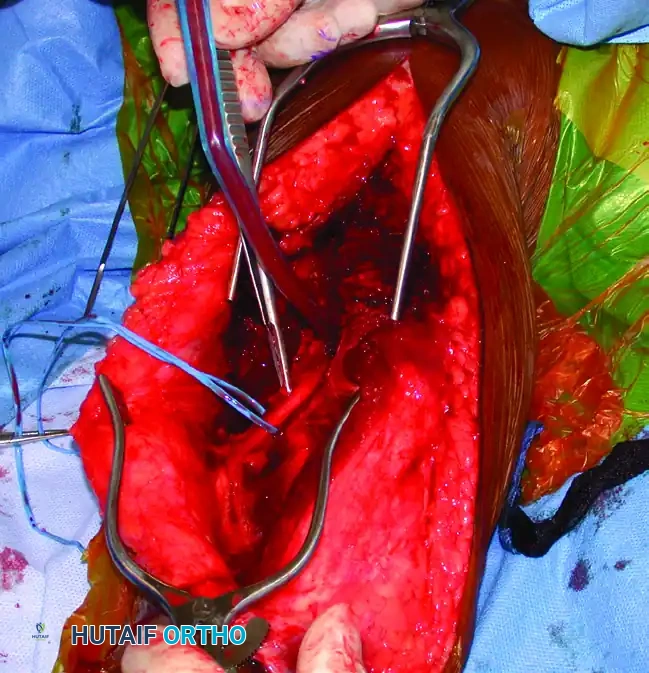
- For oblique or spiral fractures, insert an interfragmentary lag screw for provisional absolute stability.
- The Eglseder Technique: For transverse or short oblique fractures where lag screw fixation is technically unfeasible, a minifragment plate (e.g., 2.0 mm or 2.4 mm) can be applied orthogonally to the planned definitive plate. This provides excellent provisional fixation without obstructing the definitive construct.
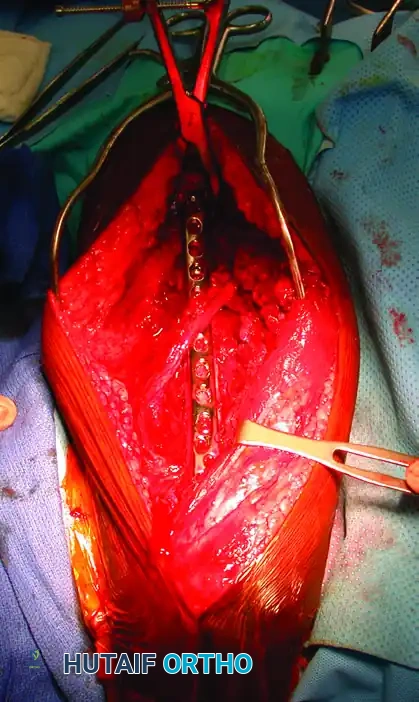
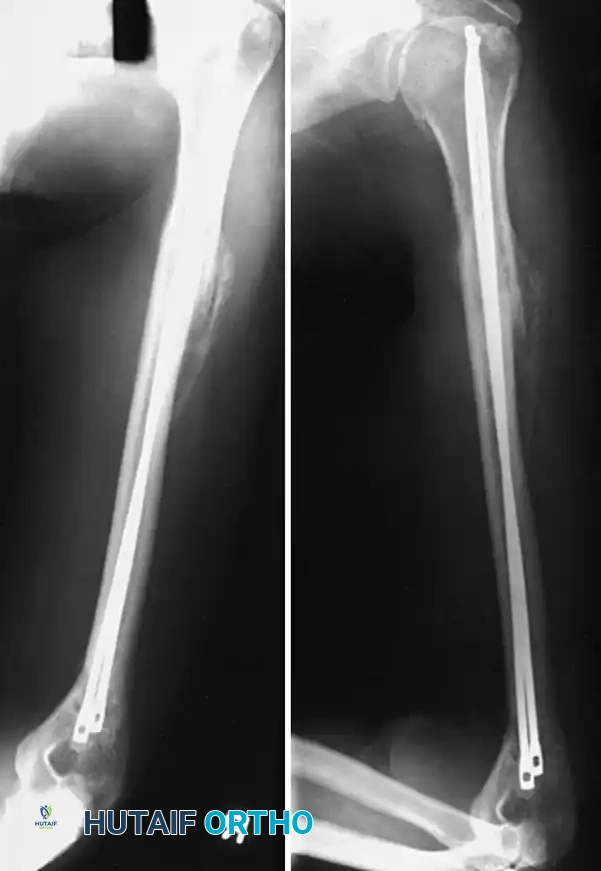
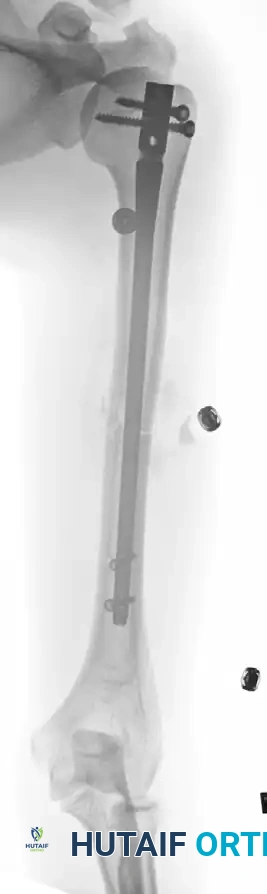
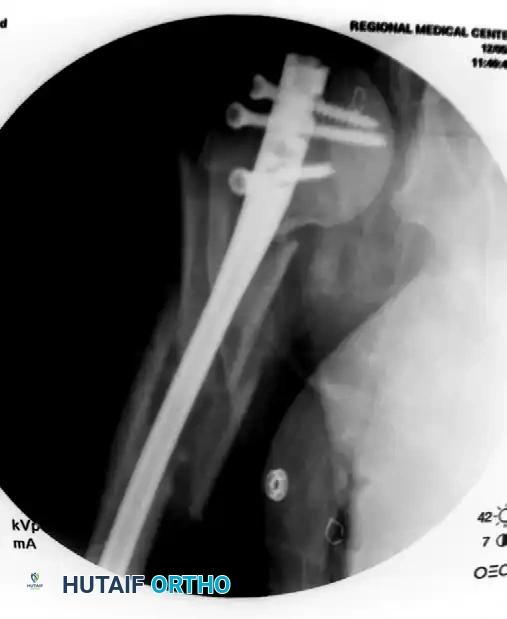
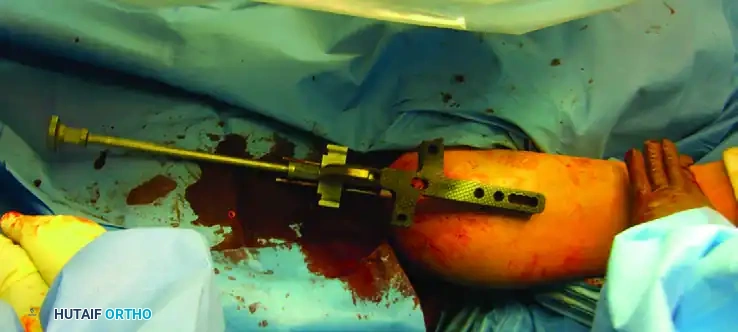
Definitive Plate Osteosynthesis
- Select a large-fragment (4.5 mm) narrow dynamic compression plate (LC-DCP) or locking compression plate (LCP).
- Apply the plate to the posterior or posterolateral surface of the humerus. Depending on the fracture pattern, the plate should function in neutralization (if a lag screw is used), compression (for transverse fractures), or bridge-plating mode (for highly comminuted fractures).
- Confirm the overall alignment of the humerus (length, rotation, and angulation) and the quality of the reduction using intraoperative fluoroscopy.
- Ensure the radial nerve rests safely adjacent to, or over, the plate without tension.
- Perform routine layered closure. Reapproximate the triceps fascia meticulously. Skin closure is performed over a closed-suction drain to prevent hematoma formation, which can compress the radial nerve.
INTRAMEDULLARY FIXATION OF THE HUMERAL SHAFT
The undeniable success of intramedullary (IM) nailing in lower extremity trauma (femur and tibia) historically led to immense enthusiasm for its application in the humeral shaft. Biomechanically, IM nails act as load-sharing devices, situated at the mechanical axis of the bone, thereby subjecting the implant to less bending stress compared to eccentric plate fixation.
However, the humerus is not a weight-bearing bone, and its primary biomechanical forces are torsional rather than axial. While literature reports excellent union rates with nailing techniques, significant problems regarding insertion site morbidity—specifically shoulder pain and rotator cuff pathology—have dampened the initial enthusiasm.
The Evolution of Humeral Nails
Early flexible nails, such as Rush pins and Ender nails, provided minimal axial or rotational stability.
These early constructs required supplementary stabilization, such as cerclage wiring or prolonged postoperative immobilization, particularly in comminuted or unstable fracture patterns. Even with these additions, the resulting construct was rarely stable enough to permit early range of motion or upper extremity weight-bearing, rendering them suboptimal for multiply-injured patients.
The advent of locking IM nails revolutionized rotational control and axial stability. However, early generations of locked nails were bulky, requiring extensive reaming of the medullary canal. This often led to fracture distraction, particularly in patients with narrow isthmuses. Modern humeral nails are designed in smaller diameters (7, 8, or 9 mm) to accommodate smaller bones and can be inserted in either a reamed or unreamed fashion.
Indications for Intramedullary Nailing
While plate osteosynthesis remains the gold standard for most isolated humeral shaft fractures, IM nailing is highly preferred in specific clinical scenarios:
1. Segmental Fractures: Nailing allows for biological fixation without the massive soft-tissue stripping required for long plates.
2. Pathological Fractures: Provides prophylactic stabilization of the entire bone.
3. Polytrauma: Allows for rapid stabilization with minimal blood loss.
4. Severe Soft-Tissue Compromise: Ideal for open fractures with extensive soft-tissue defects where plating would risk hardware exposure.
5. Osteopenic Bone: Load-sharing properties reduce the risk of hardware pullout.
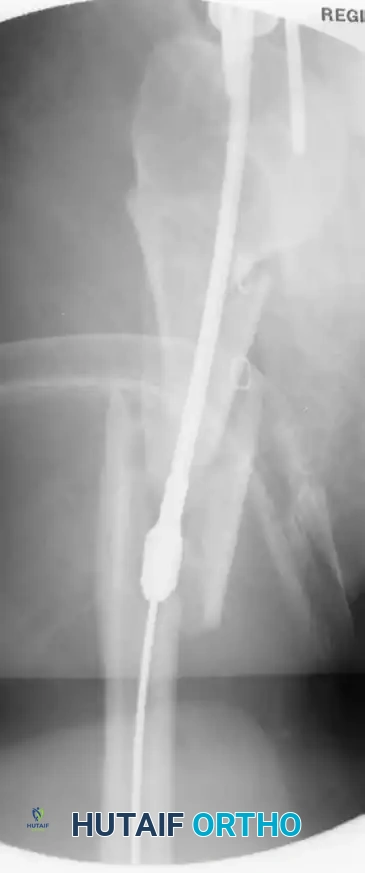
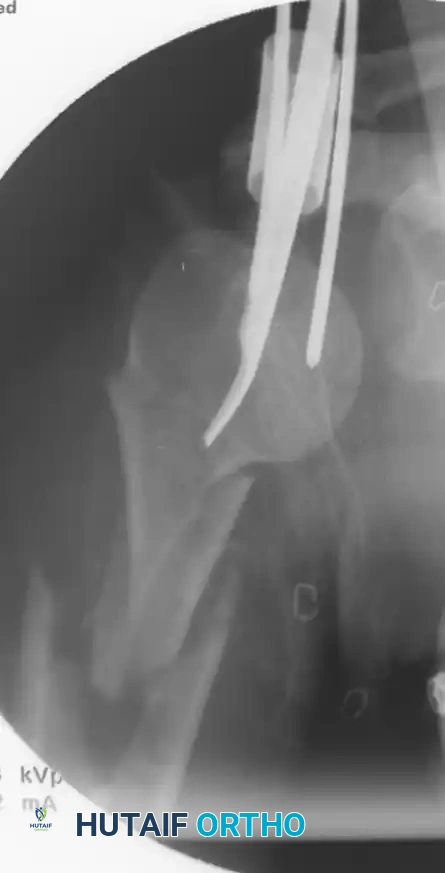
Antegrade Intramedullary Nailing: Techniques and Controversies
The antegrade approach is the most frequently utilized technique for humeral nailing in adults. However, the exact placement of the entry portal remains a subject of intense academic debate.
- Traditional Midacromial Lateral Portal: Historically, a lateral incision was used. This trajectory tends to direct the nail through the posterior aspect of the humeral head. Furthermore, the necessary incision through the rotator cuff is transverse, violating the natural fiber orientation of the supraspinatus tendon, which is heavily implicated in postoperative shoulder morbidity.
- Anterolateral Portal: Modern techniques advocate for an anterolateral starting point. This portal aligns perfectly with the linear axis of the humeral medullary canal. Crucially, the incision through the rotator cuff is made longitudinally, in line with the tendon fibers, facilitating anatomic repair and theoretically reducing postoperative shoulder pain.
🚨 Surgical Warning: Antegrade Nailing Contraindications
Alternatives to antegrade nailing (e.g., ORIF or retrograde nailing) must be strongly considered in patients with pre-existing rotator cuff pathology or in patients who rely on their upper extremities for ambulation and weight-bearing (e.g., paraplegic or quadriplegic patients).
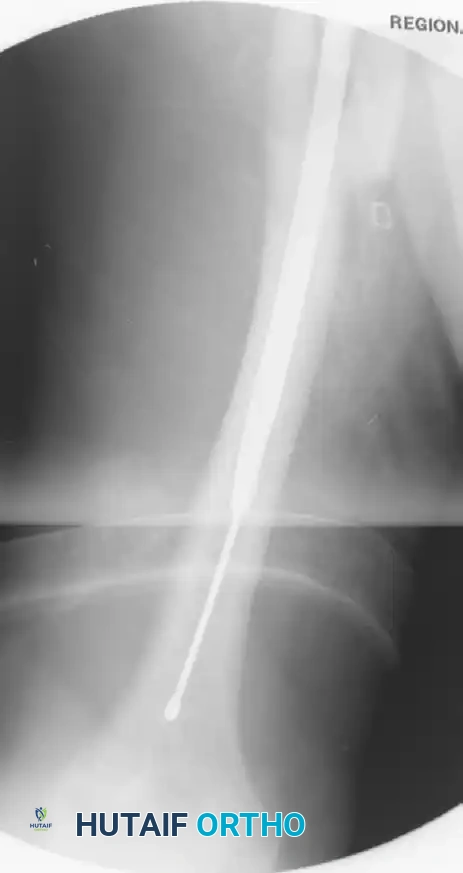
Retrograde Intramedullary Nailing
To circumvent the high incidence of shoulder pain associated with antegrade insertion (reported between 16% and 37%), retrograde insertion has been advocated. However, retrograde nailing carries a distinct risk of iatrogenic distal humeral fracture propagation during entry portal preparation.
- Traditional Starting Point: Located in the midline, approximately 2 cm proximal to the olecranon fossa.
- Olecranon Fossa Portal: More recent literature suggests insertion directly through the superior aspect of the olecranon fossa. Advantages include an increased effective working length for distal fracture segments and a straighter alignment with the medullary canal.
- Biomechanical Trade-off: Despite the anatomic advantages, biomechanical studies demonstrate that the olecranon fossa approach offers less resistance to torque and a lower load-to-failure threshold compared to the traditional superior supracondylar portal.
Advanced Nail Designs: Flexible and Expandable Systems
While rigid nails are the standard, newer designs attempt to bridge the gap between biological fixation and ease of insertion.
- Titanium Flexible Humeral Nails: These have shown success in stable fracture patterns. However, a critical cadaveric study highlighted that the axillary nerve is at significant risk during the insertion of proximal interlocking screws. Prevention requires blunt dissection through the deltoid, direct visualization of the near cortex, and the mandatory use of a soft-tissue protection sleeve during pre-drilling.
- Expandable Nails (e.g., Fixion): These self-locking nails expand via saline inflation once inside the canal, conforming to the endosteal anatomy. They provide bending and torsional stiffness comparable to locked nails without the need for distal targeting. Franck et al. demonstrated excellent results in osteoporotic elderly patients.
- Flexible Locking Nails: Stannard et al. reported high union rates (39 of 42 fractures) using flexible locking nails via extra-articular portals. However, complications (nonunions, hardware failures) were exclusively seen when using the smallest 7.5-mm nails. Therefore, flexible nails should be used with extreme caution in medullary canals measuring 8 mm or less in diameter.
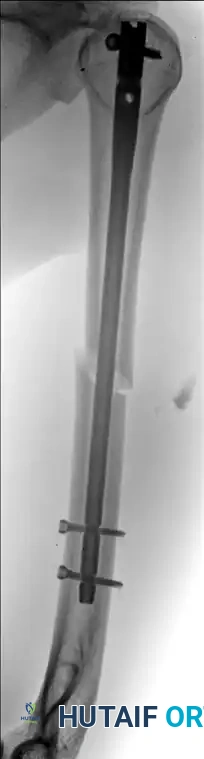
Preferred Technique: Rigid Antegrade Locked Nailing
For the majority of indications (segmental fractures, proximal-to-middle third junctions, pathological fractures, and polytrauma), rigid, locked antegrade nailing is the preferred modality.
Step-by-Step Execution:
- Preparation: Position the patient in the beach-chair or supine position. Ensure the C-arm can visualize the humerus from the humeral head to the elbow joint.
- Incision and Entry: Utilize an anterolateral incision. Split the deltoid and incise the rotator cuff in line with its fibers. Establish the entry portal just medial to the greater tuberosity, directly in line with the medullary canal.
- Guide Wire Placement: Pass a ball-tipped guide wire across the fracture site into the distal metaphysis under fluoroscopic guidance.
- Canal Preparation: If reaming is elected (to allow for a larger, more biomechanically stable nail), ream sequentially over the guide wire. Ensure the soft tissues are protected at the entry site.
- Nail Insertion: Insert the selected rigid IM nail over the guide wire. Avoid excessive forceful impaction to prevent iatrogenic comminution.
- Proximal Locking: Utilize the outrigger targeting device to insert the proximal locking screws. Ensure the axillary nerve is protected during this step by using soft tissue sleeves.
- Distal Locking and Confirmation: Perform distal locking using a freehand fluoroscopic technique. Confirm anatomic reduction, restoration of length and rotation, and accurate screw placement with orthogonal fluoroscopic views.
💎 Clinical Pearl: Radial Nerve Protection During Nailing
Although the fracture is not opened, the radial nerve remains at risk during closed reduction maneuvers, reaming, and distal interlocking screw placement. Avoid aggressive rotational manipulation of the distal fragment, and utilize a meticulous "drill-and-sleeve" technique for all distal screws.
Postoperative Protocol
Regardless of the fixation method (ORIF or IM Nailing), the postoperative goal is early mobilization.
- Days 1-14: The arm is supported in a sling for comfort. Immediate active and active-assisted range of motion of the elbow, wrist, and hands is initiated. Pendulum exercises for the shoulder are encouraged.
- Weeks 2-6: Progressive active range of motion of the shoulder is advanced as tolerated. If an antegrade nail was utilized, specific attention is given to rotator cuff rehabilitation, avoiding early aggressive active abduction to protect the cuff repair.
- Weeks 6-12: Strengthening exercises are introduced once clinical and radiographic signs of early callus formation are evident. Full weight-bearing is typically restricted until definitive radiographic union is achieved.
By adhering to strict biomechanical principles, respecting the delicate neurovascular anatomy, and tailoring the surgical approach to the specific fracture pattern and patient profile, orthopedic surgeons can achieve excellent clinical outcomes in the management of complex humeral shaft fractures.
