Introduction to Lateral Ankle Instability
Chronic lateral ankle instability (CLAI) is a debilitating condition characterized by recurrent giving-way of the outer aspect of the ankle, often accompanied by pain, swelling, and a feeling of apprehension. The lateral ligamentous complex of the ankle primarily consists of the anterior talofibular ligament (ATFL), the calcaneofibular ligament (CFL), and the posterior talofibular ligament (PTFL). The ATFL is the primary restraint to anterior talar translation and internal rotation in plantarflexion, while the CFL restrains inversion in dorsiflexion.
When conservative management—comprising physical therapy, proprioceptive training, and bracing—fails, surgical intervention is warranted. While anatomic repairs (such as the Broström-Gould procedure) are considered the gold standard for primary instability, non-anatomic tenodesis reconstructions like the Evans and Chrisman-Snook procedures remain critical in the orthopedic surgeon's armamentarium. These procedures are particularly indicated in patients with generalized ligamentous laxity, failed prior anatomic repairs, severe long-standing instability with attenuated native tissues, or high-demand heavy laborers.
This comprehensive guide details the biomechanical rationale, surgical anatomy, and step-by-step operative techniques for both the Evans and Chrisman-Snook lateral ankle reconstructions.
Preoperative Evaluation and Indications
Clinical Assessment
Patients typically present with a history of multiple inversion sprains. Clinical examination must include the anterior drawer test (assessing ATFL integrity) and the talar tilt test (assessing CFL integrity). It is imperative to evaluate for concomitant pathologies, such as peroneal tendon tears, osteochondral lesions of the talus (OCLs), and hindfoot varus alignment, as failure to address these will compromise the reconstruction.
Imaging
Standard weight-bearing radiographs (AP, lateral, and mortise views) are essential to rule out fractures and assess alignment. Stress radiography can quantify the degree of instability. Magnetic Resonance Imaging (MRI) is highly recommended to evaluate the quality of the lateral ligaments, the peroneal tendons, and the articular cartilage.
💡 Clinical Pearl
Always assess hindfoot alignment. A rigid hindfoot varus will place excessive stress on any lateral ligament reconstruction, leading to premature failure. If present, a lateralizing calcaneal osteotomy should be performed concomitantly.
The Evans Procedure: Lateral Repair of Chronic Instability
The Evans procedure is a relatively simple non-anatomic tenodesis that utilizes the entire peroneus brevis tendon to reconstruct the ATFL. While it effectively limits anterior translation and inversion, it does not anatomically reconstruct the CFL and can restrict normal subtalar kinematics.
Biomechanical Rationale
By routing the peroneus brevis tendon from its insertion at the base of the fifth metatarsal through a drill hole in the distal fibula, the Evans procedure creates a strong dynamic and static restraint against inversion. However, because the tendon is routed anteriorly and superiorly, it non-anatomically alters the axis of the subtalar joint, which can lead to long-term stiffness.
Step-by-Step Surgical Technique (Evans)
- Incision and Exposure: Make a longitudinal incision over the posterior aspect of the distal fibula, extending distally toward the base of the fifth metatarsal.
- Tendon Mobilization: Approach, divide, and mobilize the peroneus brevis tendon at its musculotendinous junction, similar to the Watson-Jones technique.
- Muscle Transfer: Suture the free proximal end of the peroneus brevis muscle belly to the adjacent peroneus longus tendon to preserve some dynamic eversion power.
- Fibular Tunnel Creation: Drill a tunnel through the distal fibula. The tunnel must be large enough to receive the mobilized tendon. Begin the drill hole at the distal tip of the fibula and direct it to emerge posteriorly, approximately 3.2 cm proximal to the tip.
- Tendon Routing and Fixation: Guide the peroneus brevis tendon through the fibular tunnel from inferior to superior.
- Tensioning: Place the ankle in a neutral position with slight eversion. Suture the tendon under tension to the adjacent periosteal and soft tissues at both the entrance and exit of the tunnel.
The Chrisman-Snook Procedure: Comprehensive Lateral Reconstruction
The Chrisman-Snook procedure is a modification of the Elmslie operation. It is a more comprehensive non-anatomic reconstruction that addresses both the ATFL and the CFL. By utilizing a split peroneus brevis tendon (or a free allograft), it recreates the anatomical vectors of both primary lateral ligaments.
Evolution and Graft Selection
Historically, the Chrisman-Snook procedure utilized the anterior half of the peroneus brevis tendon. However, harvesting the peroneus brevis can weaken active ankle eversion, which is a critical dynamic stabilizer against inversion injuries.
🚨 Surgical Warning
Harvesting the peroneus brevis in a patient with pre-existing eversion weakness can exacerbate instability. In modern practice, a semitendinosus or gracilis autograft/allograft is frequently utilized to avoid sacrificing a tendon that contributes to the dynamic stability of the lateral ankle.
Step-by-Step Surgical Technique (Chrisman-Snook)
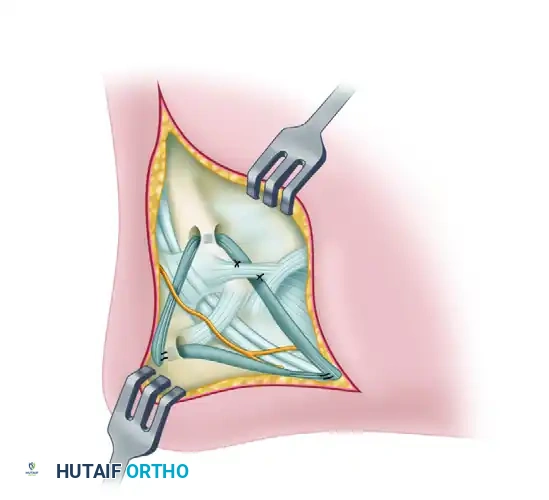
1. Incision and Soft Tissue Dissection
Make a long, curved (J-shaped) incision over the course of the peroneal tendons, starting from their musculotendinous junctions proximally and extending to the base of the fifth metatarsal distally.
Divide the superior and inferior peroneal retinacula holding the tendons in their groove behind the fibula.
Carefully identify the sural nerve. Dissect it from proximal to distal, ensuring you leave a protective layer of fatty subcutaneous tissue around it. Free the nerve sufficiently to allow gentle, atraumatic retraction throughout the procedure.
2. Tendon Harvesting and Preparation
Retract the peroneus longus tendon, which overlies the peroneus brevis tendon in the retromalleolar groove, to fully expose the peroneus brevis.
Split the peroneus brevis in half longitudinally from its insertion at the base of the fifth metatarsal upward to its musculotendinous junction. Leave both the anterior and posterior halves of the tendon attached to the base of the fifth metatarsal.
Divide the half with the longest tendon component at the musculotendinous junction. Clean most of the muscle tissue away from the cut end proximally to allow smooth passage through bone tunnels.
3. Talus Preparation and Free Graft Fixation (Alternative Technique)
If a free graft (semitendinosus or gracilis) is used instead of the split peroneus brevis, it must first be secured in the neck of the talus.
Use a drill to create a blind-ended bone tunnel in the lateral aspect of the talar neck, large enough to accept the graft. The Arthrex biotenodesis set allows for precise measurement of the tendon diameter and provides multiple drill sizes to create an exact-fit tunnel. Secure the graft in the talus using a biotenodesis screw.
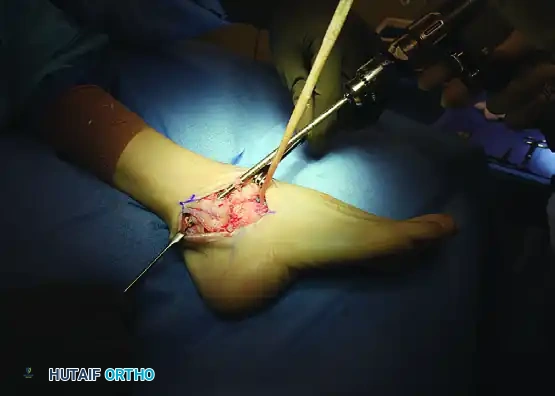
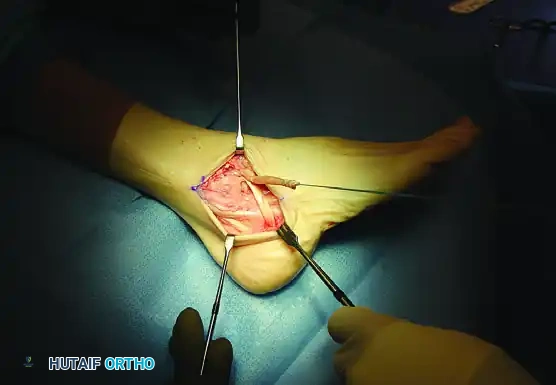
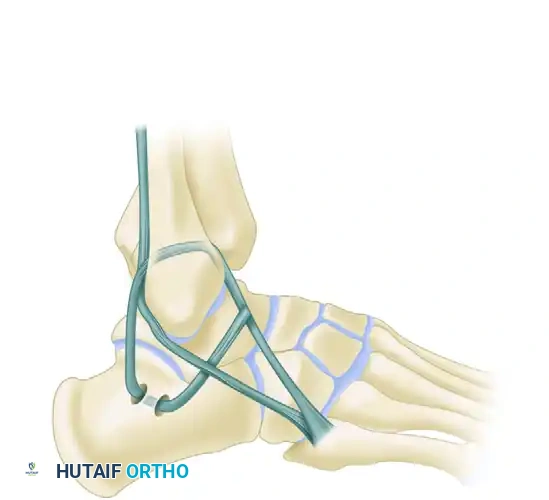
4. Fibular Tunnel Creation (ATFL Reconstruction)
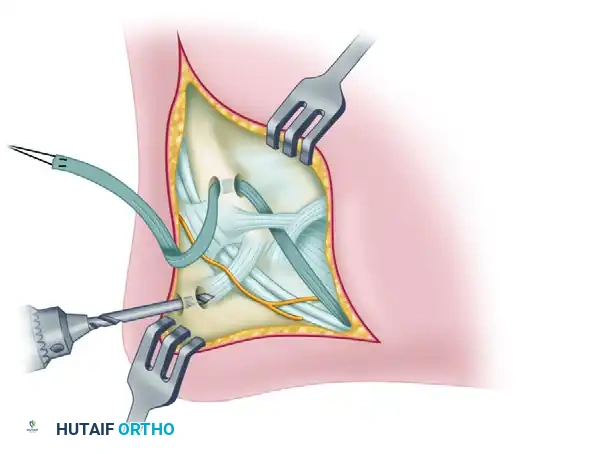
Drill an appropriate-sized tunnel through the distal fibula in an anteroposterior direction. This tunnel should be located at, or just proximal to, the level of the tibiotalar joint line. Make the hole slightly larger than the diameter of the graft to facilitate passage.
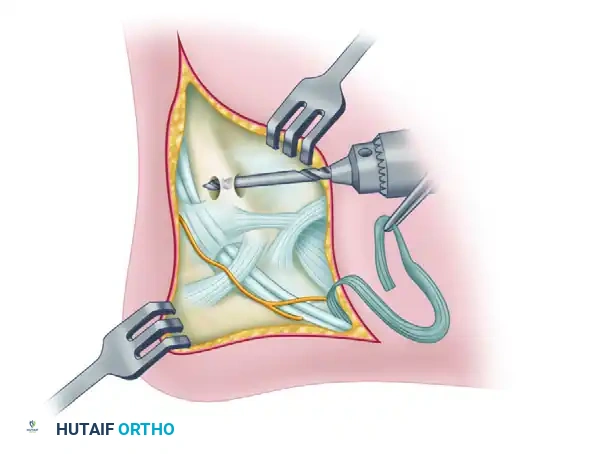
Pass a strong, nonabsorbable suture through the free end of the graft in a grasping fashion (e.g., Krackow or whipstitch). Use a suture passer to thread the suture and the graft through the fibular tunnel from anterior to posterior.
After the tendon graft has been pulled through the tunnel, place the ankle in a neutral dorsiflexion position and the foot in mild eversion, maintained by gentle manual positioning. Pull the graft taut. Secure the graft to the periosteal ligamentous tissues adjacent to the anterior end of the drill hole using strong, nonabsorbable sutures. Alternatively, a biotenodesis screw can be placed directly into the fibular bone tunnel to secure the graft. This anterior limb of the graft effectively replaces the ATFL.
If a robust stump of the original ATFL remains on the talus, suture it firmly to the contiguous tendon graft to enhance the biological repair.
5. Calcaneal Tunnel Creation (CFL Reconstruction)
Return the peroneus longus tendon and the remaining intact half of the peroneus brevis tendon to the fibular groove. Allow the newly routed graft to pass superficial to them; this creates a sling effect that helps prevent postoperative subluxation or dislocation of the peroneal tendons.
Expose the lateral border of the calcaneus by dissecting distally and posteriorly. Elevate the periosteum to reveal a constant vertical ridge on the lateral calcaneal wall (the peroneal tubercle area).
Drill two holes, approximately 1.5 cm apart, anterior and posterior to this vertical ridge. These holes should be the same diameter as the fibular tunnel. Join the two holes deep within the cancellous bone using curved curets to create a continuous U-shaped tunnel.
6. Graft Tensioning and Final Fixation
Pass the tendon graft through this calcaneal tunnel from posterior to anterior. The posterior and inferior direction of the graft from the fibula to the calcaneus anatomically duplicates the vector of the original calcaneofibular ligament (CFL).

Place sutures at both ends of the calcaneal tunnel, securing the graft to the adjacent soft tissues and periosteum.
Management of Graft Length Variations:
* If the graft is short: Drill a single hole completely through the calcaneus from the lateral to the medial side. Make a small stab incision on the medial side of the heel. Use a passing suture to pull the graft tautly into the lateral hole, and tie the suture over a padded button on the medial side of the heel. Alternatively, use a biotenodesis screw to secure the short graft directly into the lateral calcaneus.
* If the graft is long enough: Suture the remaining tail of the graft directly to the insertion of the peroneus brevis on the base of the fifth metatarsal (as originally described by Chrisman and Snook). Alternatively, and more commonly recommended today for additional support, route the graft back superiorly and suture it onto itself at the anterior end of the fibular tunnel.
7. Final Construct and Closure
Verify the tension of the reconstruction by taking the ankle through a range of motion. The ankle should demonstrate restored stability to anterior drawer and inversion stress, without excessive restriction of physiologic dorsiflexion and plantarflexion.
After the graft is definitively sutured in place, meticulously close the extensor retinaculum and fascia over the fibular groove to ensure the peroneal tendons remain stable. Close the subcutaneous tissue and skin in a routine, layered fashion.
Postoperative Rehabilitation Protocol
The success of non-anatomic tenodesis procedures relies heavily on strict adherence to a phased postoperative rehabilitation protocol. The goal is to protect the healing graft while progressively restoring range of motion, strength, and proprioception.
Phase I: Maximum Protection (Weeks 0–6)
- Weeks 0–2: A nonwalking cast or rigid posterior splint is applied in the operating room with the ankle in neutral dorsiflexion and slight eversion. The patient is strictly non-weight-bearing (NWB).
- Week 2: The initial cast is removed, and surgical sutures are extracted. The incision is inspected for healing. A new NWB short-leg cast is applied.
- Weeks 2–6: The patient remains NWB in the cast for an additional 4 weeks to allow for initial biological integration of the tendon graft within the bone tunnels.
Phase II: Controlled Mobilization (Weeks 6–10)
- Week 6: The cast is removed, and the patient is transitioned to a removable walking boot.
- Weight-Bearing: Progressive weight-bearing as tolerated (WBAT) is initiated.
- Physical Therapy: Formal physical therapy begins. Early goals include active range of motion (AROM) in the sagittal plane (dorsiflexion/plantarflexion). Inversion is strictly avoided to protect the graft. Gentle isometric peroneal strengthening is introduced.
Phase III: Functional Rehabilitation (Weeks 10–16)
- Week 10: The walking boot is discontinued. The patient transitions to a rigid functional ankle brace (e.g., ASO or AirCast) for all weight-bearing activities.
- Therapy Progression: Therapy emphasizes proprioceptive training (BAPS board, single-leg stance), dynamic stabilization, and progressive resistance exercises for the peroneal musculature.
- Orthotics: A lateral heel wedge is recommended for use in standard footwear for an additional 6 months to mechanically offload the lateral reconstruction.
Phase IV: Return to Sport (Months 4–6+)
- The functional brace is utilized during high-impact activities and sports for at least 4 to 6 months postoperatively.
- Return to competitive play is permitted when the patient demonstrates symmetrical strength, full pain-free range of motion, and successful completion of sport-specific functional testing (e.g., figure-of-eight running, cutting drills).
Complications and Pitfalls
While highly effective for restoring stability, the Evans and Chrisman-Snook procedures carry specific risks that the orthopedic surgeon must mitigate:
- Sural Nerve Injury: The sural nerve is highly vulnerable during the J-shaped incision and lateral calcaneal exposure. Neuroma formation or chronic regional pain syndrome (CRPS) can result from iatrogenic injury. Meticulous, blunt dissection is mandatory.
- Subtalar Stiffness: Because these are non-anatomic reconstructions, they inherently restrict some degree of physiologic subtalar motion. Over-tensioning the graft, particularly in excessive eversion, will exacerbate postoperative stiffness and can lead to lateral column overload.
- Peroneal Weakness: Harvesting the peroneus brevis reduces dynamic eversion strength. This is the primary reason modern techniques favor allograft reconstruction.
- Wound Healing Complications: The lateral ankle has a tenuous blood supply. Excessive retraction or poor soft-tissue handling can lead to skin necrosis or delayed wound healing.
By understanding the precise biomechanical goals and executing the surgical steps with meticulous attention to detail, surgeons can utilize the Evans and Chrisman-Snook techniques to provide durable, long-lasting stability for patients suffering from severe chronic lateral ankle instability.
📚 Medical References
- lateral ankle reconstruction, Foot Ankle Int 16:748, 1995.
- Sammarco GJ, DiRaimondo CV: Surgical treatment of lateral ankle instability syndrome, Am J Sports Med 16:501, 1988.
- Sammarco GJ, Idusuyi OB: Reconstruction of the lateral ankle ligaments using a split peroneus brevis tendon graft, Foot Ankle Int 20:97, 1999.
- Sammarco GJ, Makwana NK: Treatment of talar osteochondral lesions using local osteochondral graft, Foot Ankle Int 23:693, 2002.
- Saragaglia D, Fontanel F, Montbarbon E, et al: Reconstruction of the lateral ankle ligaments using an inferior extensor retinaculum fl ap, Foot Ankle Int 18:723, 1997.
- Schuman L, Struijs PA, Van Dijk CN: Arthroscopic treatment for osteochondral defects of the talus: results at follow-up at 2 to 11 years, J Bone Joint Surg 84B:364, 2002.
- Scranton PE Jr, McDermott JE: Anterior tibiotalar spurs: a comparison of open versus arthroscopic débridement, Foot Ankle Int 13:125, 1992.
- Sedln ED: A device for stress inversion or eversion roentgenograms of the ankle, J Bone Joint Surg 42A:1184, 1960.
- Shea MP, Manoli A: Foot fellow’s review: osteochondral lesions of the talar dome, Foot Ankle Int 14:48, 1993.
- Sheth P, Yu B, Laskowski ER, et al: Ankle disk training infl uences reaction times of selected muscles in a simulated ankle sprain, Am J Sports Med 25:538, 1997.
- Smith PA, Miller SJ, Berni AJ: A modifi ed Chrisman-Snook procedure for reconstruction of the lateral ligaments of the ankle: review of 18 cases, Foot Ankle Int 16:259, 1995.
- Snook GA, Chrisman OD, Wilson TC: Long-term results of Chrisman-Snook operation for reconstruction of the lateral ligaments of the ankle, J Bone Joint Surg 67A:1, 1985.
- Snyder RB, Lipscomb AB, Johnston RK: The relationship of
