INTRODUCTION TO INTERTAN CEPHALOMEDULLARY NAILING
Intertrochanteric femoral fractures represent a significant portion of the fragility fractures encountered by orthopedic surgeons. While stable fracture patterns (OTA/AO 31-A1) may be adequately managed with a sliding hip screw (SHS), unstable patterns—including reverse obliquity fractures, fractures with subtrochanteric extension, and those with compromised lateral femoral walls (OTA/AO 31-A2 and 31-A3)—demand the biomechanical advantages of a cephalomedullary nail.
The InterTAN device (Smith & Nephew) represents a significant evolutionary step in intramedullary nailing. Traditional dual-screw cephalomedullary nails were historically plagued by the "Z-effect" or "reverse Z-effect," where differential migration of the two proximal screws led to femoral head cut-out or medial migration of the screws. The InterTAN system mitigates this through its integrated proximal interlocking screws, which function as a single biomechanical construct. This unique worm-gear mechanism allows for active, controlled linear compression intraoperatively while providing exceptional rotational stability to the cervicocephalic fragment.
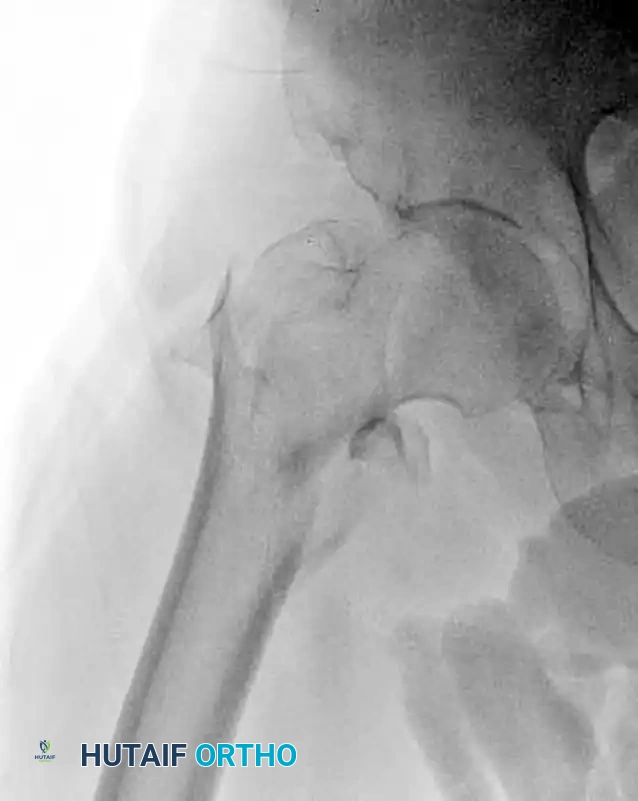
Preoperative anteroposterior radiograph demonstrating an unstable intertrochanteric femoral fracture, an ideal indication for the InterTAN device.
BIOMECHANICAL ADVANTAGES
The InterTAN nail incorporates several distinct design features that elevate its biomechanical performance compared to standard single-screw or non-integrated dual-screw nails:
- Integrated Dual-Screw Construct: The proximal locking mechanism consists of a lag screw and a compression screw that interlock. This prevents independent screw migration, effectively eliminating the Z-effect.
- Rotational Stability: The dual-screw configuration provides two points of fixation within the femoral head, drastically increasing resistance to rotational forces during physiological loading.
- Trapezoidal Proximal Profile: The proximal portion of the nail features a trapezoidal cross-section rather than a standard cylinder. This design places more material on the lateral tension side, increasing fatigue strength, while the narrower medial profile preserves the gluteus medius tendon insertion and minimizes removal of critical cancellous bone in the greater trochanter.
- Active Linear Compression: The integrated mechanism allows the surgeon to actively compress the fracture site along the axis of the femoral neck, promoting primary bone healing and reducing the risk of postoperative varus collapse.
CLINICAL PEARL: The trapezoidal shape of the proximal nail not only enhances biomechanical strength but also provides a "press-fit" in the proximal metaphysis, enhancing rotational stability of the nail within the medullary canal even before distal locking screws are placed.
PREOPERATIVE PLANNING AND PATIENT POSITIONING
Meticulous preoperative planning is paramount. High-quality anteroposterior (AP) and cross-table lateral radiographs of the affected hip, along with an AP view of the entire femur, are required to assess canal diameter, anterior bowing, and the presence of distal deformity or hardware.
Patient Positioning
- Place the patient supine on a radiolucent fracture table.
- Secure the bilateral lower extremities in traction boots. The contralateral leg is typically placed in a "scissor" configuration (extended and dropped posteriorly) or abducted in a hemilithotomy position to allow unobstructed access for the C-arm fluoroscope.
- Pad all bony prominences meticulously to prevent neuropraxia, paying special attention to the perineal post.
Fracture Reduction
Achieving an anatomical or slightly valgus reduction prior to draping is the most critical step of the operation.
* Apply longitudinal traction to restore length.
* Adjust internal rotation (typically 10° to 15°) to correct the anteversion of the femoral neck and bring it parallel to the floor.
* Verify reduction on both AP and lateral fluoroscopic views. The medial cortex (calcar) must be anatomically reduced or in slight valgus; varus reduction is unacceptable and leads to a high rate of fixation failure.
SURGICAL WARNING: Never attempt to compensate for a poor closed reduction with the intramedullary nail. If closed reduction is inadequate, percutaneous techniques (e.g., using a bone hook, collinear reduction clamp, or Steinmann pins as joysticks) or a limited open reduction must be performed before establishing the entry portal.
SURGICAL TECHNIQUE: STEP-BY-STEP
1. Establishment of the Entry Portal
The entry portal for the InterTAN nail is located at the tip of the greater trochanter or slightly medial to it (approximately 5 degrees lateral to the anatomical axis of the femur).
* Make a 3 to 5 cm longitudinal incision proximal to the greater trochanter.
* Incise the fascia lata in line with the skin incision and split the abductor musculature bluntly to palpate the trochanteric tip.
* Insert a guide pin into the tip of the greater trochanter. Verify its position on AP and lateral fluoroscopy. On the AP view, it should be at the tip or slightly medial; on the lateral view, it should be centered in the anterior-posterior dimension of the trochanter, in line with the medullary canal.
2. Proximal Canal Preparation
Once the guide pin is perfectly localized under fluoroscopy, the proximal femur must be prepared to accommodate the trapezoidal proximal geometry of the nail.
- Introduce the 12.5-mm entry reamer / 16-mm channel reamer combination through the soft tissue guide (entry portal tube) over the guide pin.
- Insert the channel reamer to the level of the lesser trochanter. The entry portal tube features a positive stop to prevent over-insertion.

Insertion of the entry reamer/channel reamer combination to the level of the lesser trochanter.
- For a long InterTAN nail, remove the entry reamer and guide pin at this time, leaving the channel reamer in place to protect the proximal soft tissues and guide subsequent instrumentation.
3. Medullary Canal Reaming
- Introduce the ball-tipped guide pin (or a reducer followed by the guide pin) through the channel reamer. Advance it down the femoral shaft to the level of the physeal scar (for long nails) or the desired depth for a short nail.
- Measure for the length of the intramedullary nail using the depth gauge over the guide pin.
- Ream the medullary canal sequentially. It is standard practice to ream to a diameter 1.5 mm larger than the selected nail diameter to prevent cortical binding and iatrogenic fracture. For example, if a 10-mm diameter nail is selected, ream sequentially up to 11.5 mm.

Sequential reaming of the femoral canal through the protective channel reamer.
4. Nail Insertion
- Assemble the selected InterTAN nail to the radiolucent insertion handle. Ensure the connection is completely tight to prevent trajectory errors during proximal locking.
- Advance the nail into the femur over the ball-tipped guide pin.
- Crucial Maneuver: As with all antegrade femoral nails inserted through a trochanteric portal, begin insertion with the guide facing anteriorly. This utilizes the anterior bow of the nail to navigate the proximal geometry more easily.
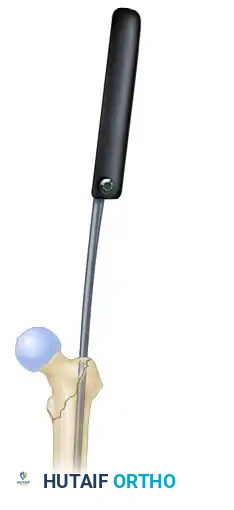
Placement of the nail beginning with the insertion guide facing anteriorly to accommodate the femoral bow.
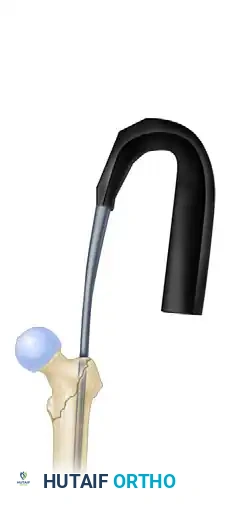
- Once the nail has been inserted approximately halfway down the intramedullary canal, rotate the guide 90 degrees laterally.
- Monitor the insertion of the nail meticulously with lateral fluoroscopy to avoid anterior cortical perforation, a known complication in patients with an excessive anterior femoral bow.
PITFALL: Do not use excessive force or a heavy mallet to seat the nail. If resistance is encountered, remove the nail and ream the canal an additional 0.5 mm to 1.0 mm. Forcing the nail can result in an iatrogenic comminuted fracture of the femoral shaft.
5. Proximal Locking: The Integrated Screw System
The proximal locking sequence is the defining characteristic of the InterTAN procedure. Precision here dictates the biomechanical success of the construct.
- Before seating the nail completely, evaluate femoral anteversion with lateral fluoroscopy. Rotate the nail via the insertion handle to ensure that the targeting wire within the handle perfectly transects the center of the femoral head and neck.
- Confirm appropriate nail depth with the alignment arm and fluoroscopy in the AP plane. The trajectory should allow the proximal screws to sit in the inferior half of the femoral neck on the AP view.
- Remove the ball-tipped guide pin.
- Make a small incision laterally through the skin and fascia lata corresponding to the targeting arm. Place the appropriate drill sleeve assembly down to the lateral aspect of the femur.
Insertion of the drill sleeve assembly through a small lateral incision, seated firmly against the lateral femoral cortex.
- Pilot Hole and Guide Pin Placement: Use the 4.0-mm drill to create a pilot hole through the lateral cortex. Insert the 3.2-mm guide pin through the sleeve. Advance it into the femoral head.
- The goal is a center-center position: centered in the inferior half of the neck on the AP view, and perfectly centered in the head on the lateral view. Advance the pin to within 5 mm of the subchondral bone.
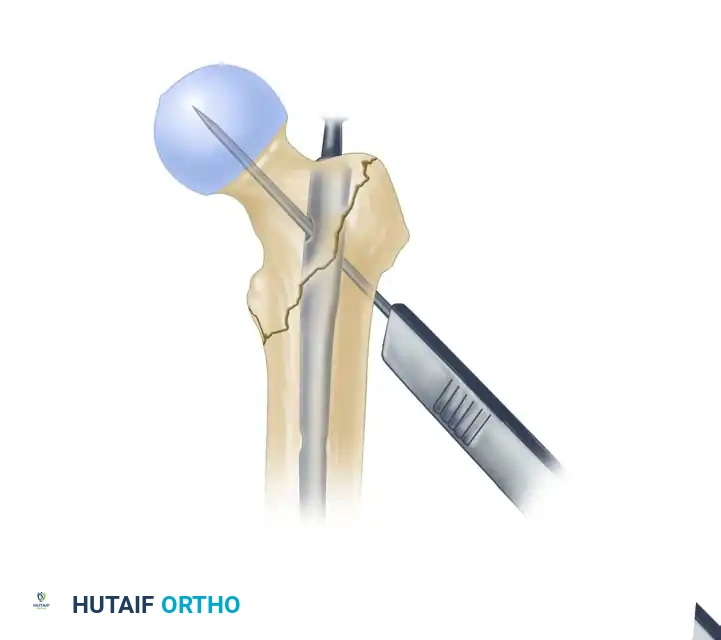
Placement of the 3.2-mm guide pin in the ideal center-center position within the femoral head, stopping 5 mm short of the subchondral bone.
- Measure for the length of the lag screw using the measuring device over the guide pin. Subtract 5 to 10 mm from the measured length of the pin, depending on the amount of active compression desired.
- Derotational Bar Placement: Use the 7.0-mm drill through the inferior hole of the drill sleeve to drill the path for the derotational bar (which will later become the path for the compression screw). Insert the derotation bar to stabilize the head-neck fragment and prevent rotation during the subsequent reaming of the lag screw.
Drilling the inferior trajectory for the derotational bar, which secures the fragment against rotation.
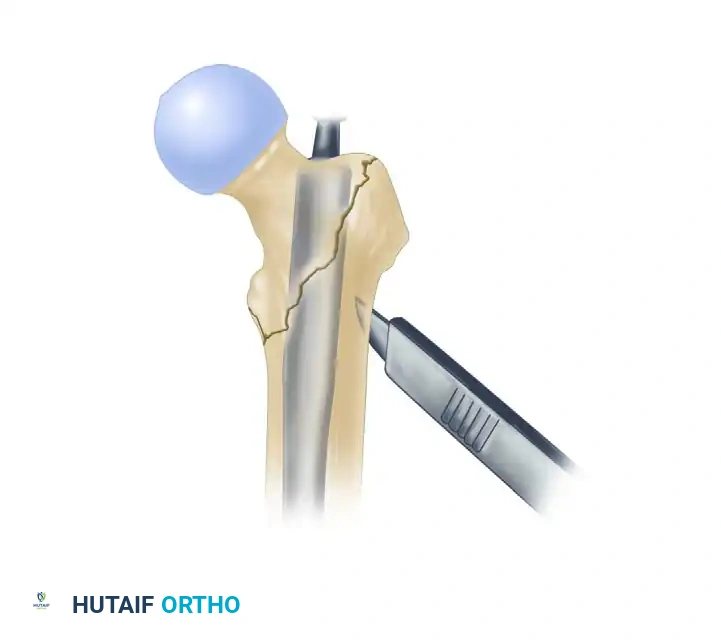
- Lag Screw Preparation: Use the 10.5-mm stepped drill to drill over the 3.2-mm guide pin. Drill to the chosen length of the lag screw.

Using the 10.5-mm drill over the guide pin to prepare the channel for the primary lag screw.
- Insert the appropriate-length lag screw over the guide pin. Ensure the threads are fully engaged within the dense cancellous bone of the femoral head.
- Compression Screw Insertion: Remove the derotation bar from the inferior sleeve. Insert the integrated compression screw into the inferior hole.
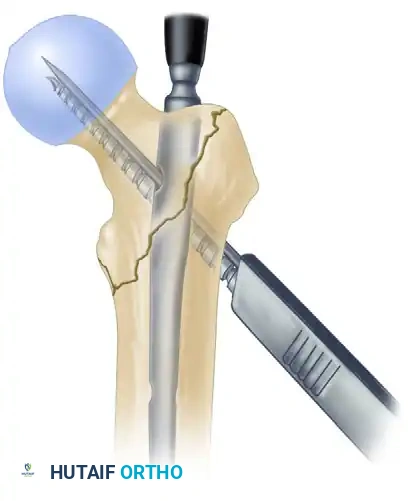
Insertion of the integrated compression screw inferior to the lag screw. The worm-gear mechanism engages to provide linear compression.
SURGICAL PEARL: Before completely tightening the compression screw to compress the fracture, you must relax the traction on the fracture table. Failure to release traction will prevent the proximal fragment from compressing against the distal fragment, potentially leading to a gap at the fracture site and subsequent nonunion.
6. Distal Locking
Following successful proximal fixation and compression, proceed to distal locking.
* For short nails, distal locking is typically performed through the targeting arm attached to the insertion handle.
* For long nails, distal locking is performed using a perfect circles freehand technique under fluoroscopy.
* Depending on the fracture pattern and the need for dynamization, insert one or two distal screws in either a static or dynamic configuration.
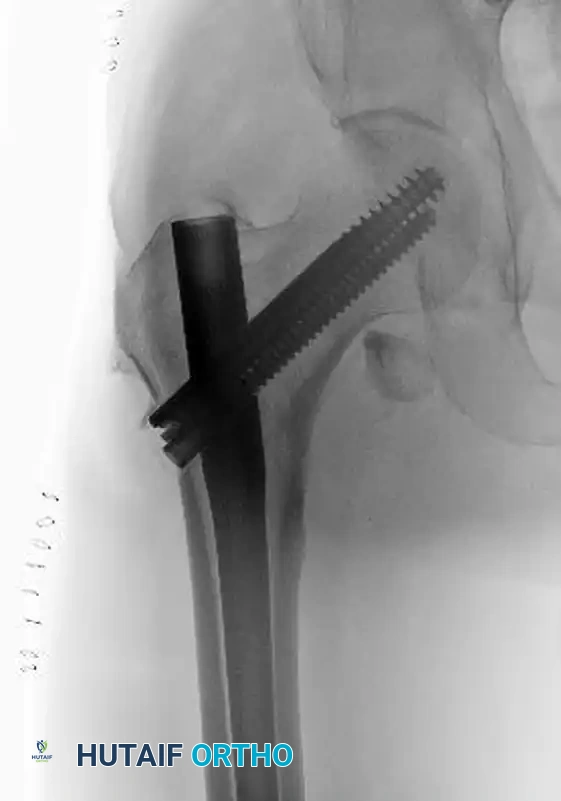
Postoperative anteroposterior radiograph demonstrating excellent reduction and fixation with the InterTAN device. Note the integrated proximal screws and the restoration of the medial calcar.
POSTOPERATIVE PROTOCOL AND REHABILITATION
The robust biomechanical stability provided by the InterTAN system generally allows for aggressive postoperative rehabilitation.
- Weight-Bearing: Patients are typically allowed weight-bearing as tolerated (WBAT) immediately postoperatively with the assistance of a walker or crutches, provided bone quality is adequate and the fracture pattern is not highly comminuted in the subtrochanteric region.
- Physical Therapy: Early mobilization is critical to prevent complications associated with prolonged bed rest (e.g., deep vein thrombosis, pneumonia, decubitus ulcers). Focus on hip abductor strengthening and gait training.
- DVT Prophylaxis: Chemical and mechanical deep vein thrombosis prophylaxis should be initiated according to institutional protocols and patient-specific risk factors, typically continuing for 28 to 35 days postoperatively.
- Follow-up: Clinical and radiographic follow-up is routinely performed at 2 weeks (for wound check and suture removal), 6 weeks, 3 months, and 6 months to assess for progressive fracture consolidation and the absence of hardware complications.
COMPLICATIONS AND AVOIDANCE
While the InterTAN nail significantly reduces the risk of the Z-effect and varus collapse, complications can still occur, primarily due to technical errors.
- Cut-out: The most common mode of failure in cephalomedullary nailing. It is directly correlated with a Tip-Apex Distance (TAD) greater than 25 mm. Strict adherence to achieving a center-center position of the guide pin and placing the screws deep into the subchondral bone minimizes this risk.
- Anterior Cortical Perforation: Occurs when a straight nail is driven into a femur with a large anterior bow. Prevent this by starting with the nail rotated anteriorly, monitoring insertion with lateral fluoroscopy, and ensuring adequate over-reaming.
- Malreduction (Varus): Accepting a varus reduction drastically increases the bending moment on the nail and the proximal screws, leading to hardware failure or cut-out. Always strive for an anatomical or slight valgus reduction before initiating the entry portal.
