Introduction to Distal Femoral Nailing
The management of distal femoral fractures has evolved significantly, with intramedullary nailing receiving increased attention and widespread adoption in modern orthopedic traumatology. Historically, the treatment of these complex injuries was fraught with complications, including axial malalignment, posttraumatic arthritis, knee stiffness, and profound instability—particularly following nonoperative management or the use of early, inadequate fixation devices.
Today, intramedullary devices are favored for their ability to provide "biological" osteosynthesis. Unlike traditional rigid plating, which acts as a load-sparing device and often requires extensive periosteal stripping, intramedullary nails function as load-sharing implants. This fundamental biomechanical advantage offers greater soft tissue preservation, maintains the fracture hematoma, and significantly reduces the need for supplemental bone grafting.
However, the application of intramedullary nails in the distal femur is not without biomechanical challenges. Meticulous preoperative planning, an understanding of deforming muscular forces, and precise surgical execution are paramount to achieving union and restoring limb function.
Biomechanics of Intramedullary Fixation
Load-Sharing vs. Load-Sparing
The primary biomechanical distinction between intramedullary nails and extramedullary plates lies in stress distribution. Intramedullary nails, positioned along the mechanical axis of the femur, share axial loads with the surrounding bone cortex. This load-sharing phenomenon stimulates secondary bone healing via callus formation. Conversely, plates act as load-sparing devices, shielding the bone from stress, which can occasionally lead to delayed union or implant fatigue if the fracture does not heal rapidly.
Construct Stability and Hardware Failure
Despite the biological advantages, biomechanical testing has demonstrated that nail fixation provides less rigid stabilization of distal femoral fractures compared to dual-plate or modern locked-plate fixation.
Surgical Warning: Hardware failure has been reported in up to 15% of distal-third femoral fractures treated with antegrade interlocking nailing, particularly when utilizing older, slotted nail designs.
The incidence of hardware failure increases exponentially if the fracture line propagates within 5 cm of the most proximal screw hole, creating a critical stress riser. To mitigate the risk of implant failure, several biomechanical principles must be strictly adhered to:
* Subchondral Purchase: The nail must be driven as distally as possible, anchoring securely into the dense subchondral bone of the femoral condyles.
* Implant Selection: Utilizing solid, non-slotted nails with increased wall thickness significantly enhances the fatigue life of the implant.
* Controlled Loading: Delaying full weight-bearing in highly comminuted or unstable fracture patterns protects the distal locking screws from shear failure.
Comparative Biomechanical Studies
Extensive mechanical testing has compared antegrade nailing, retrograde nailing, and extramedullary devices:
* Antegrade vs. Retrograde: In femoral shaft fractures with stable configurations (good bony contact), no significant difference in stability exists between antegrade and retrograde insertion. However, in unstable fracture configurations, the size (diameter) of the nail, rather than the method of insertion, is the primary determinant of construct stability.
* Nails vs. Plates: The dynamic condylar screw (DCS) with a dispersed screw pattern exhibits greater torsional stiffness than the supracondylar nail. Conversely, the supracondylar nail, utilizing a grouped distal screw configuration, absorbs significantly more energy during axial loading.
* Ito et al. compared the supracondylar nail with a condylar blade plate, concluding that the supracondylar nail provides stability equal to a plate in axial and bending forces, falling short only when subjected to extreme torsional loads.
Preoperative Planning and Patient Positioning
The distal femur is subjected to powerful deforming forces from the surrounding musculature. The gastrocnemius muscles exert a strong posterior pull on the distal fragment, leading to an extension deformity (apex posterior angulation). Simultaneously, the adductor magnus pulls the distal fragment medially, creating a varus deformity.
The Impact of Positioning on Alignment
Tornetta and Tiburzi conducted pivotal research on the effects of patient positioning during antegrade interlocked intramedullary nailing of distal fractures:
* Lateral Decubitus Position: When nailing is performed with the patient in the lateral decubitus position, the unsupported weight of the leg inevitably causes valgus angulation at the fracture site.
* Supine Position: When the patient is positioned supine, the gravity-assisted valgus is eliminated; however, the unopposed pull of the gastrocnemius exacerbates the apex posterior (recurvatum) deformity.
Clinical Pearl: To counteract the gastrocnemius pull when the patient is supine, a padded bump must be placed under the distal femur (not the popliteal fossa) to flex the knee to approximately 30 to 50 degrees. This relaxes the gastrocnemius and aids in reducing the extension deformity.
Surgical Technique: Retrograde Supracondylar Nailing
Retrograde nailing has become the gold standard for many extra-articular (OTA 33A) and simple intra-articular (OTA 33C1) distal femoral fractures.
Step 1: Patient Setup and Reduction
Place the patient supine on a radiolucent flat table. The knee is flexed over a sterile triangle or radiolucent bump to 30–50 degrees. Closed reduction is attempted using manual traction. If the fracture remains malaligned, percutaneous reduction techniques using Schanz pins as joysticks or the strategic placement of Poller (blocking) screws should be employed to correct varus/valgus and flexion/extension malalignment prior to reaming.
Step 2: Articular Reconstruction (If Applicable)
If an intra-articular split is present, it must be anatomically reduced and provisionally fixed with K-wires before the medullary canal is breached. The articular block is then definitively fixed using 6.5-mm or 7.3-mm cannulated cancellous lag screws.
Note: These screws must be placed anteriorly or posteriorly to avoid obstructing the central path of the retrograde nail.
Step 3: Surgical Approach and Entry Point
A 3-cm midline incision is made through the patellar tendon (trans-tendinous) or via a medial parapatellar approach. The intercondylar notch is visualized.
The starting point is critical:
* AP View: Dead center of the intercondylar notch.
* Lateral View: Just anterior to Blumensaat's line.
An awl or guide pin is inserted, and the entry portal is opened with a rigid reamer.
Step 4: Reaming and Nail Insertion
A ball-tipped guide wire is passed across the fracture site into the proximal femur. Sequential flexible reaming is performed, typically over-reaming by 1.0 to 1.5 mm larger than the selected nail diameter. The selected retrograde nail is inserted manually.
Surgical Warning - Patellar Impingement: Nail impingement on the patella is a well-documented complication, reported in up to 12% of cases. This is strictly avoided by ensuring the distal end of the nail is properly countersunk at least 2 to 4 mm beneath the articular cartilage of the intercondylar notch.
Step 5: Distal and Proximal Locking
Distal locking is performed first using the outrigger targeting guide. A minimum of two, preferably three or four, multiplanar locking screws are inserted to maximize fixation in the osteoporotic metaphyseal bone. Proximal locking is then performed via a freehand perfect-circle technique under fluoroscopy.
Complex Intra-Articular Fractures: Nailing vs. Submuscular Plating
While intramedullary nailing is highly effective, severe comminution with complex intra-articular extension (OTA 33C2, 33C3) often precludes the use of a nail. In such cases, open reduction usually is necessary to obtain an anatomical articular reconstruction.
In patients with good bone stock, 6.5-mm cancellous lag screws provide secure enough fixation to allow movement after a few days. However, in patients with osteoporotic bone or severe comminution, a buttress plate or modern locked plate is necessary to prevent cephalad migration of the condyles.
The following imaging sequence demonstrates a highly comminuted distal femur fracture managed with an open articular reduction and submuscular plating, highlighting the alternative approach when nailing is contraindicated by articular complexity:
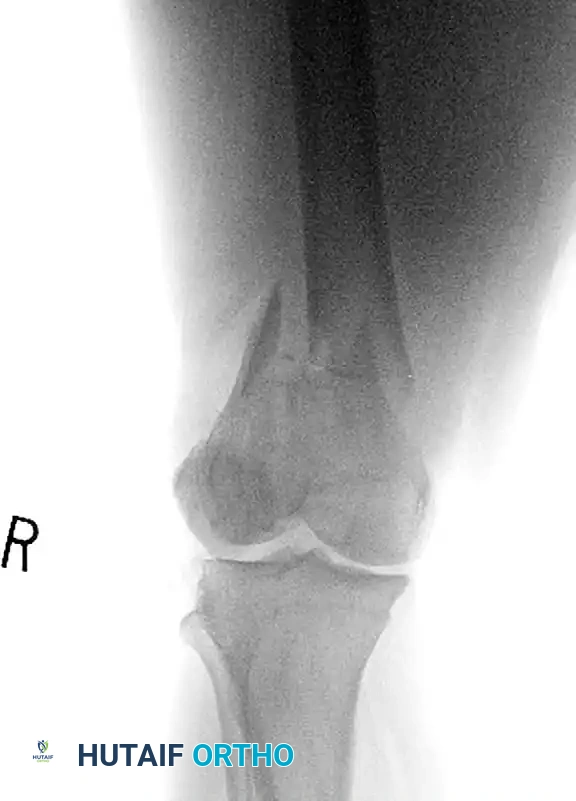
FIGURE A: Comminuted fracture of the distal femur with severe intra-articular extension. The complexity of the articular block makes standard retrograde nailing biomechanically unfavorable without first achieving absolute articular stability.
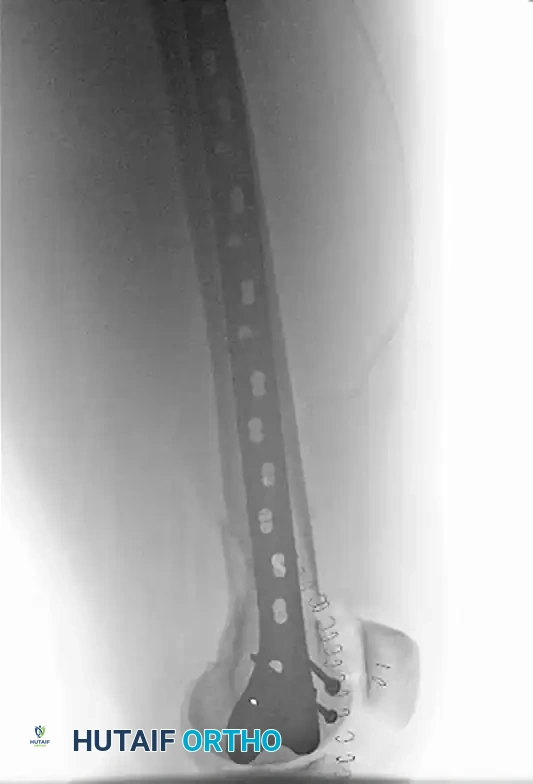
FIGURE B: AP radiograph demonstrating Open Reduction Internal Fixation (ORIF). A lateral parapatellar arthrotomy was utilized to directly view and achieve anatomical reduction of the articular component.
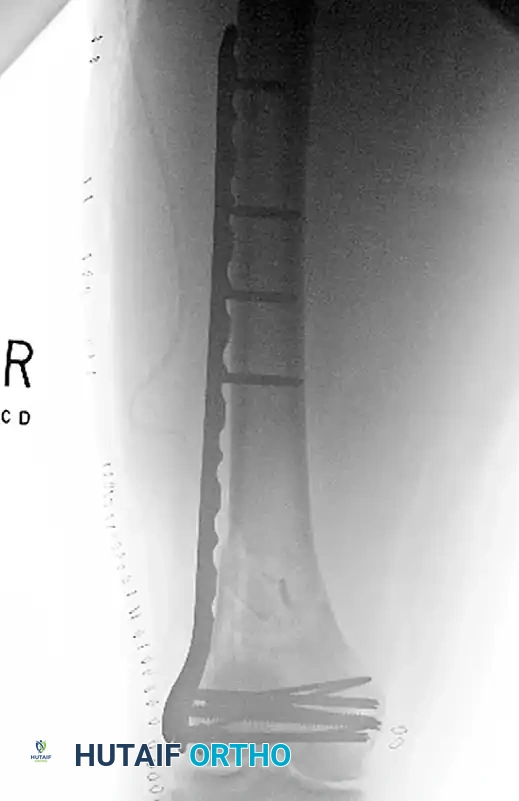
FIGURE C: Lateral radiograph showing the submuscular plate, which was positioned percutaneously following the articular reconstruction, bridging the metaphyseal comminution.
Management of Unicondylar Fractures
Unicondylar fractures of the femur represent a distinct subset of distal injuries. Some minimally displaced fractures can be treated with percutaneous reduction and screw fixation. However, displaced fractures demand ORIF. Ostermann et al. reported excellent results in 83% of patients at 6 months follow-up with ORIF of unicondylar fractures of the femur. Notably, all fractures that yielded less than excellent results were in patients with severe associated polytrauma or soft tissue injuries.
Clinical Outcomes and Complications of Retrograde Nailing
Reports of retrograde supracondylar nailing have consistently shown highly acceptable clinical results:
* Union Rates: 90% to 100%.
* Knee Range of Motion: Averages between 100 to 116 degrees of flexion.
Despite these excellent outcomes, surgeons must be vigilant regarding potential complications:
* Infection: 0% to 4%. Minimized by meticulous soft tissue handling and limiting the arthrotomy size.
* Malunion: 0% to 8%. Usually a result of failing to recognize and correct the extension/valgus deforming forces prior to reaming.
* Hardware Failure: 4% to 10%. Often related to premature weight-bearing in comminuted fractures or utilizing nails with inadequate diameters.
* Nail Fracture: 0% to 8%.
* Symptomatic Hardware (Knee Pain): Often related to prominent distal locking screws or failure to countersink the nail, leading to patellofemoral impingement.
Historical Perspective: Flexible Intramedullary Implants
Historically, flexible intramedullary implants, such as the Zickel supracondylar device, Ender rods, and Rush rods, were utilized with some success to treat distal femoral fractures. These devices relied on canal fill and three-point bending principles rather than rigid interlocking.
Historically, we have used flexible intramedullary devices most often in elderly patients with minimally comminuted supracondylar fractures to provide rapid, minimally invasive stabilization. However, since the development of more rigid plate and screw devices and the advent of interlocking intramedullary nails, the indications for their use are exceedingly limited. Today, newer implant designs with minimally invasive insertion techniques and multiplanar locking capabilities have effectively antiquated the use of flexible devices in adult distal femoral traumatology.
Postoperative Protocol and Rehabilitation
The postoperative rehabilitation protocol must be tailored to the fracture pattern, bone quality, and the rigidity of the fixation achieved.
* Early Mobilization: Continuous Passive Motion (CPM) or active-assisted range of motion exercises should begin on postoperative day one to prevent knee stiffness and intra-articular adhesions.
* Weight-Bearing Status: For stable fracture patterns (transverse or short oblique with cortical contact), touch-down weight-bearing (TDWB) is initiated immediately, progressing to partial weight-bearing at 6 weeks.
* Delayed Weight-Bearing: In highly comminuted fractures where the nail is functioning purely as a bridging device (load-bearing rather than load-sharing), full weight-bearing must be delayed until radiographic evidence of bridging callus is observed, typically between 8 to 12 weeks, to prevent hardware fatigue and failure.
