INTRODUCTION TO INTERFASCICULAR NERVE GRAFTING
The fundamental tenet of peripheral nerve reconstruction is the establishment of a tension-free coaptation. When a peripheral nerve sustains a severe injury resulting in a segmental defect, primary end-to-end neurorrhaphy is often impossible without introducing excessive tension. Tension at the repair site compromises intraneural microcirculation, leading to ischemia, profound fibroblastic proliferation, and ultimately, a dense scar barrier that prevents axonal crossing.
To circumvent this, the interfascicular nerve grafting technique, pioneered and modified by Millesi, remains the gold standard for bridging nerve gaps. This microsurgical approach relies on the precise excision of the neuroma, meticulous intraneural dissection to isolate healthy fascicular groups, and the interposition of autologous nerve grafts. By matching corresponding fasciculi between the proximal and distal stumps, the surgeon provides an optimal biological conduit for regenerating axons.
💡 Clinical Pearl: The Tension-Free Mandate
A nerve graft must always be utilized if an end-to-end repair requires joint flexion beyond physiological resting postures to achieve coaptation. The graft should be cut 10% to 15% longer than the measured gap to account for postoperative limb extension and natural graft shrinkage.
PREOPERATIVE PREPARATION AND POSITIONING
Optimal surgical outcomes begin with meticulous preoperative planning and patient positioning.
- Positioning: Keep the extremity in an extended position throughout the procedure. This ensures that the true maximal length of the nerve gap is measured and that the interposed grafts will not be subjected to tension during postoperative mobilization.
- Hemostasis: A pneumatic tourniquet is utilized during the initial exposure and dissection phases. However, it must be deflated prior to the final coaptation to ensure absolute hemostasis, as postoperative hematoma formation is highly detrimental to nerve regeneration.
- Magnification: An operating microscope is mandatory for the intraneural dissection, fascicular mapping, and micro-suturing phases.
SURGICAL TECHNIQUE: STUMP PREPARATION AND FASCICULAR MAPPING
1. Exposure and Epineurectomy
Expose the injured nerve using standard extensile approaches, identical to those used for primary neurorrhaphy.
* Begin the dissection in normal-appearing, unscarred tissue both proximally and distally, working systematically toward the zone of injury (the neuroma-in-continuity or the terminal neuroma and glioma).
* Once the stumps are isolated, incise the epineurium longitudinally in areas where the nerve architecture appears normal.
* Excise a circumferential cuff of the epineurium from both the proximal and distal stumps. This epineurectomy prevents the epineurial connective tissue from proliferating and obstructing the regenerating axons.
2. Intraneural Dissection and Neuroma Resection
Utilizing the operating microscope, commence intraneural dissection within the healthy segment of the nerve.
* Carefully separate the internal neurovascular structures, working progressively toward the scarred ends.
* Attempt to identify large individual fasciculi and distinct groups of smaller fasciculi.
* Ensure meticulous hemostasis by coagulating the smaller intraneural vascular branches using bipolar microcoagulating forceps on the lowest effective power setting to prevent thermal necrosis of adjacent axons.
3. Staggered Fascicular Transection
As intraneural fibrosis is encountered, transect each fasciculus or group of fasciculi individually at the exact level where the fibrosis begins.
* Because scarring rarely affects all fascicles equally, this dissection will result in fasciculi being transected at different levels.
* Upon completion, four to six fasciculi or fascicular groups, all of varying lengths, should be present at each stump end. This staggered arrangement prevents the formation of a single, confluent transverse scar plate.
🚨 Surgical Warning: Tourniquet Deflation
Before proceeding to graft measurement and placement, deflate the tourniquet. Compress the wound with saline-moistened packs. Meticulous hemostasis must be achieved now; avoid the use of suction drainage tubes near the repair site, as they can disrupt the micro-sutures or aspirate the fibrin glue.
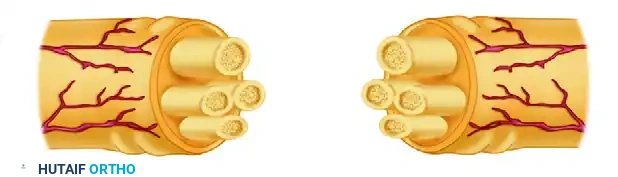
4. Fascicular Mapping
Draw a detailed sketch of both the proximal and distal nerve stumps.
* Attempt to identify and match the corresponding fasciculi and groups of fasciculi in each stump.
* Note: The more proximal the lesion, the less defined the fascicular groups become due to the complex internal plexuses of the nerve. Use profound clinical judgment, anatomical knowledge, and intraoperative electrical stimulation (if applicable) to match the motor and sensory fascicular groups accurately.
DONOR NERVE HARVEST: THE SURAL NERVE
By measuring the gaps remaining between the matched fasciculi at each end of the nerve, estimate the total length of the nerve graft needed. Each major fasciculus or group requires its own segment of graft.
While several nerves can serve as donors (e.g., saphenous, lateral cutaneous of the thigh, medial/lateral cutaneous of the forearm, superficial branch of the radial nerve), the sural nerve is the preferred choice for most reconstructive situations due to its length, predictable anatomy, and favorable fascicular architecture.
Sural Nerve Harvest Technique
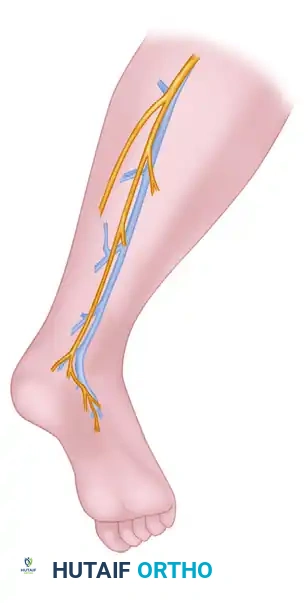
- Incision: Expose the sural nerve through a short transverse incision positioned posterior to the lateral malleolus.
- Identification: Isolate the nerve from the small (lesser) saphenous vein, which typically lies just anterior and superficial to the nerve.
- Dissection: Determine the proximal course of the nerve in the calf by applying gentle longitudinal traction.
- Harvesting Approach:
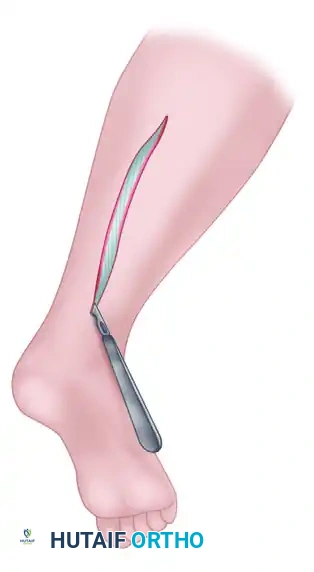
- Step-ladder technique: Make additional transverse incisions along the course of the nerve in the calf to allow further proximal dissection.
- Longitudinal technique: If exceptionally long segments of nerve are required, a single longitudinal incision is highly recommended. This minimizes the potential for traction-induced neuropraxia or structural damage to the donor nerve during a difficult harvest.
- Transection: Transect the nerve proximally so that its cut end retracts deep beneath the fascia or muscle bellies in the proximal calf. This critical step avoids the formation of a painful, superficial neuroma.
- Graft Preparation: Close the calf incisions. Keep the harvested graft moist with physiological saline. Dissect any excess fat from the epineurium of the graft, and section it into shorter segments of appropriate lengths to bridge the specific fascicular gaps.
GRAFT INTERPOSITION AND MICROVASCULAR COAPTATION
With the extremity positioned in extension and the grafts prepared, the reconstructive phase begins.
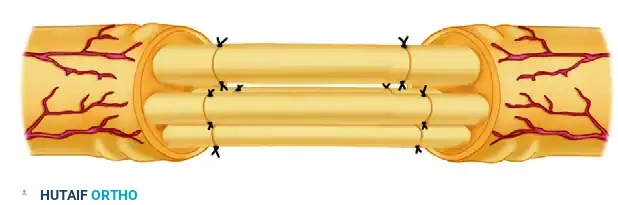
- Using the operating microscope, carefully interpose each graft segment between the corresponding matched fasciculi of the proximal and distal stumps.

- Secure the epineurium of the graft end to the perineurium of the recipient fasciculus (or fascicular group) using a single, precisely placed suture of 10-0 monofilament nylon.
- Because the extremity is extended and the grafts are cut 10% to 15% longer than the gap, the grafts will lie completely without tension. Under these ideal conditions, a single suture per coaptation site is often sufficient to maintain alignment.
💡 Clinical Pearl: Fibrin Glue Augmentation
To reinforce the repair site, minimize surgical trauma from multiple needle passes, and provide a watertight seal, fibrin glue (a mixture of equal parts thrombin and fibrinogen, as described by Narakas) can be applied over the coaptation sites. This stabilizes the fascicular alignment while reducing foreign body reaction.
POSTOPERATIVE CARE AND REHABILITATION
The philosophy of postoperative immobilization following interfascicular grafting varies, balancing the need to protect the micro-sutures against the benefits of early mobilization to prevent joint stiffness.
Institutional vs. Millesi Protocols
- Traditional Institutional Policy:
- Upper Extremity: Immobilize in a posterior molded plaster splint (or a Velpeau dressing if the shoulder girdle is involved) for 4 weeks. This is followed by a plastic splint that allows gradual extension over the subsequent 2 to 3 weeks.
- Lower Extremity: For major nerves (e.g., sciatic or peroneal), maintain a spica cast for at least 6 weeks. Following cast removal, apply a long-leg brace that controls knee extension, allowing 4 weeks or more for gradual, complete extension depending on the initial tension of the repair.
- Millesi’s Accelerated Protocol: Millesi advocated that because the grafts are placed without tension and are inherently elongated, the joints should be immobilized for no longer than 10 days in the exact position held during surgery. After 10 days, the splint is removed, and active exercises of all joints are initiated. This minimizes perineural adhesions and joint contractures.
Wound Care and Monitoring
- Do not disturb the initial dressing until the 7th to 10th postoperative day, at which point skin sutures are removed. Extreme care must be taken during splint removal to avoid inadvertent traction on the limb.
- Tracking Regeneration: The progress of axonal regeneration is monitored clinically by the advance of the Tinel sign.
- As the Tinel sign progresses distally along the graft, it may temporarily halt at the distal coaptation site. However, it usually resumes its advance.
- Intervention: If the Tinel sign fails to progress across the distal suture line after 3 to 4 months, a mechanical block (scarring) is assumed. Surgical re-exploration, resection of the distal coaptation, and secondary direct repair are indicated.
SPINAL ACCESSORY NERVE (SAN) INJURY AND REPAIR
The spinal accessory nerve (Cranial Nerve XI) is highly susceptible to iatrogenic injury during surgical procedures in the posterior triangle of the neck, most notably during lymph node biopsies or radical neck dissections.
Clinical Presentation and Pathomechanics
Woodhall provided the definitive clinical description of the profound morbidity following SAN transection. Patients typically present with:
* Generalized weakness in the affected shoulder girdle and arm.
* Inability to actively abduct the shoulder beyond 90 degrees.
* Sensory disturbances varying from a pulling sensation near the surgical scar to severe, incapacitating aching radiating to the medial border of the scapula and down the arm.
* Classic Deformity: Atrophy of the superior one-third of the trapezius muscle. The shoulder sags, and elevation power is markedly diminished. The scapula rotates distally and laterally, flaring slightly with its inferior angle resting closer to the midline than its superior angle.
* Differential Diagnosis: Unlike the scapular winging caused by serratus anterior paralysis (long thoracic nerve injury), the flaring of the inferior angle in SAN palsy disappears when the arm is raised anteriorly.
Indications for Surgery and Timing
- Low-Velocity Missile Injuries: If no vascular or visceral injuries demand immediate exploration, a period of observation for 3 to 4 weeks is appropriate. If electrodiagnostic studies (EMG/NCS) reveal persistent denervation of the trapezius without clinical signs of recovery, surgical exploration is indicated.
- Iatrogenic Injuries: If the nerve injury is recognized intraoperatively, immediate primary repair should be performed. If recognized postoperatively, or if a segment was intentionally resected during tumor extirpation, reconstructive efforts should be delayed for 2 to 3 weeks to allow the initial surgical bed to heal and inflammation to subside.
- Salvage Options: If the gap is too massive for grafting, or if the patient's condition (e.g., terminal malignancy, heavy irradiation) precludes nerve reconstruction, regional tendon transfers (e.g., Eden-Lange procedure) remain the primary alternative.
Surgical Approach to the Spinal Accessory Nerve
- Incision: Once the initial wound has healed, make an incision across the middle of the posterior triangle, carefully following the natural Langer’s lines (skin folds) of the neck.
- Anatomical Landmarks: The terminal portion of the SAN emerges at the junction of the proximal and middle thirds of the posterior border of the sternocleidomastoid (SCM) muscle. It courses diagonally (distally and posteriorly) across the posterior triangle to innervate the lateral border of the trapezius at the junction of its middle and distal thirds.
- Identification: The incision must be extensile enough to permit exact identification of both the proximal and distal stumps.
- Pitfall: Do not confuse the lesser occipital or greater auricular nerves (which course superiorly) with the SAN.
- Stimulation: Stimulate the proximal nerve stump. Contraction of the trapezius confirms continuity if the nerve is only contused.
- Repair Strategy:
- If extensive perineural scarring is present without discontinuity, perform a meticulous external and internal neurolysis.
- If the nerve is divided, mobilize the ends and section them back to healthy, pouting funiculi.
- Perform an end-to-end neurorrhaphy if it can be achieved under zero tension.
- If a gap exists, utilize the interfascicular nerve grafting technique (as described above, utilizing the sural or great auricular nerve as a donor) to bridge the defect and restore trapezius function.
