INTRODUCTION AND BIOMECHANICAL CONSIDERATIONS
The medial malleolus serves as the critical medial buttress of the ankle mortise and provides the primary osseous attachment for the robust deltoid ligament complex. Anatomical reduction and rigid internal fixation of medial malleolar fractures are paramount to restoring the congruity of the tibiotalar joint, preventing talar shift, and mitigating the risk of post-traumatic osteoarthritis. Even a 1-mm lateral shift of the talus can reduce the tibiotalar contact area by up to 42%, exponentially increasing peak articular contact stresses.
Operative intervention is strictly indicated for displaced fractures, fractures associated with syndesmotic disruption or lateral malleolar instability (bimalleolar and trimalleolar equivalents), and open fractures. The choice of fixation—whether utilizing lag screws, tension band constructs, or buttress plates—is dictated by the fracture pattern (e.g., transverse avulsion versus vertical shear), the degree of comminution, and the patient's intrinsic bone quality.
PREOPERATIVE PLANNING AND PATIENT POSITIONING
Thorough preoperative radiographic evaluation is mandatory, including standard anteroposterior (AP), lateral, and mortise views of the ankle. Advanced imaging, such as computed tomography (CT), may be warranted to assess articular impaction, occult posterior malleolar involvement, or complex comminution.
Positioning
- Place the patient in the supine position on a radiolucent operating table.
- A bump may be placed under the ipsilateral hip to internally rotate the leg, bringing the lateral malleolus anteriorly if concurrent fibular fixation is required. However, for isolated medial malleolus fixation, the leg can remain in a neutral, externally rotated resting posture.
- Apply a well-padded pneumatic tourniquet to the proximal thigh to ensure a bloodless surgical field.
- Prepare and drape the entire lower extremity to allow for intraoperative manipulation and fluoroscopic evaluation.
SURGICAL APPROACH: THE ANTEROMEDIAL INCISION
Meticulous soft tissue handling is the cornerstone of successful medial malleolar surgery. The vascular supply to the skin overlying the medial malleolus is notoriously tenuous, relying on a delicate angiosome network.
🔪 Surgical Warning: Soft Tissue Management
Handle the skin with extreme care, reflecting the flap intact with its underlying subcutaneous tissue as a single, full-thickness layer. The blood supply to the skin in this region is poor, and aggressive retraction or multi-layered dissection will inevitably lead to skin sloughing, wound dehiscence, and potential deep infection.
Step-by-Step Approach
- Incision Placement: Make an anteromedial incision that begins approximately 2 cm proximal to the fracture line. Extend the incision distally and slightly posteriorly, curving to end approximately 2 cm distal to the tip of the medial malleolus.
- Rationale for the Anteromedial Curve: We prefer this specific trajectory for two primary reasons:
- The posterior tibial tendon and its synovial sheath, located directly posterior to the malleolus, are less likely to be inadvertently damaged.
- The surgeon is afforded excellent visualization of the articular surfaces, especially the anteromedial aspect of the tibiotalar joint, which permits highly accurate alignment of the fracture.
- Limitations: Note that this incision cannot be made extensile distally if associated midfoot or hindfoot injuries must be treated concurrently.
- Neurovascular Protection: Identify and meticulously protect the greater saphenous vein and its accompanying saphenous nerve, which typically cross the operative field anteriorly. Retract them gently with a vessel loop.
FRACTURE PREPARATION AND ANATOMICAL REDUCTION
The distal fragment of the medial malleolus is usually displaced distally and anteriorly due to the pull of the deltoid ligament and the mechanism of injury.
Debridement and Joint Inspection
- Periosteal Interposition: A small fold of periosteum is commonly interposed between the fracture surfaces, physically blocking anatomical reduction. Remove this fold from the fracture site using a sharp curet or a periosteal elevator, exposing the small, interlocking serrations of the fracture bed.
- Articular Debridement: Débride small, loose osseous or chondral fragments from the joint space.
- Osteochondral Preservation: Large osteochondral fragments must be preserved. If structural support is lacking, these fragments should be supported with a localized cancellous bone graft to prevent late articular subsidence.
Provisional Fixation
- With a pointed bone-holding clamp or a large towel clip, grasp the distal tip of the malleolus and bring the detached fragment into its normal anatomical position.
- While maintaining compression, internally fix the fragment with two 2.0-mm smooth Kirschner wires (K-wires). Drill these wires across the fracture site from the distal tip of the malleolus, directing them proximally and slightly laterally into the dense metaphyseal bone of the distal tibia.
- Fluoroscopic Verification: Check the fracture reduction with AP, lateral, and mortise radiographs. Ensure that the joint line is perfectly congruent and that the K-wires do not penetrate the articular surface.
DEFINITIVE FIXATION OF THE MEDIAL MALLEOLUS
Once anatomical reduction is confirmed, proceed with definitive fixation. The modality chosen depends heavily on the fracture morphology.
Technique 1: Lag Screw Fixation (Standard Transverse Fractures)
For standard transverse or short oblique fractures with a solid distal fragment:
1. If the reduction is satisfactory, remove one of the provisional K-wires.
2. Use a cannulated drill system or a standard drill with a 2.5-mm bit to create a pilot hole for the screw. A long pelvic drill bit may be necessary if bicortical lag screw fixation is chosen.
3. Measure the depth and insert a 4.0-mm partially threaded cancellous lag screw.
4. Remove the second K-wire and replace it with a second 4.0-mm lag screw to provide rotational stability.
5. Joint Inspection: Carefully inspect the interior of the joint, particularly at the superomedial corner (the axilla of the mortise), to ensure the screw threads have not inadvertently crossed the articular surface.
6. Use intraoperative radiographs to verify the final position of the screws and the maintenance of the fracture reduction.
Technique 2: Tension Band Wiring (Small Fragments or Osteoporosis)
If the medial malleolar fragment is very small, comminuted, or if the patient has severe osteoporosis, fixation with a standard lag screw may be impossible or prone to pull-out.
1. Place two parallel K-wires obliquely from distal to proximal across the fracture site.
2. Pass a 1.2-mm (18-gauge) stainless steel wire through a drill hole in the tibial metaphysis proximal to the fracture.
3. Route the wire in a figure-of-eight fashion around the protruding ends of the K-wires distally.
4. Tension the wire to convert the distracting forces of the deltoid ligament into dynamic compressive forces across the fracture site. Bend and impact the K-wires to prevent soft tissue irritation.
Technique 3: Buttress Plating (Vertical Shear Fractures)
Large vertical fractures of the medial malleolus (typically seen in supination-adduction injuries) involve proximal comminution and extreme shear forces.
1. Lag screws alone are insufficient and often result in loss of reduction as the talus drives the fragment proximally.
2. Apply an anti-glide buttress plate to the medial surface of the tibia to mechanically block proximal migration. A small, one-third tubular plate or a specialized medial distal tibial locking plate is usually sufficient.
3. Soft Tissue Caution: To avoid wound complications, extreme care must be taken when applying bulky hardware to this area of poor skin coverage. Ensure the plate is perfectly contoured to the bone.
CONCURRENT MANAGEMENT OF THE LATERAL MALLEOLUS AND SYNDESMOSIS
Medial malleolar fractures rarely occur in isolation. They are frequently accompanied by lateral malleolar fractures and syndesmotic disruptions. Anatomical reduction and maintenance of fibular length are absolute prerequisites for restoring the ankle mortise.
Fibular Fixation Strategies
- Intramedullary Devices: Insert a Rush rod, interlocking fibular rod, or other intramedullary device across the fracture line into the medullary canal of the proximal fragment.
- Pitfall Avoidance: If using an intramedullary device, do not tilt the lateral malleolus toward the talus. The insertion point for intramedullary fixation tends to be the lateral surface of the malleolar tip. Because the intramedullary appliance is straight, the lateral malleolus may be inadvertently tilted toward the talus, resulting in narrowing of the ankle mortise and reduced motion. This mistake can be avoided by carefully contouring the intramedullary pin prior to insertion.
- Distal Fibular Screws: If the fracture is below the level of the plafond, if the distal fragment is small, and if the patient has good bone stock, use an intramedullary 3.5-mm malleolar screw for fixation. A 4.5-mm lag screw can be used in larger patients. Alternatively, orient the malleolar screw slightly obliquely to engage the medial cortex of the fibula proximal to the fracture.
- Poor Bone Quality: In patients with severe osteopenia, place K-wires obliquely from lateral to medial through the distal and proximal fibular fragments and secure them further with a tension band wire.
- Plate Fixation: If the fracture is above the level of the syndesmosis, use a small fragment, one-third tubular plate for fixation after anatomical reduction has been obtained. A 3.5-mm dynamic compression plate can be used in larger individuals or for more proximal fractures.
- The plates can be used to supplement lag screw fixation (neutralization) or to span a comminuted segment (bridge plating).
- In general, place three cortical screws in the shaft of the fibula above the fracture and two or three screws distal to the fracture. Unicortical cancellous screws are placed below the level of the plafond to avoid joint penetration.
- If the plate is placed posterolaterally, it acts as a highly stable antiglide plate.
- Several commercially available precontoured fixed-angle distal fibular locking plates provide excellent alternative fixation options distally, however, this is often at the expense of increased hardware prominence.
Syndesmotic Evaluation and Fixation
Following bimalleolar fixation, the distal tibiofibular syndesmosis must be rigorously tested using the intraoperative "Cotton test" (lateral traction on the fibula) or an external rotation stress test under fluoroscopy.
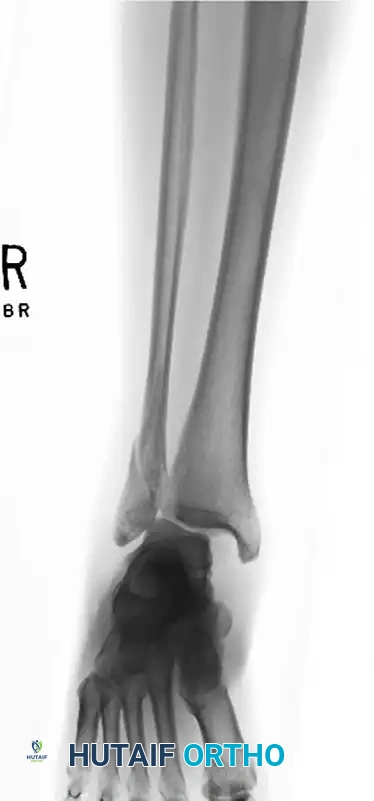
FIGURE 54-7 A: Preoperative lateral malleolar fracture with associated medial clear space widening and severe syndesmotic disruption.
If syndesmotic instability is identified, it must be reduced and stabilized.
1. Reduce the syndesmosis using a large reduction clamp placed across the medial and lateral malleoli. Ensure the foot is held in neutral dorsiflexion to prevent over-constriction of the mortise, as the anterior wedge of the talar dome is wider than the posterior aspect.
2. Insert one or two 3.5-mm or 4.5-mm cortical screws parallel to the joint line, approximately 2 to 3 cm proximal to the tibial plafond.
3. Screws can be placed across three cortices (both fibular cortices and the lateral tibial cortex) or four cortices (quadricortical) depending on surgeon preference and patient weight-bearing compliance.
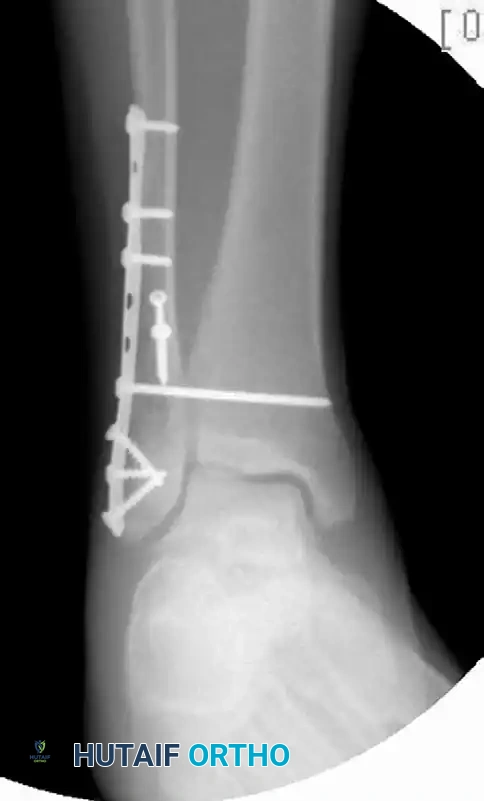
FIGURE 54-7 B: Postoperative AP/Mortise view. The fibula is anatomically reduced with a plate, and concentric tibiotalar reduction is restored and maintained with a single quadricortical syndesmotic screw.

FIGURE 54-7 C: Postoperative Lateral view demonstrating the fibular plate construct and the trajectory of the syndesmotic screw.
💡 Clinical Pearl: Severe Soft Tissue Compromise
For fractures in highly osteoporotic patients or patients with exceptionally poor soft tissue coverage (e.g., severe diabetic vasculopathy), formal plating may carry an unacceptable risk of necrosis. In these salvage scenarios, reduce and stabilize the fracture with K-wires placed obliquely through the distal fibular fragment directly into the tibia, bypassing extensive soft tissue stripping.
POSTOPERATIVE CARE AND REHABILITATION
The postoperative protocol must be tailored to the security of the fixation, the quality of the patient's bone, and the integrity of the soft tissue envelope.
Standard Protocol (Good Bone Quality & Secure Fixation)
- Immediate Post-Op: The ankle is immobilized in a well-padded posterior plaster splint in a strictly neutral position (0 degrees of dorsiflexion) and elevated continuously to minimize edema.
- First Postoperative Visit (10-14 Days): The splint and sutures are removed. If the bone quality is good and the fixation is secure, the splint can be replaced with a removable fracture boot.
- Early Rehabilitation: Active and active-assisted range-of-motion (ROM) exercises of the ankle and subtalar joints are begun immediately to prevent arthrofibrosis.
- Weight-Bearing: Weight bearing is strictly restricted (Non-Weight Bearing - NWB) for 6 weeks. After 6 weeks, partial weight bearing (PWB) can be initiated if radiographic evidence shows the fracture is healing well, progressing to full weight bearing (FWB) as tolerated.
Conservative Protocol (Poor Bone Quality, Skin Compromise, or Tenuous Fixation)
If skin conditions, severe osteoporosis, or other factors have prevented secure, rigid fixation, the fracture must be protected for a significantly longer duration.
1. Immobilization: The patient is placed in either a short-leg or a long-leg non–weight-bearing cast, depending on the stability of the fixation and the presence of syndesmotic injury.
2. Cast Conversion: If a long-leg cast is utilized initially to control rotation, it can generally be converted to a short-leg cast at the 4 to 6-week mark.
3. Weight-Bearing Restrictions: The patient is not allowed to bear any weight on the ankle until fracture healing is progressing well radiographically, which typically takes 8 to 12 weeks in compromised hosts.
4. Transition: Once bridging callus is observed, a short-leg walking cast or rigid boot is worn, and weight bearing is progressed gradually. The cast is permanently removed only when the fracture has achieved solid clinical and radiographic union.
