Introduction to Tibial External Fixation
External fixation remains an indispensable modality in the armamentarium of the orthopedic trauma surgeon. While intramedullary nailing is the gold standard for most closed and low-grade open tibial shaft fractures, external fixation is the definitive or damage-control treatment of choice for complex fracture patterns associated with severe soft-tissue compromise.
The primary goals of external fixation are to provide rigid osseous stability, restore length, alignment, and rotation (length-alignment-rotation, or LAR), and allow unhindered access for soft-tissue management. This masterclass delineates the biomechanical principles, anatomical safe zones, and step-by-step surgical techniques required for the successful application of modular uniplanar fixators, the Ilizarov device, and the Taylor Spatial Frame (TSF).
Indications and Preoperative Planning
The decision to utilize an external fixator over internal fixation is dictated primarily by the "personality" of the fracture and the condition of the soft tissue envelope.
Primary Indications
- Severe Open Fractures: Gustilo-Anderson Type IIIB and IIIC fractures where extensive periosteal stripping and soft-tissue loss preclude internal fixation.
- Compartment Syndrome: Facilitates stabilization without further elevating intracompartmental pressures, allowing simultaneous fasciotomies.
- Damage Control Orthopedics (DCO): Rapid stabilization in the polytraumatized patient to minimize the systemic inflammatory response syndrome (SIRS).
- Infected Nonunions: Eradication of osteomyelitis followed by bone transport (e.g., Ilizarov method).
- Periarticular Fractures with Diaphyseal Extension: Where standard plating or nailing is biomechanically insufficient or soft tissues are critically compromised.
Clinical Pearl: The first step in the management of complex, high-energy tibial fractures is determining limb salvageability. A dysvascular, insensate terminal limb often functions poorer than a well-fitted prosthesis. Consider the Mangled Extremity Severity Score (MESS), the number of required reconstructive operations, and the patient's psychological resilience before committing to prolonged limb salvage.
Biomechanics of Tibial External Fixation
Understanding the biomechanics of external fixation is paramount for constructing a frame that promotes secondary bone healing (callus formation) while preventing mechanical failure. The stability of the construct is influenced by several modifiable variables:
- Pin Diameter: The stiffness of a pin is proportional to the fourth power of its radius ($r^4$). Increasing pin diameter significantly increases construct rigidity. However, pin diameter should not exceed one-third of the bone's diameter to prevent stress risers and iatrogenic fractures.
- Pin Spread: Maximizing the distance between the two outermost pins within a single bone segment enhances stability.
- Bone-to-Bar Distance: The fixator bar should be placed as close to the skin as possible (allowing 2-3 cm for postoperative swelling) to decrease the bending moment on the pins.
- Number of Pins: Increasing the number of pins per segment increases stiffness, though the biomechanical advantage diminishes after three pins per segment.
- Multiplanar Constructs: Adding a second bar or utilizing a ring construct (Ilizarov) dramatically increases torsional and bending stiffness.
Anatomical Safe Zones and Pin Placement
Before fixator application, a rigorous review of cross-sectional anatomy is mandatory to confirm the "safe zones" for pin placement. The goal is to minimize the risk of iatrogenic injury to neurological, vascular, or tendinous structures.
The Tibial Safe Zones
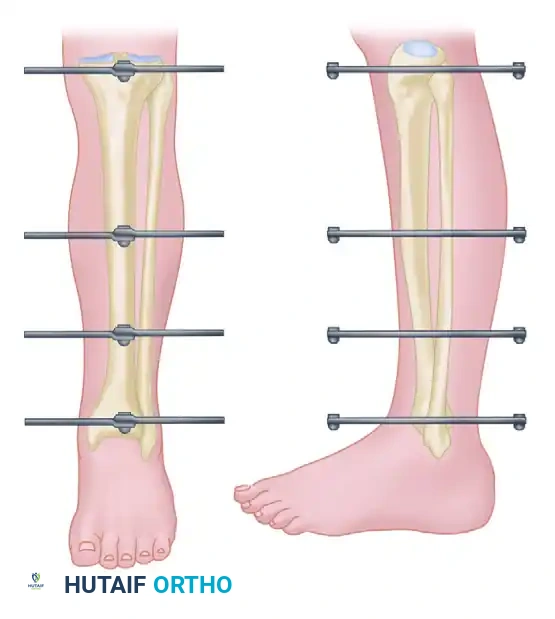
- Proximal Third: The safe zone is located anteromedially. Pins should be placed at least 15 mm distal to the articular surface to avoid penetrating the joint capsule. Care must be taken to avoid the pes anserinus tendons medially and the patellar tendon anteriorly.
- Middle Third: The anteromedial face of the tibia is subcutaneous and provides an excellent, safe corridor. Pins should be placed through the anterior or anteromedial cortex.
- Distal Third: The safe zone narrows. Pins must avoid the anterior tibial artery and deep peroneal nerve laterally, and the saphenous nerve and vein medially.
Surgical Warning: Always place pins through the subcutaneous border of the tibia to avoid soft-tissue tethering. Tethered muscle or tendon will cause severe pain, restrict joint range of motion, and dramatically increase the risk of pin tract infection.
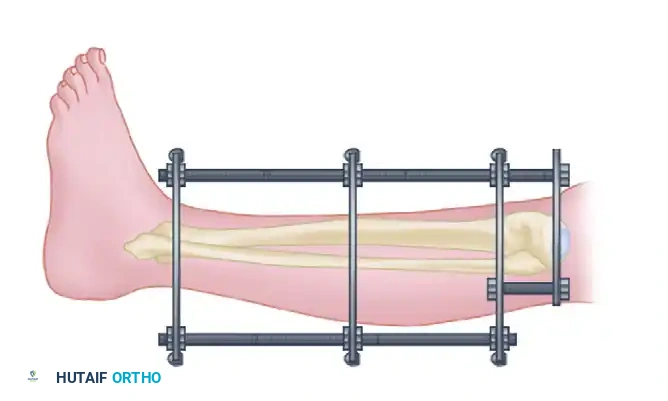
Surgical Technique: Generic Modular External Fixator
The following is a standardized, step-by-step technique for the application of a generic modular uniplanar external fixator (Surgical Technique 54-13).
1. Patient Positioning and Reduction
Place the patient supine on a radiolucent table. Hold the fracture in proper alignment by manual reduction (for closed fractures) or by bone clamps placed through an open wound.
2. Proximal and Distal Pin Insertion
Place the most proximal and distal pins first. These establish the foundation of the frame.
* They should be in the same plane, perpendicular to the long axis of the tibia, and parallel to the knee and ankle joints.
* If segment length allows, place these pins at the metaphyseal-diaphyseal junction. The cortical bone here is thicker, providing superior pin purchase compared to the cancellous bone of the extreme metaphysis.
3. The Art of Pin Insertion
Make small longitudinal incisions over the planned insertion sites. Bluntly dissect the soft tissues down to the bone using a hemostat to protect neurovascular structures.
* Predrilling: Place a drill sleeve firmly against the bone. Predrill the pinhole with the appropriate-size drill bit. Predrilling is critical as it lowers the risk of thermal necrosis and subsequent pin loosening.
* Insertion: Insert a pin with the correct thread length through the sleeve by hand (using a T-handle) into the bone.
* Bicortical Purchase: Ensure the pin engages the far cortex. However, threads should not protrude excessively into the soft tissues on the far side, nor should the smooth shank sit within the near cortex.
Pitfall: Some modern pins feature a conical rather than a cylindrical threaded portion to create a radial preload upon tightening. Never back out a conical pin after insertion; doing so instantly destroys the radial preload and guarantees premature loosening. If a conical pin is driven too deeply, it must be removed and placed in a new site.
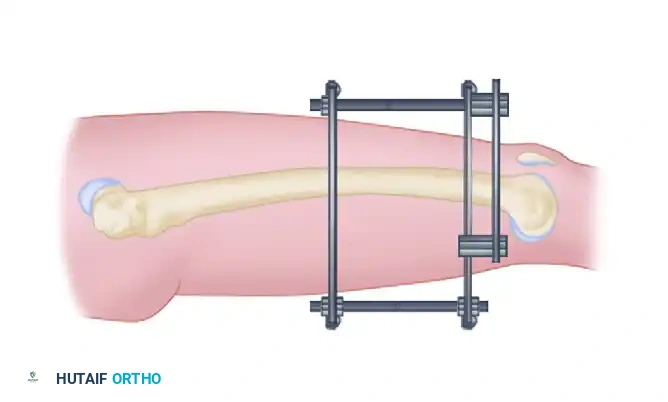
4. Frame Assembly
Place the predetermined number of pin-to-bar clamps onto the fixator bar and provisionally tighten them. Loosen the upper and lower clamps and attach the assembled frame to the proximal and distal pins.
The fixator bar must be of adequate length to span the fracture but not so long that it impinges on the ankle or restricts dorsiflexion.

5. Reduction and Inner Pin Placement
Check the fracture reduction under fluoroscopy. If alignment, length, and rotation are acceptable, securely tighten the proximal and distal pin clamps onto the bar.
Next, place the inner pins.
* Place the inner pin in each fragment at least 1 cm (preferably 2 to 3 cm if length allows) from the fracture site.
* Avoid undisplaced areas of comminution. Placing pins too close to the fracture hematoma risks converting a pin tract infection into deep osteomyelitis.
* Securely tighten all connections. If deemed necessary for stability, insert a third pin into each fragment between the previously placed pins.
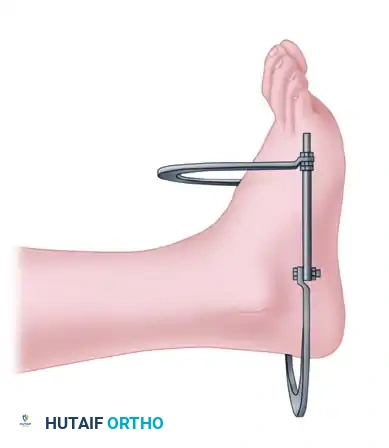
6. Foot Inclusion (Spanning the Ankle)
In cases of distal tibial fractures, unstable ankle injuries, or severe soft-tissue defects requiring immobilization, the foot must be included in the frame.
- Insert 3-mm or 4-mm pins through the subcutaneous border of the first or fifth metatarsal.
- Alternatively, place pins through the base of the second metatarsal (dorsal to plantar), strictly avoiding the dorsalis pedis artery and deep peroneal nerve.
- If necessary, place larger half-pins or transfixion pins in the posterior tuberosity of the calcaneus.
- Critical Alignment: Lock the foot in a neutral position. Strictly avoid equinus, inversion, or eversion.
Connect the foot pins to the tibial frame using specialized pin clamps or additional bars and bar-to-bar clamps.
7. Final Radiographic Confirmation
Obtain full-length anteroposterior and lateral radiographs to confirm adequate reduction and hardware placement before leaving the operating room.
Surgical Warning: Combining external fixation with lag screw fixation of the diaphysis is highly discouraged. This hybrid approach disrupts the periosteal blood supply further and creates stress risers, significantly increasing the risk of nonunion and mechanical failure.
Advanced Ring Fixators: Ilizarov and Taylor Spatial Frame
While modular uniplanar fixators are excellent for acute trauma, advanced ring fixators offer unparalleled versatility for complex fractures, nonunions, and deformity correction.
The Ilizarov External Fixator
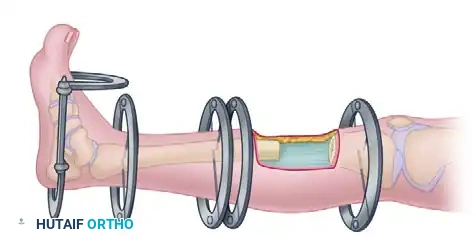
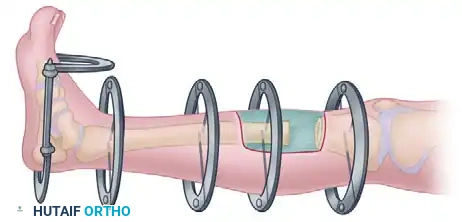
The tensioned wire external fixator, pioneered by Gavriil Ilizarov, is invaluable in the acute and subacute care of difficult tibial fractures, especially metaphyseal fractures with significant shaft extension.
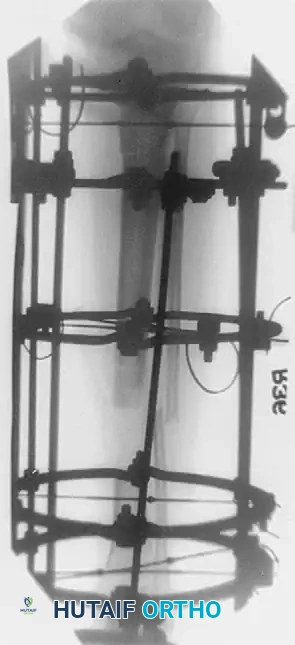
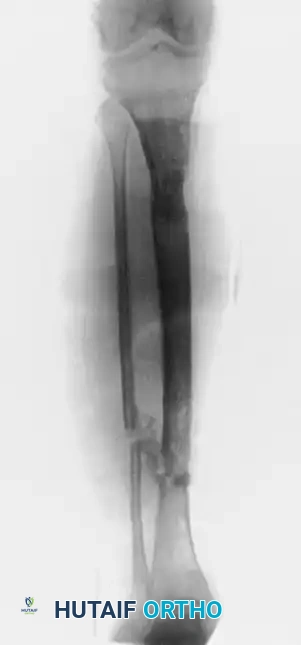
Above: Infection after an open tibial fracture treated with bone resection and Ilizarov bone transport, with bone graft at the docking site.
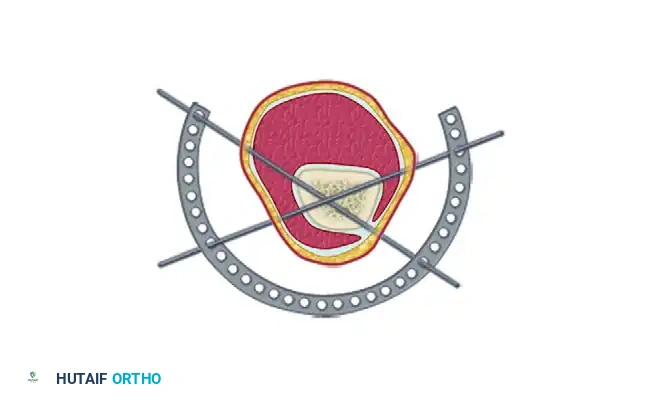
Biomechanics of the Ilizarov Frame:
Stabilization of short periarticular fragments is highly effective with this device. Four 1.8-mm diameter wires used to stabilize a bicondylar tibial plateau fracture provide an effective cross-section of fixation of 7.2 mm.
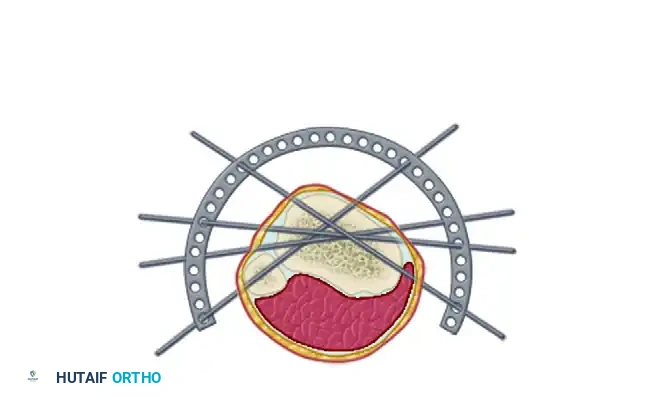

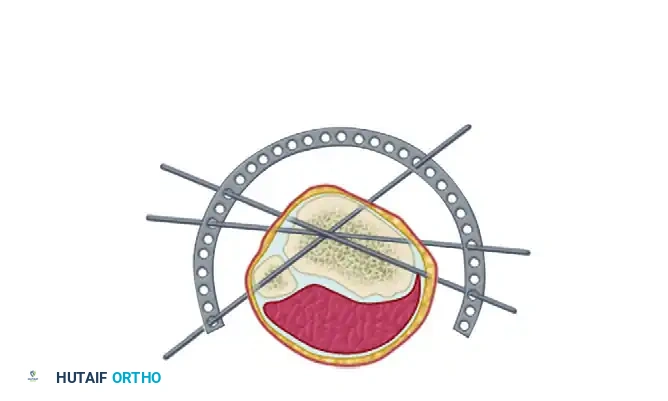
Above: The Ilizarov external fixation provides a "trampoline effect" because of highly tensioned wires that are supported circumferentially.
These four wires provide eight cortical interfaces. Because of their multiplanar orientation, they virtually eliminate late displacement of fragments. The wires are highly tensioned (typically 110-130 kg) and supported circumferentially by the rings, providing a dynamic "trampoline of fixation" that stimulates osteogenesis through axial micromotion while preventing shear.
The Taylor Spatial Frame (TSF)
The Taylor Spatial Frame is a unique hexapod ring and wire fixator consisting of two rings connected by six oblique struts. It utilizes the principles of the Stewart-Gough platform to provide six degrees of freedom.
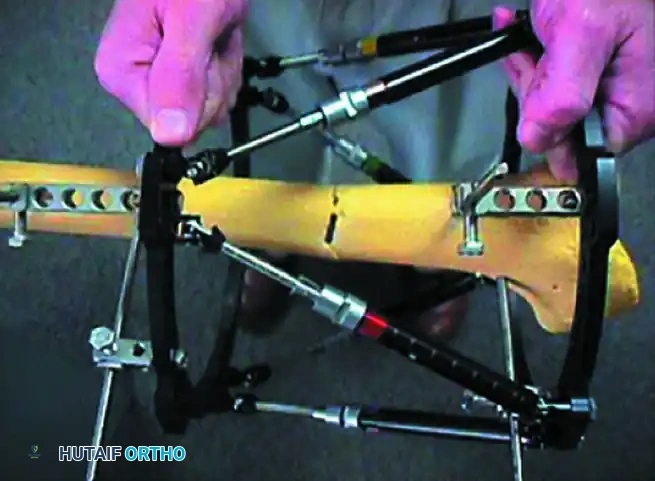
Its application is similar to the Ilizarov device, but it utilizes FastFx struts. Reduction is performed manually under image intensification until the best possible reduction is obtained in the AP and lateral planes, at which point the struts are locked.
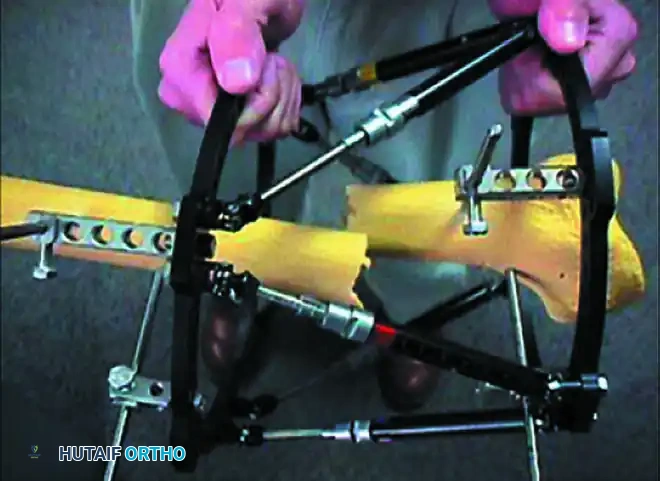
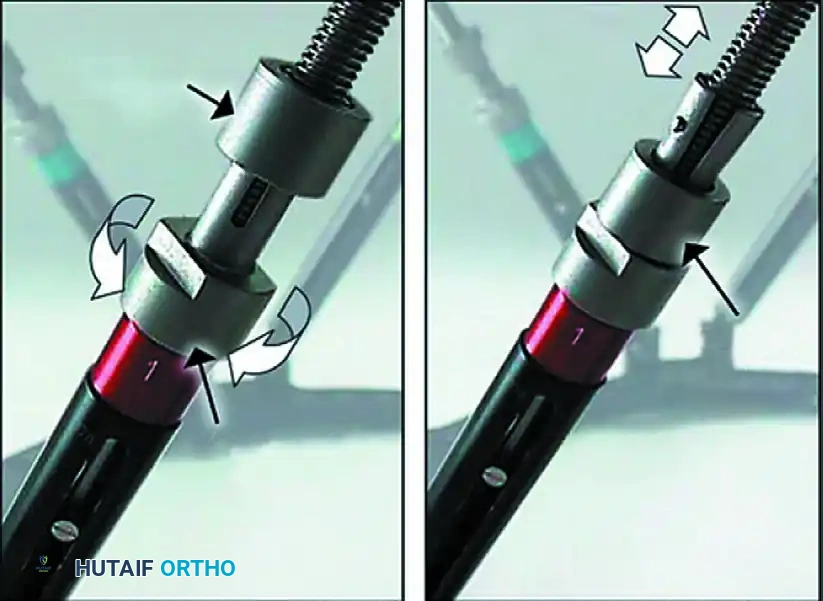
Above: FastFx struts allow reduction under direct vision or C-arm control. With the locking sleeve released, strut lengths can be changed to effect fracture reduction. Gradual adjustments can be made using the deformity correction computer program.
With the aid of computer software, radiographic parameters (length, rotation, translation, coronal, and sagittal alignment) are entered. The software generates a prescription, allowing the patient to adjust the struts daily as an outpatient to achieve perfect anatomical reduction. While primarily used for malunions, it is highly effective in acute trauma.
Postoperative Protocol and Rehabilitation
Meticulous postoperative care is as critical as the surgery itself to prevent complications and ensure union.
Pin Site Care
- Initiate pin site care after the initial postoperative dressing is removed (usually at 48-72 hours).
- Clean pin sites daily using a diluted hydrogen peroxide solution or antibacterial soap and water.
- Inspect daily for signs of erythema, tension, or purulent drainage.
Weight-Bearing and Dynamization
- Weeks 0-6: Only touch-down weight-bearing is allowed. Emphasize hip and knee range-of-motion and isometric quadriceps exercises. If the foot is not included, initiate early ankle ROM to prevent equinus contractures. Use a removable splint at night.
- Foot Pin Removal: If the foot was included to protect a soft-tissue wound, remove the foot pins after soft-tissue healing (usually 4 to 6 weeks). For unstable ankle injuries, retain them until the ankle is stable.
- Bone Grafting: At approximately 6 weeks, consider autogenous bone grafting (usually via a posterolateral approach) if there is significant bone loss (>50% of the cortex) or risk factors for delayed union.
- Dynamization: After 6 weeks, progress weight-bearing as callus develops. The frame can be converted to a dynamic configuration (loosening the bar to allow axial loading) to stimulate bone healing. Dynamization may be done sooner in axially stable, transverse fractures.
Frame Removal Criteria
Frames are retained until clinical and radiographic union is achieved.
To test for union:
1. Loosen the pin-to-bar clamps on one side of the fracture.
2. Manually stress the fracture.
3. Obtain stress radiographs.
If movement is detected, retighten the frame. If solid, remove the fixator. Protect the limb in a functional brace or cast, allowing weight-bearing as tolerated until full strength is regained. Vigorous activities are restricted for 6 months post-removal.
Complications and Management Strategies
When safe zones are respected and meticulous soft-tissue techniques are employed, immediate complications are rare. Most complications are late-onset.
1. Pin Tract Infection
This is the most common complication.
* Superficial: Treat with aggressive daily cleansing and oral antibiotics (targeting Staphylococcus aureus).
* Deep/Loosening: Persistent drainage with radiographic lucency indicates osteomyelitis and pin loosening. The pin must be removed, the tract curetted, and a new pin placed at a different site to maintain construct stability.
2. Neurovascular Injury
Direct injury is rare but possible, especially with transfixion pins in bilateral frames. Vascular injury is more often the result of late erosion of a vessel against a pin. Persistent bleeding at surgery or late spontaneous bleeding must be urgently investigated (angiography) to rule out pseudoaneurysm or late erosion.
3. Malunion and Nonunion
Removal of the external fixator and application of a cast before definitive union in high-energy fractures frequently results in malunion or nonunion.
If callus has not increased over a 3-month period, intervention is required (bone grafting or electromagnetic stimulation).
4. Conversion to Intramedullary Nailing
Converting an external fixator to an intramedullary nail carries a high risk of deep infection, especially if there is a history of pin tract infection.
Clinical Pearl: To minimize infection risk during conversion, remove the external fixator, aggressively treat any pin site issues, and place the patient in a cast or brace. Delay intramedullary nailing for an average of 7 weeks after fixator removal. This "pin holiday" has been shown to be extremely successful in safely managing delayed unions or nonunions without precipitating deep medullary sepsis. Furthermore, Gustilo recommended delaying any reconstructive surgery (grafting or nailing) until all soft-tissue wounds are fully reepithelialized.
