INTRODUCTION TO PROXIMAL PHALANX EXTENSION OSTEOTOMY
Hallux rigidus is the most common degenerative arthropathy of the foot, characterized by progressive loss of dorsiflexion at the first metatarsophalangeal (MTP) joint, dorsal osteophyte formation, and debilitating pain during the toe-off phase of the gait cycle. While arthrodesis remains the gold standard for end-stage disease, joint-sparing procedures are highly preferred for patients with early to moderate stages of hallux rigidus who wish to maintain joint mobility.
The extension osteotomy of the proximal phalanx, historically pioneered and modified by Kessel, Bonney, and Moberg, is a cornerstone joint-sparing procedure. By resecting a precisely measured dorsal closing wedge from the base of the proximal phalanx, the surgeon effectively shifts the functional arc of motion. While the total arc of motion remains unchanged, the available plantarflexion is translated into functional dorsiflexion, thereby restoring the mechanics necessary for normal ambulation and alleviating dorsal impingement.
This comprehensive guide details the biomechanical rationale, precise surgical techniques (including the Kessel-Bonney-Moberg and Thomas-Smith modifications), and evidence-based postoperative protocols required to master this procedure.
BIOMECHANICS AND RATIONALE
To fully appreciate the efficacy of the extension osteotomy, one must understand the biomechanics of the first ray during the gait cycle. Normal ambulation requires approximately 65 to 75 degrees of dorsiflexion at the first MTP joint to engage the windlass mechanism effectively. In hallux rigidus, dorsal osteophytes and capsular contractures mechanically block this motion.
The extension osteotomy does not "create" new motion; rather, it redistributes it.
Biomechanical Pearl: If a patient presents with a total MTP joint arc of 40 degrees (10 degrees of dorsiflexion and 30 degrees of plantarflexion), a 15-degree dorsal closing wedge osteotomy will shift the arc. Postoperatively, the patient will exhibit 25 degrees of dorsiflexion and 15 degrees of plantarflexion. This shift provides the necessary dorsal clearance to prevent impingement during terminal stance.
Geometrically, a 1 mm dorsal wedge resection at the base of the proximal phalanx correlates to approximately 3 to 4 degrees of angular correction. Therefore, a standard 5 to 6 mm wedge will yield roughly 15 to 24 degrees of increased functional dorsiflexion.
INDICATIONS AND CONTRAINDICATIONS
Indications
Patient selection is the most critical determinant of success for an extension osteotomy. Ideal candidates include:
* Coughlin and Shurnas Grade 1 or 2 Hallux Rigidus: Mild to moderate joint space narrowing with preserved, albeit painful, motion.
* Adequate Plantarflexion: The patient must possess at least 15 to 20 degrees of preoperative plantarflexion, as this motion will be sacrificed to gain dorsiflexion.
* Pain at End-Range Dorsiflexion: Symptoms primarily driven by dorsal impingement rather than mid-arc crepitus.
* Active Patients: Individuals who require MTP joint motion for occupational or recreational activities (e.g., running, kneeling) and wish to avoid arthrodesis.
Contraindications
- Advanced Degenerative Joint Disease: Coughlin and Shurnas Grade 3 or 4 hallux rigidus with severe joint space loss and mid-arc pain.
- Inflammatory Arthropathy: Rheumatoid arthritis or gouty arthropathy with diffuse joint destruction.
- Inadequate Plantarflexion: Patients with a rigid, neutral MTP joint will be left with a functionally elevated, non-purchasing hallux if an extension osteotomy is performed.
- Severe Osteoporosis: Poor bone stock that precludes stable internal fixation of the osteotomy.
PREOPERATIVE PLANNING AND ANATOMY
Radiographic Assessment
Standard weight-bearing anteroposterior (AP), lateral, and sesamoid views of the foot are mandatory. The lateral radiograph is utilized to template the osteotomy. The surgeon must measure the dorsal osteophytes (if a concurrent cheilectomy is planned) and calculate the exact base width of the dorsal wedge required to achieve the desired angular shift.
Surgical Anatomy
- Extensor Mechanism: The extensor hallucis longus (EHL) and extensor hallucis brevis (EHB) tendons traverse the dorsal aspect of the proximal phalanx. The surgical approach requires splitting or retracting these structures.
- Neurovascular Bundles: The dorsomedial and dorsolateral cutaneous nerves must be identified and protected during the superficial dissection.
- Flexor Hallucis Longus (FHL): The FHL runs directly plantar to the proximal phalanx. Penetration of the plantar cortex during the osteotomy risks lacerating or tethering the FHL, leading to severe postoperative morbidity.
SURGICAL TECHNIQUE: KESSEL, BONNEY, AND MOBERG EXTENSION OSTEOTOMY
This classic technique (Technique 81-37) relies on a precise dorsal closing wedge, preserving the plantar cortex as a functional hinge, and utilizing simple, low-profile fixation.
1. Positioning and Approach
The patient is placed supine on the operating table. A calf or ankle tourniquet is applied to ensure a bloodless surgical field. Intravenous antibiotics are administered prior to tourniquet inflation.
- Expose the proximal half of the proximal phalanx through a 3 to 4 cm midline dorsal longitudinal incision centered over the MTP joint and the proximal phalanx.
- Carefully dissect through the subcutaneous tissues, identifying and retracting the dorsal cutaneous nerve branches using blunt dissection.
2. Extensor Mechanism Management
- Identify the extensor hood mechanism.
- Split the extensor mechanism longitudinally down the midline.
- Carefully elevate the extensor tendons subperiosteally and retract them to either side (medial and lateral) using small Hohmann retractors. This exposes the bare dorsal cortex of the proximal phalanx.
3. Preparation for Fixation
Before making any bone cuts, it is imperative to pre-drill the fixation holes to avoid fracturing the delicate cortical bridges later.
- Drill two holes (one on either side of the proposed wedge) in a medial-to-lateral direction near the dorsal cortex.
- The proximal hole should be placed exactly 3 mm distal to the articular surface of the base of the proximal phalanx.
- The holes should be only large enough to allow the free passage of a 24-gauge stainless steel wire or a heavy nonabsorbable suture (e.g., #2 FiberWire).
Surgical Pitfall: Ensure that at least 2 to 3 mm of intact dorsal cortex remains between the planned distal osteotomy cut and the distal fixation hole. If the hole is placed too close to the osteotomy site, the wire will cut through the bone bridge during tensioning, resulting in fixation failure.
4. Executing the Osteotomy
The osteotomy is performed using a small oscillating or sagittal saw equipped with a fine-toothed blade. Copious cold saline irrigation must be used to prevent thermal necrosis of the bone.
- The Proximal Cut: Begin the first osteotomy 2 to 3 mm distal to the proximal drill hole. Slant the saw blade in a plantar-distal direction.
- The Distal Cut: Begin the second osteotomy at a point 5 to 6 mm distal to the first cut. Direct the saw blade proximally and plantarward to meet the first osteotomy cut.
- The apex of the wedge must meet near the plantar base of the proximal phalanx.
CRITICAL WARNING: Avoid penetrating the plantar cortex with the saw or the chisel. The plantar cortex must remain intact to serve as a stabilizing hinge. Complete transection destabilizes the osteotomy and places the underlying Flexor Hallucis Longus (FHL) tendon at imminent risk of laceration.
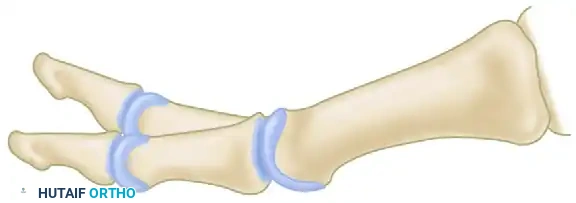
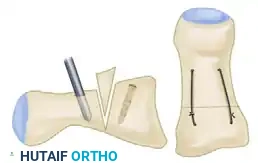
Diagram illustrating the Kessel, Bonney, and Moberg extension osteotomy. Note the dorsal wedge removal and the pre-drilled holes for wire or heavy suture fixation.
5. Wedge Removal and Closure
- Pass a single 24-gauge wire (or heavy nonabsorbable suture) through both pre-drilled holes.
- Gently remove the excised dorsal bone wedge using a small rongeur or a fine sharp chisel.
- Apply gentle, sustained upward pressure on the distal phalanx to close the osteotomy. This action will create a controlled "greenstick" fracture of the plantar cortex, allowing the dorsal bone surfaces to appose flushly.
- Once the bone surfaces are perfectly apposed, tension and tie the wire (or suture) securely on the lateral side of the phalanx to minimize soft tissue irritation.
6. Closure
- Deflate the tourniquet and secure meticulous hemostasis.
- Repair the longitudinally split extensor tendon using a continuous or interrupted roll stitch with an absorbable suture (e.g., 3-0 Vicryl).
- Close the joint capsule with interrupted nonabsorbable sutures. If possible, completely cover the osteotomy site with local soft tissue to prevent hardware prominence.
- Close the skin in a routine, tension-free fashion.
SURGICAL TECHNIQUE: THOMAS AND SMITH MODIFICATION
The Thomas and Smith modification (Technique 81-36) frequently combines the proximal phalangeal extension osteotomy with a first metatarsal cheilectomy. This dual approach addresses both the mechanical block (dorsal osteophyte) and the functional arc deficit simultaneously.
Cheilectomy and Osteotomy Integration
- Metatarsal Resection: A generous cheilectomy is performed first. Bone is resected from the dorsal aspect of the first metatarsal head in line with the dorsal metatarsal shaft. This removes the primary source of dorsal impingement.
- Phalangeal Osteotomy: Following the cheilectomy, attention is turned to the proximal phalanx. A dorsal closing wedge osteotomy is performed. The dorsal width of the proximal phalangeal osteotomy typically measures exactly 6 mm.
Thomas and Smith modification: Amount of bone resected from the first metatarsal (cheilectomy) and the 6 mm dorsal wedge from the proximal phalanx. Extreme care is taken to protect the flexor hallucis longus (FHL) tendon.
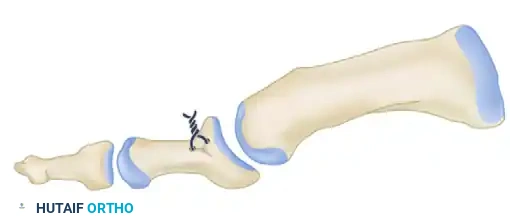
Lateral view of the metatarsophalangeal joint after the proximal phalangeal dorsal closing wedge osteotomy, demonstrating flush apposition of the osteotomy site.
Final construct showing the 3-0 wire fixation securely in place, maintaining the dorsal closing wedge and shifting the functional arc of motion.
POSTOPERATIVE CARE AND REHABILITATION
The postoperative protocol must balance the need for osteotomy site stability with the imperative to initiate early motion to prevent capsular adhesions. Two primary rehabilitation pathways exist, depending on the rigidity of the fixation and patient compliance.
Protocol A: Early Mobilization (Kessel, Bonney, and Moberg)
This protocol is preferred when fixation is exceptionally stable and the patient is highly compliant.
* Weeks 0-6: The patient is placed in a rigid, wooden-soled postoperative shoe. Weight-bearing as tolerated on the heel and lateral border of the foot is permitted immediately.
* Weeks 1-2: The surgical dressings are reduced. Gentle, passive dorsiflexion exercises of the MTP joint are initiated to prevent extensor tendon adhesions.
* Weeks 3-4: Active and passive plantarflexion exercises are introduced.
* Week 6: Radiographs are obtained to confirm clinical and radiographic union. Transition to normal, supportive footwear begins.
Protocol B: Cast Immobilization (Alternative Approach)
This protocol is utilized if bone quality is poor, the plantar hinge was completely transected, or patient compliance is a concern.
* Weeks 0-3: A short-leg walking cast with dorsal and plantar toe extensions is applied in the operating room. Partial weight-bearing with crutches is allowed.
* Week 3: The cast, roll stitch, and skin sutures are removed. A new, well-molded short-leg walking cast is applied.
* Weeks 3-6: The patient continues in the cast for an additional 3 weeks (total of 6 weeks) or until radiographic evidence of osteotomy union is confirmed. Physical therapy for MTP joint range of motion begins only after cast removal.
COMPLICATIONS AND MANAGEMENT
While the extension osteotomy is highly successful, surgeons must be prepared to manage potential complications:
- Plantar Hinge Fracture: Complete transection of the plantar cortex converts a stable closing wedge into an unstable transverse fracture. If this occurs, simple wire fixation is insufficient. The surgeon must immediately upgrade the fixation to a dorsal mini-fragment plate or crossed K-wires to prevent dorsal angulation and non-union.
- Flexor Hallucis Longus (FHL) Injury: Plunging the saw blade through the plantar cortex can lacerate the FHL. This results in a loss of active hallux plantarflexion and severe push-off weakness. Prevention via meticulous saw control is paramount.
- Hardware Prominence: The dorsal skin over the proximal phalanx is thin. Wire knots or bulky sutures can cause shoe-wear irritation. Ensure knots are buried laterally in the soft tissue. If irritation persists after bone union, hardware removal may be necessary.
- Transfer Metatarsalgia: Overcorrection (resecting a wedge larger than 6-7 mm) can excessively elevate the hallux, preventing it from purchasing the ground during stance. This shifts weight-bearing forces to the lesser metatarsal heads, causing intractable transfer metatarsalgia. Precise preoperative templating prevents this error.
- Under-correction: Failing to resect an adequate wedge will leave the patient with residual dorsal impingement and persistent pain. Ensure the wedge is at least 5 to 6 mm at its dorsal base for clinically significant results.
By adhering to strict patient selection criteria, executing precise surgical technique, and following structured postoperative rehabilitation, the extension osteotomy of the proximal phalanx remains a highly durable and effective solution for the management of early to moderate hallux rigidus.
📚 Medical References
- extension osteotomy for neglected congenital dislocation of the hip in young adults, Acta Orthop Belg 66:181, 2000.
- Albinana J, Dolan LA, Spratt KF, et al: Acetabular dysplasia after treatment for developmental dysplasia of the hip: implications for secondary procedures, J Bone Joint Surg 86B:876, 2004.
- Ando M, Gotoh E: Signifi cance of inguinal folds for diagnosis of congenital dislocation of the hip in infants aged three to four months, J Pediatr Orthop 10:331, 1990.
- Angliss R, Fujii G, Pickvance E, et al: Surgical treatment of late developmental displacement of the hip: results after 33 years, J Bone Joint Surg 87B:384, 2005.
- Barlow TG: Early diagnosis and treatment of congenital dislocation of the hip, J Bone Joint Surg 44B:292, 1962.
- Bar-On E, Huo MH, DeLuca PA: Early innominate osteotomy as a treatment for
