INTRODUCTION TO DIAGNOSTIC SHOULDER ARTHROSCOPY
Diagnostic shoulder arthroscopy remains the gold standard for evaluating intra-articular glenohumeral pathology. For the orthopedic surgeon, a profound, three-dimensional understanding of shoulder anatomy, biomechanics, and normal anatomical variants is paramount. The ability to systematically navigate the joint, establish precise accessory portals, and differentiate between physiological variants and true pathological lesions dictates the success of subsequent therapeutic interventions.
This masterclass details the establishment of superior and posterolateral accessory portals, the nuances of patient positioning, and a rigorous, step-by-step approach to diagnostic arthroscopy.
PATIENT POSITIONING AND BIOMECHANICS
The choice of patient positioning—lateral decubitus versus the "beach chair" (modified Fowler) position—largely depends on surgeon preference, the specific pathology being addressed, and anesthetic considerations.
The Lateral Decubitus Position
In the lateral decubitus position, the operative arm is placed in balanced suspension using 10 to 15 pounds of traction, typically abducted to 45 degrees and forward flexed to 20 degrees.
* Visual Orientation: Most surgeons orient the camera so that the image on the monitor corresponds to this position, rendering the glenoid horizontal.
* Advantages: Excellent visualization of the inferior capsule and labrum, natural distraction of the glenohumeral joint, and a lower risk of cerebral hypoperfusion events.
The Beach Chair Position
The patient is seated upright at approximately 45 to 60 degrees.
* Visual Orientation: The glenoid articular surface is viewed in a vertical orientation. The arthroscopic camera is maintained in its normal upright position, which facilitates highly intuitive instrument triangulation.
* Advantages: Anatomical orientation of the shoulder, ease of converting to an open procedure if necessary, and the ability to manipulate the arm freely through a full range of motion without traction constraints.
Surgical Warning: When utilizing the beach chair position, the surgical and anesthesia teams must remain vigilant regarding the risk of hypotensive bradycardic events (the Bezold-Jarisch reflex) and ensure adequate cerebral perfusion pressure is maintained throughout the procedure.
ESTABLISHING ACCESSORY PORTALS
While the standard posterior and anterior portals are sufficient for diagnostic purposes, complex reconstructions—particularly of the superior labrum anterior to posterior (SLAP) complex and the rotator cuff—require specialized accessory portals.
The Superior Portal (Neviaser Portal)
First described by Neviaser, the superior portal provides an unparalleled trajectory to the superior glenoid, the biceps anchor, and the superior capsule.
Indications: SLAP lesion repair, superior capsular release, and passage of sutures for rotator cuff repair.
Surgical Technique:
1. Palpation: The entry site is easily palpable as a soft spot located in the supraspinatus fossa, bounded by the clavicle anteriorly, the acromioclavicular joint laterally, and the spine of the scapula posteriorly.
2. Needle Localization: Introduce an 18-gauge spinal needle exactly 1 cm medial to the medial border of the acromion.
3. Trajectory: Direct the needle at an angle of 30 to 45 degrees relative to the skin, aiming 10 degrees posteriorly.
4. Intra-articular Entry: The needle should enter the joint at the superior margin of the glenoid, just posterior to the attachment of the long head of the biceps tendon.
5. Arthroscopic Confirmation: Always observe the passage of the spinal needle arthroscopically to confirm the proper trajectory and position before making a small skin incision and introducing the cannula.
Clinical Pearl: Medial deviation during the establishment of the Neviaser portal places the suprascapular nerve and artery at significant risk as they traverse the suprascapular notch. Strict adherence to the 1 cm medial landmark is mandatory.
The Portal of Wilmington
This posterolateral accessory portal is specifically designed to approach posterior Type II SLAP lesions, providing an optimized angle of approach to the posterosuperior glenoid and labrum.
Surgical Technique:
1. Landmarks: The portal location is precisely 1 cm anterior and 1 cm lateral to the posterior acromial angle.
2. Trajectory: The instrumentation is directed toward the superior labrum.
3. Precautions: Extreme care must be taken when placing this portal to avoid iatrogenic damage to the muscular and tendinous portions of the infraspinatus and supraspinatus near their insertion onto the greater tuberosity.
DIAGNOSTIC ARTHROSCOPY: A SYSTEMATIC APPROACH
Arthroscopic examination of the shoulder must be executed in a precise, methodical, and reproducible manner to ensure no pathology is overlooked.
Initial Entry and Orientation
To begin, a 4-mm, 30-degree arthroscope is inserted through the standard posterior portal (located 2 cm inferior and 1 cm medial to the posterolateral corner of the acromion). Fluid inflow is typically established through the arthroscopic sheath.
Upon entering the joint, the long head of the biceps tendon is immediately located. This structure serves as the primary anatomical landmark for orientation.
Step 1: The Superior Compartment
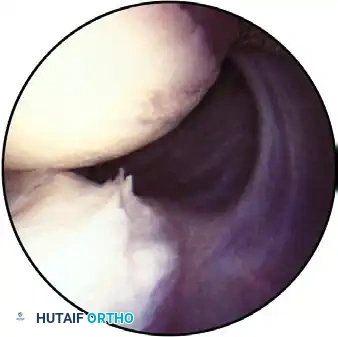
With the patient in the lateral decubitus position and the camera upright, the glenoid is oriented horizontally. The systematic examination begins superiorly.
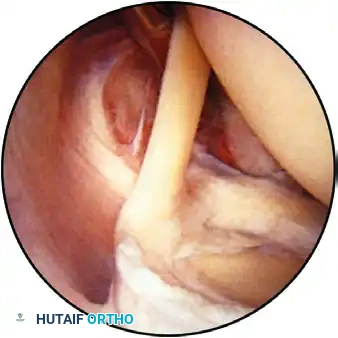
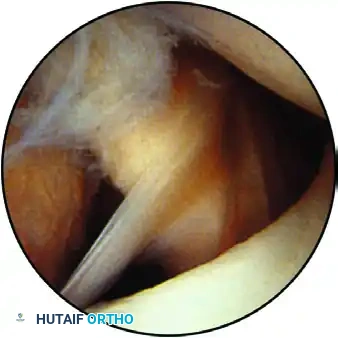
Observation of the superior part of the shoulder joint, demonstrating the biceps tendon inserting into the superior labrum. The humeral head is positioned superior-right, and the glenoid is inferior.
The arthroscope is advanced to evaluate the articular cartilage of the glenoid and the humeral head. The humeral head is dynamically assessed by internally and externally rotating the arm, observing for chondromalacia, osteochondral defects, or traumatic lesions.
On the central glenoid articular surface, a distinct area of thin or absent articular cartilage may be observed. This "bare spot" is a normal anatomical finding and must not be misidentified as an osteochondral defect.
Step 2: The Anterior Compartment and Anatomical Variants
As the arthroscope is advanced anteriorly, the superior and inferior surfaces of the biceps tendon, the biceps anchor, and the superior labrum are meticulously evaluated for fraying or partial tearing.
The bicipital arch, formed by the superior glenohumeral ligament (SGHL) and the coracohumeral ligament (CHL), is inspected to ensure the biceps tendon is stable and properly centered.
View of the anterior structures: The superior glenohumeral ligament and subscapularis tendon are visible on the right, with the middle glenohumeral ligament located inferiorly.
If a SLAP lesion is suspected, it must be dynamically probed to determine stability. These lesions typically result from traction injuries (e.g., overhead throwing) or a fall on an outstretched extremity, causing superior translation of the humerus against the biceps-labral complex.
The arthroscope is then directed over the anterior labrum toward the anterior "soft spot"—a triangular interval bounded by the biceps tendon proximally, the subscapularis tendon distally, and the glenoid articular surface inferiorly.
Establishing the Anterior Portal:
Depending on the planned procedure, an anterior working portal is established in this soft spot using an outside-in (antegrade) technique. A spinal needle is used to localize the optimal trajectory before incision. Once the cannula is placed, a probe is introduced to palpate the anterior structures.
Evaluating Labral Variants:
A thorough understanding of anterior labral anatomy is critical. According to Detrisac and Johnson, the labrum varies from a thin, firmly attached rim to a thickened, meniscoid-type structure.
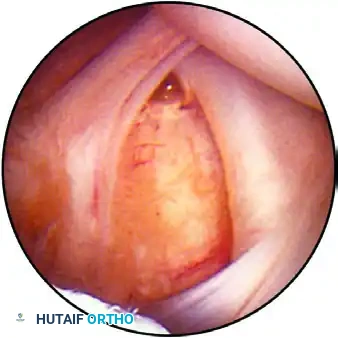
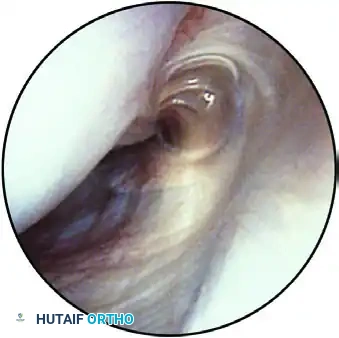
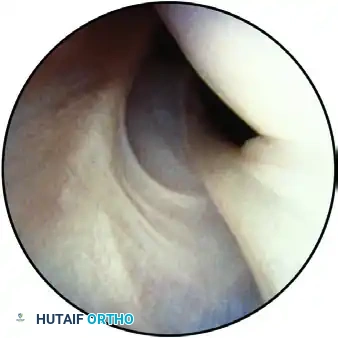
A normal sublabral hole, where the labrum above the midglenoid notch is separated from the glenoid margin.
Variations such as a sublabral hole are present in up to 80% of patients with superior wedge-type labra and are strictly non-pathological.
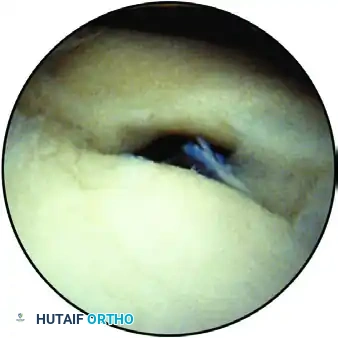
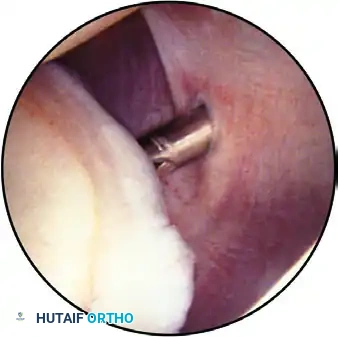
The Buford complex: A normal anatomical variant showing the insertion of a cordlike middle glenohumeral ligament directly into the biceps anchor, with an absent anterosuperior labrum.
Snyder described the Buford complex, a variant where the middle glenohumeral ligament (MGHL) is thickened and cordlike, inserting directly into the biceps tendon, leaving a bare area on the anterosuperior glenoid devoid of labral tissue. Recognizing this prevents the catastrophic error of surgically "repairing" a normal Buford complex, which would severely restrict external rotation.
Step 3: The Inferior Recess and Glenohumeral Ligaments
The arthroscope is directed inferiorly to examine the anterior band of the inferior glenohumeral ligament (IGHL) and the MGHL.
A middle cord variant of the glenohumeral ligament crossing the subscapularis tendon.
Normally, the anterior band of the IGHL attaches to the glenoid neck between the 2-o’clock and 4-o’clock positions. The anterior capsule typically consists of three distinct ligaments, though variations such as a confluent MGHL/IGHL or complete absence of ligaments exist.
The rotator interval gap must be measured. A gap exceeding 1 cm adjacent to the glenoid, particularly when associated with a 2+ to 3+ clinical sulcus sign, warrants surgical plication.
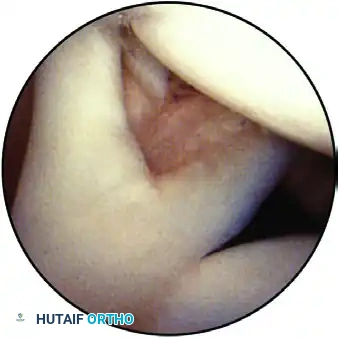
The inferior pouch, displaying the hammock-like structure of the glenohumeral ligaments and the inferior labrum.
As the arthroscope enters the inferior pouch, the lens is rotated back toward the superior glenoid. Evidence of instability—such as synovitis, loose bodies, or labral detachment—is noted.
Capsular attachment to the humeral head, observed through the inferior pouch.
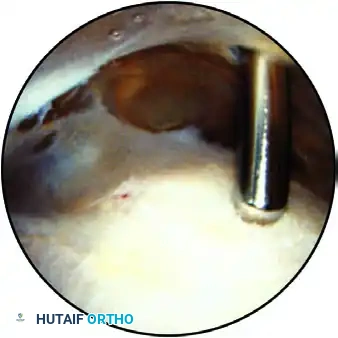
Using a probe from the anterior portal, the humeral head is gently lifted from the glenoid to stress the capsulolabral attachments.
* ALPSA Lesion: If the capsule and labrum appear medially retracted on the glenoid neck, careful palpation is required to rule out an Anterior Labral Periosteal Sleeve Avulsion (ALPSA), described by Neviaser. This occurs when anterior subluxation causes partial detachment and medial/inferior healing of the complex.
* Drive-Through Sign: Described by Warren, if the arthroscope can be easily swept from the superior to the inferior joint space with the arm slightly externally rotated, it indicates generalized capsular laxity that must be addressed during stabilization.
Step 4: The Rotator Cuff Undersurface
The arthroscope is withdrawn slightly to examine the superior capsule and the undersurface of the rotator cuff. The lens is directed superiorly, and the cuff insertion into the greater tuberosity is evaluated while the arm is gently rotated.

Evaluation of the rotator cuff for fraying, partial tears, or calcific deposits. The supraspinatus tendon is visible superiorly, with the biceps tendon in the center.
The arthroscope follows the tendon medially. A semicircular ridge of fibers just medial to the tuberosity insertion is the "rotator cuff arch," a normal anatomical finding.
Surgical Technique - Marking Partial Tears:
When an undersurface partial articular-sided tendon avulsion (PASTA) is identified, its depth is probed. The area is marked by passing an 18-gauge spinal needle through the tear from a lateral approach, deploying a polydioxanone (PDS) suture. This allows the surgeon to locate the exact site of the lesion when viewing from the subacromial space later in the procedure. Minor fraying can be treated with light motorized debridement to stimulate a localized healing response.
Differentiating the Bare Area from a Hill-Sachs Lesion:
The posterior portion of the rotator cuff and the "bare area" of the humeral head are observed. The normal bare area is located inferior to the cuff insertion, features small entering vessels, and lacks cartilage. This must be distinguished from a true Hill-Sachs lesion (an impaction fracture indicating recurrent anterior instability), which is characterized by articular cartilage present both superior and inferior to the bony defect.
Internal Impingement:
In overhead throwing athletes, the arm is taken out of traction and placed into an abducted, externally rotated (ABER) position. If undersurface fraying of the posterior rotator cuff is observed abutting the posterosuperior glenoid labrum (a "kissing lesion" as described by Jobe), this confirms the diagnosis of internal impingement.
Step 5: The Posterior Compartment
To thoroughly evaluate the posterior structures, the arthroscope is transitioned to the anterior portal, utilizing the posterior portal for instrumentation.
The posterior articular surface, posterior labrum, posterior pouch, and posterior capsule, viewed with the arthroscope inserted through the anterior portal.
The posterior labrum and capsule are inspected for redundancy, fraying, or reverse Bankart lesions indicative of posterior instability.
The posterior band of the inferior glenohumeral ligament, visible with internal rotation as it approaches its insertion at the 7-o’clock to 9-o’clock positions.
Viewing from the anterior portal also provides an excellent orthogonal perspective of the anterior structures.

The anterior band of the inferior glenohumeral ligament observed from the anterior portal, showing its superior humeral insertion.
The capsulolabral attachment to the glenoid, clearly delineated when observed through the anterior portal.
Step 6: Subacromial Evaluation
Following the intra-articular diagnostic sweep, the arthroscope is redirected into the subacromial space to evaluate the bursal surface of the rotator cuff and the undersurface of the acromion.
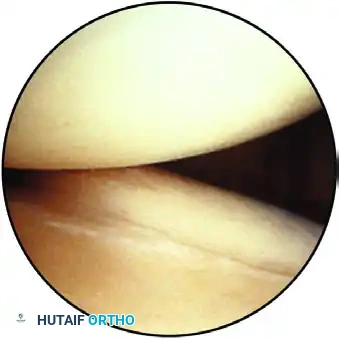
View of the subacromial space, demonstrating the bursal surface of the rotator cuff below and the acromion above.
The previously placed PDS marking suture is identified to assess the bursal extension of any articular-sided partial tears. The coracoacromial ligament and the acromioclavicular joint are also inspected for signs of impingement, spurring, or degenerative changes, completing the comprehensive diagnostic arthroscopy.
POSTOPERATIVE PROTOCOLS
Following a purely diagnostic arthroscopy or minor debridement, postoperative rehabilitation focuses on immediate mobilization to prevent adhesive capsulitis.
* Immobilization: A standard clinical sling is provided for comfort, typically discontinued within 3 to 7 days.
* Phase I (0-2 Weeks): Immediate initiation of passive range of motion (PROM) and pendulum exercises. Cryotherapy is utilized for edema and pain control.
* Phase II (2-6 Weeks): Progression to active-assisted range of motion (AAROM) and active range of motion (AROM). Scapular stabilization exercises are introduced.
* Phase III (6+ Weeks): Gradual introduction of isotonic strengthening, focusing on the rotator cuff and periscapular musculature, with a return to full activity guided by functional testing.
(Note: If stabilization, SLAP repair, or rotator cuff repair is performed, the rehabilitation protocol is strictly modified to protect the specific surgical repair.)
