INTRODUCTION TO THE QUADRUPLE HAMSTRING GRAFT
The endoscopic quadruple hamstring autograft has become a cornerstone in primary and revision anterior cruciate ligament (ACL) reconstruction. By harvesting both the semitendinosus and gracilis tendons and folding them to create a four-strand construct, surgeons can achieve an ultimate tensile strength that significantly exceeds that of the native ACL (approximately 4,000 N for a quadrupled graft versus 2,160 N for the native ligament).
This technique offers a highly favorable biomechanical profile, minimizing extensor mechanism morbidity—such as anterior knee pain and patellar fracture—often associated with bone-patellar tendon-bone (BPTB) grafts. Success relies heavily on meticulous graft harvesting, precise anatomic tunnel placement, rigid fixation, and adherence to a phased, biologically sound rehabilitation protocol.
PREOPERATIVE PLANNING AND PATIENT POSITIONING
Thorough preoperative clinical examination and advanced imaging (MRI) are mandatory to assess the status of the ACL, menisci, and secondary restraints.
Surgical Setup
- Anesthesia: The procedure is typically performed under general anesthesia, often supplemented with a regional nerve block (e.g., adductor canal block) for postoperative pain management.
- Positioning: The patient is placed supine on the operating table. A lateral post or a leg holder is positioned at the level of the mid-thigh to act as a fulcrum for applying valgus stress, facilitating access to the medial compartment.
- Tourniquet: A well-padded pneumatic tourniquet is applied to the proximal thigh.
- Examination Under Anesthesia (EUA): A comprehensive EUA is performed to confirm the pivot-shift, Lachman, and anterior drawer tests, comparing the injured knee to the contralateral side.
SURGICAL TECHNIQUE: GRAFT HARVEST AND PREPARATION
The harvest of the hamstring tendons requires a meticulous understanding of the medial knee anatomy to avoid premature graft amputation and iatrogenic nerve injury.
Incision and Exposure
Make a 4-cm longitudinal or slightly oblique incision anteromedially on the proximal tibia. The incision should start approximately 4 cm distal to the medial joint line and 3 cm medial to the tibial tuberosity.
Carry the dissection through the subcutaneous tissue to expose the sartorial fascia covering the pes anserinus insertion. Hemostasis must be meticulously maintained.
Identification of the Pes Anserinus
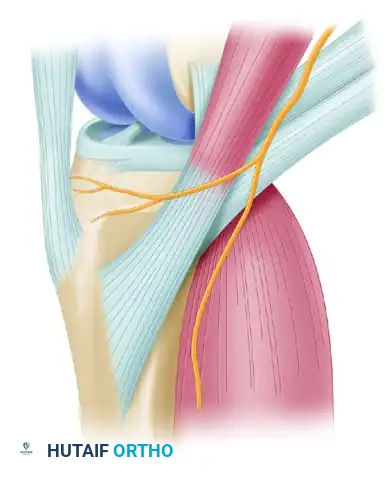
Palpate the upper and lower borders of the sartorius tendon. The gracilis and semitendinosus tendons can be palpated as distinct cord-like structures lying deep to the sartorial fascia, approximately 3 to 4 cm medial to their tendinous insertion on the tibia.
Make a short, precise incision in line with the upper border of the gracilis tendon. Carry this incision just through the first fascial layer (sartorial fascia).
Surgical Warning: Exercise extreme caution during this fascial incision. Do not penetrate too deeply, as the underlying superficial medial collateral ligament (sMCL) lies immediately deep to the hamstring tendons and can be inadvertently injured.
Graft Isolation and Mobilization
Using Metzenbaum scissors, carry the dissection proximally up the thigh. It is imperative to stay in the correct anatomical plane. Maintain adequate exposure by using properly placed retractors (e.g., Army-Navy or right-angle retractors).
Clinical Pearl: Careful observation of the superficial structures is necessary to avoid injuring the saphenous vein or the infrapatellar branch of the saphenous nerve. Straying from the correct plane of dissection increases the risk of postoperative medial knee numbness or painful neuromas.
With a curved hemostat, dissect the gracilis and semitendinosus tendons from the surrounding soft tissues about 3 cm medial to their insertion onto the tibia. After carefully identifying each tendon, use a right-angle vascular clamp to pass a Penrose drain around the gracilis tendon to isolate it.
Releasing Fibrous Extensions
This is arguably the most critical step in hamstring harvest. You must release the fibrous fascial extensions (vincula) that tether the hamstring tendons to the medial head of the gastrocnemius and the semimembranosus muscles.
* These fibrous bands typically branch off the hamstring tendons at 6 to 7 cm proximal to their distal attachment.
* Failure to completely release these bands will cause the tendon stripper to deviate into the muscle belly, resulting in premature amputation of a short, unusable graft.
Subperiosteally dissect the tendons medially to their insertion on the tibia, and release them sharply with a scalpel. Do not damage or release the sartorius tendon.
Tendon Stripping
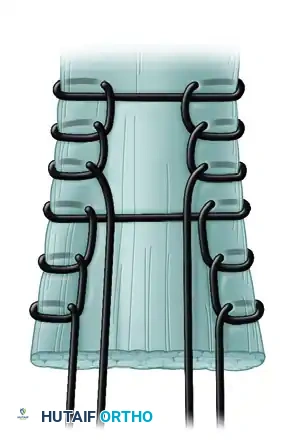
Place a nonabsorbable Krackow stitch on the distal tendon ends.
Clinical Pearl: Use different colored sutures (e.g., blue for gracilis, white/green for semitendinosus) to easily differentiate the two tendons on the back table.
- Palpate all sides of the tendon with your gloved finger to ensure there are absolutely no remaining fibrous extensions.
- Thread the free ends of the suture through an open-end tendon stripper.
- Apply firm, controlled, distal traction on the tendon sutures.
- Advance the stripper proximally in line with the tendon. If firm resistance is felt, stop immediately. Redissect around the tendons with a periosteal elevator and Metzenbaum scissors to locate the missed fascial band.
- Release the tendon proximally by maintaining controlled tension while advancing the stripper. The muscle belly should smoothly slide off the tendon as the stripper is advanced into the proximal thigh.
- Repeat the exact same procedure to release and harvest the semitendinosus tendon.
Back-Table Graft Preparation
Transfer the harvested tendons to a separate sterile preparation table.
1. Using a No. 10 blade or a blunt elevator, carefully scrape and separate any remaining adherent muscle tissue from the tendons.
2. Place a Krackow-type whipstitch in both ends of each tendon using No. 2 nonabsorbable sutures.
3. Fold both tendons in half over a passing suture or suspensory fixation loop to form a four-strand (quadruple) construct.
4. Use a calibrated tendon tube sizer to accurately measure the diameter of the quadrupled tendon. The graft must pass smoothly but snugly through the sizing tube (typically yielding a diameter between 7.5 mm and 9.0 mm).
INTRA-ARTICULAR PREPARATION AND TUNNEL PLACEMENT
Diagnostic Arthroscopy and Notchplasty
Establish standard anterolateral (viewing) and anteromedial (working) portals. Perform a comprehensive diagnostic arthroscopy, addressing any meniscal or chondral pathology.
Clear the intercondylar notch of the ruptured ACL stump using a motorized shaver and radiofrequency ablation wand. Perform a limited notchplasty if the intercondylar notch is narrow or if there is impingement against the PCL or lateral femoral condyle, ensuring adequate visualization of the "over-the-top" position and the native ACL femoral footprint.
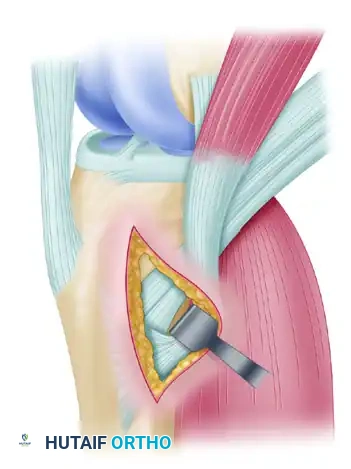
Tibial Tunnel Preparation
The tibial tunnel is prepared using an ACL tibial guide set at an angle of 50 degrees to the tibial articular surface. The intra-articular exit point should be centered in the native ACL footprint, slightly anterior to the PCL and in line with the posterior border of the anterior horn of the lateral meniscus.
- Advance a guide pin through the guide.
- Ream the tibial tunnel. Crucial Technique: The tunnel is initially reamed 2 mm smaller than the measured graft size.
- Serially dilate the tunnel up to the exact graft size to produce a snug fit.
Evidence-Based Rationale: Biomechanical studies by Cain, Phillips, and Azar have demonstrated that serially dilating the tibial tunnel (rather than extraction reaming to the final size) compresses the surrounding cancellous bone, significantly increasing the pull-out strength of the tibial fixation.
The final tibial tunnel length should ideally be 30 to 35 mm to allow for robust interference screw fixation near the articular surface.
Femoral Tunnel Preparation
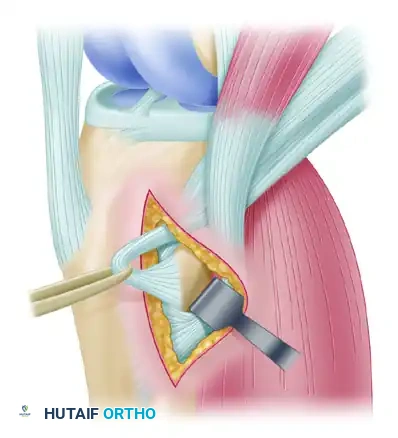
A low anteromedial (accessory AM) portal is highly recommended for reaming the femoral tunnel, as it allows for more anatomic, independent placement of the femoral footprint compared to transtibial techniques.
- Flex the knee to at least 120 degrees to avoid posterior wall blowout.
- Place a femoral offset guide over the "over-the-top" position at the anatomic center of the ACL footprint (typically the 10 o'clock position for a right knee, or 2 o'clock for a left knee).
- Advance a passing pin through the lateral femoral cortex.
- Measure the total intraosseous length.
- Use an EndoButton drill (4.5 mm) to breach the lateral cortex, followed by an acorn reamer matched to the graft diameter. Ream to a depth that allows 20 to 25 mm of the tendon to be secured within the femoral tunnel, leaving adequate room for the suspensory button to flip.
Graft Passage and Fixation
- Pass the graft through the tibial tunnel and into the femoral tunnel using a passing suture.
- Deploy the EndoButton (or similar cortical suspensory device) on the lateral femoral cortex. Apply distal traction to confirm the button has flipped and is securely seated against the bone.
- Pre-tensioning: Tension the graft manually for 3 minutes while cycling the knee through a full range of motion (0 to 120 degrees). This removes creep from the construct and ensures the graft is seated perfectly.
- Fix the tibial side using a bioabsorbable or biocomposite interference screw, typically placed while the knee is in 20 to 30 degrees of flexion and a posterior drawer force is applied to restore normal tibiofemoral step-off.
POSTOPERATIVE REHABILITATION PROTOCOL
Successful ACL reconstruction requires strict adherence to a phased rehabilitation protocol to protect the graft during the vulnerable ligamentization phase while restoring motion, strength, and proprioception.
Stage I: 0 to 2 Weeks
Focus: Protection, edema control, and early motion.
* Mobilization: Patellar mobilizations (emphasize superior/inferior glides).
* Bracing: Motion control brace (MCB) locked at 0 to 90 degrees. Sleep in brace locked in full extension.
* Exercises:
* Quadriceps sets (QS) and straight-leg raises (SLR) in all planes (emphasize SLR without extension lag).
* Prone and standing hamstring curls.
* Passive extension (emphasize achieving full symmetric extension immediately).
* Prone hangs and pillow under heel.
* Passive, active, and active-assisted ROM knee flexion (wall slides, sitting slides, prone towel pulls).
* Modalities: Edema control via compression pump. Electrical stimulation for muscle re-education if QS is poor.
* Weight Bearing: Partial weight bearing (PWB) 50% to 75% with crutches, or weight bearing to tolerance (WBTT) without crutches only if the MCB is locked in full extension.
* Goals: Full knee extension ROM, 90-degree knee flexion ROM, good QS, and emphasize a normal gait pattern.
Stage II: 2 to 4 Weeks
Focus: Progression of ROM and weight bearing.
* Bracing: MCB unlocked for full ROM.
* ROM: Progress to 120 degrees by week 4.
* Exercises:
* Progress SLR and prone/standing hamstring curls with weights.
* Stationary bike for ROM; begin low-resistance program when ROM is adequate.
* Stool scoots.
* Begin double-leg BAPS (Biomechanical Ankle Platform System), progress to single leg.
* Begin double-leg press with light weight/high repetitions.
* Wall sits at a 45-degree angle with tibia vertical; progress time.
* Lateral step-ups (4 inches) when able to perform single-leg quarter squat.
* Hip machine and hamstring machine when able to perform SLR with 10 lb.
* Knee extension 90 to 60 degrees (submaximal) with manual resistance by therapist.
* Gait: Treadmill (forward and backward) with emphasis on normal gait. Full weight bearing (FWB) with crutches; discontinue crutches when ambulating without a limp.
* Goals: ROM 0 to 120 degrees, FWB without crutches, no limp.
Stage II: 4 to 6 Weeks
Focus: Closed kinetic chain strengthening.
* ROM: Progress to full ROM by 6 weeks.
* Exercises:
* Begin Kin-Com isokinetic hamstring progression (isotonic/isokinetic).
* Begin Kin-Com dynamometer quadriceps work 90 to 40 degrees isotonics with antishear pad.
* Stairmaster (forward and backward).
* Progress closed chain exercises.
* At 6 weeks, begin Kin-Com dynamometer quadriceps work 90 to 40 degrees isokinetics (start with higher speed and work on endurance).
* Aquatic exercises.
Stage II: 8 to 10 Weeks
Focus: Advanced strengthening and early dynamic stability.
* Exercises:
* Progress above-listed exercises.
* Slow-form running with sport cord (forward and backward).
* Isokinetic quadriceps work at different speeds (60, 90, 120 degrees per second).
* Begin lunges.
* At 10 weeks, begin Fitter and slide board exercises.
Stage III: 12 to 16 Weeks
Focus: Isotonic strength and lateral agility.
* Exercises:
* Full range isotonics on Kin-Com dynamometer (begin moving antishear pad down).
* Knee extension machine with low weight/high repetitions.
* Lateral sport cord drills (slow, controlled).
* Kin-Com dynamometer test hamstrings; discontinue isokinetic hamstrings if strength is >90% of contralateral side.
* Progress isokinetic quadriceps to full extension by 16 weeks.
Stage IV: 16 to 18 Weeks
Focus: Plyometrics and return to running.
* Testing: Kin-Com dynamometer test for quadriceps; retest hamstrings if necessary.
* Exercises:
* Begin plyometric program with shuttle, minitrampoline, and jump rope only if quadriceps strength is >65%, there is no effusion, full ROM is achieved, and the knee is clinically stable.
* Begin jogging program if quadriceps strength is >65%.
Stage V: 5 to 6 Months
Focus: Sport-specific training.
* Exercises:
* Agility training.
* Sport-specific drills (e.g., carioca, 45-degree cutting, figure-of-eight drills).
* Retest quadriceps if necessary.
Stage VI: 6 Months and Beyond
Focus: Return to unrestricted play.
* Return to Sport Criteria:
* Motion > 130 degrees.
* Hamstring strength > 90% of contralateral limb.
* Quadriceps strength > 85% of contralateral limb.
* Successful completion of sport-specific agility training.
* Maintenance: Continue maintenance exercises two to three times per week to ensure long-term graft survivorship and joint health.
📚 Medical References
- quadruple hamstring grafts in skeletally immature patients, J Bone Joint Surg 86A:201, 2004.
- Anderson DR, Gershuni DH, Nakhostine M, et al: The effects of non-weight-bearing and limited motion on tensile properties of the meniscus, Arthroscopy 9:440, 1993.
- Anderson K, Marx RG, Hannafi n J, et al: Chondral injury following meniscal repair with a biodegradable implant, Arthroscopy 16:749, 2000.
- Anderson-Molina H, Karlsson H, Rockborn P: Arthroscopic partial and total meniscectomy: a long-term follow-up study with matched controls, Arthroscopy 18:183, 2002.
- Arnoczky SP: The blood supply of the meniscus and its role in healing and repair. In American Academy of Orthopaedic Surgeons: Symposium on sports medicine: the knee, St Louis, 1985, Mosby. Arnoczky SP, McDevitt CA: The meniscus: structure, function, repair, and replacement. In Buckwalter JA, Einhorn TA, Simon SR, eds: Orthopaedic basic science, Rosemont, Ill, 2000, American Academy of Orthopaedic Surgeons. Arnoczky SP, Warren RF: Microvasculature of the human meniscus, Am J Sports Med 10:90, 1982.
- Arnoczky SP, Warren RF: The microvasculature of the meniscus and its response to injury: an experimental study in the dog, Am J Sports Med 11:131, 1983.
- Arnoczky SP, Warren RF, Kaplan N: Meniscal remodeling following partial meniscectomy: an experimental study in the dog, Arthroscopy 1:247, 1985.
- Arnoczky SP, Warren RF, Spivak JM: Meniscal repair using an exogenous fi brin clot: an experimental study in dogs, J Bone Joint Surg 70A:1209, 1988.
- Augé WK, Yifan K: A technique for resolution of graft-tunnel length mismatch in central third bone-patellar tendon-bone anterior cruciate ligament reconstruction, Arthroscopy 15:877, 1999.
- Bach BR, Bush-Joseph C: The surgical approach to lateral meniscal repair, Arthroscopy 8:269, 1992.
- Baratz ME, Fu FH, Mengato RL: The effect of meniscectomy and of repair on intraarticular contact areas and stress in the human knee, Am J Sports Med 14:270, 1986.
- Barber FA: Flipped patellar tendon autograft anterior cruciate ligament reconstruction, Arthroscopy 16:483, 2000.
- Barber FA, Fanelli GC, Matthews LS, et al: The treatment of complete posterior cruciate ligament tears, Arthroscopy 16:725, 2000.
- Barber FA, Herbert MA: Meniscal repair devices, Arthroscopy 16:613, 2000.
- Barber FA, Herbert MA, Richards DP: Load to failure testing of new meniscal repair devices, Arthroscopy 20:45, 2004.
- Barber FA, Spruill B, Sheluga M: The effect of outlet fi xation on tunnel widening, Arthroscopy 19:485, 2003.
- Beaver RJ, Mahomed M, Backstein D, et al: Fresh osteochondral allografts for post-traumatic defects in the knee: a survivorship analysis, J Bone Joint Surg 74B:105, 1992.
- Bellier G, Dupont JY, Larrain M, et al: Lateral discoid menisci in children, Arthroscopy 5:52, 1989.
- Bentley G, Biant LC, Carrington RW, et al: A prospective, randomised comparison of autologous chondrocyte implantation versus mosaicplasty for osteochondral defects in the knee, J Bone Joint Surg 85B:223, 2003.
- Berg EE: Posterior cruciate ligament tibial inlay reconstruction, Arthroscopy 11:69, 1995.
- Bergfeld JA, Graham SM, Parker RD: A biomechanical comparisons of posterior cruciate ligament reconstructions using singleand double-bundle tibial inlay technique, Am J Sports Med 33:976, 2005.
- Bergstrom R, Hamberg P, Lysholm J, et al: Comparison of open and endoscopic meniscectomy, Clin Orthop Relat Res 184:133, 1984.
- Berns GS, Howell SM: Roofplasty requirements in vitro for different tibial hole placements in anterior cruciate ligament reconstruction, Am J Sports Med 21:292, 1993.
- Bionx Implants for osteochondral fragments from trauma or OCD lesions using the SmartNail. Surgical technique manual, Blue Bell, Penn, 2001, Bionx Implants, Inc. Bobic V, Morgan CD:
