Introduction to Dorsalis Pedis Free Tissue Transfer
The dorsalis pedis free tissue transfer is a highly versatile microvascular flap utilized extensively in reconstructive orthopaedic and plastic surgery. Renowned for providing thin, pliable, and potentially sensate skin, it is an ideal choice for reconstructing complex defects of the hand, foot, and distal lower extremity. Furthermore, its composite potential allows for the inclusion of vascularized bone (second metatarsal) or tendon, making it a powerful tool for multifaceted reconstructive challenges.
Despite its utility, the dorsalis pedis flap demands meticulous surgical technique. The primary limiting factor of this procedure is donor site morbidity. Aggressive or imprecise dissection can lead to delayed healing, painful scarring, or tendon exposure on the dorsum of the foot. Therefore, a profound understanding of the vascular anatomy, precise flap elevation preserving the extensor paratenon, and rigorous postoperative donor site management are paramount for the reconstructive microsurgeon.
Indications and Clinical Applications
The unique characteristics of the dorsalis pedis flap make it suitable for specific reconstructive scenarios:
- Hand Reconstruction: Ideal for resurfacing the palm, first web space, or dorsal hand defects where thin, pliable skin is required to maintain joint mobility and tendon gliding.
- Sensate Coverage: By incorporating branches of the superficial peroneal nerve, the flap can restore protective sensation to critical areas, such as the heel or the volar digits.
- Composite Defects: The flap can be harvested as an osteocutaneous unit including the underlying second metatarsal for reconstructing composite bone and soft tissue defects (e.g., metacarpal loss with overlying skin avulsion).
- Intraoral Reconstruction: Occasionally utilized for mucosal resurfacing due to its thinness and pliability.
Surgical Warning: The dorsalis pedis flap is contraindicated in patients with peripheral vascular disease, diabetes mellitus with microvascular compromise, or previous trauma to the dorsum of the foot. A dominant dorsalis pedis artery with an absent or hypoplastic posterior tibial artery is an absolute contraindication, as harvesting the flap would result in critical ischemia of the foot.
Vascular Anatomy and Biomechanics
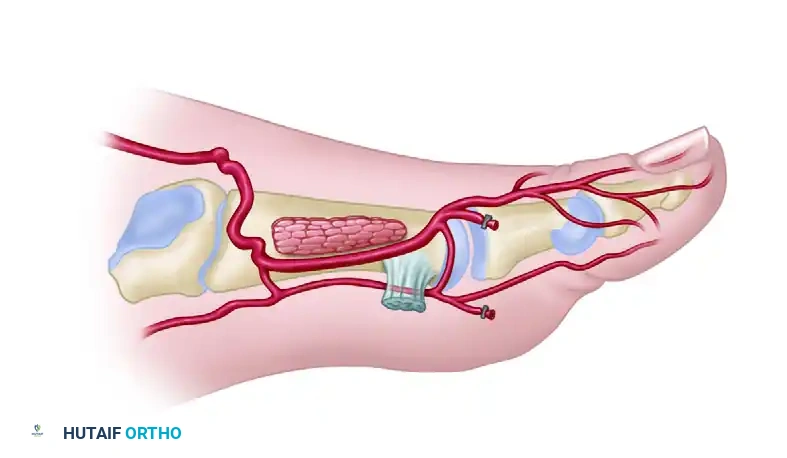
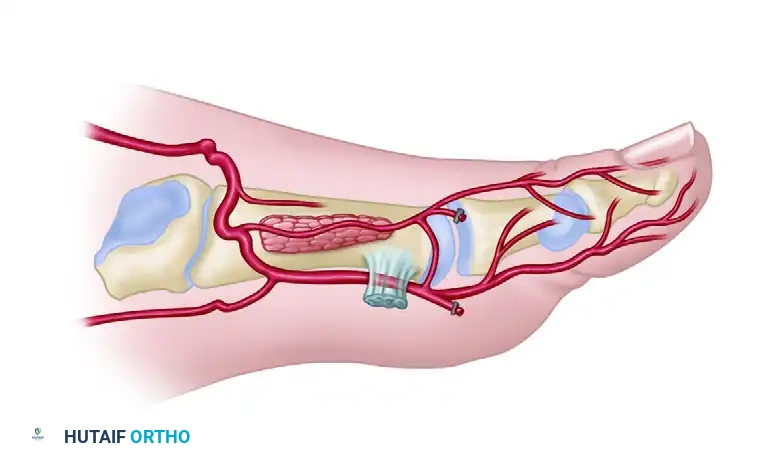
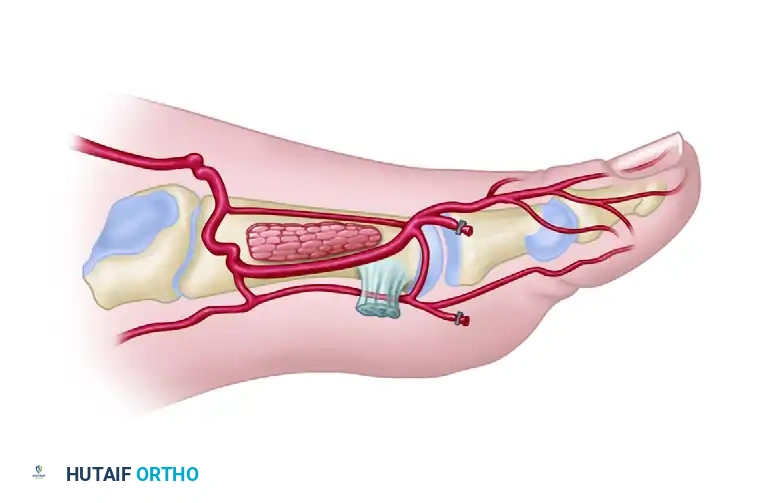
A masterful grasp of the dorsal foot vascular architecture is the foundation of a successful dorsalis pedis free flap. The primary arterial supply is the dorsalis pedis artery (DPA), a direct continuation of the anterior tibial artery as it passes deep to the extensor retinaculum.
As the DPA courses distally over the dorsal aspect of the tarsal bones, it gives off the lateral and medial tarsal arteries, followed by the arcuate artery.
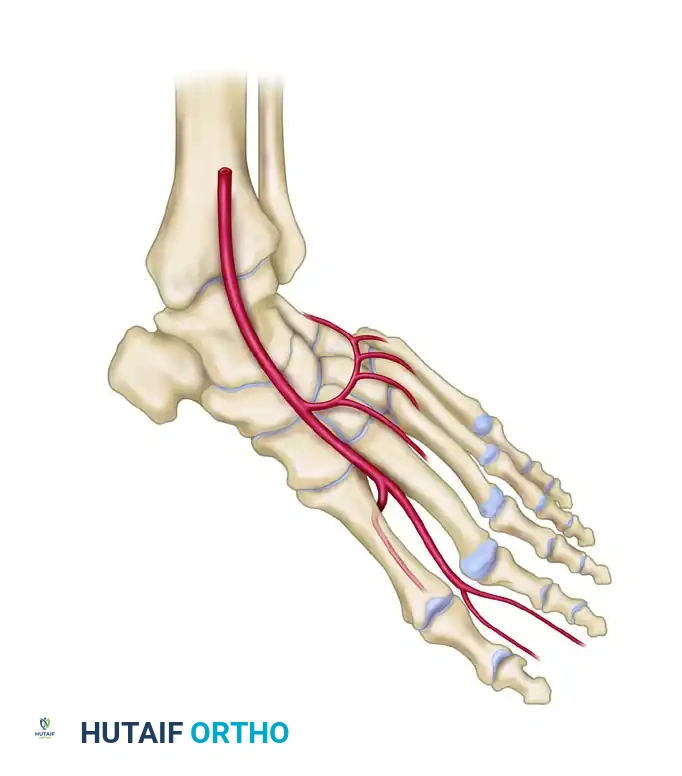
Distal to the arcuate artery, the DPA bifurcates into two terminal branches:
1. First Dorsal Metatarsal Artery (FDMA): Courses distally within the first intermetatarsal space to supply the dorsal skin of the great and second toes.
2. Deep Plantar (Communicating) Artery: Plunges plantarly between the two heads of the first dorsal interosseous muscle to anastomose with the lateral plantar artery, completing the plantar arch.
Anatomical Variances of the First Dorsal Metatarsal Artery
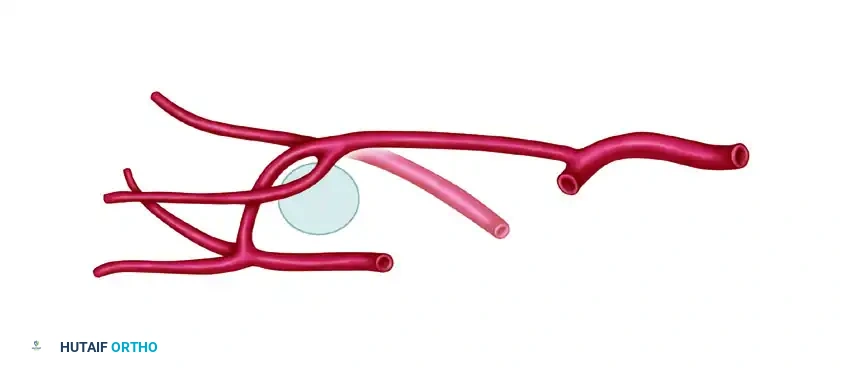
The FDMA is the critical vessel supplying the distal portion of the flap. Its anatomical course is highly variable and dictates the complexity of the dissection. The relationship of the FDMA to the first dorsal interosseous (FDI) muscle and the first metatarsal is classified to guide surgical approach.
Type I Variations (Superficial): The FDMA courses superficial to or just within the superficial fascia of the first dorsal interosseous muscle. This is the most favorable anatomy for flap harvest.
* Type IA: The artery runs a direct, superficial course.
* Type IB: The artery is superficial but exhibits a more tortuous or laterally deviated course.
Type II Variations (Intramuscular): The FDMA courses intramuscularly within the first dorsal interosseous muscle. Dissection here is tedious and requires splitting the muscle to mobilize the pedicle.
* Type IIA: The artery dips into the muscle belly but emerges distally.
* Type IIB: The artery remains deeply embedded within the muscle for the majority of its course.
Type III Variation (Absent/Hypoplastic): The FDMA is absent or severely hypoplastic. In these cases, the dorsal skin is supplied predominantly by the first plantar metatarsal artery (FPMA). Harvesting a standard dorsalis pedis flap in Type III anatomy is highly risky and often contraindicated unless the dissection is modified to include the plantar system.
Venous Drainage and Innervation
- Venous: The flap is drained by two systems: the deep venae comitantes accompanying the DPA, and the superficial venous system draining into the greater saphenous vein. Both should be harvested to ensure robust venous outflow.
- Innervation: The superficial peroneal nerve provides sensory innervation to the dorsal skin. Its branches can be identified proximally and included in the flap for sensate reconstruction.
Preoperative Planning and Patient Positioning
Preoperative Assessment
- Vascular Examination: Palpate both the dorsalis pedis and posterior tibial pulses. Perform a clinical Allen test of the foot to ensure the posterior tibial artery provides adequate collateral flow to the toes when the DPA is occluded.
- Doppler Ultrasound/Angiography: Handheld Doppler mapping of the DPA and FDMA is mandatory. In cases of previous trauma or ambiguous clinical findings, a CT angiogram or conventional angiogram is required to delineate the vascular tree and confirm the presence of a robust posterior tibial artery.
Patient Positioning
- The patient is placed in the supine position.
- A bump is placed under the ipsilateral hip to internally rotate the leg, bringing the dorsum of the foot into a neutral, accessible position.
- The entire lower extremity is prepped and draped free to allow circumferential access.
- A pneumatic tourniquet is applied to the proximal thigh.
Surgical Technique: Step-by-Step Flap Elevation
1. Flap Design and Incision
The dimensions of the flap are dictated by the recipient site defect, but strict anatomical boundaries must be respected to prevent catastrophic donor site morbidity.
* Proximal Limit: Should not extend more proximally than the extensor retinaculum.
* Distal Limit: Approximately 2 cm distal to the palpable dorsalis pedis pulse, or roughly at the level of the metatarsophalangeal (MTP) joints.
* Medial Border: The extensor hallucis longus (EHL) tendon.
* Lateral Border: The fifth toe extensor digitorum longus (EDL) tendon.
Clinical Pearl: Limiting the medial border to the EHL and the lateral border to the fifth toe EDL creates a smaller flap but is absolutely critical. Denuding the medial or lateral sides of the foot beyond these tendons drastically increases the risk of donor site skin graft failure and chronic ulceration.
2. Exsanguination and Initial Dissection
- Exsanguinate the limb by wrapping with an Esmarch bandage, inflate the pneumatic tourniquet to standard lower extremity pressures (e.g., 250-300 mmHg), and remove the wrap.
- Begin the skin incision on the medial side of the outlined flap.
- CRITICAL STEP: The dissection must be kept strictly superficial to the extensor paratenon. A scalpel is often preferred over electrocautery to carefully peel the subcutaneous tissue off the paratenon. Leaving a pristine, uninjured paratenon is the only way to ensure a satisfactory bed for the subsequent split-thickness skin graft.
3. Medial Dissection and Nerve Identification
- Continue the medial-to-lateral dissection until the EHL tendon is reached.
- Divide the deep fascia overlying the EHL tendon.
- If the flap is to be innervated, identify the branches of the superficial peroneal nerve in the proximal-lateral aspect of the incision. Transect them proximally and keep them superficial to the plane of dissection, incorporating them into the flap tissue.
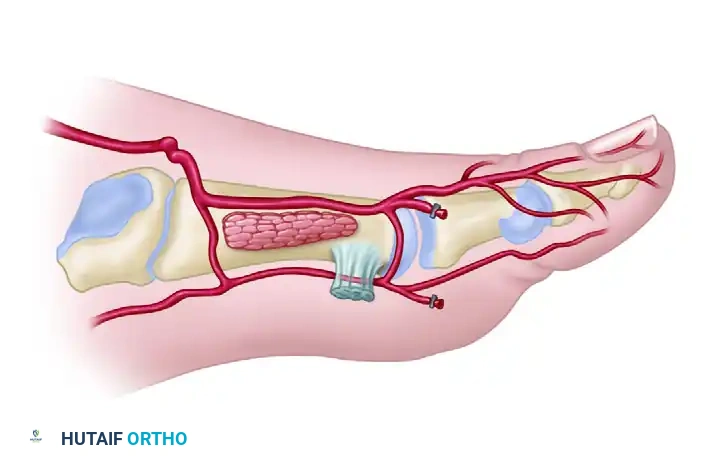
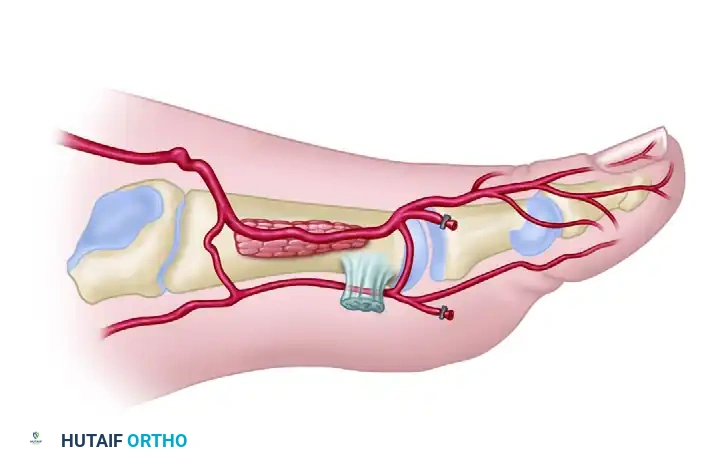
4. Vascular Dissection and Pedicle Isolation
- Retract the EHL tendon medially to expose the periosteum overlying the first metatarsal.
- Identify the dorsalis pedis artery (DPA), its accompanying venae comitantes, and the deep peroneal nerve.
- Continue the dissection laterally and distally to trace the DPA. Identify the origins of the first dorsal metatarsal artery (FDMA), the arcuate artery, and the deep plantar (communicating) artery.
- Once the deep plantar artery is definitively identified plunging plantarly, carefully ligate and transect it. This mobilizes the distal DPA and FDMA.
5. Composite Harvest (Optional)
- If vascularized bone is required for the reconstruction, the second metatarsal can be harvested at this stage.
- Perform osteotomies at the proximal and distal metaphyses of the second metatarsal.
- Carefully elevate the bone with the flap, ensuring the periosteal blood supply from the FDMA and DPA is maintained intact.
6. Distal Dissection and Flap Mobilization
- Continue dissecting distally, maintaining the plane superficial to the paratenon over the EDL tendons.
- Identify the extensor hallucis brevis (EHB) tendon, which crosses obliquely over the DPA.
- Surgical Option: The EHB tendon can be transected and carried with the flap. However, leaving the EHB muscle belly on the foot can provide valuable vascularized coverage over the underlying bone and tendons, improving the donor site bed.
- As dissection proceeds distally into the first web space, keep the FDMA superficial to the plane of dissection, ensuring it remains attached to the skin paddle.
- Ligate and divide the distal arterial branches to the toes at the distal margin of the flap.
7. Proximal Pedicle Dissection
- Divide the distal skin margins and the proximal margins near the extensor retinaculum.
- If a long vascular pedicle is required, divide the extensor retinaculum in a Z-shaped fashion. This allows proximal tracing of the DPA into the anterior tibial artery.
- Carefully ligate and divide small side branches (e.g., tarsal arteries) to free the pedicle.
8. Ischemia Check and Flap Harvest
- Before final pedicle division, temporarily place an atraumatic microvascular clamp (Acland clip) on the proximal DPA.
- Deflate the tourniquet and observe the foot. Ensure that the posterior tibial artery is sufficient to vascularize the toes via the plantar arch. Capillary refill in the toes must be brisk.
- Once foot perfusion is confirmed, determine that the recipient site team has completed their preparation.
- Ligate and divide the DPA and its accompanying veins proximally.
- Deliver the flap to the recipient site.
- Repair the Z-lengthened extensor retinaculum to prevent bowstringing of the extensor tendons.
Recipient Site Preparation and Microvascular Anastomosis
- Place the flap in the recipient area. Suture the distal margins loosely to stabilize the flap and prevent shearing forces on the pedicle during anastomosis.
- Under the operating microscope, perform the microvascular anastomoses. Standard protocol dictates repairing the arteries first to establish inflow, followed by the veins.
- Apply topical vasodilators, such as 2% lidocaine or papaverine, directly to the pedicle to minimize vasospasm.
- If an innervated flap was harvested, perform epineurial repair of the superficial peroneal nerve branches to a suitable recipient sensory nerve.
- Complete the inset and close the wounds over closed-suction drains, ensuring no compression on the pedicle.
Postoperative Care and Rehabilitation
The success of the dorsalis pedis free tissue transfer relies heavily on meticulous postoperative management, particularly concerning the donor site.
Donor Site Management
- Skin Grafting: The donor defect must be covered immediately with a split-thickness skin graft (STSG), typically harvested from the ipsilateral thigh. The graft is meshed (1:1.5) and secured over the preserved paratenon.
- Dressing: A non-adherent dressing is applied, followed by a bolster or negative pressure wound therapy (NPWT) set to low continuous suction (-75 mmHg) to ensure graft apposition without compressing the underlying foot vasculature.
- Immobilization and Elevation: A posterior splint is applied to maintain the ankle in neutral dorsiflexion. The foot is kept strictly elevated for 7 to 10 days to minimize edema and allow sufficient healing of the skin graft.
- Long-term Care: Once the graft has taken, the patient is transitioned to an elastic wrap or custom elastic compression stocking. This must be worn diligently for 3 to 6 months to minimize donor site scar hypertrophy, prevent venous engorgement, and stabilize the graft against shearing forces within footwear.
Recipient Site Rehabilitation
Activity progression is dictated by the anatomical location of the reconstruction:
* Hand Reconstruction: Once the skin has healed and edema subsides (typically 2-3 weeks), progressive rehabilitation of the hand can begin. Early passive range of motion is initiated to prevent tendon adhesions, progressing to active motion and strengthening.
* Foot or Lower Extremity Reconstruction: A highly conservative, gradually progressive program of walking is required.
* Weeks 0-3: Strict non-weight bearing (NWB) with prolonged elevation.
* Weeks 3-6: Gradual transition to partial weight bearing in a controlled ankle motion (CAM) boot.
* Weeks 6+: Progression to full weight bearing to tolerance.
* Sensory Precautions: If an innervated flap has been transferred to a weight-bearing surface of the foot, maximal participation in activities must await the return of protective sensation (often 6-12 months). During this period, the foot must be rigorously protected with custom-molded, cushioned shoe inserts to prevent pressure ulceration of the insensate flap.
Complications and Pitfalls
- Donor Site Morbidity: The most common complication. Loss of the STSG due to paratenon injury leads to exposed tendons, desiccation, and chronic wounds requiring complex secondary coverage (e.g., reverse sural flap).
- Vascular Compromise: Arterial thrombosis or venous congestion of the flap. Requires immediate return to the operating room for pedicle exploration and salvage.
- Foot Ischemia: Harvesting the DPA in a patient with an inadequate posterior tibial artery will lead to distal foot necrosis. Preoperative vascular assessment is non-negotiable.
- Neuroma Formation: Failure to properly bury the transected ends of the superficial peroneal nerve at the donor site can lead to painful neuromas, severely limiting footwear and ambulation.
By adhering to strict anatomical boundaries, preserving the extensor paratenon, and executing precise microvascular techniques, the orthopaedic surgeon can harness the full potential of the dorsalis pedis free tissue transfer while mitigating its inherent risks.
