Introduction to Neglected Achilles Tendon Ruptures
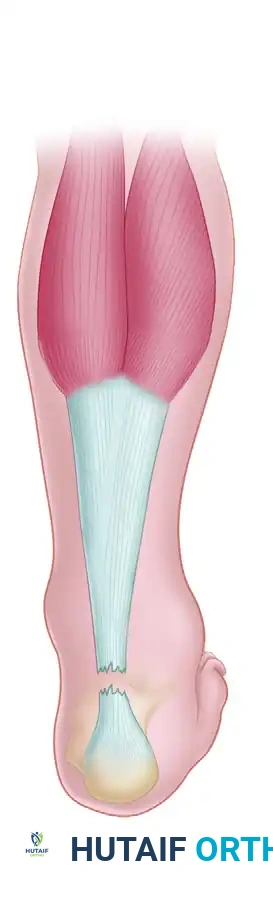
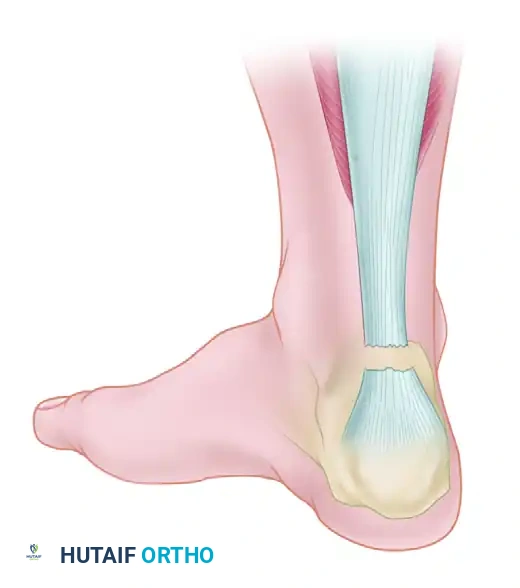
The management of neglected or chronic Achilles tendon ruptures presents a formidable challenge to the orthopedic surgeon. A rupture is generally classified as "neglected" or "chronic" when diagnosis and treatment are delayed for more than 4 to 6 weeks post-injury. During this interval, the proximal gastrocnemius-soleus complex undergoes progressive contracture, fatty infiltration, and atrophy. Simultaneously, the tendon ends retract, and the intervening void fills with disorganized, non-functional fibrotic scar tissue.
Primary end-to-end repair is rarely feasible in these scenarios due to the massive tendon defect (often exceeding 3 to 5 centimeters) and the severe tension that would be placed on the repair, leading to a high risk of wound breakdown and rerupture. Consequently, complex reconstructive techniques are required to bridge the gap, restore the resting length of the musculotendinous unit, and re-establish the biomechanical power of plantar flexion.
Among the most robust and biomechanically sound reconstructive options are the V-Y aponeurotic advancement for moderate gaps and the Flexor Hallucis Longus (FHL) tendon transfer, popularized by Wapner et al., for larger defects or cases with severely compromised host tissue.
Preoperative Evaluation and Imaging
Clinical Assessment
Patients with chronic Achilles ruptures typically present with weakness in push-off, an inability to perform a single-leg heel raise, and a palpable defect in the tendon substance, though this gap may be masked by thickened fibrotic scar tissue. The Thompson test often remains positive, though a false negative can occur if the plantaris tendon is intact or if dense scar tissue provides a tethering effect.
Radiographic Imaging
Magnetic Resonance Imaging (MRI) is the gold standard for preoperative planning.
Clinical Pearl: MRI is indispensable for delineating the exact length of the true tendon defect (distinguishing healthy tendon from interposed scar tissue), evaluating the morphology of the tendon stumps, and assessing the degree of fatty degeneration within the gastrocnemius and soleus muscle bellies. This dictates the surgical algorithm: gaps <3 cm may be managed with V-Y advancement, while gaps >3-5 cm or those with poor muscle quality necessitate an FHL transfer.
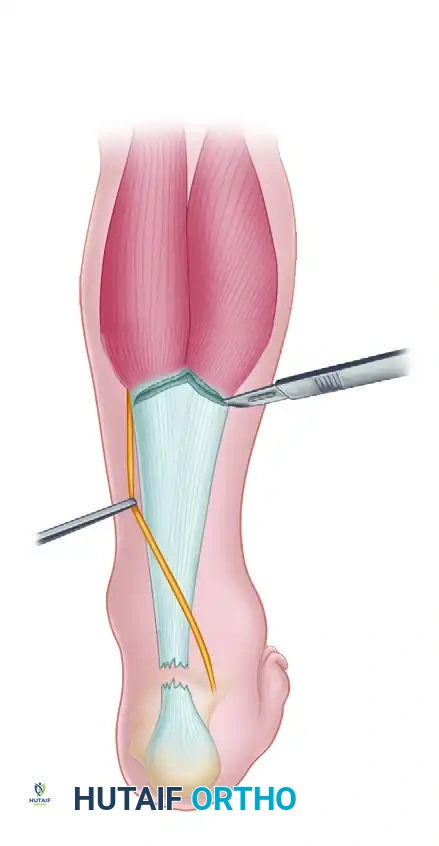
Surgical Management: V-Y Advancement Technique
For neglected ruptures with moderate defects (typically 2 to 5 cm) where the distal stump is robust and the proximal muscle belly retains adequate excursion, a V-Y aponeurotic advancement (often associated with the Abraham and Pankovich technique) is a highly effective strategy.
Step-by-Step V-Y Advancement
-
Incision and Exposure: A standard posteromedial incision is utilized to expose the ruptured ends. The fibrotic scar tissue is radically excised back to healthy, organized collagen bundles.
-
Design of the V-Flap: Proximal to the rupture, an inverted "V" incision is made through the gastrocnemius aponeurosis. The apex of the "V" is directed proximally. The length of the arms of the "V" must be at least 1.5 to 2 times the length of the defect to allow adequate distal excursion.
-
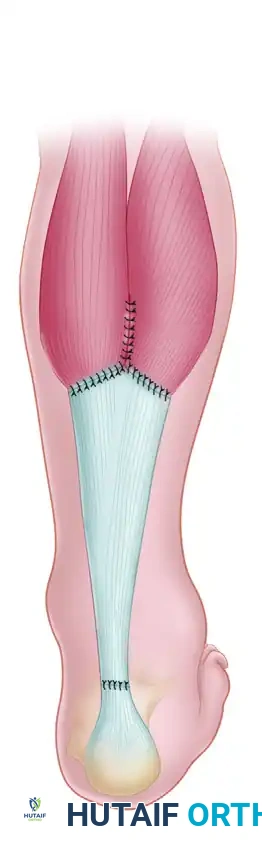
Advancement and Y-Repair: The aponeurotic flap is advanced distally, bridging the defect. The proximal "V" defect is then closed in a "Y" configuration. The advanced distal end of the flap is anastomosed end-to-end with the distal Achilles stump using heavy, non-absorbable core sutures (e.g., Krackow technique).
Biomechanical Rationale for Flexor Hallucis Longus (FHL) Transfer
When the defect exceeds 5 cm, or when the host tissue is severely degenerated, local tissue advancement is insufficient. Wapner et al. described the use of the FHL tendon as a transfer to reconstruct the Achilles tendon.
The FHL is the ideal transfer candidate for several evidence-based reasons:
* In-Phase Synergist: The FHL fires in phase with the gastrocnemius-soleus complex during the gait cycle, eliminating the need for postoperative motor re-education.
* Strength and Cross-Sectional Area: It is the second strongest plantar flexor of the foot, providing approximately 30% of the power of the Achilles tendon.
* Axis of Contraction: Its line of pull closely mimics that of the Achilles tendon.
* Vascular Supply: The low-lying muscle belly of the FHL provides a rich, well-vascularized bed to the relatively avascular "watershed" zone of the Achilles tendon, promoting robust healing and reducing infection risk.
Surgical Technique: The Wapner FHL Transfer (Technique 48-18)
Patient Positioning and Anesthesia
- Positioning: The original description by Wapner et al. notes placing the patient supine with the hip externally rotated (frog-leg position) to access the medial midfoot, followed by repositioning or utilizing a lateral decubitus position.
Surgical Warning: Many contemporary surgeons prefer the prone position. In the prone position, the medial midfoot can still be accessed for the FHL harvest by internally rotating the hip or utilizing a bump, while providing vastly superior, direct access to the posterior Achilles and calcaneus.
- Tourniquet: Apply a proximal thigh tourniquet to ensure a bloodless field.
Phase 1: FHL Harvest (Medial Midfoot Incision)
- Incision: Make a longitudinal incision on the medial border of the foot, positioned just superior to the abductor hallucis muscle. Extend this from the head of the first metatarsal proximally to the navicular.
- Dissection: Carry the dissection sharply through the subcutaneous tissue down to the fascia of the abductor hallucis.
- Muscle Reflection: Reflect the abductor hallucis along with the flexor hallucis brevis plantarward to expose the deep plantar space.
- Tendon Identification and Division: Identify the flexor hallucis longus (FHL) and flexor digitorum longus (FDL) tendons. The FHL is located deeper and more plantar. Divide the FHL as far distally as possible to maximize graft length.
- Tenodesis: To prevent postoperative hallux malleus and loss of great toe flexion, suture the distal stump of the FHL into the adjacent FDL tendon using non-absorbable sutures, ensuring the toes are held in a neutral position during fixation.
- Tagging: Place a locking tag suture (e.g., 1-0 Vicryl or FiberWire) into the divided proximal end of the FHL.
Phase 2: Posteromedial Approach and Tendon Preparation
- Posterior Incision: Make a posteromedial incision approximately 1 cm medial to the palpable edge of the Achilles tendon. Extend this from the musculotendinous junction proximally to about 2.5 cm distal to the calcaneal insertion.
- Soft Tissue Handling: Carry the incision sharply through the skin, subcutaneous tissues, and tendon sheath.
Surgical Pitfall: Minimize subcutaneous dissection. Create full-thickness fasciocutaneous flaps deep to the paratenon. The posterior skin is notoriously prone to necrosis and sloughing; preserving the vascular plexus within the paratenon is critical.
- Debridement: Inspect the substance of the tendon. Excise all necrotic, fibrotic, and disorganized scar tissue until healthy, parallel collagen fibers are encountered proximally and distally.
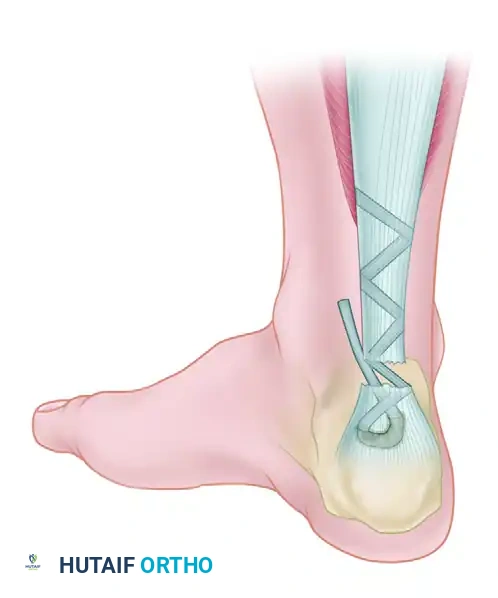
- FHL Retrieval: Incise the deep fascia longitudinally over the posterior compartment to expose the FHL muscle belly and tendon. Retrieve the tagged FHL tendon from the midfoot, pulling it proximally into the posterior wound.
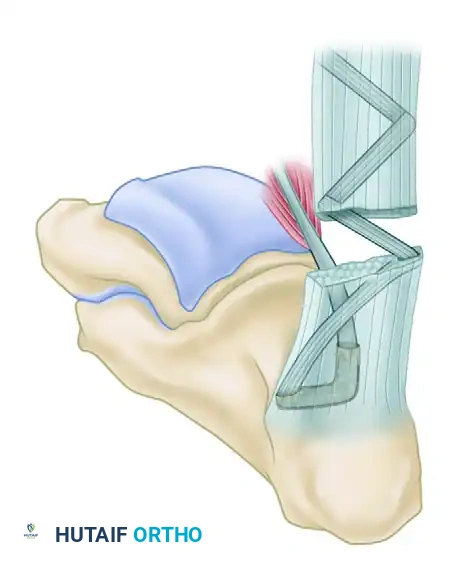
Phase 3: Calcaneal Tunnel Preparation
- Transverse Drill Hole: Drill a transverse hole just deep and distal to the insertion of the Achilles tendon, passing halfway from medial to lateral through the calcaneal body.
- Vertical Drill Hole: Drill a second hole vertically, starting just deep to the Achilles insertion, directed plantarward to intersect the first transverse drill hole midway through the posterior calcaneus.
- Tunnel Dilation: Enlarge the intersecting tunnel using a large towel clip or a specialized tendon passer to ensure smooth passage of the FHL graft.
Phase 4: Tendon Weaving and Fixation
- Tendon Passage: Using a suture passer, pull the tag suture of the FHL through the calcaneal tunnel from proximal to distal, exiting the transverse hole.
- Tensioning: Place the ankle in approximately 15 degrees of plantar flexion to set the appropriate resting tension.
- Weaving: Pass the FHL tendon through the tunnel, then route it proximally. Weave the FHL tendon from distal to proximal through the remaining substance of the Achilles tendon (or the aponeurosis) using a tendon weaver. Continue weaving until the full length of the harvested FHL tendon is utilized.
- Securing the Construct: Secure the weave at multiple points using heavy, non-absorbable sutures (e.g., 1-0 Dacron or FiberWire).
- Supplementation (Optional): If the repair requires additional bulk, it can be supplemented using the plantaris tendon or a central turndown slip of the proximal Achilles tendon.
Phase 5: Closure
- Paratenon Closure: Meticulously close the paratenon over the repair using absorbable sutures (e.g., 2-0 or 3-0 Vicryl). This layer is vital for preventing adhesions and providing vascularity.
- Skin Closure: Close the subcutaneous tissues and skin of both the posterior and medial midfoot incisions without tension.
Postoperative Rehabilitation Protocol
The postoperative rehabilitation following an FHL transfer for a neglected Achilles rupture must be carefully phased to protect the repair while preventing debilitating stiffness.
- Weeks 0 to 4 (Maximum Protection):
- Apply sterile, non-adherent dressings.
- Place the leg in a posterior plaster splint or a rigid, non-weight-bearing cast with the ankle immobilized in 15 degrees of plantar flexion.
- Strict non-weight-bearing (NWB) with crutches.
- Weeks 4 to 8 (Controlled Mobilization):
- The cast is removed.
- Transition to a short-leg walking cast or a removable controlled ankle motion (CAM) boot with the ankle brought to a neutral position (0 degrees).
- Progressive weight-bearing is initiated as tolerated.
- Weeks 8 to 12 (Strengthening Phase):
- The patient is transitioned out of the cast/boot.
- A formal physical therapy program begins, focusing on active range-of-motion (ROM) and progressive isometric and isotonic strengthening exercises.
- The patient must remain in a removable brace or use a heel lift until they achieve grade 4 to 5 plantar flexion strength and at least 10 degrees of active dorsiflexion.
- Months 3 to 6 (Return to Function):
- Athletic activity and explosive push-off movements are strictly restricted for a minimum of 6 months postoperatively to allow for complete graft incorporation and remodeling.
Complications and Mitigation Strategies
The operative treatment of chronic Achilles tendon ruptures carries a higher complication profile than primary acute repairs. Wong et al. and Kocher et al. have extensively classified these complications into minor, moderate, and major categories.
Classification of Complications (Wong et al. & Kocher et al.)
Minor Complications:
* Superficial wound infection
* Wound hematoma
* Delayed wound healing
* Adhesion of the scar to the underlying tendon
* Suture granuloma
* Minor skin necrosis
* Disturbances in sensibility (transient neuropraxia)
Moderate/Major Complications:
* Deep infection requiring surgical debridement
* Chronic fistula or sinus formation
* Deep vein thrombosis (DVT) / Pulmonary embolism (PE)
* Tendon lengthening (resulting in a weak push-off)
* Major skin slough requiring flap coverage
* Suture rupture / Tendon rerupture
Specific Complication Management
1. Rerupture:
The most common major complication is rerupture. Reported rerupture rates after operative treatment are approximately 3%, which is significantly lower than the rates reported after nonoperative management of acute tears, but remains a risk in chronic reconstructions. Strict adherence to the postoperative immobilization protocol is mandatory.
2. Sural Nerve Injury:
Sural nerve damage is a well-documented risk, reported in 3% to 40% of percutaneous repairs and 0% to 20% of open repairs.
Clinical Pearl: The sural nerve crosses the lateral border of the Achilles tendon approximately 9.8 cm proximal to the calcaneal insertion. To mitigate this risk, the posterior incision should always be placed slightly medial to the midline of the Achilles tendon, and deep retractors on the lateral side should be placed with extreme caution.
3. Wound Breakdown and Deep Infection:
Wound healing problems range from minor superficial adhesions to catastrophic deep infections associated with wound breakdown and tendon necrosis.
* Risk Factors: Patients with deep infections are typically older, have a history of corticosteroid use, possess medical comorbidities (e.g., diabetes, peripheral vascular disease), and have had a longer delay before surgical intervention.
* Prevention: Creating full-thickness fasciocutaneous flaps and preserving the paratenon are critical steps.
* Salvage: Major wound breakdown, full-thickness skin loss, and tendon necrosis may require complex reconstructive procedures, including local pedicle flaps (e.g., sural artery flap) or free tissue transfer.
By meticulously adhering to the biomechanical principles of the FHL transfer, respecting the fragile posterior soft tissue envelope, and enforcing a structured rehabilitation protocol, orthopedic surgeons can achieve excellent functional outcomes even in the most challenging cases of neglected Achilles tendon ruptures.
