INTRODUCTION TO MEDIAL ANKLE INSTABILITY
Medial ankle instability is a complex and often underdiagnosed clinical entity that can lead to profound functional impairment, chronic pain, and progressive asymmetric ankle arthrosis. The primary restraint to valgus tilting and external rotation of the talus within the ankle mortise is the deltoid ligament complex. This robust ligamentous structure is anatomically divided into two distinct layers: the superficial deltoid and the deep deltoid.
The superficial deltoid ligament originates from the anterior colliculus of the medial malleolus and fans out to insert onto the navicular, the spring ligament, and the sustentaculum tali of the calcaneus. It primarily resists hindfoot eversion. Conversely, the deep deltoid ligament—comprising the anterior and posterior tibiotalar ligaments—originates from the intercollicular groove and posterior colliculus, inserting directly onto the medial surface of the talus. The deep deltoid is the primary stabilizer against lateral talar excursion and external rotation.
When chronic insufficiency of the deltoid ligament occurs, primary repair is often inadequate due to tissue attenuation. In such cases, anatomic or non-anatomic reconstruction is mandated. The Deland Technique for deltoid ligament reconstruction utilizing a peroneus longus autograft represents a biomechanically sound, highly durable surgical solution for restoring medial column stability.
DIFFERENTIAL DIAGNOSIS OF THE "CHRONIC ANKLE SPRAIN"
Before proceeding with complex ligamentous reconstruction, the orthopedic surgeon must exercise high clinical vigilance. Many patients present with a chief complaint of "chronic ankle sprains" or persistent medial/lateral ankle pain, yet the underlying pathology may be entirely unrelated to ligamentous laxity. A rigorous differential diagnosis is paramount to avoid catastrophic misdiagnosis and inappropriate surgical intervention.
Tarsal Coalition
Tarsal coalitions represent a failure of mesenchymal segmentation, resulting in an abnormal fibrous, cartilaginous, or osseous connection between two or more tarsal bones. The most common variants are talocalcaneal (medial facet) and calcaneonavicular coalitions. Patients typically present in the second decade of life with rigid flatfoot deformity, frequent "sprains," and peroneal spasticity.
Determining the exact type and location of the tarsal coalition is critical for preoperative planning. Computed Tomography (CT) is the gold standard imaging modality for this purpose, providing high-resolution multiplanar views of the complex hindfoot articulations.
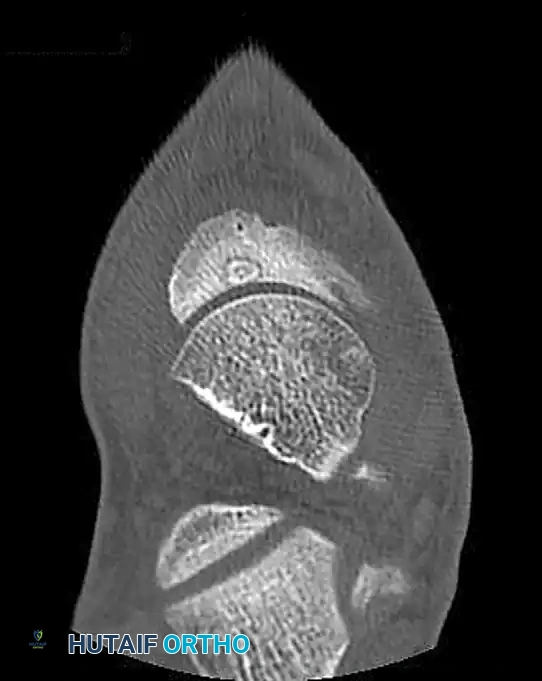
FIGURE 89-31: CT scan demonstrating a medial facet tarsal coalition of the calcaneus and talus in a young patient presenting with frequent ankle sprains.
Benign Bone Tumors and Tumor-Like Conditions
Several benign osseous lesions can present with insidious, deep-seated ankle pain that mimics chronic ligamentous injury.
- Osteoid Osteoma: This benign, bone-forming tumor is characterized by a central radiolucent nidus surrounded by sclerotic bone. Patients classically present with nocturnal pain that is dramatically relieved by nonsteroidal anti-inflammatory drugs (NSAIDs). When located in the tarsal bones (e.g., the navicular or talus), the localized inflammatory response can cause synovitis and mimic a sprain.
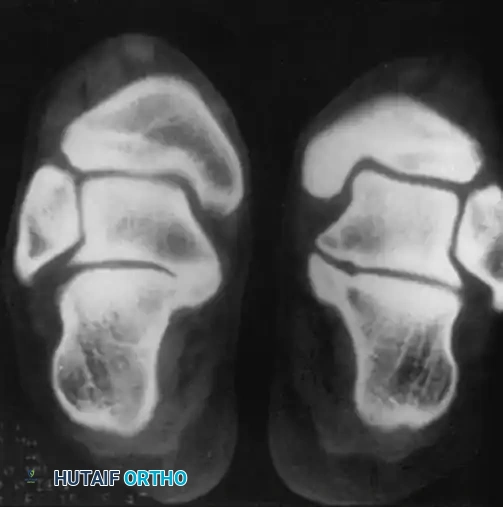
FIGURE 89-32: Osteoid osteoma of the navicular. Following precise surgical excision and structural bone grafting, the patient became completely asymptomatic.
- Eosinophilic Granuloma: A localized form of Langerhans cell histiocytosis, this lesion can present as a lytic bone defect in the hindfoot, causing localized pain, swelling, and a clinical picture easily confused with chronic mechanical instability.
- Pigmented Villonodular Synovitis (PVNS): This locally aggressive, benign synovial proliferative disorder can affect the ankle or subtalar joint. The presence of hemosiderin-laden macrophages leads to recurrent hemarthrosis, joint swelling, and pain. MRI is diagnostic, showing characteristic "blooming artifact" on gradient-echo sequences.
- Simple Bone Cyst: Unicameral bone cysts in the calcaneus or talus can weaken the structural integrity of the bone, leading to microfractures and deep pain that the patient may attribute to a prior sprain.
Occult Fractures
Fractures of the complex geometry of the hindfoot are frequently missed on initial plain radiographs.
* Lateral Process of the Talus: Often termed a "snowboarder's fracture," this injury occurs via axial loading and dorsiflexion/eversion. If missed, it leads to chronic lateral ankle pain and subtalar arthrosis.
* Anterior Process of the Calcaneus: Typically an avulsion injury of the bifurcate ligament resulting from a plantarflexion and inversion force. It closely mimics an anterior talofibular ligament (ATFL) sprain.
Clinical Pearl: Bone scanning (Technetium-99m) can serve as a highly sensitive screening technique to localize occult pathology in the chronically painful ankle. Once localized, a fine-cut CT scan is mandatory to disclose the exact fracture pattern, coalition architecture, or nidus location.
PREOPERATIVE PLANNING AND IMAGING
For patients with true medial ankle instability, a comprehensive clinical and radiographic evaluation is required.
* Clinical Examination: The patient will demonstrate a positive eversion stress test and increased external rotation of the foot relative to the tibia.
* Radiographs: Weight-bearing anteroposterior (AP), lateral, and mortise views are standard. A gravity stress view or manual external rotation stress view will demonstrate medial clear space widening (greater than 4-5 mm is highly suggestive of deep deltoid incompetence).
* MRI: Essential for evaluating the integrity of the deltoid ligament complex, assessing for concomitant osteochondral lesions of the talus (OCLs), and ruling out posterior tibial tendon pathology.
SURGICAL TECHNIQUE: DELTOID LIGAMENT RECONSTRUCTION (DELAND)
The Deland technique utilizes a peroneus longus autograft. The biomechanical rationale for this graft choice is twofold: it provides a robust, collagen-dense tissue capable of withstanding the high tensile loads of the medial ankle, and by leaving its distal insertion intact at the base of the first metatarsal, it inherently reconstructs the stabilizing vector of the superficial deltoid complex.
1. Anesthesia and Patient Positioning
The patient is placed in the supine position on a radiolucent operating table. A bump is placed under the ipsilateral hip to internally rotate the leg to a neutral position, facilitating access to both the medial and lateral aspects of the ankle. A thigh tourniquet is applied. Prophylactic intravenous antibiotics are administered prior to exsanguination and tourniquet inflation.
2. Proximal Graft Harvest and Tenodesis
The initial phase of the procedure involves harvesting the proximal portion of the peroneus longus while preserving the function of the peroneus brevis.
- Incision: Make a longitudinal incision 6 to 8 cm proximal to the tip of the lateral malleolus (fibular tip), overlying the peroneal compartment.
- Dissection: Carefully dissect through the subcutaneous tissues, taking care to identify and protect the sural nerve posteriorly and the superficial peroneal nerve anteriorly. Incise the peroneal fascia.
- Transection and Tenodesis: Identify the peroneus longus (superficial and posterior to the brevis). Transect the peroneus longus tendon at the proximal extent of the incision. To prevent loss of eversion power and to maintain the resting tension of the muscle belly, meticulously tenodese the proximal stump of the peroneus longus to the adjacent peroneus brevis tendon using non-absorbable braided suture (e.g., #0 FiberWire) in a side-to-side, pulvertaft, or whip-stitch fashion.
3. Distal Graft Mobilization
The graft must now be freed from its lateral constraints while maintaining its critical plantar insertion.
- Incision: Make a second incision over the cuboid groove at the lateral border of the foot.
- Mobilization: Identify the peroneus longus tendon as it enters the cuboid tunnel. Free the tendon at this level, pulling the transected proximal end out through this distal incision.
- Preservation of Insertion: It is absolutely critical to leave the distal attachment of the peroneus longus intact at the base of the first metatarsal and medial cuneiform. This native insertion acts as an unyielding distal anchor for the reconstruction.
4. Joint Exposure and Tunnel Preparation
Access to the osseous structures for tunnel creation requires precise incisions to avoid neurovascular injury.
- Lateral Incision: Make a small incision over the sinus tarsi to access the lateral aspect of the talar neck.
- Medial Incision: Make a longitudinal incision over the anterior border of the medial malleolus and the native deltoid ligament. Protect the saphenous vein and nerve during this exposure. Retract the tibialis anterior tendon anteriorly and the posterior tibial tendon posteriorly to expose the medial malleolus and medial talar body.
5. Talar Bone Tunnel Creation
The creation of the talar bone tunnel is the most technically demanding step of the procedure. The trajectory must replicate the anatomic axis of the deep deltoid ligament without violating the articular surfaces of the ankle or subtalar joints.
- Trajectory: Create a bone tunnel in the talar neck from lateral to medial. The drill should pass nearly parallel to the dome of the talus.
- Angulation: The drill must be slightly angled from plantar to dorsal. The starting point is the lateral inferior talar neck (accessed via the sinus tarsi incision). The exit point should be the approximate center of rotation in the talus medially (the anatomic footprint of the deep deltoid ligament).
- Drilling: Use a guide pin initially, confirming placement with intraoperative fluoroscopy (AP, lateral, and mortise views). Once the trajectory is confirmed perfect, over-drill with a cannulated reamer matched to the diameter of the prepared peroneus longus graft (typically 5.0 mm to 6.0 mm).
Surgical Warning: Misplacement of the talar tunnel is a primary cause of graft failure or restricted range of motion. If the tunnel is placed too anteriorly, the graft will be lax in plantarflexion; if placed too posteriorly, it will restrict dorsiflexion. Fluoroscopic confirmation of the center of rotation is non-negotiable.
6. Graft Passage and Fixation
- Passage: Pass the free proximal end of the peroneus longus graft from the plantar-lateral aspect of the foot, into the sinus tarsi, and through the talar bone tunnel from lateral to medial.
- Medial Routing: Once exiting the medial talus, the graft is routed toward the medial malleolus to reconstruct the deep deltoid fibers. Depending on the specific variation of the Deland technique utilized, a secondary tunnel may be created in the medial malleolus (from the intercollicular groove exiting proximally) to secure the graft.
- Tensioning and Fixation: The ankle is held in neutral dorsiflexion and slight inversion to reduce the medial clear space. The graft is tensioned appropriately.
- Interference Screw Fixation: An interference screw system (such as the Arthrex Bio-Tenodesis screw set) is highly recommended. The graft is sized, and a bioabsorbable or PEEK interference screw (matched to the tunnel diameter) is inserted to achieve rigid aperture fixation within the bone tunnels. This allows for exact sizing of the graft to fit the bone tunnels perfectly, maximizing tendon-to-bone healing.
7. Closure
The wounds are irrigated copiously with sterile saline. The extensor retinaculum and subcutaneous tissues are closed with absorbable sutures (e.g., 2-0 or 3-0 Vicryl). The skin is closed with non-absorbable monofilament (e.g., 3-0 or 4-0 Nylon) or surgical staples. A sterile, non-adherent dressing is applied, followed by a well-padded short-leg posterior splint with the ankle locked in neutral dorsiflexion and slight inversion.
POSTOPERATIVE REHABILITATION PROTOCOL
Successful deltoid ligament reconstruction relies as much on strict postoperative rehabilitation as it does on surgical execution. The protocol is designed to protect the graft during the initial phases of biological incorporation while preventing debilitating arthrofibrosis.
Phase I: Maximum Protection (Weeks 0–2)
- Immobilization: The patient remains strictly non-weight-bearing (NWB) in the initial posterior splint.
- Edema Control: Strict elevation of the operative extremity above the level of the heart.
- Follow-up: At 10 to 14 days, sutures are removed. The wound is inspected for any signs of dehiscence or infection. The patient is transitioned to a rigid CAM (Controlled Ankle Motion) boot or a short-leg fiberglass cast.
Phase II: Early Mobilization (Weeks 2–6)
- Weight-Bearing: The patient remains NWB.
- Range of Motion (ROM): If placed in a CAM boot, the patient may begin gentle, active, straight-plane dorsiflexion and plantarflexion exercises out of the boot 2-3 times daily.
- Restriction: Absolutely no active or passive eversion, as this places direct stress on the healing medial reconstruction.
Phase III: Progressive Loading (Weeks 6–12)
- Weight-Bearing: The patient is allowed to begin progressive partial weight-bearing in the CAM boot, advancing to full weight-bearing as tolerated by week 8.
- Physical Therapy: Formal physical therapy is initiated. Focus shifts to restoring full active and passive ROM, intrinsic foot muscle strengthening, and proprioceptive training (e.g., BAPS board, single-leg stance).
- Transition: By week 10-12, the patient is transitioned from the CAM boot to a supportive athletic shoe with a rigid medial-lateral stabilizing ankle brace.
Phase IV: Return to Function (Months 3–6+)
- Strengthening: Advanced closed-kinetic-chain exercises, plyometrics, and peroneal/tibialis posterior strengthening.
- Sport-Specific Training: Cutting, pivoting, and explosive movements are gradually introduced.
- Clearance: Return to competitive sports or heavy manual labor is typically permitted between 5 and 6 months postoperatively, provided the patient demonstrates symmetric strength, full ROM, and no pain with dynamic loading.
COMPLICATIONS AND SURGICAL PITFALLS
While the Deland technique is highly effective, surgeons must be cognizant of potential complications:
- Nerve Injury: The sural nerve is at high risk during the proximal peroneus longus harvest. The saphenous nerve and vein are at risk during the medial exposure. Meticulous blunt dissection and retraction are required.
- Over-Tensioning: Securing the graft with the ankle in excessive inversion can lead to a stiff, painful medial column and restrict normal hindfoot kinematics. The ankle must be fixed in neutral alignment.
- Tunnel Convergence or Fracture: In smaller patients, the lateral-to-medial talar tunnel can compromise the structural integrity of the talar neck. Precise fluoroscopic guidance and appropriate drill sizing are imperative to prevent iatrogenic talar neck fractures.
- Graft Failure: Failure of tendon-to-bone healing can occur if the interference screw is undersized or if the patient is non-compliant with the early non-weight-bearing protocol.
By adhering to strict anatomical principles, utilizing robust autograft tissue, and maintaining a high index of suspicion for differential diagnoses like tarsal coalitions and osteoid osteomas, the orthopedic surgeon can achieve excellent, reproducible outcomes in the management of complex medial ankle instability.
