Introduction to Cleft Foot (Partial Adactyly)
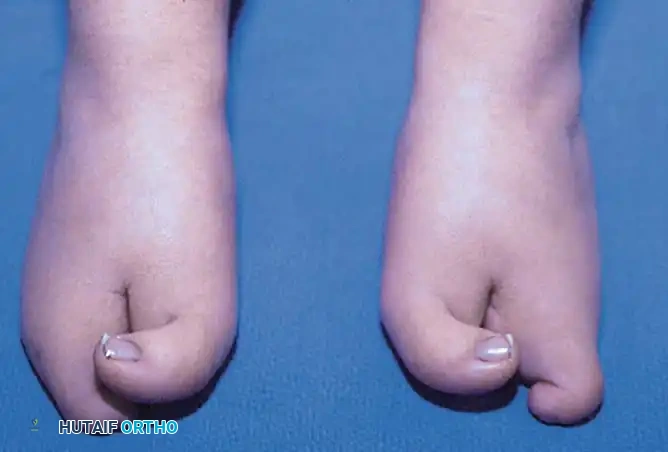
Cleft foot, historically referred to as "lobster foot" or more accurately termed split-foot malformation (SFM) or ectrodactyly, is a rare and complex congenital anomaly. It is characterized by a central, V-shaped cleft that extends proximally into the foot, occasionally reaching as far as the midfoot or hindfoot. The pathoanatomy generally involves the absence of one or more central toes and their corresponding metatarsals, frequently accompanied by dysplastic or absent tarsal bones.
Despite the high degree of morphological variability, the first (medial) and fifth (lateral) rays are typically preserved, creating a characteristic pincer-like appearance. The condition may present as an isolated deformity or as part of a broader syndromic presentation, such as Split-Hand/Foot Malformation (SHFM) syndrome, which exhibits autosomal dominant inheritance with variable penetrance.
Surgical intervention is primarily indicated to improve the functional biomechanics of the foot, facilitate normal, painless shoe wear, and enhance the cosmetic appearance of the extremity.
Clinical Presentation and Evaluation
Patients with cleft foot present with a wide spectrum of deformities. The central deficiency leads to a loss of the transverse metatarsal arch, resulting in progressive splaying of the medial and lateral columns during weight-bearing.
Clinical evaluation must meticulously assess the suppleness of the forefoot, the presence of angular deformities (such as hallux valgus or tailor's bunion), and the integrity of the soft-tissue envelope. Radiographic evaluation, including weight-bearing anteroposterior, lateral, and oblique views, is mandatory to delineate the exact osseous anatomy, identify hypoplastic or absent metatarsals, and evaluate the tarsal architecture.
💡 Clinical Pearl
Always evaluate the patient for concomitant upper extremity anomalies (cleft hand) and craniofacial defects (cleft lip/palate), as cleft foot is frequently a manifestation of SHFM syndromes. Genetic counseling is highly recommended.
Classifications of Cleft Foot
Accurate classification is essential for preoperative planning and determining the appropriate surgical intervention. Two primary classification systems are utilized: the radiographic classification by Blauth and Borisch, and the clinical classification by Abraham et al.
Blauth and Borisch Radiographic Classification
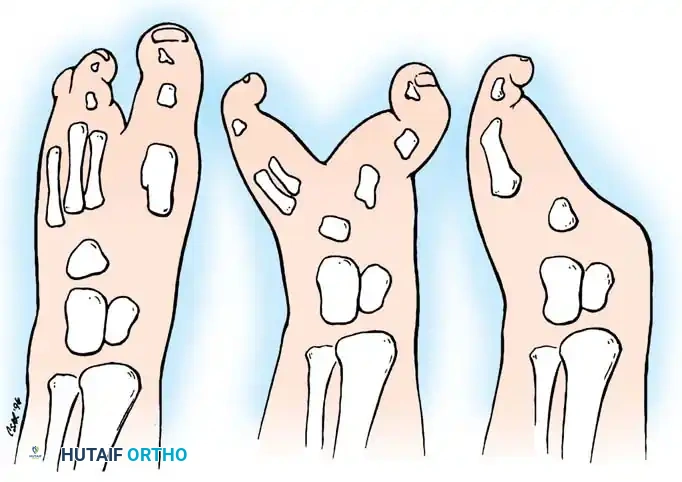
Based on a comprehensive review of 173 cleft feet, Blauth and Borisch categorized the deformity into six distinct types based strictly on the number of metatarsal bones present:
* Type I: Five metatarsals present; normal metatarsal morphology with minor soft-tissue clefting.
* Type II: Five metatarsals present; one or more metatarsals are partially hypoplastic.
* Type III: Four metatarsals present.
* Type IV: Three metatarsals present.
* Type V: Two metatarsals present.
* Type VI: One metatarsal present (severe adactyly).
Abraham et al. Clinical Classification
Abraham, Waxman, Shirali, and colleagues developed a simplified, treatment-oriented clinical classification system that guides surgical decision-making based on the depth of the cleft and the degree of forefoot splaying.
- Type I: Characterized by a central ray cleft or deficiency (usually involving the second or third rays, or both) that extends proximally up to the midmetatarsal level. Crucially, there is no significant splaying of the medial or lateral rays.
- Type II: Features a deep cleft extending proximally to the level of the tarsal bones, accompanied by significant forefoot splaying.
- Type III: Defined by the complete absence of the first through third (or fourth) rays.
Indications and Timing of Surgery
The primary goals of surgery are to close the cleft, narrow the forefoot to allow for standard shoe wear, correct angular deformities of the border digits, and provide a cosmetically acceptable foot.
Treatment Recommendations Based on Abraham Classification
- Type I Deformities: Recommended treatment consists of soft-tissue syndactylism. If a mild hallux valgus deformity is present, partial correction should be performed concurrently.
- Type II Deformities: Require aggressive soft-tissue syndactylism combined with bony work. First-ray osteotomies are frequently needed to correct splaying. Abraham et al. strongly recommend performing this surgery before the age of 5 years while the forefoot remains supple. In their series, patients older than 5 years with rigid Type II deformities often required first-ray amputation due to intractable splaying and degenerative changes.
- Type III Deformities: Surgery is generally not recommended. The remaining lateral rays often adapt to provide a stable, albeit narrow, weight-bearing platform.
Optimal Surgical Timing
Wood, Peppers, and Shook advocate for early surgical intervention, ideally at 6 months of age. The rationale for early surgery includes:
1. Anesthetic Safety: Modern pediatric anesthesia is highly safe at 6 months.
2. Tissue Malleability: The soft tissues and ligaments are highly compliant, allowing for tension-free closure of the cleft.
3. Prevention of Growth Deformities: Early realignment of the metatarsals prevents progressive angular deformities (e.g., severe hallux valgus) that occur as the child begins to bear weight on a splayed foot.
⚠️ Surgical Warning
Delaying surgery in Type II deformities beyond early childhood leads to rigid forefoot splaying. The intermetatarsal ligaments contract, and the articular surfaces remodel, making joint-sparing centralization osteotomies exceptionally difficult and prone to failure.
Surgical Principles and Biomechanics
Regardless of the specific flap technique utilized, several universal surgical principles apply to the correction of a cleft foot:
* Excision of Cleft Skin: The skin on the apposing surfaces within the cleft must be excised to create raw surfaces for syndactylization.
* Flap Preservation: Dorsal and plantar flaps must be meticulously designed and preserved to close the cleft without excessive tension.
* Resection of Unopposed Bone: If a metatarsal is present but lacks a corresponding toe (phalanges), the distal portion of that metatarsal should be resected to allow for a smooth, narrow forefoot contour.
* Correction of Border Rays: Any bony or joint deformity of the first or fifth ray (e.g., hallux valgus, metatarsus primus varus) must be corrected simultaneously. This often requires capsulotomies and closing wedge osteotomies.
* Restoration of the Transverse Arch: The intermetacarpal distance must be stabilized to prevent recurrent splaying. This requires robust reconstruction of the intermetatarsal ligament.
Step-by-Step Surgical Techniques
Soft-Tissue Syndactylization (Abraham et al. Technique)
For Type I and supple Type II deformities, a direct soft-tissue syndactylization can yield excellent functional and cosmetic results.
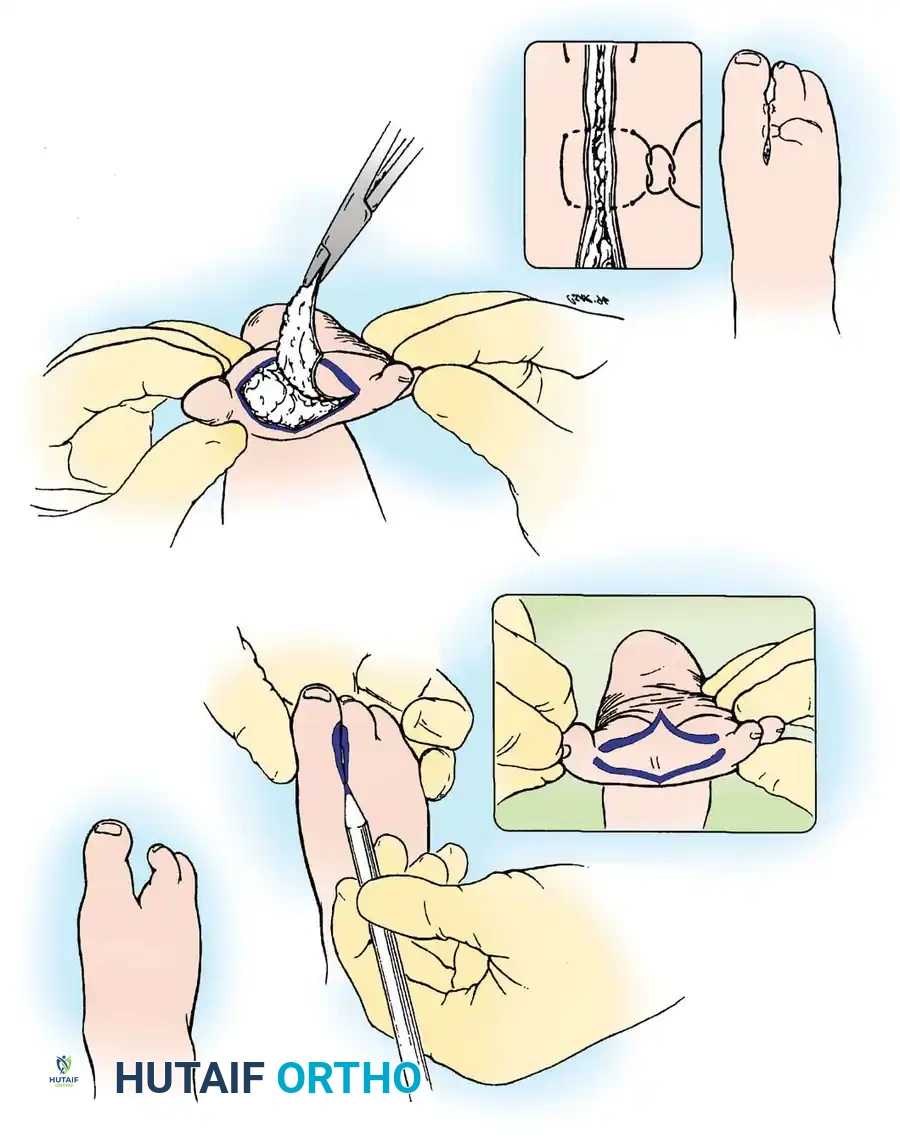
- Preoperative Marking: The cleft is manually closed by the surgeon to assess tissue redundancy. The cleavage area is marked with a sterile surgical pen on both the dorsum and the sole of the foot.
- Incision and Excision: The skin and a conservative amount of subcutaneous tissue are sharply excised along the outlined ink lines. Care is taken to protect the neurovascular bundles supplying the border digits.
- Mobilization: The skin edges are undermined to allow for tension-free approximation.
- Closure: The apposing surfaces are brought together, and the skin edges are approximated using horizontal mattress sutures to evert the edges and promote primary healing.
The Rectangular Flap Technique (Wood, Peppers, and Shook)
Wood et al. described a simplified cleft closure utilizing rectangular flaps. This technique avoids the complex geometry of multiple Z-plasties or triangular flaps, is technically easier to execute, and produces superior cosmetic outcomes by avoiding linear scar contractures in the web space.
🔪 Surgical Technique 26-4: Rectangular Flap Closure
Prerequisite: At least two metatarsals must be present to provide a stable osseous foundation for cleft closure.
Step 1: Lateral Flap Elevation
* On the lateral side of the cleft (typically the medial aspect of the fifth ray), design and raise a rectangular flap.
* The incision starts from the plantar surface of the foot and extends to the dorsum.
* Tissue Depth: Elevate a fairly thick flap that includes the subcutaneous fat to ensure robust vascularity. Do not include the deep fascia in this flap.
Step 2: Medial Flap Elevation
* Exactly opposite the lateral flap, on the medial side of the cleft (typically the lateral aspect of the first ray), design and raise a complementary rectangular flap.
* This flap is raised in the reverse direction: starting on the dorsum of the foot and extending to the plantar aspect.
* Repeat this alternating rectangular flap design two or three times proximally until the skin of the entire cleft has been addressed and excised.
Step 3: Web Space Reconstruction
* Identify the longest toe adjacent to the cleft.
* Raise a distally based skin flap from this toe. This flap will be sutured to the adjacent toe across the cleft to create a wide, cosmetically natural web space, preventing distal syndactyly migration (web creep).
Bony Correction and Osteotomies
Soft-tissue closure alone is insufficient if underlying osseous splaying exists. Failure to address the bony divergence will inevitably lead to wound dehiscence or recurrent deformity.
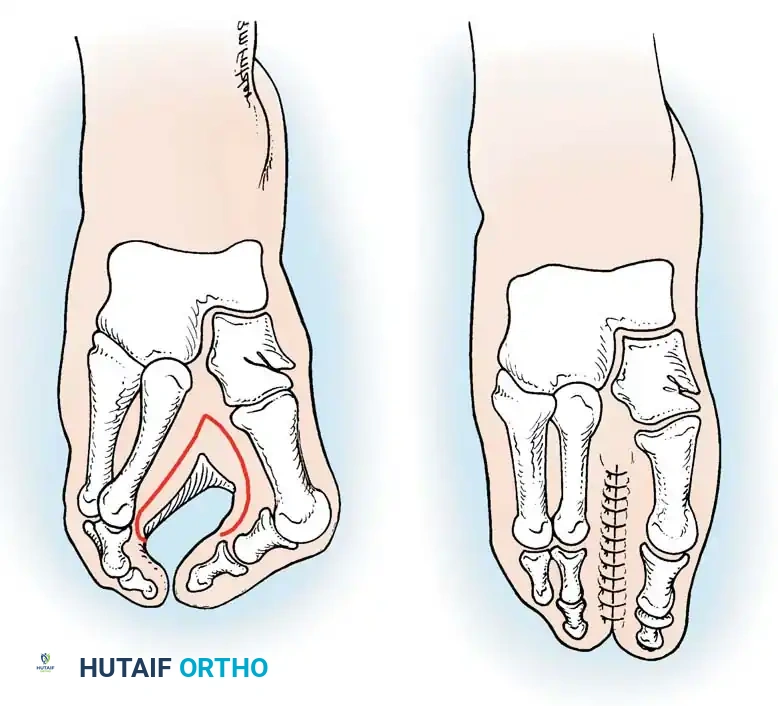
Step 4: Metatarsal Osteotomies
* If the toes spring apart upon manual closure of the cleft, bony realignment is mandatory.
* Perform closing wedge osteotomies at the proximal metaphysis/base of each divergent metatarsal (typically the first and fifth metatarsals).
* The base of the wedge should be oriented toward the cleft (medial for the 5th MT, lateral for the 1st MT) to centralize the rays.
* Fixation: Reduce the osteotomies and stabilize them using smooth Kirschner wires (typically 0.045 or 0.062 inch, depending on the child's age). The wires can be driven longitudinally down the intramedullary canal or crossed at the osteotomy site.
Step 5: Intermetacarpal Ligament Reconstruction
* To further stabilize the intermetacarpal distance and mechanically unload the tension on the delicate surgical skin flaps, the transverse intermetatarsal ligament must be reconstructed.
* Graft Options: Utilize local ligamentous tissue or redundant joint capsule excised from the cleft. If local tissue is insufficient, harvest an autograft (e.g., plantaris tendon or a strip of fascia lata).
* Pass the graft through drill holes in the adjacent metatarsal necks and tie it under tension while the forefoot is manually compressed.
Step 6: Final Closure
* Deflate the tourniquet and achieve meticulous hemostasis. Hematoma formation is a primary cause of flap necrosis.
* Close the rectangular flaps in a routine fashion using interrupted non-absorbable or absorbable sutures (e.g., 4-0 or 5-0).
* Apply a sterile, non-adherent dressing followed by a well-padded short leg cast.
Postoperative Protocol and Rehabilitation
Strict adherence to the postoperative immobilization protocol is critical to ensure bony union of the osteotomies and survival of the soft-tissue flaps.
- Weeks 0 to 3: The patient is placed in a well-padded short leg cast immediately postoperatively. The patient must remain strictly non-weight-bearing. Elevation of the operative extremity is paramount to minimize edema and protect flap microcirculation.
- Weeks 3 to 6: At the 3-week mark, the initial cast may be changed if necessary to inspect the wounds. If healing is progressing appropriately, the patient is transitioned to a short leg walking cast. Weight-bearing is now allowed and encouraged to stimulate osteotomy healing.
- Week 6: The walking cast is discontinued. Radiographs are obtained to confirm clinical and radiographic union of the metatarsal osteotomies. The Kirschner wires are removed in the clinic setting.
- Beyond 6 Weeks: Depending on the stability of the foot and the patient's age, a short leg walking cast or a rigid-soled postoperative shoe may be worn for an additional 4 to 6 weeks to protect the ligamentous reconstruction as the child returns to full activity.
Complications and Pitfalls
Surgeons undertaking cleft foot reconstruction must be prepared to manage several potential complications:
- Flap Necrosis: The most immediate postoperative risk. Caused by excessive tension on the closure, inadequate flap thickness, or underlying hematoma. Prevention: Ensure robust bony narrowing via osteotomies so that skin flaps close under zero tension.
- Recurrent Splaying: Often results from failure to reconstruct the intermetatarsal ligament or performing the surgery in an older child with rigid deformities without adequate bony resection.
- Nonunion/Malunion of Osteotomies: Rare in young children but can occur if K-wire fixation is inadequate or if weight-bearing is initiated prematurely.
- Web Creep: Distal migration of the syndactyly scar over time. Prevention: Utilize the distally based flap technique at the commissure to create a broad, natural web space.
