Introduction to Class 1D TFCC Injuries
The triangular fibrocartilage complex (TFCC) is the primary stabilizer of the distal radioulnar joint (DRUJ) and the ulnocarpal articulation. According to the Palmer classification, Class 1D injuries represent traumatic avulsions of the TFCC from its radial attachment at the distal margin of the sigmoid notch. These tears are typically oriented in the anteroposterior direction and frequently involve the critical dorsal and palmar radioulnar ligaments.
Class 1D lesions are highly associated with distal radius fractures, particularly those with intra-articular extension into the sigmoid notch. While satisfactory anatomical reduction of the radial fracture often allows the TFCC to heal, resulting in a stable DRUJ, persistent instability following fracture reduction necessitates surgical intervention. Arthroscopic transosseous repair has emerged as the gold standard for restoring the anatomic footprint of the TFCC, provided the tissue quality is sufficient and retraction is minimal.
Clinical Pearl: Always assess DRUJ stability dynamically after the fixation of a distal radius fracture. If the DRUJ remains ballottable or grossly unstable in supination and pronation, a concomitant Class 1D TFCC tear must be suspected and addressed.
Biomechanics and Pathoanatomy
The TFCC functions as a suspensory sling for the carpus and a critical tether between the distal radius and ulna. The radial attachment of the TFCC is broad, blending into the hyaline cartilage of the sigmoid notch. The dorsal and palmar radioulnar ligaments, which form the structural margins of the TFCC, are the primary restraints to dorsal and volar translation of the distal ulna, respectively.
When a Class 1D avulsion occurs, the DRUJ loses its primary soft-tissue constraint. If left untreated, this leads to chronic DRUJ instability, ulnocarpal abutment, and early-onset osteoarthritis. Displaced osseous fragments of the sigmoid notch can further mechanically block reduction or contribute to chronic instability, often requiring open reduction and internal fixation (ORIF) in conjunction with soft-tissue repair.
Indications and Patient Selection
Proper patient selection is paramount for the success of arthroscopic Class 1D repairs. The surgeon must carefully evaluate ulnar variance, tissue quality, and the chronicity of the tear.
Indications for Arthroscopic Repair
- Acute or subacute Class 1D tears with demonstrable DRUJ instability.
- Persistent DRUJ instability following rigid internal fixation of a distal radius fracture.
- Tears with less than 5 mm of radial retraction.
Contraindications and Alternative Strategies
- Ulna-Plus Variance: Arthroscopic repair in patients with significant ulna-positive variance should be approached with extreme caution. The TFCC in these patients is often degenerative, thinned, and prone to suture pull-out. Ulnar shortening osteotomy or diaphyseal recession performed concurrently with TFCC repair significantly improves outcomes by offloading the ulnocarpal joint and tensioning the ulnocarpal ligaments.
- Chronic, Retracted Tears (>5 mm): If the TFCC is retracted more than 5 mm from the sigmoid notch, primary arthroscopic repair is likely to fail due to excessive tension. In these scenarios, an open reconstruction utilizing a distally based flap of the extensor retinaculum (placed between the ulna and triquetrum and sutured to the radius and palmar/dorsal wrist capsule) is indicated.
- Displaced Sigmoid Notch Fractures: Large, displaced intra-articular fragments require open anatomic reduction rather than isolated arthroscopic soft-tissue repair.
Preoperative Setup and Diagnostic Arthroscopy
Anesthesia and Positioning
- The procedure is performed under regional anesthesia (supraclavicular or axillary block) or general anesthesia.
- Place the patient supine with the operative arm on a radiolucent hand table.
- Apply a well-padded pneumatic tourniquet to the proximal arm. Inflate the tourniquet as needed, particularly when shaving synovium or burring bone to optimize visualization.
- Suspend the hand in a wrist traction tower using finger traps on the index and long fingers, applying 10 to 15 lbs of longitudinal traction.
Diagnostic Arthroscopy
- Establish standard radiocarpal portals. Insert the arthroscope into the 3-4 portal and a tactile probe into the 6R portal.
- Perform a systematic diagnostic sweep of the radiocarpal, midcarpal, and ulnocarpal joints.
- Inspect the radial insertion of the TFCC. A Class 1D tear will present as a detachment of the articular disc from the sigmoid notch, often with a visible gap or "trampoline sign" loss of tension.
- Ulnocarpal Ligament Assessment: If arthroscopic examination reveals a clear, unobstructed view into the pisotriquetral joint, this is pathognomonic for significant disruption of the ulnocarpal ligaments (ulnolunate and ulnotriquetral). This requires concurrent repair (detailed in subsequent sections).
Surgical Technique: Arthroscopic Transosseous Repair
The core principle of Class 1D repair is to reattach the avulsed TFCC to its anatomic footprint on the distal radius using transosseous sutures.
Step 1: Preparation of the Radial Footprint
Through the 6R portal, introduce a full-radius shaver to clear hyperplastic synovium and hematoma. Switch to a motorized burr (3.0 mm or 3.5 mm) and carefully debride the distal rim of the sigmoid notch down to bleeding cancellous bone. This osseous decortication is critical to stimulate a healing response and facilitate soft-tissue integration.
Surgical Warning: Exercise meticulous control of the burr. Do not inadvertently resect or damage the intact dorsal and palmar radioulnar ligaments, as these are essential for DRUJ stability.
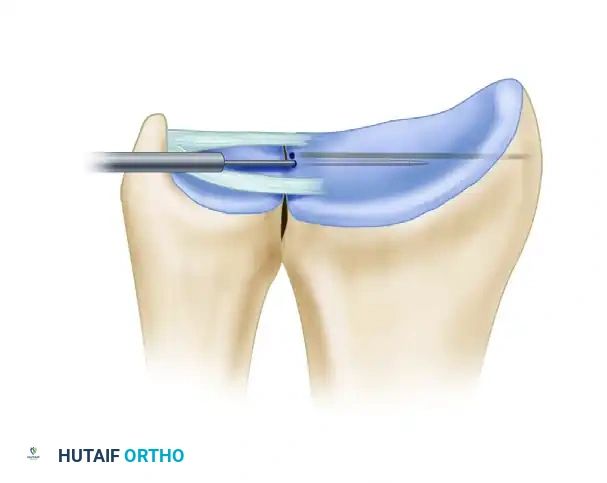
Figure A: The edge of the sigmoid notch is carefully abraded with a motorized burr to create a bleeding bone bed for TFCC reattachment.
Step 2: Transosseous Tunnel Preparation
- Determine the optimal trajectory for suture insertion by placing a 20-gauge hypodermic needle through the ulnar side of the wrist, proximal to the triquetrum. Probe the TFCC to estimate the best location for suture purchase.
- Make a small longitudinal skin incision between the extensor carpi ulnaris (ECU) and flexor carpi ulnaris (FCU) tendon sheaths. Bluntly dissect to avoid injury to the dorsal cutaneous branch of the ulnar nerve (DSBUN) and the ulnar neurovascular bundle.
- Using a power drill via the 6R or 6U portal, advance a 0.045-inch (1.2-mm) Kirschner wire to create two parallel transosseous channels in the distal radius.
- Begin the drilling side-by-side at the distal margin of the sigmoid notch, passing from the ulnar to the radial direction. Aim the wires to exit the radial cortex in the distal metaphysis, specifically between the first and second extensor compartments.
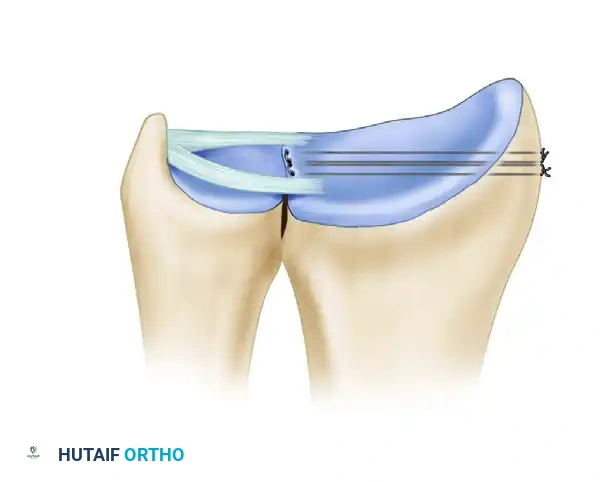
Figure B: Parallel holes are drilled through the distal radius using Kirschner wires, establishing the transosseous tunnels for suture passage.
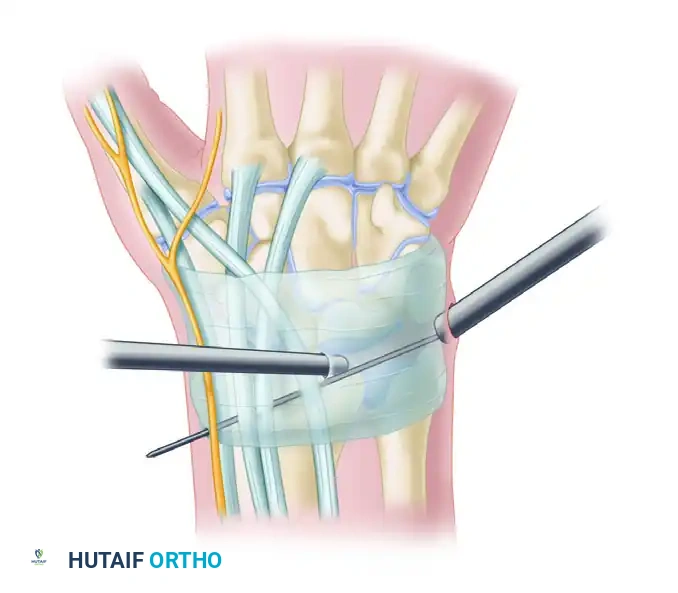
Step 3: Suture Passage (Meniscal Needle Technique)
Note: This technique was popularized by Sagerman and Short.
1. Make a 1- to 2-cm skin incision at the radial exit point of the K-wires. Use blunt dissection down to the bone to expose the wires, strictly protecting the superficial branch of the radial nerve (SBRN) and the tendons of the first and second dorsal compartments (APL, EPB, ECRL, ECRB).
2. Remove the K-wires one at a time.
3. Introduce long meniscal repair needles through an arthroscopic cannula from the ulnar side. Pass the needles through the substance of the TFCC, into the pre-drilled holes at the sigmoid notch, and out through the lateral (radial) cortex of the radius.
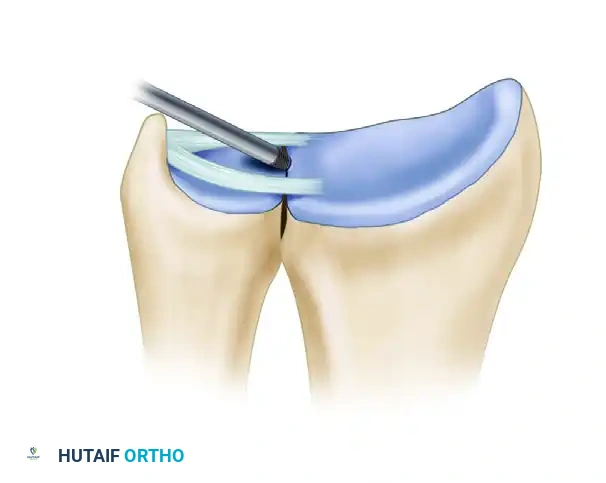
Figure C: Sutures are passed into the TFCC and through the radial drill holes utilizing long meniscal repair needles.
Step 4: Fixation and Knot Tying
- Retrieve the suture ends on the radial side of the wrist.
- Under direct arthroscopic visualization, apply tension to the sutures. Observe the TFCC being reduced anatomically against the decorticated sigmoid notch.
- Once satisfactory tension and DRUJ stability are confirmed, tie the sutures securely over the radial bony bridge between the first and second extensor compartments.
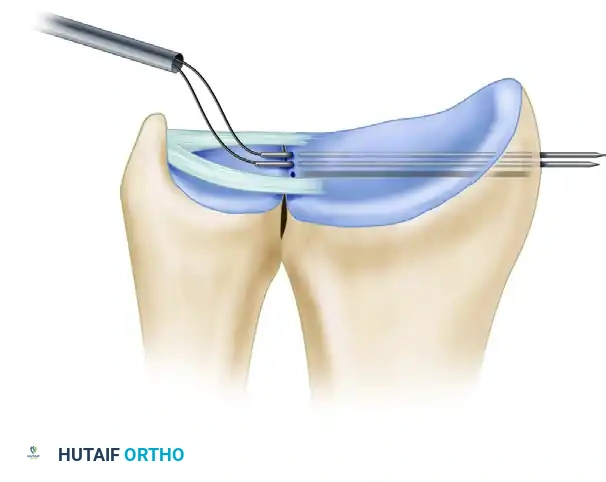
Figure D: The sutures are tied directly on the surface of the radius, securing the TFCC to its anatomic footprint.
Alternative Suture Passage Techniques
Depending on surgeon preference and available instrumentation, alternative methods for suture passage can be highly effective.
Alternative 1: Cannula-Assisted Suture Passage (Trumble Technique)
Trumble et al. described a highly controlled method using a suction cannula to protect soft tissues during needle passage.
- Insert a straight 12-French suction cannula through the 6R or 6U portal.
- Pass 2-0 absorbable monofilament sutures (e.g., Maxon or PDS) on meniscal repair needles through the cannula.
- Drive the needles through the TFCC and directly drill them through the radius at the distal margin of the sigmoid notch, moving from ulnar to radial. (If the radius was pre-drilled with K-wires, needle passage is significantly facilitated).
- Retrieve and tie the sutures over the radial cortex as previously described.
Passage of sutures through a cannula in the ulnar aspect of the wrist, positioned between the FCU and ECU just proximal to the triquetrum.
Alternative 2: Drill Guide-Tissue Protector Jig (Jantea Technique)
Jantea et al. introduced a combination drill guide-tissue protector jig to ensure precise, parallel placement of the transosseous channels.
- Insert a 1.2-mm K-wire from the ulnar side, entering between the ECU and FCU. Verify arthroscopically that this wire marks the exact insertion site of the TFCC at the sigmoid notch.
- Slide one barrel of the specialized guide over this first wire. Position the second barrel over the dorsum of the wrist against the distal radial metaphysis (between the 1st and 2nd compartments).
- Make a small incision over the radial barrel, dissecting bluntly to the cortex while protecting the SBRN and extensor tendons.
- Drill a second 1.2-mm K-wire through the guide across the radius, ensuring it exits precisely at the sigmoid notch adjacent to the first pin.
- Remove the wires and guide. Pass 18-gauge spinal needles (with trocars in place) through the radial channels from lateral to medial, exiting through the TFCC.
- Remove the trocars. Pass a 2-0 PDS suture through one needle, and a wire retrieval loop through the second. Capture the suture with the loop, withdraw, and tie over the radial cortex.
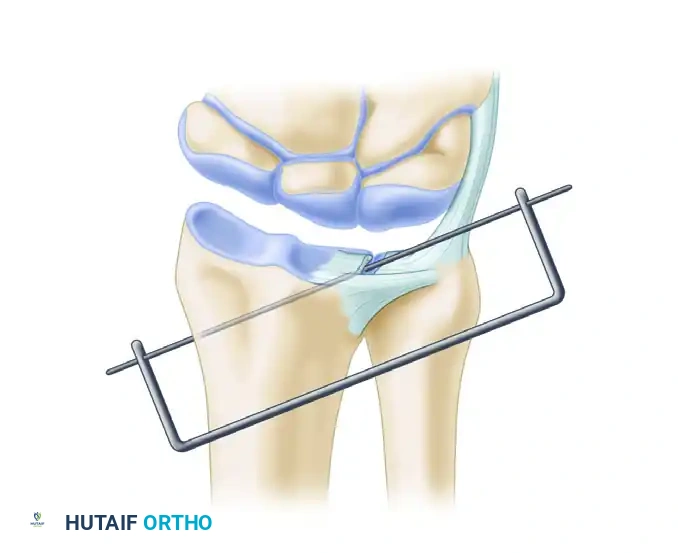
Use of a combination drill guide-tissue protector jig for precise pin placement and channel creation for suture passage.
Management of Concomitant Ulnocarpal Instability
As noted during the diagnostic arthroscopy, clear exposure of the pisotriquetral joint indicates severe disruption of the ulnocarpal ligaments. This must be addressed to restore global ulnar-sided wrist stability.
Open Ulnocarpal Ligament Repair
- Make a 1-cm or larger incision distal to the ulnar head and volar to the ECU tendon. Strictly avoid injury to the DSBUN, ulnar nerve, and ulnar artery.
- Pass two needles through the volar capsule and, under arthroscopic guidance, through the torn ulnocarpal ligaments.
- Pass a 2-0 or 3-0 absorbable polydioxanone (PDS) suture through one needle into the joint.
- Pass a nylon or wire suture loop through the second needle.
- Manipulate the first needle so the suture can be captured by the wire loop.
- Withdraw the needles, retrieve the suture ends, and tie them over the capsule, effectively creating a horizontal mattress suture that imbricates the ligament to the capsule.
Surgical Pearl for Large Defects: If the ulnocarpal defect is massive and primary repair is impossible, utilize an open volar approach. Imbricate the remaining ulnocarpal ligaments and augment the repair using a distally based strip of the flexor carpi ulnaris (FCU) tendon, securing it to the dorsum of the ulnocarpal capsule.
Addressing Class 1B Lesions
If a concomitant Class 1B lesion (ulnar avulsion) is present, or if there is residual dorsoulnar laxity after the radial repair, the TFCC must also be secured to the dorsoulnar capsule using standard inside-out or outside-in arthroscopic suturing techniques.
DRUJ Stabilization and Closure
Following the soft-tissue repair, the DRUJ must be protected from rotational shear forces during the early healing phase.
- Assess DRUJ stability. If there is any residual laxity, or to protect a tenuous repair, use a 0.062-inch (2-mm) Kirschner wire to transfix the ulna to the radius.
- Place the forearm in neutral rotation (midposition) and drive the K-wire from the ulnar (medial) to the radial (lateral) cortex, proximal to the DRUJ.
- Thoroughly irrigate the joint.
- Close the arthroscopic portals and accessory incisions with non-absorbable sutures (e.g., 4-0 nylon).
- Apply a sterile dressing and a well-molded long-arm (above-elbow) cast with the forearm in neutral rotation.
Postoperative Rehabilitation Protocol
A strict, phased rehabilitation protocol is mandatory to prevent repair failure while mitigating postoperative stiffness.
Phase 1: Immobilization (Weeks 0–4)
* The patient remains in the long-arm cast to prevent forearm pronation and supination.
* At 10 to 14 days, the cast is temporarily removed for suture removal and wound check, then a new long-arm cast is applied.
* Digital range of motion (ROM) and shoulder exercises are encouraged immediately to prevent secondary stiffness.
Phase 2: Transition and Pin Removal (Weeks 4–8)
* At 4 weeks, the long-arm cast is transitioned to a short-arm cast for an additional 3 to 4 weeks.
* At 6 to 8 weeks postoperatively, the radioulnar transfixion pin is removed in the clinic.
* The patient is transitioned to a custom-molded, removable wrist splint (Muenster or standard short-arm, depending on stability) for another 2 to 4 weeks.
Phase 3: Active Rehabilitation (Weeks 8+)
* A therapist-supervised rehabilitation program begins at 6 to 8 weeks.
* Initiate gentle active and active-assisted ROM for wrist flexion/extension and forearm pronation/supination.
* Passive stretching is introduced cautiously.
* Return to Activity: Strenuous, forceful grasping, heavy lifting, and loaded rotational activities (e.g., using a screwdriver, swinging a golf club) must be strictly avoided until full motion and symmetric grip strength have returned, typically around 4 to 6 months postoperatively.
Complications and Pitfalls
- Nerve Injury: The most common complication is iatrogenic neuropraxia or neuroma formation. The SBRN is at high risk during radial drill hole preparation and knot tying. The DSBUN is at risk during ulnar portal placement and ulnocarpal ligament repair. Meticulous blunt dissection to the bone is non-negotiable.
- Hardware Irritation: Sutures tied over the radial cortex can cause irritation to the extensor tendons (particularly the first and second compartments). Ensure knots are tied flat against the bone and buried beneath the retinaculum.
- Recurrent Instability: Often due to unrecognized ulna-positive variance, failure to debride the sigmoid notch to bleeding bone, or premature return to rotational activities.
- Stiffness: Prolonged immobilization can lead to severe DRUJ and radiocarpal stiffness. Adherence to the timeline for pin removal and initiation of supervised therapy is critical.
