INTRODUCTION TO ELBOW ARTHROSCOPY
Arthroscopic evaluation of the elbow has evolved into an indispensable diagnostic and therapeutic modality in modern orthopedic surgery. Due to the highly congruent nature of the ulnohumeral and radiocapitellar articulations, combined with the intimate proximity of major neurovascular structures, elbow arthroscopy demands a profound understanding of three-dimensional anatomy and meticulous surgical technique.
This comprehensive guide details the systematic arthroscopic examination of the elbow, encompassing indications, biomechanical considerations, precise portal placement, and step-by-step intra-articular evaluation. The goal is to provide orthopedic residents, fellows, and practicing consultants with an evidence-based framework to safely navigate the anterior and posterior compartments of the elbow.
INDICATIONS AND BIOMECHANICAL CONSIDERATIONS
Clinical Indications
Diagnostic and therapeutic elbow arthroscopy is indicated for a variety of intra-articular pathologies, including but not limited to:
* Removal of loose bodies (frequently residing in the olecranon fossa or anterior compartment).
* Evaluation and treatment of osteochondritis dissecans (OCD) of the capitellum.
* Debridement of post-traumatic or degenerative osteophytes (e.g., valgus extension overload syndrome).
* Synovectomy for inflammatory arthropathies (e.g., rheumatoid arthritis).
* Capsular release for the stiff elbow (arthrofibrosis).
* Assessment of medial or lateral collateral ligamentous instability.
Biomechanics and Pathoanatomy
The elbow is a complex hinge joint (ginglymus) with a rotational component (trochoid) at the radiocapitellar articulation. Repetitive microtrauma, particularly in overhead throwing athletes, leads to predictable patterns of failure. Valgus stress during the late cocking and early acceleration phases of throwing places immense tension on the anterior bundle of the ulnar collateral ligament (UCL) and compressive forces on the radiocapitellar joint. This biomechanical cascade frequently results in medial laxity, radiocapitellar chondromalacia, and posteromedial olecranon impingement—all of which must be systematically evaluated during the arthroscopic examination.
Clinical Pearl: The spectrum of lesions seen in the throwing athlete—medial laxity, capitellar chondromalacia, and posteromedial olecranon osteophytes—represents a continuum of pathological response to repetitive valgus extension overload.
PATIENT POSITIONING AND SETUP
Proper patient positioning is critical for optimal visualization, instrument maneuverability, and neurovascular safety. The two most common positions are the lateral decubitus and the prone position.
- Prone Positioning: Highly favored for procedures requiring extensive work in the posterior compartment. With the patient prone, the arm is allowed to hang over a padded armrest or bolster, flexing the elbow to 90 degrees. This position allows gravity to assist in expanding the posterior compartment and makes triangulation technically easier.
- Lateral Decubitus Positioning: The patient is placed in the lateral decubitus position with the operative arm supported by an arm holder. This allows excellent access to both anterior and posterior compartments.
- Supine Positioning: Less commonly used for complex posterior work but viable for anterior compartment pathology. The arm is suspended across the chest or supported by a specialized limb positioner.
Regardless of the position, a non-sterile tourniquet is applied high on the brachium. The joint must be maximally distended with fluid prior to the establishment of any portals to displace neurovascular structures away from the joint capsule.
SURGICAL TECHNIQUE: STEP-BY-STEP ARTHROSCOPIC EXAMINATION
1. Joint Distention and Initial Access
The procedure begins with maximal distention of the elbow joint. This step is non-negotiable, as it increases the distance between the anterior capsule and the radial and median nerves.
- Identify the "soft spot" in the center of the triangle formed by the lateral epicondyle, the radial head, and the tip of the olecranon.
- Insert an 18-gauge spinal needle at the direct lateral portal site, aiming directly toward the center of the joint.
- Inject 20 to 30 mL of sterile normal saline. A palpable backflow or firm distention of the capsule confirms intra-articular placement.
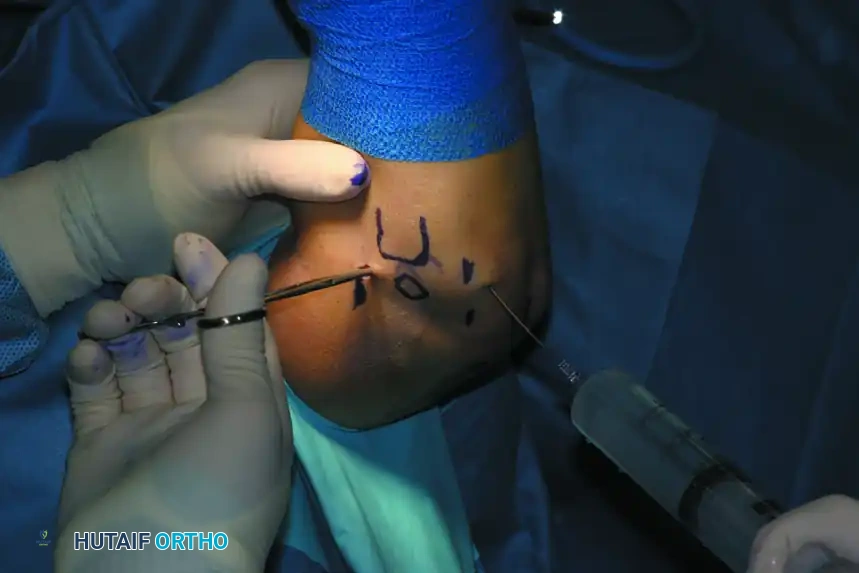
FIGURE 52-62: Hemostat being used for blunt dissection down to the joint capsule with elbow distention through the direct lateral portal.
2. Establishing the Anterolateral Portal
The anterolateral portal is typically established first for viewing the anterior compartment. It is located approximately 3 cm distal and 1 cm anterior to the lateral epicondyle.
- Incise the skin only with a #11 blade.
- Use a small hemostat to bluntly dissect through the subcutaneous tissue and muscle fascia down to the joint capsule. This blunt dissection minimizes the risk to the radial nerve.
- Pass the arthroscopy cannula with a blunt trocar along the same course as the initial distention needle, positioning it just proximal and anterior to the radiocapitellar articulation.
- Use the trocar to capture the joint capsule laterally. Increase the angle of insertion to approximately 70 degrees relative to the horizontal plane, directing it toward the center of the joint.
Surgical Warning: It is imperative to prevent the trocar from skiving medially before penetrating the joint capsule. If the trocar slides anteriorly over the capsule, it risks catastrophic damage to the radial nerve and compromises viewing and instrumentation from the anterolateral portal.
3. Anterior Compartment Evaluation (Anterolateral Viewing)
Insert the 4.0-mm or 2.7-mm 30-degree arthroscope through the anterolateral cannula. Establish inflow through the arthroscope sheath.
- Medial Structures: Direct the arthroscope medially to examine the coronoid process of the ulna and the trochlear ridge.
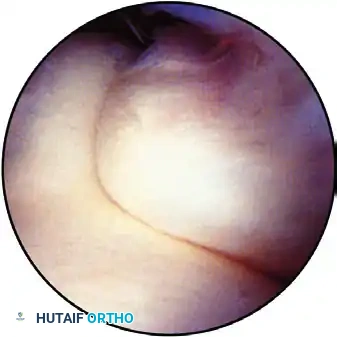
FIGURE 52-63A: View of the medial side of the elbow with the coronoid process on the right and the trochlea on the left.
- Capsular and Ligamentous Assessment: Examine the capsule medial to the articulation. As demonstrated by Timmerman and Andrews, the anterior 10% to 15% of the anterior bundle of the ulnar collateral ligament (UCL) can be visualized in some elbows. Synovitis, fraying, or capsular avulsion in this area is highly indicative of medial instability.
- Dynamic Instability Testing: Confirm instability by releasing longitudinal traction, supinating the forearm, and applying a valgus stress to the elbow at varying degrees of flexion (from 30 to 90 degrees). According to Andrews and Baumgarten, a medial joint opening of more than 1 mm under direct arthroscopic visualization indicates pathological medial laxity.
- Coronoid Fossa: Turn the scope superiorly to observe the anterior capsule and its insertion on the distal humerus. Evaluate the adequacy of the coronoid fossa. Look for embedded loose bodies, osteophytes, or dense adhesions that may impinge the coronoid process during terminal elbow flexion.
4. Establishing the Anteromedial Portal
The anteromedial portal is established to view the lateral structures and to serve as a working portal. It is located approximately 2 cm distal and 2 cm anterior to the medial epicondyle. It can be created using either the Wissinger rod technique or an outside-in technique under direct visualization.
The Wissinger Rod Technique:
* Advance the arthroscope (viewing from the anterolateral portal) across the joint to the medial capsule at the desired location for the medial portal.
* Remove the arthroscope lens, holding the cannula flush against the medial capsule.
* Insert a Wissinger rod through the cannula and advance it until it tents the skin medially.
* Incise the skin over the tented rod, push the rod through, and place a cannula sheath over the rod, advancing it back into the joint.
Direct Arthroscopic Vision Technique (Outside-In):
* Insert an 18-gauge spinal needle through the anticipated anteromedial portal site. Confirm its trajectory and intra-articular position arthroscopically.
* Incise the skin and use a hemostat to spread down to the fascia.
* Insert a blunt trocar following the needle's course, heading toward the center of the joint.
* Push the blunt trocar against the capsule to confirm the exact entry point (proximal and anterior to the articulation).
* Crucial Step: Withdraw the arthroscope slightly to keep the lens out of harm's way, then twist the blunt trocar back and forth to penetrate the capsule. This prevents the cannula from sliding anteriorly and damaging the median nerve or brachial artery.
5. Anterior Compartment Evaluation (Anteromedial Viewing)
Switch the arthroscope to the anteromedial portal, leaving a working cannula in the anterolateral portal.
- Lateral Structures: Evaluate the radioulnar and radiocapitellar articulations, as well as the annular ligament.
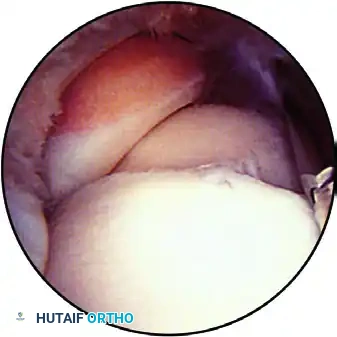
FIGURE 52-63B: Anterior aspect of the elbow viewed from the medial portal with the coronoid and trochlea in the foreground and the radiocapitellar joint. The annular ligament is clearly seen.
- Dynamic Assessment: Extending the elbow reveals more of the capitellum, while pronating and supinating the forearm exposes different facets of the radial head.
- Pathology Identification: Look for chondromalacia of the radiocapitellar joint, which frequently develops from repetitive compressive trauma in throwing or racquet sports. Apply a varus stress to the joint as the elbow is extended to better visualize the articular surface of the capitellum.
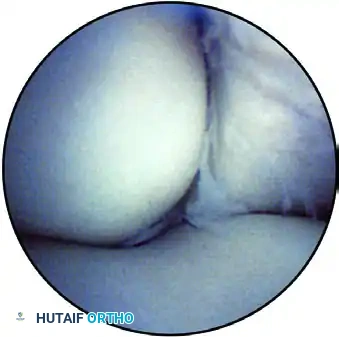
FIGURE 52-63C: Radiocapitellar joint with varus stress applied to expose the undersurface of the radial head.
- Lateral Gutter and Plica: Examine the anterolateral capsule and lateral gutter for synovitis. A synovial plica in the lateral gutter may be a normal anatomic variant; however, with repetitive trauma, this band can become thickened, fibrotic, and symptomatic, necessitating arthroscopic excision.
6. Direct Lateral Portal Examination
The direct lateral portal is established in the "soft spot," proximal and posterior to the radiocapitellar articulation, just posterior to the previously established anterolateral portal.
- Use a blunt trocar to enter the joint carefully, avoiding scuffing of the delicate radial head articular cartilage.
- Orient yourself anatomically by identifying the articulation of the three bones: the radial head, the ulna, and the capitellum.
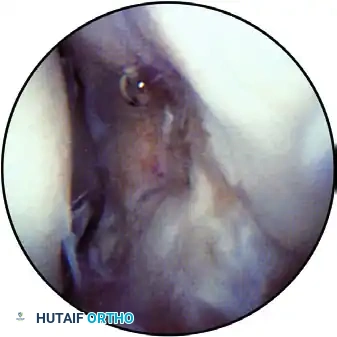
FIGURE 52-63D: With the elbow flexed 90 degrees, patient supine, and a 2.7-mm arthroscope in the direct lateral portal, the articulation of the three bones is seen. The radial head is superior left, the ulna is superior right, and the capitellum is inferior.
- Radiocapitellar Evaluation: Examine the concavity of the radial head articulating with the convex capitellum. Gently move the elbow through flexion and extension to inspect the capitellar surface for chondromalacia, chondral defects, or OCD lesions. Probe any suspected OCD lesions through an accessory portal to evaluate cartilage stability.
- Ulnohumeral Evaluation: Sweep the arthroscope posteriorly to examine the articulation between the olecranon and the trochlea. Small loose bodies frequently hide in this recess. Note the normal "bare area" in the olecranon articulation, which represents the site of the physeal scar and should not be mistaken for a chondral defect.
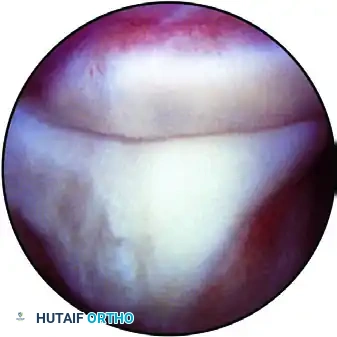
FIGURE 52-63E: Bare area of the olecranon is right inside with the trochlea on the left. The scope is in the direct lateral portal.
- Posteromedial Impingement: Follow the articulation proximally to view the posteromedial olecranon tip. Chondromalacia or osteophyte formation here is a hallmark of posteromedial elbow impingement (valgus extension overload).
7. Posterolateral Portal and Posterior Compartment Examination
The posterior compartment is best evaluated through a posterolateral portal, which can be established under direct arthroscopic guidance while viewing from the direct lateral portal.
- With the arthroscope in the direct lateral portal, direct the lens posteriorly toward the anticipated site of the posterolateral portal.
- Insert an 18-gauge needle approximately 3 cm proximal to the olecranon tip, aiming toward the olecranon fossa, and confirm a satisfactory intra-articular position.
- Incise the skin and use a small hemostat to spread down to the capsule. Insert a blunt trocar to enter the joint.
- If the direct lateral portal is to be used as a working portal (e.g., for drilling an OCD lesion), the posterolateral portal should be made in line with the radial gutter. Inserting a 70-degree arthroscope through the posterolateral portal and directing it toward the radiocapitellar joint allows for excellent separation of the viewing and working portals, facilitating easier triangulation.
Posterior Compartment Sweep:
* The arthroscopic view from the posterolateral portal includes the olecranon fossa, the olecranon tip, and the posterior aspect of the trochlea.
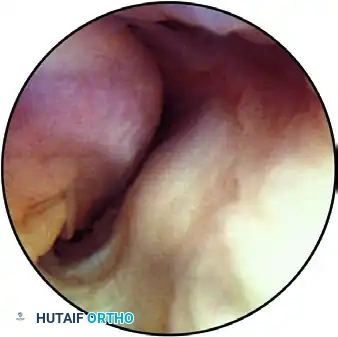
FIGURE 52-63F: Posterior compartment viewed through the posterolateral portal. The tip of the olecranon is superior, the trochlea is inferior, and the olecranon fossa is in the foreground.
- Direct the scope medially to visualize the medial gutter and a portion of the posterior band of the ulnar collateral ligament.
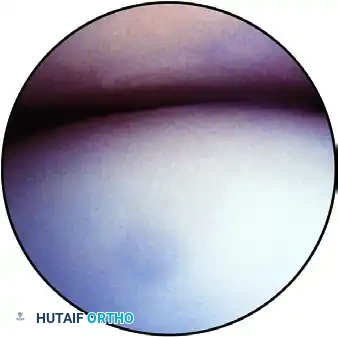
FIGURE 52-63G: Medial gutter viewed through the posterolateral portal with the posterior aspect of the ulnar collateral ligament on the right and the distal humerus on the left.
Surgical Warning: The ulnar nerve lies immediately superficial to the posteromedial osteophyte, separated from the joint space only by the thin joint capsule. Palpation along the ulnar nerve is mandatory to locate it prior to instrumentation. Extreme caution must be exercised when using motorized shavers, burrs, or osteotomes in the posteromedial compartment to avoid catastrophic iatrogenic nerve injury.
POSTOPERATIVE PROTOCOL AND REHABILITATION
Postoperative management following elbow arthroscopy is dictated by the specific pathology treated. However, general principles apply to ensure optimal recovery and prevent arthrofibrosis.
- Immediate Postoperative Phase (Days 0-7): The elbow is typically placed in a bulky, soft compressive dressing to minimize swelling. Cryotherapy and elevation are highly recommended. Immediate active and active-assisted range of motion (ROM) exercises for the elbow, wrist, and hand are initiated to prevent capsular adhesions.
- Intermediate Phase (Weeks 1-4): Sutures are removed at 7 to 10 days. Formal physical therapy focuses on restoring full terminal extension and flexion. Joint mobilizations and gentle stretching are employed. Strengthening exercises for the rotator cuff, scapular stabilizers, and wrist musculature begin.
- Advanced Phase (Weeks 4-12): Progressive resistance exercises are introduced. For throwing athletes, a structured interval throwing program is initiated once full, painless ROM and baseline strength are achieved, typically around 6 to 8 weeks postoperatively.
COMPLICATIONS AND AVOIDANCE
While elbow arthroscopy is generally safe, the complication rate is historically higher than that of knee or shoulder arthroscopy, primarily due to the proximity of neurovascular structures.
- Nerve Injury: The most feared complication. The radial nerve is at risk during anterolateral portal placement; the median nerve during anteromedial portal placement; and the ulnar nerve during posteromedial instrumentation. Strict adherence to joint distention, superficial skin incisions, blunt fascial dissection, and the use of blunt trocars is mandatory.
- Infection: Superficial portal site infections or deep septic arthritis are rare but require prompt recognition and treatment.
- Compartment Syndrome: Extravasation of irrigation fluid into the forearm or arm compartments can occur, especially during prolonged procedures or when capsular integrity is compromised. Utilizing gravity inflow or carefully monitored pump pressures, along with frequent palpation of the forearm, mitigates this risk.
- Arthrofibrosis: Postoperative stiffness is common. Early, aggressive rehabilitation and adequate pain control are essential to maintain the intraoperative gains in range of motion.
By adhering to these rigorous anatomical principles and systematic techniques, the orthopedic surgeon can safely and effectively utilize elbow arthroscopy to manage a wide array of complex joint pathologies.
