Introduction to Osteochondritis Dissecans (OCD) of the Knee
Osteochondritis dissecans (OCD) is a focal, idiopathic alteration of subchondral bone with the potential for instability and disruption of the adjacent articular cartilage. It most commonly affects the knee, specifically the lateral aspect of the medial femoral condyle. The condition is broadly categorized into Juvenile OCD (JOCD), occurring in patients with open physes, and Adult OCD (AOCD), occurring in skeletally mature individuals.
When conservative management—consisting of activity modification, protected weight-bearing, and immobilization—fails to yield radiographic or clinical improvement after 3 to 6 months, surgical intervention is warranted. For lesions where the overlying articular cartilage remains intact and the fragment is stable (International Cartilage Repair Society [ICRS] Grade I or II), arthroscopic drilling is the gold standard surgical treatment.
The primary biological objective of arthroscopic drilling is to decompress the sclerotic subchondral bone rim surrounding the OCD lesion. By creating transmalleolar channels, the procedure stimulates angiogenesis, allowing the influx of marrow-derived mesenchymal stem cells and growth factors into the avascular fragment, thereby promoting creeping substitution and osseous integration.
Indications and Patient Selection
Careful patient selection is the cornerstone of successful arthroscopic drilling. The procedure is highly effective for specific lesion types but contraindicated in others.
Primary Indications:
* Symptomatic JOCD or AOCD lesions that have failed 3 to 6 months of strict non-operative management.
* Intact articular cartilage overlying the lesion (no fissures, flaps, or loose bodies).
* Stable lesions as determined by preoperative Magnetic Resonance Imaging (MRI) and confirmed via intraoperative arthroscopic probing.
Contraindications:
* Unstable lesions (presence of a high-signal fluid line behind the lesion on T2-weighted MRI).
* Breached or detached articular cartilage (requires fixation, osteochondral autograft/allograft, or chondrocyte implantation).
* Advanced osteoarthritis or diffuse chondromalacia.
* Active joint infection.
💡 Clinical Pearl: MRI Evaluation of Stability
Preoperative MRI is critical. A lesion is generally considered unstable if there is a high-signal T2 fluid line completely surrounding the subchondral bone fragment, multiple subchondral cysts >5 mm, or an articular cartilage defect. If these signs are present, simple drilling will fail, and primary fixation must be planned.
Preoperative Planning and Setup
Imaging
Standard weight-bearing anteroposterior (AP), lateral, notch (tunnel), and skyline radiographs should be obtained. The notch view is particularly sensitive for identifying classic OCD lesions on the lateral aspect of the medial femoral condyle. MRI without contrast is the modality of choice for assessing cartilage integrity, subchondral edema, and fragment stability.
Patient Positioning and Anesthesia
- Anesthesia: The procedure is typically performed under general or regional anesthesia.
- Positioning: The patient is placed supine on the operating table. A lateral post or a standard leg holder is utilized to allow valgus/varus stress for optimal compartment visualization.
- Tourniquet: A proximal thigh tourniquet is applied and inflated after exsanguination to ensure a bloodless field, which is critical for precise visualization of subtle cartilage irregularities.
- Fluoroscopy: A C-arm image intensifier must be available in the room, particularly for skeletally immature patients or if retrograde drilling is anticipated.
Surgical Technique: Arthroscopic Evaluation and Drilling
Step 1: Diagnostic Arthroscopy and Lesion Assessment
Perform a complete and systematic diagnostic arthroscopy.
* Introduce a 30-degree viewing arthroscope through a standard anterolateral portal.
* Inspect the entire joint to rule out concomitant pathology (e.g., meniscal tears, ligamentous laxity).
* Carefully inspect the articular surface of the medial femoral condyle. Vary the degree of knee flexion between 20 and 90 degrees to fully view the posterior extent of the lesion.
* In an intact OCD lesion, the articular surface will appear smooth, often with only a slightly raised irregularity, discoloration (a grayish hue), or flattening at the borders of the lesion.
Step 2: Tactile Probing for Stability
Visual inspection alone is insufficient to confirm stability.
* Insert a calibrated arthroscopic probe through the anteromedial portal.
* Carefully and systematically probe the irregular line and the center of the lesion.
* Apply firm pressure to ensure there is no break in the continuity of the articular surface overlying the subchondral bone lesion. The cartilage should feel firm, and the fragment should not ballot or shift under the probe.
⚠️ Surgical Warning: The "Trampoline Effect"
If probing reveals a "trampoline effect" (excessive softening or ballotability) or if a subtle fissure opens upon probing, the lesion is unstable. The surgical plan must immediately pivot from isolated drilling to internal fixation (e.g., bioabsorbable pins, compression screws).
Step 3: Transarticular (Antegrade) Drilling Technique
If the lesion is confirmed to be intact and stable, transarticular drilling is performed. This approach is technically straightforward and highly effective, though it does create micro-punctures in the articular cartilage.
- Instrument Selection: Utilize a 0.045-inch (1.14 mm) or 0.062-inch (1.57 mm) Kirschner wire (K-wire). Smaller wires minimize iatrogenic cartilage damage while providing adequate channels for revascularization.
- Portal Selection:
- For inferocentral lesions of the medial femoral condyle, access is usually best achieved through the standard anteromedial portal.
- For laterocentral lesions (closer to the intercondylar notch), the trajectory may be optimized by bringing the K-wire through the anterolateral portal while viewing through the anteromedial portal.
- Execution: Position the K-wire strictly perpendicular to the articular surface. This prevents skiving and minimizes the footprint of the cartilage puncture.
- Soft Tissue Protection: Always use a drill sleeve or cannula over the K-wire to protect the infrapatellar fat pad and portal soft tissues from thermal necrosis and mechanical winding.
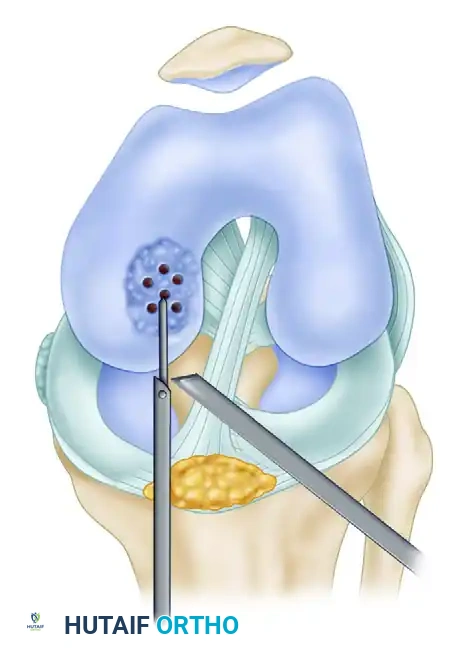
FIGURE 51-33 Technique for drilling intact lesion of osteochondritis dissecans. Multiple perforations of the lesion of the medial femoral condyle are made using a Kirschner wire through the anteromedial portal. Note the use of a protective sleeve to shield adjacent soft tissues.
- Drilling Depth and Pattern: Drill multiple holes (typically 5 to 10, depending on lesion size) spaced approximately 3 to 4 mm apart. Penetrate through the lesion, through the sclerotic subchondral rim, and into healthy, bleeding cancellous bone. A sudden "give" or change in resistance is often felt once the sclerotic rim is breached. The depth is typically 10 to 15 mm.
💡 Clinical Pearl: Thermal Necrosis Prevention
Drill at a low speed with copious intra-articular fluid flow. High-speed drilling generates excessive heat, which can cause thermal necrosis of the surrounding bone and cartilage, paradoxically impeding the healing response.
Step 4: Retrograde Drilling Technique (Physeal Sparing)
In skeletally immature patients (JOCD) with open physes, or when the surgeon wishes to completely spare the articular cartilage, retrograde drilling is an excellent, albeit technically demanding, alternative.
- Fluoroscopic Guidance: This technique relies heavily on intraoperative C-arm fluoroscopy.
- Targeting: An anterior cruciate ligament (ACL) tibial drill guide or a specialized OCD targeting guide can be used. The tip of the guide is placed on the articular surface at the center of the lesion via an arthroscopic portal.
- Trajectory: A small incision is made on the medial or lateral epicondyle (depending on the lesion location). A 0.045-inch K-wire is advanced from the extra-articular starting point, directed toward the lesion.
- Physeal Protection: Crucial Step. The starting point must be carefully chosen to avoid the distal femoral physis. The K-wire is passed starting distal to the growth plate and ending just proximal to the articular surface, thus preserving the cartilage.
- Confirmation: Passing one wire through the cartilage to exit laterally/medially can act as a spatial guide for subsequent wires, which are then passed from proximal to the lesion, stopping 1-2 mm short of the articular surface under fluoroscopic and arthroscopic visualization.
Step 5: Joint Lavage and Closure
- Once drilling is complete, thoroughly lavage the joint with normal saline to remove any bone debris or cartilage fragments generated during the procedure.
- Suction the joint dry to confirm bleeding from the transarticular drill holes (if the tourniquet is deflated).
- Remove all instruments and close the portals with non-absorbable sutures or surgical tape.
Postoperative Care and Rehabilitation Protocol
The postoperative rehabilitation protocol is as critical as the surgical execution. The primary goal is to protect the healing subchondral bone from excessive shear and compressive forces while maintaining joint mobility.
Phase 1: Maximum Protection (Weeks 0 to 6)
- Immobilization: Postoperative management consists of immobilization in a restricted-motion hinged knee brace.
- Biomechanical Unloading: The arc of motion on the brace must be controlled to prevent contact of the tibial articular surface with the femoral lesion. For example, if the lesion engages at 30 degrees of flexion, the brace should be locked in extension during weight-bearing.
- Weight-Bearing: Use of crutches with strict non-weight-bearing (NWB) or touch-down partial weight-bearing (PWB) is enforced.
- Range of Motion (ROM): Passive and active-assisted ROM exercises should be performed for 15 to 20 minutes, two to three times daily, out of the brace to nourish the cartilage and prevent arthrofibrosis.
Phase 2: Moderate Protection and Progression (Weeks 6 to 12)
- Radiographic Assessment: At 6 weeks, AP and lateral radiographs are obtained. Early healing is noted by blurring of the sclerotic rim and gradual obliteration of the radiolucent line.
- Weight-Bearing: If early healing is noted radiographically and the patient is asymptomatic, weight-bearing is gradually progressed to full over a 2-to-4-week period.
- Age Considerations: Four to 6 weeks of immobilization and restricted weight-bearing is common for young patients (JOCD). However, older patients (AOCD) or those with larger lesions (>2 cm) should continue immobilization and avoid weight-bearing until definite radiographic evidence of healing is noted, which may take 8 to 12 weeks.
Phase 3: Strengthening and Return to Play (Months 3 to 6+)
- Once full, painless weight-bearing and full ROM are achieved, closed-kinetic-chain strengthening exercises are initiated.
- Impact activities (running, jumping) are strictly prohibited until complete osseous integration is confirmed, often requiring a follow-up MRI at 4 to 6 months postoperatively.
- Return to competitive sports is typically permitted between 6 and 9 months, contingent upon complete radiographic healing, absence of effusion, and symmetrical quadriceps strength.
Complications and Surgical Pitfalls
While arthroscopic drilling is generally safe, several complications can arise if meticulous technique is not followed:
- Iatrogenic Cartilage Damage: Skiving of the K-wire due to a non-perpendicular approach can cause linear lacerations in the healthy cartilage. Always use a cannula and ensure a 90-degree angle of approach.
- Physeal Arrest: In JOCD, inadvertent drilling across the open distal femoral physis can lead to premature growth arrest and subsequent angular deformity. Fluoroscopy is mandatory when drilling near the physis.
- Hardware Breakage: Bending or breaking a K-wire inside the condyle is a severe complication. Avoid altering the trajectory of the wire while it is engaged in bone. If a change in direction is needed, withdraw the wire completely and re-drill.
- Failure to Heal: Despite adequate drilling, some lesions (particularly in adults) may fail to revascularize. Persistent pain and lack of radiographic progression at 6 months necessitate revision surgery, typically involving osteochondral autograft transfer (OATS) or internal fixation with bone grafting.
