APPLIED BIOMECHANICS IN TOTAL HIP ARTHROPLASTY
The biomechanics of total hip arthroplasty (THA) differ fundamentally from those of the screws, plates, and intramedullary nails used in fracture fixation. While trauma implants are designed to provide only partial, temporary support until osteosynthesis occurs, total hip components must withstand decades of relentless cyclic loading. Routine daily activities generate forces equal to at least three to five times the patient's body weight, and dynamic activities can subject the implant to overloads of 10 to 12 times the body weight.
A profound, evidence-based understanding of hip biomechanics is mandatory for the orthopedic surgeon. This knowledge dictates proper preoperative templating, intraoperative execution, intelligent component selection, and the successful management of postoperative complications. Furthermore, it forms the basis for counseling patients regarding postoperative physical activity and weight-bearing protocols.
Forces Acting on the Hip Joint
To accurately conceptualize the forces acting on the hip joint, the body weight must be depicted as a load applied to a lever arm extending from the body’s center of gravity (located anterior to the second sacral vertebra) to the center of the femoral head.
The abductor musculature acts on an opposing lever arm extending from the lateral aspect of the greater trochanter to the center of the femoral head. To maintain a level pelvis during a single-leg stance, the abductors must exert a moment equal to the moment created by the body weight. During the dynamic phases of gait, an even greater moment is required to tilt the pelvis appropriately.
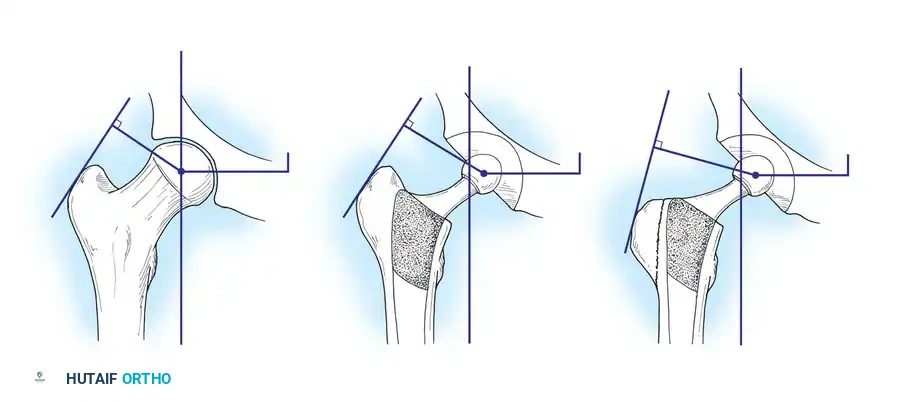
Because the ratio of the length of the body weight lever arm to the abductor lever arm is approximately 2.5 : 1, the force generated by the abductor muscles must approximate 2.5 times the body weight just to maintain a level pelvis when standing on one leg. Consequently, the estimated joint reaction force (load on the femoral head) during the stance phase of gait is the sum of the abductor force and the body weight—equating to at least three to four times the body weight. Straight leg raising generates a similar magnitude of force.
Clinical Pearl: The Charnley Concept vs. Modern Techniques
Sir John Charnley’s original biomechanical concept for THA relied on shortening the body weight lever arm by deepening (medializing) the acetabulum, and lengthening the abductor lever arm by laterally reattaching an osteotomized greater trochanter. This theoretically reduced the total load on the hip by 30%, bringing the lever arm ratio closer to 1 : 1.
Today, the principle of aggressive medialization has been largely abandoned in favor of preserving the subchondral bone of the pelvis. Surgeons now deepen the acetabulum only as much as necessary to obtain adequate bony coverage for the hemispherical cup. Furthermore, routine trochanteric osteotomy is rarely performed. Instead, the abductor lever arm is optimized by utilizing high-offset femoral stems. These modern compromises in original biomechanical principles represent a beneficial biological trade-off: preserving vital pelvic bone stock and avoiding the high complication rates associated with greater trochanteric nonunion.
Peak Contact Forces and Dynamic Loading
Analytical models by Crowninshield et al. calculated peak contact forces across the hip joint during gait ranging from 3.5 to 5 times the body weight, while other models predicted values up to six times the body weight during single-limb stance. Interestingly, experimentally measured forces using instrumented prostheses (in vivo telemetry) generally yield slightly lower values. Davey et al. recorded joint contact forces of 2.6 to 2.8 times the body weight during the single-limb stance phase, and Rydell recorded peak values of three times the body weight.
However, during activities such as lifting, running, or jumping, the load can spike to 10 times the body weight. Excess patient adiposity and high-impact physical activities exponentially increase the forces that act to loosen, bend, or catastrophically fracture the femoral stem.
Sagittal Plane Forces and Stem Torsion
Forces on the hip joint do not act exclusively in the coronal plane. Because the body’s center of gravity is posterior to the transverse axis of the hip joint, forces also act in the sagittal plane, creating a bending moment that deflects the stem posteriorly.
These posterior deflecting forces are magnified when the loaded hip is flexed—such as when arising from a low chair, ascending or descending stairs, or lifting heavy objects.
During the normal gait cycle, resultant forces are directed against the prosthetic femoral head from a polar angle between 15 and 25 degrees anterior to the sagittal plane of the prosthesis. During stair climbing and straight leg raising, this resultant force shifts even further anteriorly on the head. This eccentric loading causes posterior deflection, or retroversion, of the femoral component.
Brand et al. measured these "out-of-plane" forces at 0.6 to 0.9 times body weight. Because implanted femoral components must withstand substantial torsional forces immediately postoperatively, cementless stems must be designed and implanted to achieve absolute initial rotational stability (press-fit) within the femoral diaphysis or metaphysis. Similarly, the geometry of a cemented implant must impart rotational stability within its polymethylmethacrylate (PMMA) cement mantle.

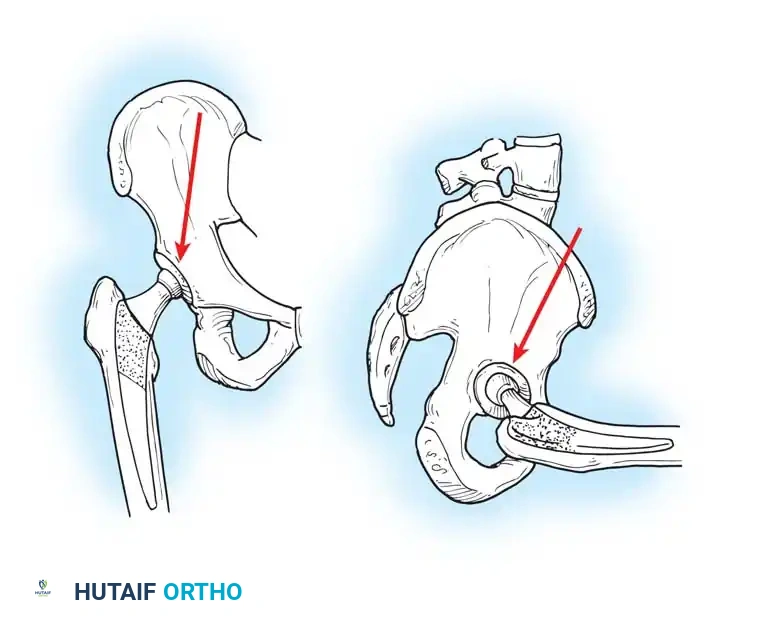
Center of Rotation and Joint Reaction Forces
The superior-inferior and medial-lateral location of the hip's center of rotation profoundly affects the forces generated around the implant. Mathematical models by Johnston, Brand, and Crowninshield demonstrated that the joint reaction force is minimized when the hip center is restored to its true anatomical location.
Conversely, placing the hip center in a superior, lateral, or posterior position significantly increases joint reaction forces and abductor fatigue. While isolated superior displacement (without lateralization) produces only relatively small increases in periacetabular stress—a technique sometimes necessary in developmental dysplasia of the hip (DDH) or severe revision scenarios with deficient superior bone stock—clinical studies consistently document a higher incidence of progressive radiolucencies and component migration when the hip center is left in a nonanatomical position.
STRESS TRANSFER TO BONE AND ADAPTIVE REMODELING
The long-term survivorship of a femoral stem is dictated by how it transfers stress to the host femur. The material composition, geometry, size, and method of fixation dramatically alter this stress transfer pattern.
According to Wolff’s Law, bone remodels in response to the mechanical stresses placed upon it. A major concern in THA is that adaptive bone remodeling arising from "stress shielding" compromises implant support, produces aseptic loosening, and predisposes the femur to periprosthetic fracture. Stress transfer to the proximal femur is highly desirable because it provides the physiological stimulus necessary to maintain bone mass and prevent disuse osteopenia.
Modulus of Elasticity and Stem Design
A decrease in the modulus of elasticity (stiffness) of the stem decreases the stress retained within the stem and increases the stress transferred to the proximal femur (or the proximal third of the cement mantle). Stems manufactured from titanium alloy (Ti-6Al-4V) possess a lower modulus of elasticity compared to cobalt-chromium (CoCr) alloys, theoretically reducing stress shielding.
However, this benefit is highly dependent on the cross-sectional diameter of the stem. The bending stiffness (flexural rigidity) of a cylinder is proportional to the fourth power of its radius. Therefore, small increases in stem diameter produce massive increments in stiffness. A large-diameter titanium stem will be stiffer than a small-diameter CoCr stem, negating the benefits of the material's lower modulus of elasticity.
Engh et al. conducted detailed examinations of femoral stress shielding following cementless THA. They found that almost all femurs exhibiting moderate to severe proximal bone resorption contained stems 13.5 mm in diameter or larger.
Surgical Warning: The Risk of Extensive Porous Coating
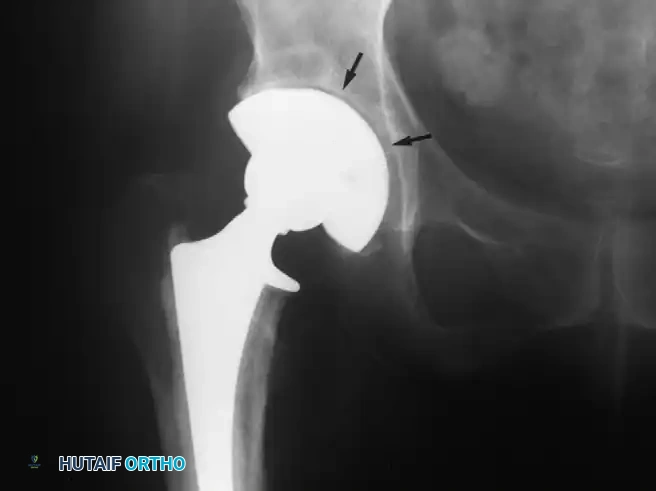
While extensive porous coating ensures rigid distal fixation, it exacerbates proximal stress shielding. When a stem is rigidly fixed at the diaphyseal isthmus, the load bypasses the proximal metaphysis entirely. Localized cortical hypertrophy is frequently observed at the distal extent of the porous coating, while the proximal medial cortex undergoes severe osteopenia.
Using videodensitometry on autopsy-retrieved femurs, Maloney et al. confirmed that for both cemented and cementless implants, the area of greatest bone mineral density loss consistently occurs in the proximal medial cortex (the calcar region).
The Role of the Calcar Collar
To combat proximal medial bone loss, some stems incorporate a medial collar designed to seat directly on the resected femoral neck. Theoretically, this allows direct axial loading of the calcar, stimulating bone preservation.
In practice, achieving perfect, uniform contact between the collar and the cut surface of the bone is technically demanding. While the role of a collar in preventing loosening of a cemented component remains debated, any loading of the proximal medial neck likely decreases bone resorption and reduces stresses in the proximal cement mantle. Furthermore, a collar serves as a reliable physical stop to prevent stem subsidence during cement pressurization.
In cementless designs, collars are highly controversial. A collar that bottoms out on the calcar before the stem achieves a rigid metaphyseal or diaphyseal press-fit will result in a loose implant, leading to micromotion, thigh pain, and failure of osteointegration.
Hoop Stresses and Proximal Femoral Fractures
Cementless stems generally produce strains in the bone that are more physiological than those caused by fully cemented stems, provided the sizing and coating are optimal. Walker and Robertson found proximal medial bone strains to be 65% of normal with a collarless press-fit stem.
However, surgeons must be acutely aware of hoop stresses. When a tapered, collarless stem is driven into the femur, it acts as a wedge, generating massive circumferential (hoop) stresses. Excessive proximal wedging can easily cause intraoperative calcar fractures or propagate occult microfractures that fail postoperatively.
Stem geometry plays a critical role here. Mallory, Head, and Lombardi reviewed titanium stems with tapered geometries and found an overall incidence of radiographic proximal femoral atrophy of only 6%. In contrast, cylindrical distal geometries that completely fill the diaphysis are associated with much higher rates of proximal stress shielding.
ACETABULAR BIOMECHANICS AND PELVIC STRESS DISTRIBUTION
On the pelvic side, the biomechanical goal is to distribute the joint reaction forces evenly across the acetabular dome while minimizing peak stresses that could lead to component migration or polyethylene wear.
Finite element analysis indicates that when a cemented all-polyethylene cup is utilized, peak stresses concentrate directly in the adjacent subchondral pelvic bone. The introduction of metal-backed hemispherical cups with modular polyethylene liners revolutionized acetabular biomechanics. The rigid metal shell acts to dissipate high focal stresses, distributing the load more evenly across the peripheral rim of the acetabulum, which is structurally better equipped to handle compressive forces.
Pitfall: Over-Reaming the Acetabulum
Aggressive reaming that destroys the subchondral bone plate removes the pelvis's primary load-bearing structure. The subchondral bone must be preserved to support the metal shell. Ream only to bleeding cancellous bone to ensure a rigid press-fit (typically 1-2 mm under-reaming depending on the cup design and bone quality).
SURGICAL INSTRUCTIONS: APPLYING BIOMECHANICS IN THE OR
1. Preoperative Templating and Indications
- Indications: End-stage osteoarthritis, avascular necrosis (AVN), or DDH where pain is refractory to conservative management.
- Templating: Establish the anatomical center of rotation. Measure the required horizontal offset to restore the abductor lever arm. Determine the leg length discrepancy by referencing the inter-teardrop line to the lesser trochanters.
2. Patient Positioning
- Lateral Decubitus: Standard for posterior and lateral approaches. Ensure the pelvis is rigidly fixed; any pelvic tilt will alter the surgeon's perception of acetabular version and inclination, leading to biomechanically unstable cup placement.
- Supine: Utilized for the Direct Anterior Approach (DAA). Allows for intraoperative fluoroscopy to dynamically assess offset, leg length, and component positioning against the contralateral hip.
3. Surgical Approaches and Biomechanical Implications
- Posterior Approach (Moore/Southern): Splits the gluteus maximus and detaches the short external rotators. Biomechanical advantage: Completely preserves the gluteus medius and minimus (the primary abductors), maintaining the integrity of the abductor lever arm. Disadvantage: Higher risk of posterior dislocation if the posterior capsule and rotators are not meticulously repaired.
- Direct Anterior Approach (Smith-Petersen): An internervous, intermuscular plane (between TFL and Sartorius/Rectus Femoris). Biomechanical advantage: Leaves the abductor mechanism entirely undisturbed, offering immediate dynamic stability and allowing for rapid postoperative mobilization.
- Direct Lateral Approach (Hardinge): Involves splitting the gluteus medius and vastus lateralis. Biomechanical disadvantage: Direct trauma to the abductor insertion can weaken the abductor lever arm, occasionally resulting in a persistent postoperative Trendelenburg gait.
4. Step-by-Step Biomechanical Restoration
- Acetabular Preparation: Ream to preserve subchondral bone. Impact the cup at 40-45 degrees of inclination and 15-20 degrees of anteversion to optimize the load-bearing vector and maximize the safe zone for impingement-free range of motion.
- Femoral Preparation: Broach the femur to achieve rotational stability. Pay strict attention to the version of the broach (aiming for 10-15 degrees of anteversion).
- Restoring Offset: Perform a trial reduction. Assess soft tissue tension. If the abductors are lax, utilize a high-offset neck or a longer head to lateralize the femur, thereby lengthening the abductor lever arm without excessively lengthening the leg.
- Stability Testing: Take the hip through a full range of motion. Test for posterior impingement (extension and external rotation) and anterior impingement (flexion and internal rotation). Impingement creates a fulcrum effect that leverages the head out of the socket, representing a catastrophic biomechanical failure.
5. Postoperative Protocols
- Weight-Bearing: Modern cementless, porous-coated implants with a rigid intraoperative press-fit generally allow for immediate weight-bearing as tolerated. This early axial loading stimulates osteointegration via Wolff's Law.
- Rehabilitation: Focus heavily on abductor strengthening. A strong abductor mechanism is the most critical dynamic stabilizer of the hip joint, directly counteracting the massive lever arm of the patient's body weight during the stance phase of gait.
- Precautions: Tailored to the surgical approach (e.g., avoiding excessive flexion, adduction, and internal rotation for posterior approaches) until the soft tissue envelope heals and restores the static biomechanical restraints.
