Distal Humerus Anterolateral Approach: Master Safe Fracture Fixation
Introduction & Epidemiology
Fractures of the distal humerus represent approximately 2% of all adult fractures and a significant portion of upper extremity trauma. While intra-articular distal humeral fractures are well-recognized entities, fractures of the distal diaphyseal segment, often extending into the metaphysis or articular region, present unique challenges. The anterolateral approach to the distal humerus is a valuable surgical option for addressing these fractures, particularly those involving the distal fourth of the humerus, including the classic Holstein-Lewis fracture, distal humeral shaft fractures, and select supracondylar fractures with diaphyseal extension.
The incidence of distal humeral fractures demonstrates a bimodal distribution, affecting younger males due to high-energy trauma and older osteoporotic females from low-energy falls. The increasing life expectancy and prevalence of osteoporosis suggest a rising trend in these injuries. Open reduction and internal fixation (ORIF) is the preferred treatment for most displaced, unstable, or irreducible distal humeral fractures, aiming for anatomical reduction, stable fixation, and early mobilization to restore elbow function and prevent long-term disability.
The choice of surgical approach is critical for optimal exposure, minimal soft tissue disruption, and safe management of neurovascular structures. The anterolateral approach offers distinct advantages over alternative approaches, such as the direct anterior or posterior triceps-splitting approaches, especially when extensive distal and proximal exposure of the humerus is required, while minimizing the risk of ulnar nerve injury inherent in posterior approaches. This approach facilitates direct visualization of the fracture site and the radial nerve, enabling precise reduction and stable fixation, particularly for anterolaterally placed plates.
Surgical Anatomy & Biomechanics
A thorough understanding of the regional anatomy is paramount for safe and effective utilization of the anterolateral approach. The distal fourth of the humerus is characterized by several key muscular and neurovascular structures.
Muscular Anatomy
The primary muscles encountered or related to this approach include:
*
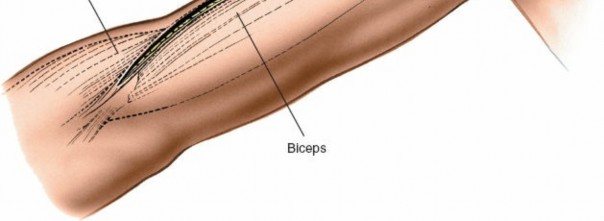
Biceps Brachii:
Located anteriorly, its lateral border serves as a key landmark for the incision.
*
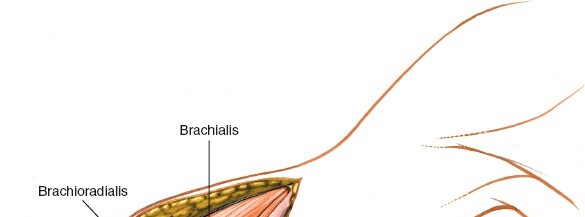
Brachialis:
Lying deep to the biceps, directly investing the anterior surface of the distal humerus. The anterolateral approach typically involves incising the fascia lateral to the biceps and then retracting the biceps and brachialis medially, or dissecting through the lateral aspect of the brachialis muscle to expose the bone.
*
Triceps Brachii:
Forms the posterior compartment. While not directly entered, its lateral head and fascia may be encountered if posterior extension is required.
*
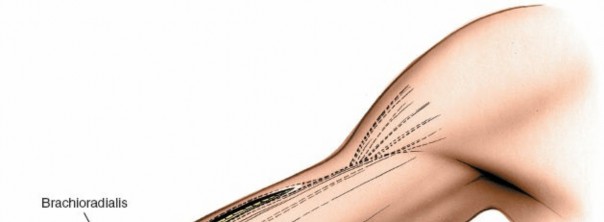
Brachioradialis:
Originates from the lateral supracondylar ridge of the humerus and forms the lateral border of the forearm proximally.
Neurovascular Anatomy
The principal neurovascular structures at risk or to be protected include:
*
Radial Nerve:
This is the most critical structure in this approach. It courses obliquely from posterior to anterior around the humeral shaft in the spiral groove, penetrating the lateral intermuscular septum approximately 10-12 cm proximal to the lateral epicondyle. After piercing the septum, it lies in the anterior compartment, nestled between the brachialis and brachioradialis muscles, before dividing into its superficial (sensory) and deep (motor, posterior interosseous nerve) branches anterior to the lateral epicondyle. The anterolateral approach provides excellent access for identification and protection of the radial nerve in its distal humeral course, facilitating its exploration if injury is suspected (e.g., Holstein-Lewis fractures).
*
Brachial Artery and Median Nerve:
These structures lie more medially within the neurovascular bundle of the anterior compartment and are typically protected by the biceps and brachialis muscles, which are retracted medially. They are generally not at direct risk with careful lateral dissection.
Biomechanics of Distal Humeral Fixation via Anterolateral Approach
Fixation principles for distal humeral fractures demand stable constructs that resist bending, torsion, and axial compression. For shaft fractures and Holstein-Lewis fractures, an anterolateral plate application typically employs a dynamic compression plate (DCP), limited contact-DCP (LC-DCP), or locking compression plate (LCP).
*
Plate Positioning:
The plate is applied to the anterolateral aspect of the humerus, contouring it to match the bone's anatomical curvature. This position provides strong fixation against typical deforming forces.
*
Screw Configuration:
A sufficient number of bicortical screws (typically 3-4 proximal and 3-4 distal to the fracture) are necessary to achieve adequate working length and stiffness. Locking screws provide angular stability, which is particularly beneficial in osteoporotic bone or comminuted fractures, preventing screw pullout.
*
Working Length:
Optimizing the working length (the unbridged segment of the plate between the innermost screws proximal and distal to the fracture) is crucial. A longer working length allows for more elastic fixation, promoting callus formation, while a shorter working length provides rigid fixation, suitable for absolute stability indications (e.g., intra-articular fractures or non-unions requiring compression).
*
Fracture Reduction:
Indirect reduction techniques are preferred to preserve the periosteal blood supply, but direct reduction may be necessary for anatomical alignment. Provisional fixation with K-wires or reduction clamps helps maintain reduction during plating.
Indications & Contraindications
The anterolateral approach is indicated for a specific subset of distal humeral pathologies where its advantages in exposure and safety profile are maximized.
Indications
-
Open Reduction and Internal Fixation (ORIF) of Fractures of the Distal Half of the Humerus:
- Holstein-Lewis Fractures (Radial Groove Fractures): These oblique or spiral fractures of the distal third of the humerus are classically associated with radial nerve palsy due to entrapment or laceration. The anterolateral approach offers direct access to the fracture and the radial nerve for exploration, decompression, and repair.
- Distal Humeral Shaft Fractures: Transverse, oblique, spiral, or comminuted fractures of the distal diaphysis, particularly when stability is best achieved with an anterolateral plate.
- Select Supracondylar Humerus Fractures with Diaphyseal Extension: For patterns where the fracture line extends significantly into the shaft, requiring a longer plate than can be accommodated by purely distal approaches.
- Exploration, Decompression, or Repair of the Radial Nerve in the Distal Part of the Arm: Given the direct line of sight and safe dissection plane to the radial nerve in this region.
- Removal of Hardware from Previous Fixation: When the implants are situated on the anterolateral aspect.
- Nonunions or Malunions of the Distal Humerus: Requiring revision fixation and bone grafting.
Contraindications
- Active Infection: In the surgical field or systemic sepsis.
- Severe Open Fractures: With extensive soft tissue compromise, requiring alternative approaches (e.g., external fixation) or staged procedures.
- Extreme Comminution: Where stable internal fixation is unattainable.
- Significant Medical Comorbidities: Precluding safe general anesthesia and surgical intervention.
- Purely Posterior Fractures: Where a posterior approach would provide superior access and biomechanical advantage for plate placement (e.g., isolated olecranon fractures or certain distal intra-articular patterns best addressed with posterior plating).
Operative vs. Non-Operative Indications
| Indication Type | Operative Management (Anterolateral Approach) | Non-Operative Management |
|---|---|---|
| Fractures | - Displaced distal humeral shaft fractures | - Non-displaced, stable distal humeral shaft fractures without neurovascular compromise. |
| - Holstein-Lewis fractures (high risk of radial nerve palsy, often requiring exploration) | - Minimally displaced spiral/oblique fractures (rare, typically require fixation for stability). | |
| - Comminuted distal humeral shaft fractures requiring stable fixation. | - Patients with severe comorbidities precluding surgery. | |
| - Fractures with associated neurovascular compromise (e.g., radial nerve palsy due to entrapment) requiring exploration and possible repair. | ||
| Other | - Radial nerve exploration/decompression for palsy (e.g., in Holstein-Lewis type injuries or iatrogenic injury). | - Radial nerve palsy without fracture or clear mechanical entrapment (initial observation often warranted, particularly if a neurapraxia is suspected, with EMG follow-up). |
| - Nonunions/malunions of distal humerus amenable to revision. | - Non-displaced stable nonunions without pain or functional deficit. | |
| - Removal of symptomatic hardware from previous anterolateral fixation. |
Pre-Operative Planning & Patient Positioning
Meticulous pre-operative planning is essential for predictable outcomes and minimizing complications.
Pre-Operative Planning
-
Imaging:
- Plain Radiographs: Anteroposterior and lateral views of the humerus, including the elbow and shoulder, are standard. Traction views can aid in assessing comminution and reducibility.
- Computed Tomography (CT) Scan: Crucial for complex fracture patterns, especially those with comminution or articular involvement, providing detailed 3D reconstructions to fully delineate fracture morphology, aid in templating, and plan implant placement.
- Magnetic Resonance Imaging (MRI): Rarely indicated for acute fractures but may be useful in assessing soft tissue injuries, chronic nerve pathology, or suspected tumor.
- Templating: Utilize X-ray templates or digital templating software with anatomical plates to pre-contour plates and determine optimal plate length and screw positions. This helps anticipate challenges and ensures appropriate implant availability.
- Neurovascular Assessment: Document baseline neurological status (especially radial nerve function) and vascular status. This is critical for post-operative comparison. If a radial nerve palsy exists pre-operatively, discuss the possibility of exploration with the patient.
- Anesthesia and Blood Management: Discuss regional vs. general anesthesia. Prepare for potential blood loss, though typically minimal with this approach. Tourniquet use is standard.
Patient Positioning
Place the patient supine on the operating table. The arm should be positioned on a dedicated arm board, abducted approximately 60 degrees. This provides optimal exposure to the anterolateral aspect of the distal humerus and facilitates movement of the forearm for radial nerve visualization if necessary.
Patient positioned supine on the operating table with the arm abducted on an arm board.
Exsanguinate the limb either by elevating it for 3 minutes or by applying a soft rubber bandage, then apply a pneumatic tourniquet as proximally as possible on the upper arm. The tourniquet pressure should be set appropriately (typically 250-300 mmHg or 100 mmHg above systolic blood pressure) and inflated just prior to incision. The entire upper limb, from shoulder to hand, should be prepped and draped to allow for full range of motion of the elbow and potential extension of the incision.
Detailed Surgical Approach / Technique
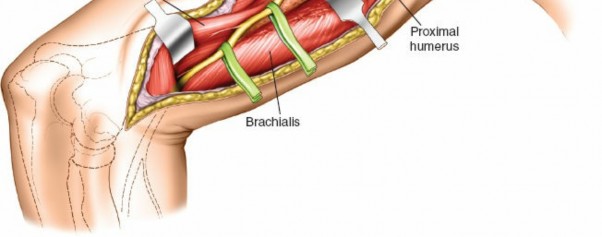
The anterolateral approach exposes the distal fourth of the humerus. Its major advantage over a purely brachialis-splitting anterior approach is its extensibility, both distally (for radial nerve exploration into the forearm) and proximally (for longer diaphyseal fractures), while minimizing direct triceps disruption.
Landmarks and Incision
Landmarks:
* The
lateral border of the biceps brachii muscle
provides the key superficial landmark.
* The
flexion crease of the elbow
helps define the distal extent.
* The
lateral epicondyle
of the humerus.
Incision:
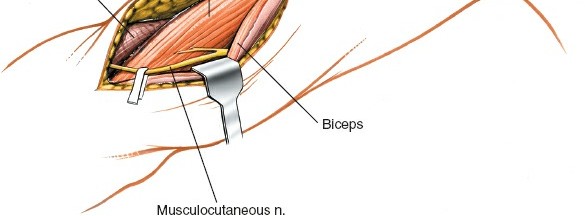
Make a curved longitudinal incision along the lateral border of the biceps muscle. Start approximately 10-12 cm proximal to the elbow flexion crease, curving slightly laterally to follow the course of the distal humerus. The incision should extend distally to just proximal to the lateral epicondyle, or further if distal extension into the forearm is needed for radial nerve exploration or extensive articular involvement.
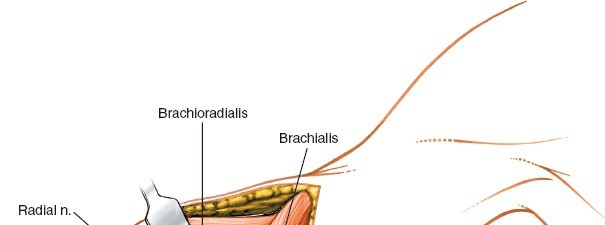
Illustration depicting the relevant anatomical landmarks for the anterolateral approach.

Incision marked along the lateral border of the biceps brachii muscle, curving slightly distally.
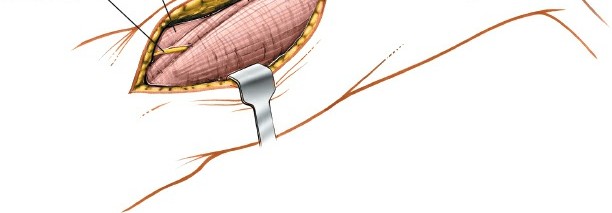
Deep Dissection
- Skin and Subcutaneous Tissue: Incise the skin and subcutaneous tissues down to the superficial fascia. Identify and ligate or coagulate any superficial veins.
-
Fascial Incision:
Incise the deep fascia along the lateral border of the biceps brachii muscle.
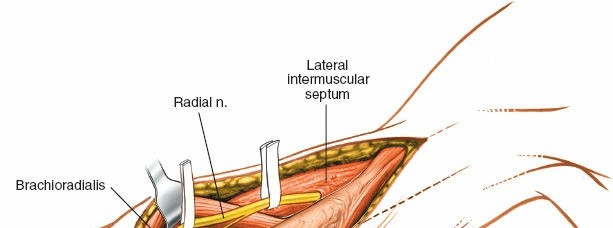
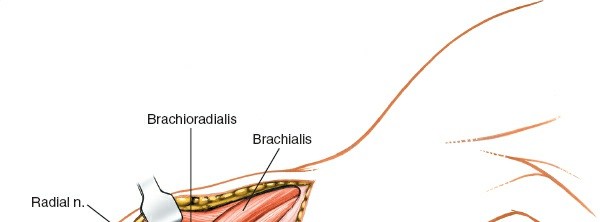
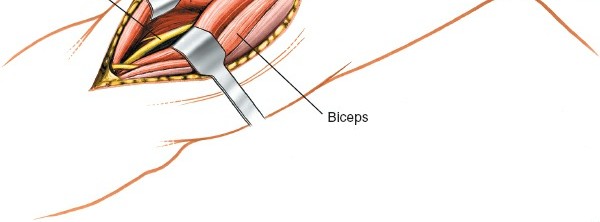
Deep fascia incised, revealing underlying musculature. - Interval Identification: Retract the biceps brachii muscle medially. This exposes the underlying brachialis muscle. The interval between the biceps (medial) and the lateral head of the triceps (posterolateral) or the brachialis (medial) and brachioradialis (lateral) is developed.
-
Brachialis Muscle Dissection:
The anterolateral approach involves entering the interval between the brachialis muscle and the brachioradialis/extensor-pronator mass. Alternatively, the brachialis muscle can be split longitudinally in its lateral third or carefully elevated from the periosteum of the humerus. When elevating the brachialis, it is crucial to stay directly on the bone to avoid perforating vessels that enter the muscle medially.

Careful dissection to identify the plane between muscles and expose the brachialis. -
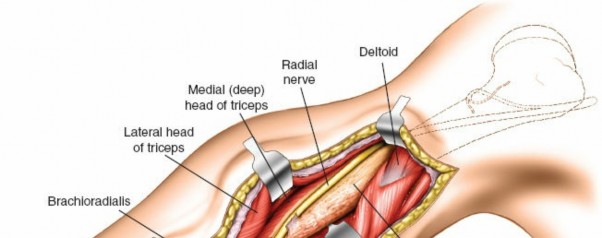
Radial Nerve Identification and Protection:
This is the most critical step. The radial nerve typically emerges from the spiral groove and pierces the lateral intermuscular septum approximately 10-12 cm proximal to the lateral epicondyle. It then courses anteriorly, lying in the interval between the brachialis and brachioradialis muscles.
- Carefully dissect along the lateral aspect of the brachialis and deep to the brachioradialis. Identify the radial nerve as it emerges.
- Once identified, gently mobilize the nerve and protect it with a vessel loop or rubber drain. Ensure it is not under tension during retraction.
-
In Holstein-Lewis fractures, thorough exploration of the radial nerve is mandatory.
It may be lacerated, contused, or entrapped within the fracture fragments. Release any impingement and assess its integrity. If lacerated, consider primary repair or grafting depending on the deficit and injury pattern.

Identification and careful protection of the radial nerve (indicated by probe).
Further exposure demonstrating the radial nerve freed and protected, allowing access to the humerus.
-
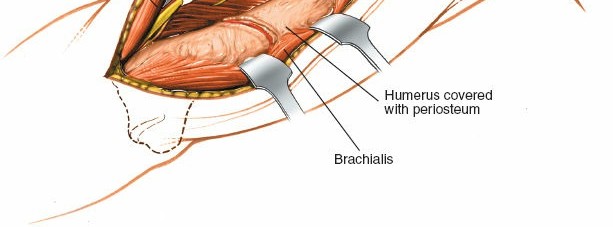
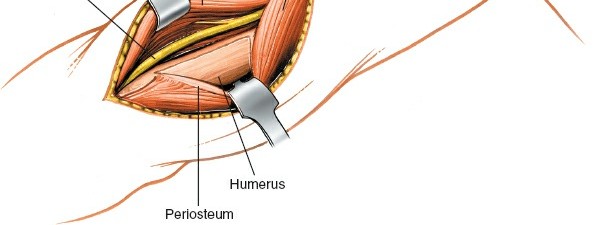
Exposure of the Humerus:
With the radial nerve protected and retracted, and the brachialis muscle either split or elevated and retracted medially, the anterolateral surface of the humerus is exposed. Elevate the periosteum cautiously only where necessary for plate application, preserving soft tissue attachments where possible to maintain blood supply to the bone fragments.
Periosteal elevation revealing the fracture site on the distal humerus.
Fracture Reduction
- Direct vs. Indirect Reduction: Aim for indirect reduction techniques using traction, manipulation, and ligamentotaxis to restore length and alignment, minimizing further soft tissue stripping. However, direct reduction with specialized clamps may be necessary for anatomical alignment, especially in articular or complex metaphyseal fractures.
-
Provisional Fixation:
Once reduced, stabilize the fracture provisionally with K-wires or reduction clamps. Ensure rotational alignment is correct.
Fracture exposed and provisionally reduced with a clamp.
K-wires used for provisional fixation after reduction.
Internal Fixation
- Plate Selection and Contouring: Select an appropriate locking or non-locking plate (e.g., LCP, LC-DCP) for the anterolateral aspect of the humerus. Pre-contour the plate to match the anatomical curvature of the bone. For highly comminuted fractures or osteoporotic bone, a locking plate is generally preferred for angular stability.
-
Plate Application:
Apply the plate to the anterolateral surface of the humerus. Ensure it is centered over the bone and spans the fracture appropriately, providing adequate screw purchase both proximally and distally.
Contoured plate positioned on the anterolateral aspect of the humerus. -
Screw Insertion:
- Begin with a lag screw (if applicable) across an oblique fracture component to achieve interfragmentary compression.
- Insert screws through the plate. For locking plates, drill according to implant-specific guidelines and insert locking screws. For non-locking plates, dynamic compression can be achieved by eccentric screw placement.
-
Typically, at least three to four bicortical screws should be placed in each main fragment (proximal and distal to the fracture) to achieve adequate fixation. Ensure screw lengths are appropriate to avoid medial neurovascular impingement.
Insertion of screws through the plate into the humerus.
-
Final Assessment:
Confirm anatomical reduction and stable fixation under fluoroscopy. Check for any impingement of neurovascular structures.
Final construct with plate and screws in place, demonstrating stable fixation.
Wound Closure
- Irrigation: Copiously irrigate the wound.
- Nerve Check: Re-check the radial nerve for any signs of traction or compression.
- Muscle and Fascia Closure: Loosely approximate the brachialis muscle (if split) or allow it to fall back into position. Close the deep fascia and subcutaneous layers.
-
Skin Closure:
Close the skin with staples or sutures.

Completed wound closure following successful internal fixation.
Complications & Management
Despite meticulous surgical technique, complications can occur with the anterolateral approach to the distal humerus. Awareness and timely management are crucial for optimal patient outcomes.
Common Complications
| Complication | Incidence (Approximate) | Management Strategies |
|---|---|---|
| Radial Nerve Palsy | 10-20% (Holstein-Lewis) |
-
Pre-existing:
Exploration/decompression at time of ORIF, especially if fracture pattern suggests entrapment.
- Post-operative (New): Often neurapraxia. Initial observation (3-6 months), serial EMG studies. If no recovery, consider re-exploration and neurolysis/repair/grafting. Tendon transfers if irreversible. |
| Nonunion | 5-10% |
-
Risk Factors:
Severe comminution, osteopenia, inadequate fixation, infection, poor biological environment.
- Management: Revision ORIF with plate exchange, bone grafting (autograft or allograft), potentially electrical stimulation. Address contributing factors. |
| Malunion | 5% | - Management: If symptomatic (pain, deformity, functional limitation), corrective osteotomy. Asymptomatic malunions may be observed. |
| Infection | 1-3% |
-
Superficial:
Oral antibiotics, local wound care.
- Deep: Surgical debridement, intravenous antibiotics, irrigation, possible hardware removal (if fixation stable), or two-stage revision. |
| Hardware Failure | <5% |
-
Causes:
Nonunion, premature weight-bearing, inadequate initial fixation.
- Management: Revision ORIF, often with stronger construct (e.g., longer plate, dual plates), bone grafting if nonunion present. |
| Heterotopic Ossification (HO) | 5-10% (clinically significant) |
-
Prevention:
Post-operative NSAIDs, single low-dose radiation (controversial for humerus, more common in elbow HO).
- Management: If symptomatic and mature, surgical excision. |
| Elbow Stiffness/Contracture | Common (variable severity) |
-
Prevention:
Early, controlled range of motion (ROM) exercises.
- Management: Aggressive physical therapy, dynamic splinting. If severe and recalcitrant, surgical arthrolysis. |
| Vascular Injury | Rare (<1%) | - Management: Immediate vascular surgery consultation, repair of injured vessel. |
Specific Considerations
- Radial Nerve Injury: The most frequent and concerning complication, particularly with Holstein-Lewis fractures. Pre-operative documentation of nerve function is paramount. Intra-operative identification and protection are non-negotiable. If a post-operative radial nerve palsy develops in a patient without pre-existing palsy, careful observation is usually warranted for 3-6 months. Electromyography (EMG) and nerve conduction studies (NCS) can help differentiate between neurapraxia, axonotmesis, and neurotmesis. Persistent palsy or lack of recovery often warrants exploration.
- Nonunion: Risk factors include inadequate stability, poor bone quality, extensive comminution, and infection. Management often requires revision surgery with robust fixation, biological augmentation (autogenous bone graft, allograft, or bone graft substitutes), and addressing any underlying contributing factors.
Post-Operative Rehabilitation Protocols
Post-operative rehabilitation is crucial for restoring elbow function, minimizing stiffness, and ensuring successful fracture healing. Protocols vary depending on fracture stability, fixation strength, patient comorbidities, and surgeon preference, but generally follow a phased approach.
Phase 1: Immediate Post-Operative (Weeks 0-2)
- Immobilization: The arm is typically placed in a sling for comfort and protection. Some surgeons prefer a posterior splint for a brief period (e.g., 1-2 weeks) to reduce swelling and provide additional immobilization, especially for unstable constructs.
- Pain Management: Aggressive pain control with multimodal analgesia.
-
Early Motion (if stable fixation):
- Hand, Wrist, and Shoulder ROM: Active and passive range of motion exercises for the hand, wrist, and shoulder should begin immediately to prevent stiffness in these joints.
- Elbow AROM (Active Range of Motion): For stable constructs, gentle, gravity-assisted elbow flexion and extension (e.g., "pendulum" exercises or supine passive flexion/extension) can be initiated cautiously within a pain-free arc. Avoid passive overpressure.
- Patient Education: Instruct the patient on signs of complications and adherence to activity restrictions.
- Weight Bearing: Absolutely no weight bearing or lifting with the affected arm.
Phase 2: Early Mobilization & Strengthening (Weeks 2-6)
- Increased Elbow ROM: Gradually increase the active range of motion for elbow flexion and extension, working towards full extension as tolerated, while respecting pain. Gentle, controlled passive stretching may be introduced if active ROM plateaus.
- Forearm Pronation/Supination: Begin active forearm pronation and supination exercises.
- Initiate Light Strengthening: Isometric exercises for the elbow flexors and extensors may be introduced, provided fixation is robust. Begin with very light resistance.
- Progressive Activities: Continue all activities from Phase 1.
- Weight Bearing: Still no weight bearing or lifting with the affected arm.
Phase 3: Progressive Strengthening & Functional Return (Weeks 6-12)
- Advancing Strengthening: Progress to isotonic strengthening exercises using light weights or resistance bands for elbow flexion, extension, pronation, and supination. Focus on eccentric and concentric contractions.
- Functional Activities: Begin integrating activities of daily living (ADLs) that require increasing loads.
- Scar Management: Initiate scar massage and desensitization if scar adhesions or tenderness are present.
- Radiographic Assessment: Obtain follow-up radiographs to assess fracture healing. If radiographic signs of union are present, weight-bearing restrictions may be gradually eased.
- Weight Bearing: Gradual, progressive weight bearing and lifting may be introduced, starting with very light loads (e.g., <1 kg) and increasing as tolerated and based on radiographic union.
Phase 4: Return to Full Activity (Weeks 12+)
- Advanced Strengthening: Continue strengthening exercises, gradually increasing resistance and progressing to sport-specific or work-specific activities.
- Proprioception and Endurance: Incorporate exercises to improve proprioception and muscular endurance.
- Return to Activity: Full return to unrestricted activities, including contact sports or heavy labor, is typically permitted once there is complete radiographic union, full pain-free ROM, and satisfactory strength. This often occurs between 4-6 months post-operatively, but can extend to a year or more for complex injuries.
Important Considerations:
*
Individualization:
Rehabilitation protocols must be individualized based on the patient's progress, fracture pattern, quality of fixation, and bone healing.
*
Pain-Guided Progression:
Activity progression should always be pain-guided.
*
Therapist Collaboration:
Close collaboration with a hand/upper extremity physical or occupational therapist is highly recommended.
*
Delayed Union/Nonunion:
If delayed union or nonunion is suspected, rehabilitation must be halted or modified to prevent further complications and allow for surgical intervention if needed.
Summary of Key Literature / Guidelines
The anterolateral approach for distal humeral fractures, particularly diaphyseal and supracondylar extension patterns, is supported by a growing body of literature emphasizing its versatility and favorable neurovascular safety profile compared to other approaches for specific indications.
-
Holstein-Lewis Fractures:
Several studies highlight the anterolateral approach as the preferred method for managing Holstein-Lewis fractures. It allows for direct visualization and protection of the radial nerve, reducing the incidence of missed nerve entrapment and facilitating exploration when pre-existing palsy exists. Union rates are generally high with appropriate internal fixation.
- Ekholm et al. (2006) reviewed outcomes of humeral shaft fractures, suggesting that an anterolateral approach provides good results for distal third fractures, especially for radial nerve exploration.
- Nerve Injury: * While the radial nerve is at risk, systematic reviews indicate that an operative approach, particularly the anterolateral, often results in better outcomes for nerve recovery when palsy is present pre-operatively due to decompression or repair. The incidence of iatrogenic radial nerve injury post-operatively using this approach is relatively low in experienced hands.
-
Comparison to Other Approaches:
- Anterior Brachialis-Splitting Approach: The anterolateral approach is superior in its extensibility. The purely anterior approach is limited distally by the radial nerve and proximally by the deltoid insertion. The anterolateral approach facilitates longer plating constructs and better visualization of the lateral cortex.
- Posterior Triceps-Sparing/Triceps-Splitting Approach: While posterior approaches are excellent for truly posterior pathology and often preferred for intra-articular distal humeral fractures requiring dual column fixation, they carry a higher risk of ulnar nerve morbidity and may be less ideal for fractures primarily involving the anterolateral or lateral cortex of the distal shaft. The anterolateral approach avoids direct triceps disruption, potentially leading to faster recovery of triceps strength.
- Gerwin et al. (1996) discussed various approaches to the humerus, outlining the advantages of the anterolateral approach for distal shaft lesions.
-
Fixation Principles:
The literature consistently supports rigid internal fixation for distal humeral fractures to allow early mobilization. Locking plates have gained favor, particularly in osteoporotic bone and comminuted fractures, due to their angular stability and reduced reliance on bone-plate interface friction. Biomechanical studies have demonstrated the efficacy of anterolateral plate constructs in resisting common deforming forces.
- Guidelines from organizations like the AO Foundation emphasize meticulous technique, indirect reduction, and stable fixation constructs for optimal outcomes.
In conclusion, the anterolateral approach to the distal humerus is a versatile and safe surgical option for a specific spectrum of fractures and pathologies. Its key advantages include excellent access to the distal humeral shaft, direct visualization and protection of the radial nerve, and extensibility, making it an invaluable tool in the armamentarium of the orthopedic trauma surgeon. Mastery of the detailed anatomy and surgical steps, combined with diligent post-operative rehabilitation, is essential for maximizing patient outcomes and minimizing complications.
Clinical & Radiographic Imaging