Comprehensive Introduction and Patho-Epidemiology
Osteochondral lesions of the talus (OLTs) present a formidable challenge to the orthopedic surgeon, fundamentally altering the biomechanics and biochemical homeostasis of the tibiotalar joint. Historically classified by Berndt and Harty, these lesions involve a continuum of articular cartilage damage and subchondral bone pathology, ranging from simple chondral bruising to massive, displaced osteochondral fragments with underlying cystic degeneration. While arthroscopic marrow stimulation techniques (such as microfracture) remain the gold standard for primary, small lesions (typically less than 10 to 15 millimeters in diameter), they frequently fail in the context of large, deep, or cystic lesions due to the biomechanical inferiority of the resulting fibrocartilage repair tissue. For these complex lesions, structural restoration utilizing osteochondral autograft or allograft transfer becomes the definitive reconstructive mandate.
The pathophysiology of OLTs is generally bifurcated into traumatic and insidious (often ischemic) etiologies. Traumatic lesions are classically lateral, shallow, and morphologically wafer-like, resulting from shear forces during inversion and dorsiflexion injuries. Conversely, medial lesions are typically deeper, cup-shaped, and often present without a distinct history of acute trauma, suggesting a multifactorial etiology involving repetitive microtrauma, localized ischemia, and endocrine factors. Regardless of the etiology, the progression of an untreated large OLT inevitably leads to subchondral cyst formation, progressive joint space narrowing, and early-onset post-traumatic osteoarthritis. The overarching surgical objective is to restore the congruity of the articular surface with hyaline cartilage while re-establishing the structural integrity of the subchondral bone plate.
The anatomical geometry of the ankle joint, characterized by a highly congruent mortise, severely restricts direct perpendicular access to the talar dome. This perpendicular access is an absolute prerequisite for the precise harvesting and implantation of osteochondral cylindrical grafts. While arthroscopy offers excellent visualization, its working angles are inherently constrained. Medial or lateral malleolar osteotomies have traditionally been employed to gain access to the posterior and central aspects of the talus. However, for lesions located in the anterior two-thirds of the medial or lateral talar dome, these approaches involve unnecessary morbidity and often still fail to provide the optimal orthogonal trajectory required for graft insertion.
Enter the anterior tibial osteotomy, colloquially known as the "trap door" technique. This highly specialized, intra-articular osteotomy is a masterclass in precision osseous engineering. By meticulously elevating a defined rectangular block of the anterior tibial plafond, the surgeon gains unparalleled, direct, and orthogonal access to the anterior and central talar dome. This approach minimizes the morbidity associated with taking down the medial malleolus, preserves the critical deltoid ligament complex, and allows for precise execution of osteochondral autograft transfer systems (OATS). Mastery of this technique is essential for the advanced foot and ankle reconstructive surgeon aiming to optimize outcomes in young, active patients with massive talar defects.
Detailed Surgical Anatomy and Biomechanics
A profound comprehension of the anteromedial ankle's surgical anatomy is the bedrock upon which a successful anterior tibial osteotomy is built. The osteology of the distal tibia and talus dictates the geometric parameters of our surgical approach. The distal tibia flares out to form the tibial plafond, articulating with the highly congruent, convex surface of the talar dome. The medial malleolus extends distally to form the medial wall of the ankle mortise. A critical osseous landmark for this procedure is the angle of Hardy, which defines the anterior-most extent of the medial malleolar articular facet. This specific anatomical juncture serves as the precise starting point for the inferior-medial aspect of our trap door osteotomy, ensuring that the critical weight-bearing architecture of the medial mortise remains structurally uncompromised.
The neurovascular topography of the anterior ankle is dense and unforgiving, demanding meticulous dissection. The primary anterior neurovascular bundle, consisting of the deep peroneal nerve and the anterior tibial artery and veins, courses directly anterior to the ankle joint capsule. This bundle is reliably located within the intermuscular interval between the tibialis anterior (TA) tendon medially and the extensor hallucis longus (EHL) tendon laterally. While our anteromedial approach typically places this bundle lateral to the primary zone of dissection, aberrant branching or aggressive retraction can precipitate devastating ischemic or neuropathic complications. Furthermore, the superficial anteromedial field is traversed by the great saphenous vein and the saphenous nerve. The initial longitudinal incision must be carefully planned and executed to identify, mobilize, and protect these structures, as iatrogenic injury to the saphenous vein can lead to significant postoperative hematoma, while saphenous nerve transection results in painful neuromas and medial foot numbness.
The musculotendinous units crossing the anterior ankle dictate our surgical intervals. The tibialis anterior tendon is the most prominent palpable landmark on the anteromedial aspect of the joint. Our surgical corridor is established just medial to the TA tendon, running parallel to the medial talar facet. This interval allows for medial retraction of the skin and subcutaneous tissues while the TA tendon is gently retracted laterally, safely displacing the deep neurovascular bundle away from the osteotomy site. The extensor hallucis longus (EHL) and extensor digitorum longus (EDL) remain undisturbed in the lateral compartment of the anterior ankle. Understanding these dynamic intervals allows the surgeon to maximize exposure while minimizing soft tissue trauma.
The capsuloligamentous constraints and the inherent biomechanics of the proposed osteotomy require careful consideration. The anterior joint capsule is relatively thin but highly innervated and vascularized; a precise, longitudinal capsulotomy is required to expose the joint without destabilizing it. For lateral lesions requiring a lateralized trap door, the surgeon must remain acutely aware of the distal tibiofibular syndesmosis. The most lateral vertical saw cut must be maintained at least 2 millimeters medial to the syndesmotic articulation to prevent iatrogenic diastasis. Biomechanically, the trap door osteotomy is ingeniously designed. By angling the inferior cut 22 degrees posteriorly, the surgeon creates a trapezoidal, keystone-like bone block. Upon reinsertion, axial loading of the ankle joint dynamically compresses the trap door into its bed, conferring intrinsic biomechanical stability that augments the primary bioabsorbable pin fixation.
Exhaustive Indications and Contraindications
The decision to proceed with an anterior tibial osteotomy and subsequent osteochondral autograft transfer must be predicated on a rigorous, evidence-based evaluation of the patient's pathology. The primary indication for this procedure is the presence of a large, deep osteochondral lesion located in the anterior two-thirds of the medial or lateral talar dome. Specifically, lesions exceeding 10 millimeters in diameter, lesions with a depth greater than 10 millimeters, or those associated with significant subchondral cystic degeneration are prime candidates. In these scenarios, marrow stimulation techniques are statistically doomed to fail, necessitating structural grafting. Furthermore, this procedure is heavily indicated as a secondary intervention for patients who have previously undergone failed arthroscopic microfracture or debridement, provided their joint space remains preserved.
Topographical lesion mapping is a critical component of the decision-making process. The anterior tibial osteotomy is uniquely suited for lesions that are centrally or anteriorly located on the talar dome, where plantarflexion of the ankle brings the pathology directly into the surgical window. If a lesion is located in the posterior one-third of the talus, an anterior trap door will fail to provide adequate orthogonal access, and a medial malleolar osteotomy or a posterior arthroscopic approach must be utilized instead. The surgeon must meticulously correlate the preoperative magnetic resonance imaging (MRI) and computed tomography (CT) scans with the anticipated intraoperative line of sight to ensure the chosen osteotomy will yield the necessary exposure.
Contraindications to this procedure are both absolute and relative, heavily influencing patient selection. Absolute contraindications include the presence of advanced, diffuse tibiotalar osteoarthritis (Kellgren-Lawrence Grade III or IV), as restoring a focal cartilage defect will not ameliorate global joint degeneration. Active joint infection, diffuse avascular necrosis of the talar body, and severe, uncorrectable hindfoot malalignment are also absolute contraindications. Relative contraindications encompass uncontrolled diabetes mellitus, peripheral vascular disease, and active tobacco use, all of which significantly impair bone healing and increase the risk of osteotomy nonunion or graft failure. Patients with a body mass index (BMI) in the morbidly obese category also present a higher risk of mechanical graft subsidence and require extensive preoperative counseling.
To facilitate rapid clinical decision-making, the following table delineates the primary indications and contraindications for the anterior tibial osteotomy and OATS procedure:
| Category | Clinical Parameters | Rationale |
|---|---|---|
| Primary Indications | OLT > 10 mm diameter or > 10 mm depth | Marrow stimulation yields inferior fibrocartilage; structural graft required. |
| Primary Indications | Subchondral cystic degeneration | Cystic voids must be debrided and structurally filled to prevent talar collapse. |
| Primary Indications | Failed prior microfracture | Revision scenario requiring definitive hyaline cartilage restoration. |
| Topographical Indication | Anterior 2/3 of medial/lateral talar dome | Ankle plantarflexion brings this region directly into the trap door window. |
| Absolute Contraindication | Advanced Tibiotalar Osteoarthritis | Focal repair is futile in the presence of global joint degeneration. |
| Absolute Contraindication | Diffuse Talar Avascular Necrosis | Graft requires a vascularized bony bed for incorporation and survival. |
| Absolute Contraindication | Active joint space infection | High risk of deep osteomyelitis and systemic sepsis. |
| Relative Contraindication | Posterior 1/3 Talar Lesions | Inadequate orthogonal access; requires medial malleolar osteotomy. |
| Relative Contraindication | Uncontrolled Diabetes / Heavy Smoking | Drastically increased risk of osteotomy nonunion and wound dehiscence. |
Pre-Operative Planning, Templating, and Patient Positioning
Surgical excellence is achieved long before the patient enters the operating theater; it is born in the meticulous phases of preoperative planning. Advanced imaging is non-negotiable. Standard weight-bearing anteroposterior, lateral, and mortise radiographs are obtained to assess global joint space, alignment, and the presence of osteophytes. However, MRI is the gold standard for characterizing the chondral surface, subchondral edema, and the exact dimensions of the lesion. High-resolution, fluid-sensitive sequences (such as T2 fat-suppressed or STIR) are critical for identifying occult cystic changes. Furthermore, a fine-cut, non-contrast CT scan is highly recommended for three-dimensional osseous templating. The CT scan allows the surgeon to precisely map the angle of Hardy, measure the available anterior tibial metaphysis, and virtually template the 1 cm by 3 cm trap door cuts to ensure adequate bone stock and optimal trajectory.
Templating also involves anticipating the required size of the osteochondral graft. Based on the MRI and CT measurements, the surgeon must ensure that the available instrumentation (typically 6, 8, or 10 mm coring reamers) will adequately encompass the entire lesion in a single pass. If the lesion is oblong or exceeds 10 mm in multiple dimensions, a "snowman" technique utilizing two overlapping grafts may be required, which necessitates a slightly wider osteotomy exposure. The surgeon must also plan the donor site—typically the non-weight-bearing medial or lateral articular facets of the ipsilateral talus, or alternatively, the ipsilateral knee (non-weight-bearing periphery of the femoral condyles) if massive bulk is required.
Operating room setup and fluoroscopic positioning are critical logistical components. A standard radiolucent operating table is utilized. The fluoroscopy unit (C-arm) must be positioned to enter the sterile field from the contralateral side of the table. It is imperative that the C-arm can obtain perfect, orthogonal anteroposterior and lateral views of the ankle mortise without requiring any repositioning of the patient's leg. This requires a highly mobile C-arm and a skilled radiologic technologist. The ability to quickly bring the C-arm in and out of the field is essential for verifying the depth and trajectory of the osteotomy saw cuts and confirming the final flush seating of the osteochondral graft.
Patient positioning is engineered to maximize surgical ergonomics and exposure. The patient is placed in the supine position. A well-padded thigh tourniquet is applied to the ipsilateral limb to guarantee a completely bloodless surgical field, which is absolutely vital for the precise identification of the cartilage margins and neurovascular structures. A large gel bolster or bump is placed beneath the ipsilateral hip/buttock. This maneuver internally rotates the entire lower extremity, bringing the medial aspect of the ankle into a perfectly vertical, accessible orientation for the primary surgeon. The leg is then meticulously prepped and draped free from just below the knee down to the toes, utilizing a sterile stockinette and impervious draping to allow for unrestricted, full range of motion of the ankle joint throughout the procedure.
Step-by-Step Surgical Approach and Fixation Technique
The Surgical Approach: Gaining Access
With the patient optimally positioned and the tourniquet inflated to 250-300 mmHg, the surgical approach commences. For a medial-sided lesion, a 7-centimeter anteromedial longitudinal incision is executed. The incision is centered over the joint line, running parallel to the medial talar facet and situated just medial to the palpable tibialis anterior tendon. The initial skin incision must be deliberate but superficial. Deepening the incision through the subcutaneous tissues requires meticulous blunt and sharp dissection to identify and mobilize the great saphenous vein and the accompanying saphenous nerve. These structures are gently retracted medially using a vessel loop or a blunt Ragnell retractor. Small crossing venous tributaries should be formally ligated or electrocoagulated to prevent postoperative hematoma.
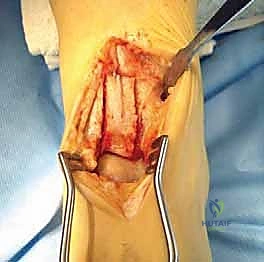
Once the superficial neurovascular structures are secured, the deep fascia is incised in line with the skin incision. The tibialis anterior tendon sheath is identified, and the tendon itself is mobilized and retracted laterally using a deep right-angle retractor. This maneuver safely displaces the deep peroneal nerve and anterior tibial artery laterally, out of the primary surgical corridor. The anterior ankle joint capsule is now fully exposed. Using a #15 scalpel blade, a precise, longitudinal capsulotomy is performed. The capsular incision is extended proximally onto the distal tibia and distally over the talar neck. A Freer or Cobb elevator is then utilized to subperiosteally strip the anterior capsule from the distal tibial metaphysis, exposing the medial half of the tibial plafond and the anterior aspect of the talar dome. If hypertrophic synovitis obscures the articular surfaces, a targeted synovectomy is performed using a motorized shaver or pituitary rongeurs.
Tibial Osteotomy Using the Trap Door Technique
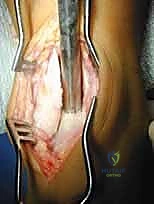
The creation of the tibial trap door is the most technically demanding phase of the procedure, requiring absolute precision. Using a Cobb elevator, the periosteum over the anterior distal tibia is carefully elevated proximally for about 4 to 5 centimeters, creating a pristine osseous surface for our cuts. The critical landmark, the angle of Hardy (the anteromedial corner of the tibial plafond), is visually and palpably identified. A surgical marking pen or electrocautery is used to make a 1-centimeter mark on the articular margin, starting exactly at the angle of Hardy and extending laterally. A second horizontal mark is made 3 centimeters proximal to the joint line on the anterior tibial metaphysis. These marks define the inferior and superior boundaries of the osteotomy.
Before any saw cuts are made, the bone must be predrilled for subsequent fixation. Using a 2.0-millimeter drill bit, two transverse, parallel holes are drilled from anterior to posterior across the planned trap door footprint on the tibial metaphysis. These holes will later accommodate bioabsorbable pins or small fragment screws. Predrilling before the osteotomy ensures perfect anatomical alignment upon reduction.
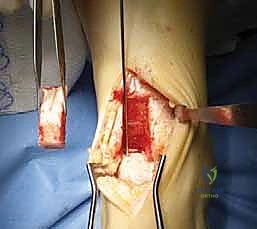
With the fixation holes prepared, the saw cuts are initiated using a Hall microoscillating saw equipped with a thin, fine-toothed no. 64 blade (e.g., Zimmer). The first vertical cut begins at the angle of Hardy and extends 3 centimeters proximally. The second vertical cut is made strictly parallel to the first, starting 1 centimeter lateral to the initial cut at the joint line. Both vertical cuts must be advanced to a uniform depth of exactly 2 centimeters into the distal tibia.
Following the vertical cuts, a superior horizontal cut is made connecting their proximal extents. The final, most critical maneuver is the inferior angled cut. The saw is angled inferiorly and exactly 22 degrees posteriorly from the anterior metaphysis toward the joint surface. This creates a beveled, trapezoidal wedge. A thin, 10-millimeter osteotome is gently inserted into the superior and vertical cuts. With controlled, light mallet taps, the trap door is mobilized and carefully extracted. The bone block is immediately wrapped in a saline-soaked laparotomy sponge and stored safely on the back table.
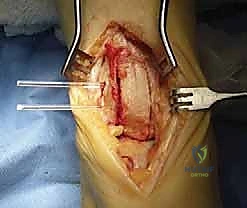
Coring Out the Lesion and Preparing the Bed
With the trap door removed, the surgeon now possesses an unprecedented, direct orthogonal view of the medial talar dome. To optimize exposure of the lesion, the ankle is firmly plantarflexed. A thin Freer elevator is placed superiorly to protect the remaining intact tibial plafond. The osteochondral lesion is meticulously probed to define its margins, assessing the integrity of the surrounding hyaline cartilage. The diseased cartilage is often fibrillated, ballotable, or entirely detached.
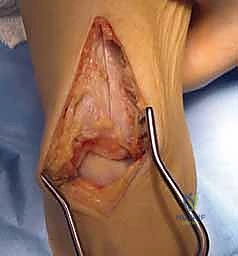
Based on preoperative templating and intraoperative probing, an appropriately sized OATS coring reamer (typically 8 mm or 10 mm) is selected. The reamer is positioned absolutely perpendicular to the curvature of the talar dome, centered directly over the lesion.
The reamer is advanced under power to a depth of approximately 12 to 15 millimeters, ensuring complete excision of the chondral defect and the underlying necrotic or cystic subchondral bone. The core is extracted, leaving a perfectly cylindrical recipient socket. The base of this socket is critically evaluated. If dense, sclerotic bone is present at the base, it will act as a barrier to vascular ingrowth, dooming the graft to failure. In such instances, a 0.045-inch Kirschner wire is utilized to perform microfracture at the base of the socket, penetrating the sclerosis to access the vascular marrow channels, thereby encouraging robust bleeding and subsequent graft incorporation.
Harvesting the Graft and Final Fixation
Attention is then turned to harvesting the autologous osteochondral graft. While the ipsilateral knee can be used, harvesting from the non-weight-bearing articular facets of the talus itself minimizes donor site morbidity. Using a mini-Hohmann retractor, the medial facet of the talar body is exposed. The harvesting tubular chisel is positioned approximately 4 millimeters inferior to the talar dome to ensure the critical weight-bearing shoulder of the talus is not compromised.
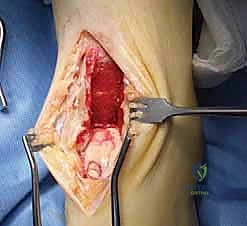
The chisel is driven into the bone to a depth matching the recipient socket (12-15 mm) and toggled slightly to extract the core. The harvested graft is inspected to ensure a healthy, intact cartilage cap and a robust bony base. The graft is then transferred to the recipient socket.
Using a specialized tamp and a mallet, the graft is gently press-fit into the defect. It is absolutely imperative that the cartilage cap of the graft sits perfectly flush with, or slightly proud (less than 1 mm) of, the surrounding native talar cartilage. A sunken graft will lead to poor load sharing and continued pain, while an excessively proud graft will cause reciprocal "kissing" lesions on the tibial plafond.
Once the graft is perfectly seated, the joint is thoroughly irrigated to remove any osseous debris. The tibial trap door is retrieved from the back table and meticulously reinserted into its donor site. The 22-degree bevel ensures it seats snugly and resists displacement into the joint under axial load.
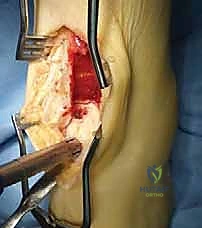
The predrilled holes are perfectly aligned, and two bioabsorbable pins (e.g., 2.0 mm poly-L-lactic acid pins) or 2.7 mm cortical screws are inserted to secure the block. The anterior capsule is closed with interrupted 2-0 Vicryl sutures, the extensor retinaculum is repaired, and the skin is closed in a layered fashion.
Complications, Incidence Rates, and Salvage Management
Despite meticulous surgical technique, the anterior tibial osteotomy and OATS procedure carry a distinct profile of potential intraoperative and postoperative complications. Intraoperatively, the most feared complication is iatrogenic injury to the anterior neurovascular bundle (deep peroneal nerve and anterior tibial artery). While rare (<1% incidence) when proper retraction techniques are employed, aggressive lateral retraction or aberrant anatomy can lead to vessel laceration or neuropraxia. Another significant intraoperative risk is the fracture of the trap door bone block during mobilization. If the saw cuts are not completely connected, forcefully levering the block with an osteotome can cause it to shatter. In such events, the fragments must be carefully pieced together and stabilized with mini-fragment plates or multiple K-wires, significantly complicating the postoperative rehabilitation.
A profound, specific complication related to the geometry of the osteotomy is the propagation of a medial malleolar stress fracture. If the vertical saw cuts are made deeper than 3 centimeters into the distal tibia, or higher than 4 centimeters proximally, the structural integrity of the medial malleolus is severely compromised. Under physiological loading, this stress riser can propagate into a complete, displaced fracture of the medial mortise, requiring immediate open reduction and internal fixation (ORIF) and drastically altering the patient's prognosis. Adhering strictly to the 1 cm x 3 cm x 2 cm dimensions is paramount.
Postoperatively, the most common complications relate to the biological incorporation of the graft and the healing of the osteotomy. Graft subsidence or non-incorporation occurs in approximately 5-10% of cases, often due to inadequate debridement of the sclerotic recipient bed or thermal necrosis during graft harvesting. If the graft fails, patients will experience recurrent deep ankle pain and mechanical symptoms. Nonunion of the tibial trap door is exceedingly rare due to the highly vascular metaphyseal bone and the compressive biomechanics of the beveled cut, but it can occur in heavy smokers or non-compliant patients who bear weight prematurely. Salvage management for a failed OATS procedure represents a significant challenge. Options include revision grafting with a bulk fresh osteochondral allograft, or in cases of severe secondary degeneration, definitive ankle arthrodesis or total ankle arthroplasty.
| Complication | Estimated Incidence | Etiology/Risk Factors | Salvage / Management Strategy |
|---|---|---|---|
| Neurovascular Injury | < 1% | Aggressive retraction; aberrant anatomy. | Primary microvascular repair; extensive physical therapy for neuropraxia. |
| Trap Door Fracture | 2 - 4% | Incomplete saw cuts; forceful levering. | Mini-fragment plate fixation; prolonged non-weight-bearing. |
| Medial Malleolar Fracture | 1 - 3% | Saw cuts exceeding 3cm depth or 4cm height. | Immediate ORIF with tension band or lag screws. |
| Graft Subsidence / Failure | 5 - 10% | Sclerotic bed; thermal necrosis; early weight-bearing. | Revision with bulk allograft; Ankle Arthrodesis if arthritic. |
| Osteotomy Nonunion | < 2% | Smoking; diabetes; inadequate fixation. | Revision fixation with bone grafting and bone stimulator. |
| Donor Site Morbidity | 3 - 5% | Harvesting too close to weight-bearing dome. | Symptomatic management; rarely requires secondary intervention. |
Phased Post-Operative Rehabilitation Protocols
The postoperative rehabilitation following an anterior tibial osteotomy and OATS procedure is a delicate, protracted process that must balance the mechanical protection of the osteotomy and graft with the biological necessity of early joint motion to nourish the articular cartilage. The protocol is strictly phased and requires intense collaboration between the surgeon, the physical therapist, and a compliant patient.
Phase I: Maximal Protection (Weeks 0-2)
Immediately following surgery, the patient is placed in a bulky, well-padded posterior splint with the ankle in a neutral (90-degree) position. The patient is designated strictly non-weight-bearing (NWB) on the operative extremity, utilizing crutches or a knee scooter. The primary goals during this phase are wound healing, massive edema control (via strict elevation above the level of the heart), and pain management. Deep vein thrombosis (DVT) prophylaxis is initiated based on the patient's individualized risk profile. At the two-
