ANTERIOR THORACOPLASTY: PRINCIPLES AND BIOMECHANICS
The management of severe, rigid spinal deformities frequently requires a circumferential approach to achieve adequate three-dimensional correction. Anterior thoracoplasty serves a dual purpose in this paradigm: it provides a profound structural release of the thoracic cage and yields high-quality autologous bone graft.
The advantages of anterior thoracoplasty mirror those of posterior thoracoplasty, but with distinct biomechanical and physiological benefits. For the patient, the reduction of the rib prominence (rib hump deformity) is often the most critical aesthetic outcome of surgical correction. By resecting the apical ribs, the surgeon directly addresses the rotational chest wall asymmetry. Furthermore, the structural softening of the chest wall significantly facilitates the mobilization and correction of rigid scoliotic or kyphotic deformities during subsequent posterior instrumentation.
Crucially, the abundant autologous bone graft obtained from the resected ribs during an anterior thoracoplasty obviates the need for a separate iliac crest bone graft (ICBG) harvest. This eliminates the well-documented postoperative morbidity associated with ICBG, including chronic donor site pain, hematoma, and infection.
Surgical Technique: Open Anterior Thoracoplasty
When performing an open anterior thoracoplasty, meticulous subperiosteal dissection is paramount to protect the underlying pleura and neurovascular bundles.
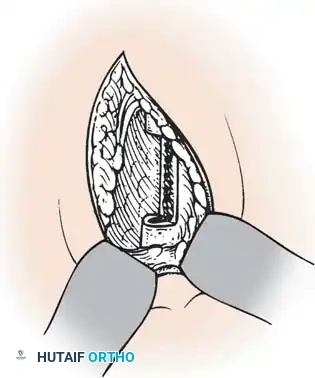
- Exposure: Following a standard thoracotomy, reflect the parietal pleura over the chest wall to expose the targeted ribs.
- Periosteal Incision: From within the thoracotomy, use electrocautery to divide the periosteum longitudinally, directly in line with the center of the rib.
- Subperiosteal Dissection: Utilize a curved periosteal elevator (e.g., Doyen or Alexander elevator) to complete a circumferential subperiosteal dissection of the rib, extending laterally to the posterior axillary line.
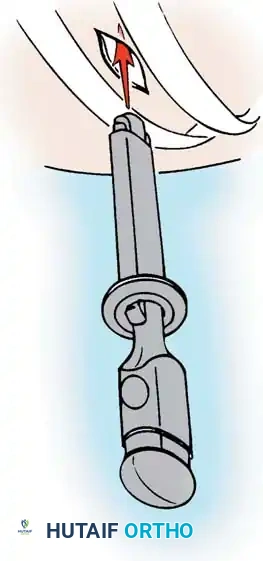
- Rib Osteotomy: Divide the rib laterally with an end-cutting instrument or rib shears. Grasp the divided end of the rib with a Kocher clamp and gently bring it into the thoracic cavity to apply traction.
- Medial Dissection: Continue the circumferential dissection of the periosteum and intercostal muscles medially, advancing toward the costotransverse articulation.
- Disarticulation: Carefully disarticulate the rib head from both the costotransverse and costocorporal (costovertebral) articulations.
- Completion: Remove the posterior portions of the remaining apical ribs in a similar manner to complete the thoracoplasty.
Clinical Pearl: This extensive thoracoplasty not only improves the patient's postoperative appearance and provides excellent structural bone graft, but it also significantly softens the chest wall. This softening is biomechanically essential to facilitate exposure and correction in patients with highly rigid, ankylosed, or severe structural deformities.
VIDEO-ASSISTED THORACOSCOPIC SURGERY (VATS) IN SPINAL DEFORMITY
Video-assisted thoracoscopic surgery (VATS) has revolutionized the treatment of pediatric and adult spinal deformities. It is now a commonly utilized, minimally invasive procedure for anterior spinal release. While endoscopic anterior instrumentation of thoracic scoliosis remains a controversial topic—with most surgeons currently preferring a posterior approach utilizing segmental pedicle screw constructs—VATS remains the gold standard for anterior release.
The advantages of thoracoscopic surgery over traditional open thoracotomy are substantial. In addition to providing superior illumination and magnification of the anterior spinal column, VATS minimizes surgical trauma. Benefits include:
* Preservation of the latissimus dorsi and serratus anterior muscles.
* Decreased chest wall injury, leading to significantly less long-term post-thoracotomy pain syndrome.
* Reduced intraoperative blood loss.
* Superior cosmetic outcomes due to small portal incisions.
* Shorter recovery times and potentially shorter hospital stays.
* Improved postoperative pulmonary function compared to open thoracotomy.
Indications and Contraindications
The primary disadvantages of thoracoscopy are its steep learning curve and high technical demands. Specialized endoscopic equipment is required, and a multidisciplinary approach is mandatory. A general, pediatric, or thoracic surgeon familiar with VATS should be available to assist, particularly during the initial stages of the learning curve, and should remain scrubbed for the entire case. Furthermore, the anesthesiologist must be highly skilled in the use of double-lumen endotracheal tubes or bronchial blockers to achieve reliable one-lung ventilation.
Indications for VATS Anterior Release:
* Neuromuscular scoliosis in patients with compromised pulmonary function who require an anterior release but cannot tolerate an open thoracotomy.
* Rigid spinal curves requiring an anterior release prior to posterior instrumentation and fusion.
* Skeletal immaturity (Risser 0, open triradiate cartilages) in pediatric patients where anterior fusion is required to prevent the "crankshaft phenomenon" (continued anterior spinal growth following a posterior-only fusion).
Relative Indications:
* Rigid thoracic idiopathic curves that fail to correct on preoperative bending or traction radiographs.
* Rigid kyphotic deformities (e.g., Scheuermann's kyphosis).
* Note: With the advent of highly rigid, all-pedicle-screw posterior instrumentation systems, the absolute need for anterior release in standard idiopathic spinal deformities has decreased.
Contraindications:
* Inability of the patient to physiologically tolerate single-lung ventilation.
* Severe or acute respiratory insufficiency.
* High airway pressures requiring positive-pressure ventilation.
* Severe emphysema or restrictive lung disease.
* Previous thoracotomy or empyema (due to dense pleural adhesions obliterating the working space).
OPERATING ROOM SETUP AND ERGONOMICS
VATS is a technically demanding procedure that requires meticulous preoperative planning. Surgeons must familiarize themselves with the equipment, which includes 30-degree angled 10-mm telescopes, high-definition cameras, dual monitors, flexible portals, and long-handled manual instruments (curettes, pituitary rongeurs, fan retractors, endoscopic clip appliers, and specialized periosteal elevators).
Surgeon Positioning and Monitor Placement
Ergonomics and spatial orientation are the most challenging aspects of VATS. Surgeons utilize two primary setups based on preference and training.
Some surgeons prefer the conventional setup, working facing the patient with the patient in a lateral decubitus position.
Alternatively, other surgeons prefer to work from behind the patient. This allows the surgeon to work away from the spinal cord, pushing instruments toward the anterior vertebral body rather than pulling them toward the neuroaxis.

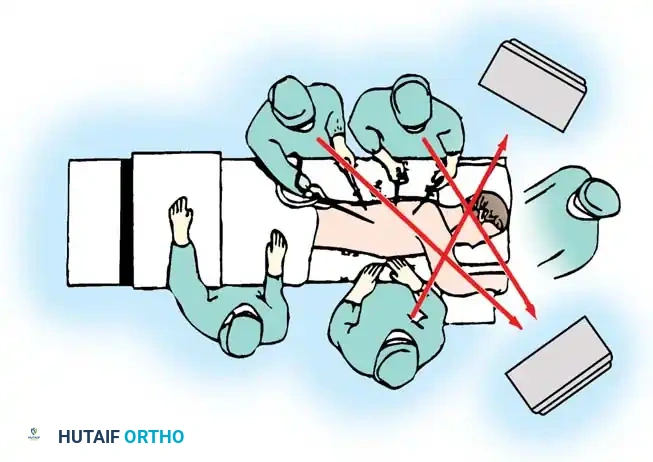
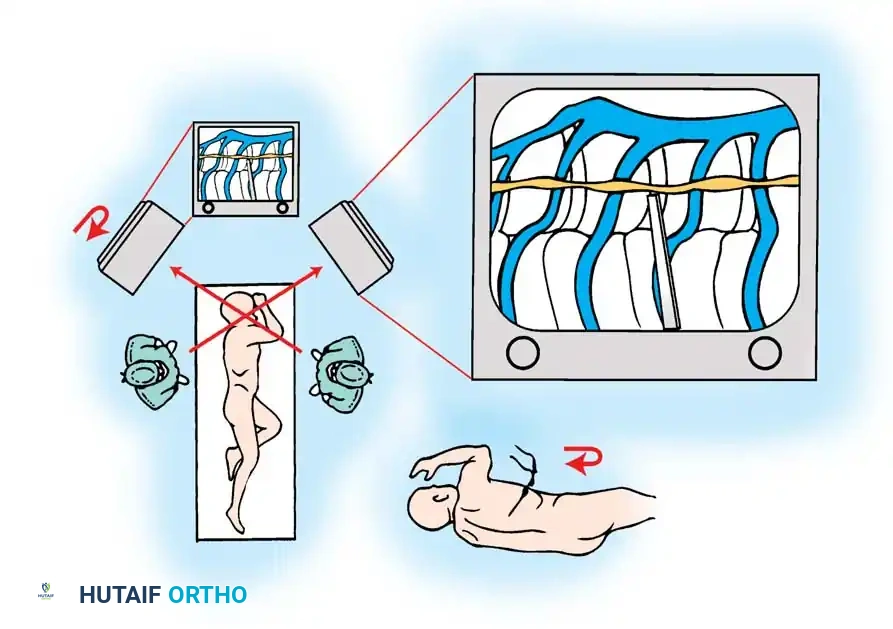
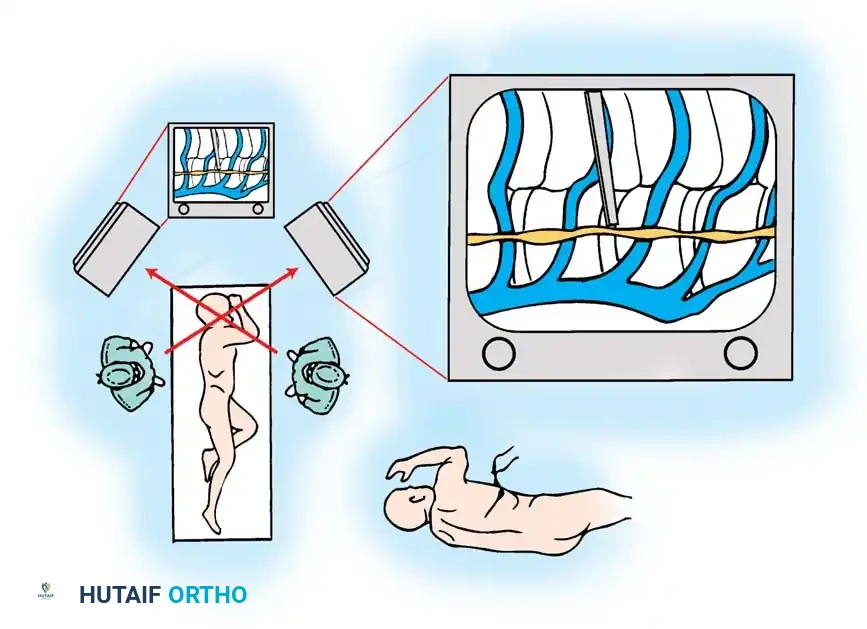
Because the traditional setup for most endoscopic procedures requires members of the surgical team to be on opposite sides of the patient, working opposite the camera image can lead to severe spatial disorientation (the "mirror effect"). To combat this, Horton described the camera monitor inversion technique.
In this technique, the monitor on the posterior aspect of the patient is physically inverted. Once the visualization port for the camera is established, the scope is inserted, and the camera head is rotated 180 degrees on the scope mount. The assistant holding the inverted camera views the inverted monitor, which effectively projects a "normal" image, identical to what would be seen in an open thoracotomy.
SURGICAL TECHNIQUE: VATS ANTERIOR RELEASE AND DISCECTOMY
Surgical Warning: Experience in VATS should be obtained by practicing on animal or cadaveric models, and by observing master surgeons, before attempting this on live patients. Bleeding from segmental vessels can be catastrophic and difficult to control endoscopically.
Anesthesia and Positioning
- Anesthesia: Obtain general anesthesia. Achieve single-lung ventilation using either a double-lumen endotracheal tube or a bronchial blocker.
- Positioning: Turn the patient into the true lateral decubitus position. Ensure the patient is securely taped or strapped to the table to allow for table tilting during the procedure.
- Lung Deflation: Prepare and drape the operative field as the anesthesiologist deflates the operative lung. Allow approximately 20 minutes for complete resorption atelectasis to occur, which maximizes the intrathoracic working space.
- Arm Placement: Place the upper arm on an elevated stand with the shoulder slightly abducted and flexed more than 90 degrees. This elevates the scapula and allows for the placement of portals higher into the axilla. Place an axillary roll under the dependent axilla to prevent brachial plexus compression.
- Landmarks: Palpate and outline the scapular borders, the twelfth rib, and the iliac crest with a sterile marker.
Portal Placement
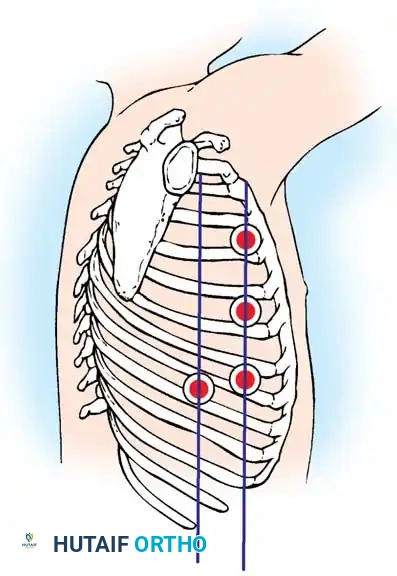
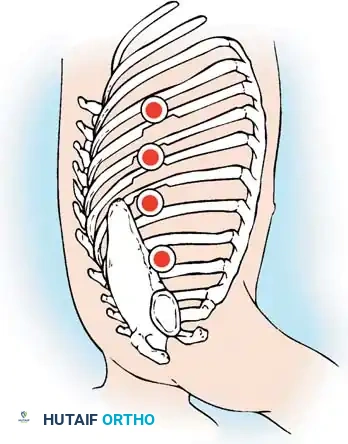
- First Portal: Place the initial visualization portal at or around the T6 or T7 interspace in the posterior axillary line.
- Incision: Make a 15- to 20-mm skin incision with a scalpel parallel to the superior surface of the rib. Continue with electrocautery through the intercostal muscles.
- Safety Check: Always make the incision over the top (superior border) of the rib to avoid damaging the intercostal neurovascular bundle, which runs in the costal groove on the inferior border. Insert a finger into the incision to confirm the lung is fully deflated and free from the chest wall before inserting the trocar.
- Trocar Insertion: Insert flexible portals through the intercostal spaces using a blunt trocar.

- Portal Seating: Remove the trocar, leaving the flexible portal securely in place to protect the intercostal nerve from neuropraxia during instrument manipulation.
Intrathoracic Navigation and Discectomy
- Endoscope Insertion: Insert a 10-mm, 30-degree angled rigid thoracoscope. Prevent fogging by prewarming the scope and treating the lens with a sterile fog reduction solution (FRED).
- Exploration: Evaluate the intrathoracic space. The superior thoracic spine can usually be visualized without lung retraction. However, visualization below T9-T10 typically requires a fan retractor to depress the diaphragm.
- Level Identification: The first rib is usually obscured by apical structures; therefore, the first visually identifiable rib is the second rib. Count the ribs sequentially caudad to identify the operative levels. Confirm levels intraoperatively by inserting a long, blunt-tipped spinal needle into a disc space and obtaining a cross-table fluoroscopic image.
- Working Portals: Select subsequent portal sites under direct endoscopic visualization. Insert trocars carefully to avoid diaphragmatic or pulmonary laceration.
- Pleural Dissection: Use an endoscopic L-hook electrocautery to divide the parietal pleura. Place the hook in the pleura over the disc space, midway between the rib head and the anterior longitudinal ligament. Pull the pleura away from the spine and cauterize proximally and distally.
- Vascular Anatomy: Identify the intervertebral discs (which appear as avascular elevations or "hills") and the vertebral bodies (which appear as depressions or "valleys" covered by the segmental vessels).
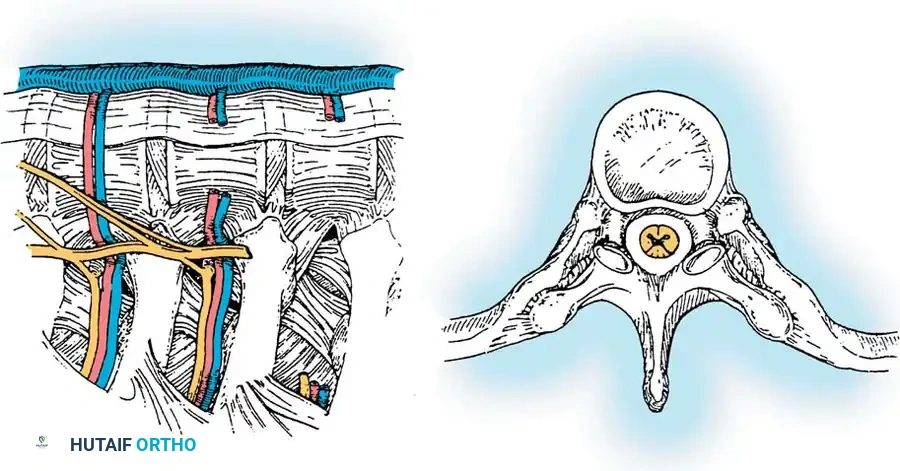
- Segmental Vessels: For a simple anterior release, it is generally advised not to ligate the segmental vessels routinely, as tearing them can lead to severe hemorrhage. However, any vessel that tethers the working space or is at high risk of avulsion should be isolated and coagulated with bipolar cautery or clipped.
- Annulotomy: Once the pleura is reflected, proceed to the excision of the annulus fibrosus. The rib heads are the most reliable anatomical landmarks. The head of the rib articulates with the base of the pedicle and the vertebral body just caudad to, or directly at, the level of the corresponding disc space (e.g., the T9 rib head points to the T8-T9 disc space).
- Discectomy: Make a transverse cut with cautery across the annulus, parallel to the vertebral endplates. Elevate the periosteum to isolate the disc. Continue the incision deep into the nucleus pulposus.
- Endplate Preparation: Use long-handled endoscopic rongeurs, curettes, and Cobb elevators to perform a thorough discectomy. Remove all cartilaginous endplates down to bleeding subchondral bone to ensure a robust fusion mass.
- Hemostasis: Control epidural or subchondral bleeding by packing the evacuated disc space tightly with oxidized regenerated cellulose (Surgicel).
- Mobility Assessment: After completing the releases, apply moderate mechanical force to the spinal column segment using a blunt instrument to confirm that structural mobility has been achieved.
Bone Grafting and Closure
- Graft Harvesting: If structural graft is required, rib sections can be harvested endoscopically through the portal sites.
- Graft Preparation: The harvested rib is passed off the field, morcellized into cancellous fragments, and then packed back into the empty disc spaces to promote interbody arthrodesis.
- Pleural Management: The parietal pleura may be loosely reapproximated over the spine or left open, depending on surgeon preference.
- Chest Tube Placement: Place a thoracostomy tube (chest tube) through the most posterior-inferior portal. Under direct endoscopic vision, guide the tube so it lies parallel to the vertebral column, resting in the posterior gutter. Connect the tube to a closed water-seal drainage system.
- Closure: Instruct the anesthesiologist to manually inflate the operative lung under direct vision. Observe for any parenchymal air leaks. Once full lung expansion is confirmed, remove the remaining portals and close the incisions in layers.
Complications and Pitfalls
Surgical Pitfall - Hemorrhage: Bleeding is the most feared complication of endoscopic spinal surgery. A minor venous bleed can rapidly obscure the camera lens, leading to a complete loss of visualization. Always have a radiopaque sponge loaded on a long endoscopic sponge stick ready on the Mayo stand. If a segmental vessel or epidural vein is torn, immediately apply direct, firm pressure with the sponge stick. Do not blindly use suction or cautery in a pool of blood. Once the bleeding is tamponaded, slowly roll the sponge away to identify the source and apply endoscopic clips or bipolar cautery precisely.
