Introduction & Epidemiology
The anterior approach to the ankle joint provides a direct and extensile operative corridor, facilitating access to the tibiotalar articulation and adjacent structures. Historically, this approach has been fundamental in reconstructive foot and ankle surgery, particularly for addressing end-stage ankle arthritis, complex distal tibial fractures, and various intra-articular pathologies. Its utility lies in the relatively straightforward anatomical plane and the capacity for robust visualization and instrumentation required for precise articular reduction and stable internal fixation.
Epidemiologically, ankle pathologies requiring surgical intervention are diverse. Ankle arthritis, whether post-traumatic, inflammatory, or degenerative, is a leading indication for both arthrodesis and total ankle arthroplasty, procedures frequently performed via the anterior approach. Distal tibial pilon fractures, often high-energy injuries, necessitate meticulous articular reconstruction, for which anterior plating can be advantageous. Furthermore, a significant proportion of ankle infections, osteochondral lesions of the talus, and anterior impingement syndromes are amenable to anterior surgical access. The prevalence of these conditions underscores the continued relevance and necessity of mastering the anterior approach in orthopedic surgical training and practice.
Surgical Anatomy & Biomechanics
A comprehensive understanding of the anterior ankle anatomy is paramount to minimize iatrogenic injury and optimize surgical outcomes. The anatomical structures encountered during an anterior approach, from superficial to deep, include:
- Skin and Subcutaneous Tissue: The skin over the anterior ankle is relatively thin, with limited subcutaneous adipose tissue. This characteristic renders it susceptible to wound healing complications, particularly in areas of compromised vascularity or excessive tension.
-
Superficial Nerves:
- The superficial peroneal nerve (SPN) typically emerges from the deep fascia approximately 10-12 cm proximal to the ankle joint and divides into its terminal branches (intermediate and medial dorsal cutaneous nerves) to innervate the dorsum of the foot, sparing the first web space. These branches are highly variable in their course and are vulnerable during incision and superficial dissection.
- The saphenous nerve , a terminal branch of the femoral nerve, courses with the great saphenous vein anterior to the medial malleolus, providing sensation to the medial aspect of the ankle and foot. While less commonly in the direct field of a central anterior approach, its medial branches can be at risk during more medially placed incisions or extensive retraction.
-
Vascular Structures:
- The anterior tibial artery , a continuation of the popliteal artery, courses between the tibialis anterior and extensor hallucis longus tendons proximally, becoming the dorsalis pedis artery distal to the extensor retinaculum. It is accompanied by two venae comitantes and the deep peroneal nerve, forming the neurovascular bundle. This bundle is consistently located, generally lateral to the tibialis anterior tendon and medial to the extensor hallucis longus, making it a critical landmark to identify and protect.
-
Tendons and Retinacula:
- The extensor retinaculum (superior and inferior divisions) acts as a fibrous band spanning the anterior ankle, tethering the extensor tendons.
- The tibialis anterior (TA) tendon is the most medial of the extensor tendons, responsible for ankle dorsiflexion and inversion.
- The extensor hallucis longus (EHL) tendon lies lateral to the TA, facilitating dorsiflexion of the great toe and assisting in ankle dorsiflexion.
- The extensor digitorum longus (EDL) tendons are most lateral, responsible for dorsiflexion of the lesser toes and ankle.
-
The
peroneus tertius (PT)
tendon, when present, is the most lateral of the extensor tendons.
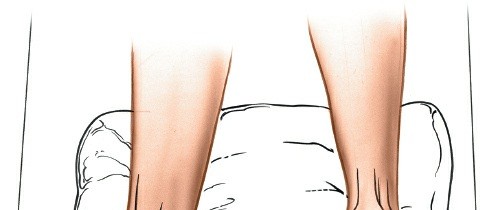
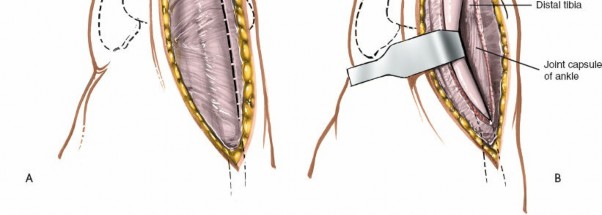
Figure 12-1 depicts the anterior ankle anatomy with key neurovascular and tendinous structures. The venous structures, appearing blue under partial exsanguination, aid in identifying the neurovascular bundle.
- Deep Nerves: The deep peroneal nerve , a terminal branch of the common peroneal nerve, accompanies the anterior tibial/dorsalis pedis artery. It lies deep to the extensor retinaculum and is responsible for motor innervation to the extensor muscles and sensation to the first web space. Its proximity to the surgical field makes it highly susceptible to stretch, compression, or direct transection.
- Joint Capsule and Synovium: Deep to the neurovascular structures and tendons lies the anterior joint capsule of the tibiotalar joint, enveloped by synovium.
Biomechanics:
The anterior approach provides direct access to the tibiotalar articulation, which is critical for restoring the mechanical axis of the lower extremity, especially in cases of ankle arthrodesis or arthroplasty. For arthrodesis, achieving optimal alignment (neutral dorsiflexion, slight valgus, and slight external rotation) and rigid fixation is paramount for functional outcomes and prevention of adjacent joint degeneration. For pilon fractures, the anterior approach facilitates direct visualization and reduction of the articular surface fragments of the distal tibia, a key determinant of long-term success. The ability to apply anterior plating constructs offers biomechanical advantages in resisting tensile forces anteriorly and maintaining reduction.
Indications & Contraindications
The anterior approach to the ankle offers versatility for a range of orthopedic conditions affecting the tibiotalar joint and distal tibia.
Indications:
1.
Ankle Arthrodesis:
The primary indication cited in the seed content, providing excellent exposure for joint preparation, debridement, and rigid internal fixation.
2.
Total Ankle Arthroplasty (TAA):
Many contemporary TAA systems are designed for implantation via an anterior approach, allowing for precise bony cuts and component placement.
3.
Open Reduction and Internal Fixation (ORIF) of Distal Tibial (Pilon) Fractures:
Especially comminuted intra-articular fractures where direct visualization and reduction of the anterior and central articular fragments are necessary. Anterior plating constructs provide strong fixation.
4.
Excision of Osteochondral Lesions of the Talus (OCLTs):
Particularly for anterior or central dome lesions that are amenable to direct visualization and debridement or fixation.
5.
Anterior Ankle Impingement Syndrome:
Debridement of osteophytes (tibial or talar spurs) or synovitis causing mechanical impingement.
6.
Synovectomy:
For inflammatory or degenerative conditions leading to symptomatic synovitis.
7.
Removal of Loose Bodies:
Intra-articular fragments that cause locking, pain, or crepitus.
8.
Drainage of Ankle Joint Infections:
For septic arthritis where open debridement and washout are indicated.
9.
Revision Surgery:
For previous failed arthrodesis, arthroplasty, or fracture fixation requiring access to the anterior joint.
Contraindications:
*
Compromised Anterior Skin and Soft Tissue Envelope:
Severe soft tissue injury, active infection, or poor skin quality anteriorly (e.g., extensive scarring from previous surgery, ulceration, severe edema, or burns) may preclude this approach due to high risk of wound complications.
*
Peripheral Vascular Disease:
Significant arterial insufficiency in the lower extremity can impair wound healing and increase the risk of infection.
*
Active Infection in the Surgical Field (unless the primary indication is for drainage/debridement):
Elective procedures should be postponed until infection is controlled.
*
Severe Deformity:
Extreme varus or valgus deformities that may be better corrected through alternative approaches (e.g., medial or lateral opening wedge osteotomies) or combined approaches.
*
Specific Fracture Patterns:
Pilon fractures with predominant posterior or medial comminution may benefit from alternative or supplementary approaches.
*
Patient Factors:
Uncontrolled diabetes, malnutrition, or immunosuppression can increase operative risk.
Operative vs. Non-Operative Indications
| Indication/Condition | Primary Operative Consideration (Anterior Approach) ```
The following steps outline the pre-operative planning and patient positioning for an anterior ankle approach, emphasizing principles crucial for optimal surgical execution.
Pre-Operative Planning & Patient Positioning
Meticulous pre-operative planning is critical for any orthopedic surgical intervention, particularly for complex ankle pathologies addressed via an anterior approach. This includes thorough patient evaluation, diagnostic imaging review, surgical templating, and strategic patient positioning.
Pre-Operative Evaluation
- Clinical History and Physical Examination: Assess for concomitant injuries, neurovascular status, skin condition, presence of pre-existing scars, and any signs of infection. Evaluate the range of motion and stability of the ankle. Document any pre-existing neuropathies, such as superficial peroneal nerve dysfunction, to aid in post-operative assessment.
-
Imaging Review:
- Plain Radiographs: Standard anteroposterior, lateral, and mortise views of the ankle are essential for initial assessment of fracture patterns, arthritic changes, or deformity. Weight-bearing views are crucial for evaluating joint space narrowing and alignment in arthritic conditions.
- Computed Tomography (CT) Scan: Indispensable for intra-articular fractures (pilon fractures), providing detailed assessment of articular comminution, fragment displacement, and bone loss. Also valuable for evaluating complex osteochondral lesions and surgical planning for ankle arthroplasty by assessing bony morphology.
- Magnetic Resonance Imaging (MRI): Useful for assessing soft tissue pathology (tendons, ligaments, cartilage), osteochondral lesions, bone marrow edema, and inflammatory conditions.
- Vascular Studies: If peripheral vascular disease is suspected, ankle-brachial index (ABI) or more advanced vascular studies may be indicated to assess perfusion and reduce the risk of wound complications.
- Surgical Templating: For total ankle arthroplasty, templating with specific implant systems helps in determining component size, optimal alignment, and potential need for ancillary procedures. For pilon fractures, templating aids in plate selection and screw trajectory planning.
- Informed Consent: Thoroughly discuss the procedure, expected outcomes, and potential complications, with specific emphasis on neurovascular injury (particularly deep peroneal nerve neuropraxia), wound healing issues, and infection, which are heightened concerns with the anterior approach.
- Prophylaxis: Administer pre-operative intravenous antibiotics per institutional protocol. Ensure appropriate deep vein thrombosis (DVT) prophylaxis is initiated.
Patient Positioning
The patient is placed in a
supine position
on the operating table.

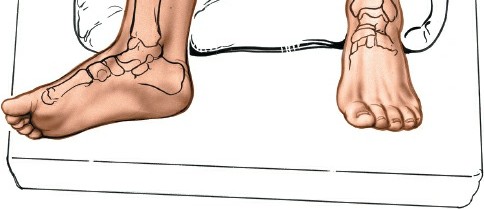
Figure 12-2 illustrates the supine patient positioning on the operating table.
- Limb Preparation: The operative limb is prepped and draped from the mid-thigh to the toes, allowing for full knee and ankle range of motion during the procedure. A sterile stockinette or impervious drape may be applied to the lower leg.
-
Exsanguination and Tourniquet Application:
- Thigh Tourniquet: A pneumatic thigh tourniquet is applied high on the thigh.
- Partial Exsanguination: Prior to inflation, the foot is partially exsanguinated by elevating it for 3 to 5 minutes or by applying a soft rubber bandage (e.g., Esmarch bandage) loosely to the foot and binding it firmly to the calf. Complete exsanguination should be avoided as it can make identification of the neurovascular bundle more challenging. As noted in the seed content, partial exsanguination allows the venous structures to appear blue, aiding in the identification of the neurovascular bundle.
- Tourniquet Inflation: The tourniquet is then inflated to an appropriate pressure (typically 100 mmHg above systolic blood pressure or 250-300 mmHg for normotensive patients).
- Image Intensifier (Fluoroscopy): The C-arm image intensifier is positioned to allow for immediate anteroposterior, lateral, and mortise views of the ankle without repositioning the limb or the machine, crucial for verifying reduction and implant placement.
- Support: A bolster or sandbag can be placed under the ipsilateral hip to prevent external rotation of the limb, ensuring the ankle is in a neutral anatomical position.
Detailed Surgical Approach / Technique
The anterior approach requires a meticulous, layer-by-layer dissection to protect vital neurovascular structures while providing adequate exposure.
Incision
- Skin Marking: With the ankle in a neutral position, the following landmarks are identified and marked: the anterior border of the tibia, the medial and lateral malleoli, the extensor hallucis longus (EHL) tendon, and the course of the deep peroneal nerve and dorsalis pedis artery (typically between EHL and tibialis anterior or slightly more lateral). The superficial peroneal nerve branches should also be approximated.
-
Incision Placement:
A longitudinal incision is typically made.
- Straight Longitudinal Incision: Centered over the anterior aspect of the ankle, extending approximately 8-10 cm. This incision usually lies between the tibialis anterior and extensor hallucis longus tendons, or just lateral to the EHL. The choice depends on the specific pathology and desired access. For total ankle arthroplasty, a more central incision often provides the best access to both malleoli.
-
Slightly Oblique Incision:
Some surgeons prefer a slightly oblique incision, parallel to the line of the deep peroneal nerve, to minimize direct crossing of the nerve branches.
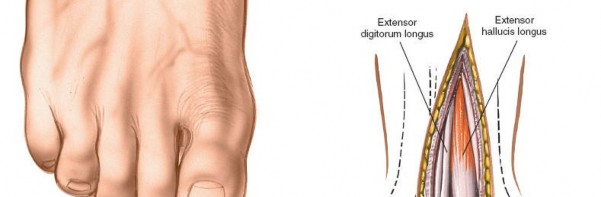
Figure 12-3 illustrates the typical skin incision line for an anterior approach, often positioned slightly lateral to the midline.
Superficial Dissection
- Skin and Subcutaneous Tissue: The incision is carried through the skin and subcutaneous tissue. Careful hemostasis is maintained.
-
Superficial Peroneal Nerve Protection:
At this stage, the branches of the superficial peroneal nerve are most vulnerable. They should be meticulously identified, gently mobilized, and protected. If encountered, they are retracted, usually laterally, throughout the procedure. Subcutaneous fat can be gently undermined to locate these nerves.

Figure 12-4 demonstrates the initial dissection through the skin and subcutaneous fat, revealing the superficial peroneal nerve branches, which are carefully protected.
Deep Dissection and Internervous Plane
- Deep Fascia: The deep fascia is incised longitudinally. This exposes the underlying extensor retinaculum and the extensor tendons.
- Extensor Retinaculum: The extensor retinaculum, particularly its inferior limb, is identified. It may be incised longitudinally or partially divided to improve access. Some surgeons prefer to make a Z-plasty incision in the retinaculum to facilitate later repair and minimize tendon irritation.
-
Identification of Neurovascular Bundle and Tendons: The key step in deep dissection is the identification of the anatomical structures within the surgical corridor:
- Tibialis Anterior (TA) tendon: Most medial.
- Extensor Hallucis Longus (EHL) tendon: Lies lateral to TA.
- Extensor Digitorum Longus (EDL) tendons: Most lateral.
-
Neurovascular Bundle (Deep Peroneal Nerve and Dorsalis Pedis Artery):
This bundle typically lies between the EHL and TA, or sometimes slightly lateral to EHL, deep to the extensor retinaculum.

Figure 12-5 displays the deep dissection, illustrating the exposure of the extensor tendons and the identification of the deep peroneal nerve (often seen lateral to the EHL) and dorsalis pedis artery.
-
Establishing the Internervous Plane: The optimal surgical interval is typically between the extensor hallucis longus (EHL) tendon and the extensor digitorum longus (EDL) tendons . This interval provides good access to the anterior tibiotalar joint while minimizing traction on the neurovascular bundle (which often lies medial to EHL) and the EHL tendon itself.
- The EHL tendon is retracted medially.
- The EDL tendons (and peroneus tertius, if present) are retracted laterally.
-
This retraction exposes the underlying anterior joint capsule and the neurovascular bundle (deep peroneal nerve and dorsalis pedis artery), which is carefully protected, usually by retracting it medially along with the EHL, or directly lateral depending on the primary internervous plane chosen. Constant vigilance is required to prevent stretch or direct injury.
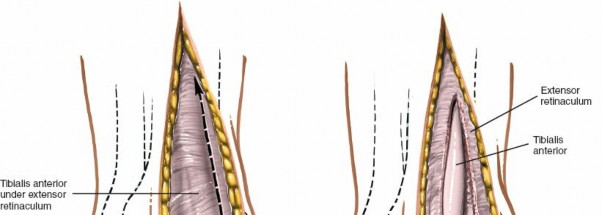
Figure 12-6 details the retraction of the EHL medially and the EDL laterally, exposing the neurovascular bundle (deep peroneal nerve and dorsalis pedis artery) beneath. Note the meticulous protection of these structures.

Figure 12-7 shows a similar view, emphasizing the wide exposure gained by meticulous retraction, clearly displaying the anterior joint capsule.
Capsulotomy and Joint Exposure
-
Incision of Joint Capsule: Once the anterior joint capsule is fully exposed, it is incised longitudinally, parallel to the long axis of the tibia. This incision can be extended proximally along the anterior aspect of the tibia and distally onto the talar neck to maximize exposure.

Figure 12-8 demonstrates the longitudinal incision of the anterior joint capsule, allowing direct visualization of the tibiotalar joint surfaces. -
Joint Distraction (Optional): For procedures like arthrodesis or arthroplasty, a distractor (e.g., small external fixator) may be applied from the tibia to the talus or calcaneus to open the joint space, facilitating debridement, osteophyte removal, or component insertion. This can provide improved visualization of the posterior aspect of the joint.
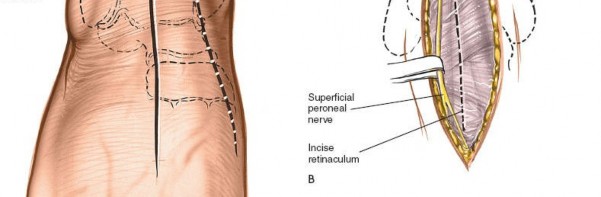
Figure 12-9 illustrates the application of a small distractor to further open the ankle joint space, aiding in visualization and access to the posterior aspects of the articulation during procedures like arthrodesis or arthroplasty.
Specific Procedures
A. Ankle Arthrodesis
- Cartilage Debridement: All remaining articular cartilage, subchondral bone, and fibrous tissue from the distal tibia and talar dome are meticulously removed to expose bleeding cancellous bone. Power burrs, osteotomes, and curettes are used.
- Joint Preparation: Ensure optimal alignment for fusion (typically neutral dorsiflexion, 0-5 degrees of hindfoot valgus, and slight external rotation, aligning the second ray with the tibial crest). The joint surfaces may be contoured for maximal surface area contact.
-
Fixation:
Multiple methods can be employed via an anterior approach:
- Cannulated Screws: Often three screws, typically from the tibia into the talus (two anterior-to-posterior, one anteromedial-to-posterolateral) or a combination of talus-to-tibia and tibia-to-talus. Compressionscrews are applied to generate interfragmentary compression.
-
Anterior Plating:
A contoured anterior plate (e.g., an "A" frame or specific ankle arthrodesis plate) can provide robust neutralization and compression. Screws are placed bicortically where possible.
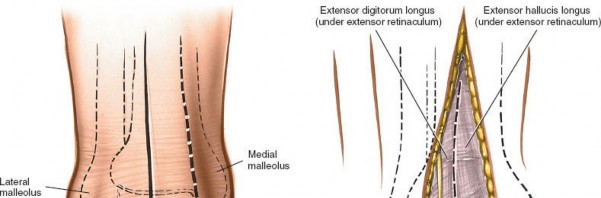
Figure 12-10 demonstrates the placement of an anterior plate for ankle arthrodesis, providing stable internal fixation and compression. - Combined Fixation: Screws combined with an anterior plate offer a highly stable construct.
- Bone Grafting (Optional): Autograft or allograft may be packed into any remaining gaps or defects to enhance fusion rates.
B. Total Ankle Arthroplasty (TAA)
- Bony Cuts: Using specialized instrumentation specific to the chosen implant system, precise bony resections of the distal tibia and talus are performed to prepare for component implantation. Intra-operative fluoroscopy or navigation may be used to verify accuracy.
- Trial Implantation: Trial components are inserted to assess fit, alignment, stability, and range of motion.
- Definitive Implantation: The definitive tibial and talar components are cemented or press-fit according to the implant system's protocol.
-
Polyethylene Liner Insertion:
The appropriate size polyethylene liner is then inserted.

Figure 12-11 shows the implanted components of a total ankle arthroplasty, demonstrating the precise anatomical reconstruction achievable via the anterior approach.
C. Open Reduction and Internal Fixation of Pilon Fractures
- Debridement: The joint is thoroughly debrided of hematoma, loose bone fragments, and soft tissue.
- Articular Reduction: Direct visualization through the anterior approach allows for meticulous reduction of the articular fragments. K-wires may be used for provisional fixation.
-
Metaphyseal Fixation:
Once articular reduction is achieved, buttress plating (often an anterior or anteromedial plate) is applied to support the articular surface and provide stability to the metaphysis.

Figure 12-12 illustrates a contoured anterior plate fixed with screws for a pilon fracture, providing buttress support to the distal tibia. - Screw Placement: Screws are placed to capture articular fragments and secure the plate to the tibia, adhering to principles of lag screw and position screw fixation.
- Bone Grafting (Optional): Defects in the metaphysis may be bone grafted.
Wound Closure
- Joint Capsule Repair: The anterior joint capsule is repaired with absorbable sutures to help contain the joint and aid in stability.
- Extensor Retinaculum Repair: If divided, the extensor retinaculum is meticulously repaired, often with a Z-plasty or simple longitudinal repair, taking care to avoid overtightening which can cause tendon irritation.
- Deep Fascia: The deep fascia is closed with absorbable sutures.
- Subcutaneous Layer: The subcutaneous tissue is approximated with absorbable sutures.
- Skin Closure: The skin is closed with non-absorbable sutures or staples. Ensure tension-free closure.
- Drain Placement (Optional): A small suction drain may be considered if significant oozing is anticipated, particularly after complex fracture fixation or revision surgery.
- Sterile Dressing: Apply a sterile dressing and appropriate splint or cast depending on the procedure.
Complications & Management
While the anterior approach provides excellent access, it is associated with a distinct set of potential complications, predominantly related to the vulnerability of the anterior soft tissue envelope and neurovascular structures. Vigilant surgical technique and careful post-operative management are essential for mitigating these risks.
Common Complications
| Complication | Incidence (Approximate) | Salvage/Management Strategies
| Deep Peroneal Nerve (Deep Fibular Nerve) Neuropathy / Deep Peroneal Nerve Entrapment Syndrome | 5-10% (can be higher in specific complex procedures like TAA/arthrodesis) |
| Wound Healing Issues (dehiscence, necrosis) | 5-15% (higher in patients with diabetes, PVD, smoking, extensive dissection) |
| Infection (Superficial/Deep) | 1-5% (similar rates to other elective orthopedic procedures, but can be higher with prolonged open time or compromised soft tissue) |
| Nonunion (for arthrodesis) / Malunion (for fracture) | 5-20% (depending on patient factors, fracture complexity, surgical technique) |
| Hardware Complications (prominence, loosening) | 5-15% (can be higher with non-anatomic implant placement) |
| Ankle Stiffness / Range of Motion Loss | Variable (expected with arthrodesis, but can occur after fracture or soft tissue procedures) |
| Complex Regional Pain Syndrome (CRPS) | <1-5% |
Management Strategies
-
Deep Peroneal Nerve Neuropathy:
- Prevention: Meticulous identification and gentle retraction are paramount. Avoid excessive stretch or direct compression from retractors.
- Management: Most neuropraxias are temporary and resolve with conservative management (rest, NSAIDs, physical therapy, neuropathic pain medication). Persistent symptoms or severe deficit may warrant nerve conduction studies/EMG. Surgical exploration for neurolysis or repair is rarely indicated but considered for documented transection or severe entrapment refractory to conservative care.
-
Wound Healing Issues:
- Prevention: Careful tissue handling, tension-free closure, minimizing subfascial dissection, rigorous hemostasis, and optimizing patient comorbidities (e.g., glycemic control). Consider plastic surgery consultation for complex closures or high-risk patients.
-
Management:
- Superficial Dehiscence: Local wound care, serial debridement, negative pressure wound therapy (NPWT).
- Deep Dehiscence/Necrosis: Surgical debridement, potential need for rotational flaps or free tissue transfer by plastic surgery.
-
Infection:
- Prevention: Strict aseptic technique, pre-operative antibiotics, appropriate wound closure.
-
Management:
- Superficial Infection: Oral antibiotics, local wound care.
- Deep Infection (Periprosthetic Joint Infection/Osteomyelitis): Surgical irrigation and debridement, culture-directed intravenous antibiotics, potential for hardware removal (for nonunion or persistent infection), or two-stage revision arthroplasty (for TAA).
-
Nonunion/Malunion:
- Prevention: Achieving rigid fixation, optimal alignment, adequate joint preparation, and biological enhancement (e.g., bone graft).
-
Management:
- Asymptomatic Nonunion/Malunion: Observation.
- Symptomatic Nonunion/Malunion: Revision surgery with debridement, repeat fixation, bone grafting, and potentially external fixation.
-
Hardware Complications:
- Prevention: Careful implant selection, anatomical placement, contouring plates to minimize prominence.
- Management: Symptomatic prominent hardware typically requires surgical removal after adequate bone healing or fusion has occurred. Loosening may require revision.
-
Ankle Stiffness / Range of Motion Loss:
- Prevention: Early, controlled range of motion exercises in appropriate cases (e.g., soft tissue procedures, stable fractures).
- Management: Aggressive physical therapy, dynamic splinting, manipulation under anesthesia (MUA), or arthroscopic/open lysis of adhesions for severe, refractory stiffness. Arthrodesis, by definition, eliminates motion.
-
Complex Regional Pain Syndrome (CRPS):
- Prevention: Minimizing surgical trauma, adequate pain control post-operatively.
- Management: Early recognition, multidisciplinary pain management (physical therapy, occupational therapy, neuropathic medications, sympathetic blocks).
Post-Operative Rehabilitation Protocols
Post-operative rehabilitation following an anterior ankle approach is highly dependent on the primary surgical procedure performed, patient factors, and intra-operative stability. The overarching goals are to protect the surgical repair/reconstruction, control pain and edema, restore range of motion, regain strength, and facilitate a safe return to functional activities. The following outlines general principles; specific protocols vary widely.
Phase I: Protection & Early Healing (Weeks 0-6/8)
- Goal: Protect surgical repair, minimize pain and swelling, maintain adjacent joint mobility.
-
Immobilization:
- Ankle Arthrodesis/Complex Pilon Fractures: Non-weight bearing (NWB) in a short leg cast or CAM boot. Often a posterior splint initially, followed by a cast at 1-2 weeks.
- Total Ankle Arthroplasty (TAA): NWB in a splint or CAM boot, with early controlled range of motion initiated by some surgeons.
- OCLT Excision/Loose Body Removal/Impingement Debridement: NWB or protected weight-bearing (PWB) in a CAM boot or walking cast, or even early full weight-bearing (FWB) depending on stability.
- Weight-Bearing: Strictly NWB for arthrodesis and pilon fractures until radiographic evidence of healing (often 6-8 weeks). TAA protocols vary, from NWB for 2-4 weeks to immediate protected weight-bearing for some contemporary designs.
- Pain & Edema Management: Elevation, ice, analgesics (opioids, NSAIDs, acetaminophen).
-
Range of Motion (ROM):
- Ankle Arthrodesis/TAA/Fractures: No active or passive ankle ROM initially to protect fixation. Focus on knee, hip, and toe ROM.
- Other Procedures: Gentle active dorsiflexion/plantarflexion may be initiated early, gradually increasing as tolerated.
- Exercises: Isometric quadriceps and gluteal exercises, core strengthening. Non-weight-bearing cardiovascular exercise (e.g., arm ergometer).
- Wound Care: Monitor incision for signs of infection or delayed healing. Stitch/staple removal typically at 2-3 weeks.
Phase II: Controlled Mobilization & Progressive Weight-Bearing (Weeks 6/8-12)
- Goal: Gradually increase weight-bearing, restore ankle ROM (for non-fusion cases), improve muscle strength.
- Immobilization: Transition from cast to CAM boot.
-
Weight-Bearing:
- Ankle Arthrodesis/Pilon Fractures: Gradual progression to protected weight-bearing (PWB) in CAM boot with crutches or walker, based on radiographic signs of healing. Full weight-bearing (FWB) once fusion site is consolidated.
- TAA: Progressive weight-bearing as per surgeon protocol, often transitioning to FWB in boot or supportive shoe.
- Other Procedures: Gradual progression to FWB in a supportive shoe.
-
Range of Motion:
- Ankle Arthrodesis: Continued focus on adjacent joint ROM.
- TAA/Fractures (stable)/Other Procedures: Initiate active and passive ankle ROM exercises (dorsiflexion, plantarflexion, inversion, eversion). Modalities such as continuous passive motion (CPM) may be used. Progress to gentle stretching.
- Strengthening: Introduce isometric and light resistance exercises for ankle muscles (dorsiflexors, plantarflexors, invertors, evertors). Begin with resistance bands.
- Proprioception: Gentle balance exercises (e.g., standing on the operative leg with support).
Phase III: Advanced Strengthening & Functional Return (Weeks 12+)
- Goal: Achieve full strength and ROM (where applicable), restore proprioception, return to prior activity levels.
- Weight-Bearing: Full weight-bearing, transitioning from CAM boot to supportive lace-up shoes, then to regular footwear.
- Range of Motion: Continue to work on achieving full, pain-free ROM. Address any persistent stiffness with targeted stretching and mobilization techniques.
- Strengthening: Progress to progressive resistance exercises with increased weight/resistance. Incorporate eccentric exercises. Calf raises (double-leg, then single-leg), step-ups, toe raises.
- Proprioception & Balance: Advanced balance exercises (e.g., single-leg stance, wobble board, uneven surfaces). Sport-specific drills if applicable.
- Gait Training: Address any compensatory gait patterns. Work on normalization of gait.
- Return to Activity: Gradual return to light activities, then more demanding activities. High-impact sports are typically restricted, especially after TAA and arthrodesis. Full return to sport for fracture patients may take 6-12 months.
Important Considerations:
- Neuropathic Pain: Monitor for deep peroneal nerve symptoms or CRPS. Management may involve physical therapy, desensitization techniques, and pharmacotherapy.
- Wound Sensitivity: Address scar tissue sensitivity with massage and desensitization techniques.
- Patient Compliance: Emphasize the importance of adherence to protocols to optimize outcomes and prevent complications.
- Individualization: Protocols must be individualized based on patient progress, pain levels, and specific surgical findings. Close communication between surgeon and physical therapist is essential.
Summary of Key Literature / Guidelines
The anterior approach remains a cornerstone of ankle surgery, with extensive literature supporting its application across various pathologies. Contemporary research and clinical guidelines continually refine its indications, techniques, and post-operative management.
For Ankle Arthrodesis , the anterior approach is well-established, offering high fusion rates ranging from 80-95%, often comparable to lateral or arthroscopic approaches. Studies emphasize the importance of meticulous cartilage debridement, adequate compression, and rigid internal fixation for successful outcomes. While complications like wound healing issues and deep peroneal nerve irritation are noted, advancements in soft tissue handling and surgical technique have progressively mitigated these risks. The American Academy of Orthopaedic Surgeons (AAOS) clinical practice guidelines for ankle arthritis generally recommend arthrodesis or arthroplasty for end-stage arthritis refractory to conservative care, with the choice of approach often guided by surgeon preference, patient factors, and deformity.
In Total Ankle Arthroplasty (TAA) , the anterior approach is now dominant for most three-component designs. Literature highlights superior early and mid-term survival rates (85-95% at 5-10 years) for modern implants. Studies comparing anterior TAA to arthrodesis show comparable functional outcomes, with TAA offering the advantage of preserving adjacent joint motion. However, TAA is associated with a higher rate of revision surgery and specific complications such as periprosthetic lucencies, component subsidence, and ankle stiffness. The anterior approach specifically carries risks of deep peroneal nerve injury, with reported rates of transient neuropraxia ranging from 5% to 20%, though permanent deficits are rare. Careful surgical planning and precise bony resection via the anterior window are critical for optimizing alignment and minimizing complications.
For Pilon Fractures , the anterior approach is frequently combined with other approaches (e.g., anterolateral, posteromedial) for complex, multi-fragmentary injuries. When used for anterior pilon fractures, it permits direct visualization and reduction of the articular surface. The benefits include direct buttress plating of the anterior metaphysis, which is often under tension, and the ability to address articular impaction. Studies indicate that meticulous soft tissue management, staging procedures (if high-energy injury), and anatomical reduction are crucial for preventing post-traumatic arthritis and wound complications. A systematic review by Assal et al. (2010) on pilon fractures underscores that while surgical outcomes have improved, the anterior approach must be judiciously applied, considering the soft tissue envelope and fracture morphology.
Regarding Anterior Ankle Impingement , both open anterior debridement and arthroscopic techniques have demonstrated efficacy. Open anterior approaches via limited incisions are typically reserved for large osteophytes, concomitant OCLTs, or when arthroscopic access is challenging. Outcomes are generally favorable, with good pain relief and return to activity.
Overall, the literature consistently reinforces that while the anterior approach provides excellent access, it necessitates an intimate knowledge of the anatomy and meticulous surgical execution. Future research continues to focus on refining surgical techniques, improving implant designs, optimizing rehabilitation protocols, and further understanding long-term outcomes for pathologies addressed via this invaluable surgical corridor.
Clinical & Radiographic Imaging