INTRODUCTION AND BIOMECHANICAL RATIONALE
The management of humeral shaft fractures requires a nuanced understanding of upper extremity biomechanics, soft tissue envelopes, and neurovascular anatomy. While nonoperative management with functional bracing remains the gold standard for many closed diaphyseal fractures, operative intervention is strictly indicated for polytrauma patients, open fractures, pathological fractures, floating elbows, and fractures failing conservative management.
Antegrade intramedullary (IM) nailing offers a biologically favorable, load-sharing construct that aligns closely with the mechanical axis of the humerus. Compared to open reduction and internal fixation (ORIF) with dynamic compression plates, IM nailing minimizes periosteal stripping, preserves the fracture hematoma, and provides superior biomechanical stability against bending forces. However, the antegrade approach demands meticulous surgical technique to mitigate the risks of iatrogenic rotator cuff pathology, shoulder impingement, and neurovascular compromise during distal interlocking.
PREOPERATIVE PLANNING AND TEMPLATING
Thorough preoperative evaluation is the cornerstone of successful intramedullary nailing.
- Radiographic Evaluation: Obtain orthogonal, full-length anteroposterior (AP) and lateral radiographs of the humerus, including the shoulder and elbow joints.
- Canal Diameter Assessment: Carefully evaluate the diaphyseal diameter at the isthmus. The medullary canal must be adequate to accommodate the selected intramedullary nail. If the canal diameter is excessively narrow (typically less than 8 to 9 mm) or exhibits severe deformity, reaming may induce iatrogenic comminution or thermal necrosis. In such instances, plate fixation is the preferred alternative.
- Implant Selection: Determine the appropriate nail length and diameter using digital templating software or radiographic overlays. The nail should span the fracture site with adequate purchase in the distal metaphysis, remaining 1 to 2 cm proximal to the olecranon fossa.
Clinical Pearl: Always template the contralateral, uninjured humerus if the fractured side is highly comminuted or shortened. This provides an accurate baseline for restoring anatomic length and rotation.
SURGICAL ANATOMY AND PATIENT POSITIONING
Optimal patient positioning and fluoroscopic setup are critical to facilitate seamless reduction and hardware insertion without compromising the sterile field.
Patient Positioning
- Position the patient supine on a fully radiolucent operating table.
- Elevate the thorax on the operative side by placing a bump under the scapula, angling the torso 30 to 40 degrees. This "bumped supine" or modified beach-chair position allows the shoulder to fall posteriorly, providing unobstructed access to the greater tuberosity.
- Ensure the head and neck are secured in a neutral position to prevent brachial plexus traction injuries.
- Drape the arm free to allow full manipulation, including flexion, extension, and rotation.
Fluoroscopy Setup
Place the image intensifier (C-arm) on the contralateral side of the table, opposite the primary surgeon. The monitor should be positioned in the surgeon's direct line of sight.
* AP View: Achieved by rolling the C-arm unit back (away from the patient).
* Lateral View: Achieved by rolling the unit forward over the chest, capturing an orthogonal view of the shoulder and humeral shaft without requiring excessive rotation of the fractured limb.
SURGICAL TECHNIQUE: ANTEGRADE INTRAMEDULLARY NAILING
Approach and Deltoid Splitting
Make a 3 to 5 cm longitudinal incision diagonally from the anterolateral corner of the acromion. Proceed with sharp dissection through the subcutaneous tissues. Identify the raphe between the anterior and middle thirds of the deltoid muscle. Split the deltoid bluntly in line with its fibers.
Surgical Warning: The axillary nerve crosses the deep surface of the deltoid approximately 5 to 7 cm distal to the lateral edge of the acromion. To strictly protect the axillary nerve, never extend the deltoid split more than 5 cm distal to the acromion. Place a stay suture at the distal apex of the split to prevent inadvertent propagation during reaming.
Rotator Cuff Management
Under direct visualization, identify the supraspinatus tendon. Incise the rotator cuff longitudinally, strictly in line with its fibers, typically just posterior to the bicipital groove.
Place heavy, full-thickness non-absorbable stay sutures (e.g., #2 FiberWire) into the medial and lateral leaflets of the incised rotator cuff. These sutures serve a dual purpose: they allow for retraction during the procedure to protect the cuff from the reamer, and they facilitate a robust, anatomic repair during closure.
Entry Portal and Guidewire Placement
The optimal entry point is located on the greater tuberosity, just medial to its lateral edge and posterior to the biceps tendon.
1. Utilize an awl or a cannulated entry reamer over a guide pin to breach the proximal cortex.
2. Pass a ball-tipped guidewire through the entry portal.
3. Advance the guidewire down the humeral canal under continuous fluoroscopic guidance. Ensure the wire passes posterior to the biceps tendon to avoid intra-articular entrapment.
4. Confirm the guidewire's position within the medullary canal on both AP and lateral fluoroscopic views.
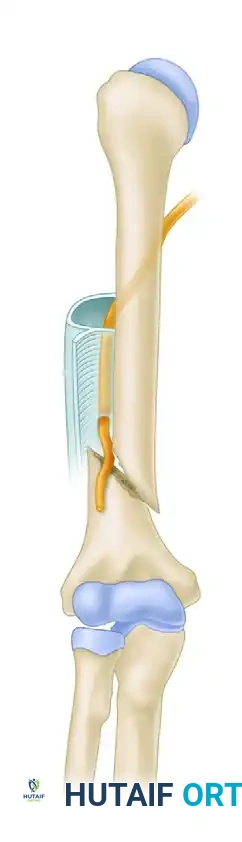
Canal Preparation and Reaming
Carefully advance the proximal opening reamer over the guidewire. It is imperative to use a soft tissue protector sleeve to shield the rotator cuff and articular cartilage from the reamer flutes.
- Use a closed reduction device or manual traction to align the fracture fragments.
- Pass the bead-tipped guidewire across the fracture site and into the distal metaphysis, centering it just above the olecranon fossa.
- Begin sequential reaming. Ream the humerus to a predetermined diameter, which is typically 1.0 to 1.5 mm larger than the selected nail diameter. This over-reaming prevents nail incarceration and reduces the risk of iatrogenic fracture propagation.
Clinical Pearl for Mid-Shaft Fractures: In fractures of the middle third of the humeral shaft, the radial nerve is at high risk of entrapment between fracture fragments during reduction. If closed reduction is difficult, make a small "mini-open" incision at the fracture site. Manually sweep the fracture site to ensure the radial nerve is not entrapped before proceeding with final reduction and reaming.
Nail Insertion
Once reaming is complete, exchange the ball-tipped guidewire for a smooth wire if required by the specific nail system.
1. Mount the selected intramedullary nail onto the insertion jig.
2. Pass the nail down the humeral canal using gentle, twisting manual pressure. Avoid aggressive mallet strikes to prevent distraction of the fracture or iatrogenic comminution.
3. Ensure the proximal tip of the nail is countersunk at least 2 to 4 mm below the articular surface of the humeral head. A prominent nail will cause severe subacromial impingement and secondary rotator cuff arthropathy.
Proximal Interlocking
Utilize the outrigger targeting device attached to the insertion jig to place the proximal locking bolts.
* Make small stab incisions through the skin.
* Use blunt dissection down to the bone, carefully spreading the soft tissues with a hemostat to avoid injury to the axillary nerve, which courses in proximity to the proximal locking trajectory.
* Insert the locking screws and confirm their length and position fluoroscopically.
Distal Interlocking
Distal interlocking is the most hazardous step regarding neurovascular injury. The radial nerve courses laterally in the distal third of the arm, making lateral-to-medial screw insertion highly dangerous.
- Anterior-to-Posterior (AP) Locking: Always place distal interlocking screws in an AP direction to avoid the radial nerve.
- Approach: Make a 4 to 5 cm longitudinal incision anteriorly over the distal humerus, centered over the locking holes.
- Dissection: Identify the biceps brachii musculature. Bluntly split the biceps muscle belly or retract it medially. Carefully split the underlying brachialis muscle longitudinally down to the anterior cortex of the humerus.
- Protection: This blunt, meticulous dissection is mandatory to avoid iatrogenic damage to the brachial artery and the musculocutaneous nerve, which lie in the anterior compartment.
- Use a tissue protection sleeve, drill both cortices, measure, and insert the appropriate length screws.
Closure and Rotator Cuff Repair
Thoroughly irrigate the surgical wounds. The most critical step of the closure is the anatomic repair of the rotator cuff. Use the previously placed full-thickness stay sutures to meticulously close the supraspinatus defect. Failure to achieve a watertight, robust repair will result in postoperative shoulder weakness and pain. Close the deltoid fascia, subcutaneous tissue, and skin in a standard layered fashion.
Confirm the final fracture reduction, hardware placement, and screw lengths on final AP and lateral fluoroscopy images.
POSTOPERATIVE REHABILITATION PROTOCOL
The primary advantage of intramedullary nailing is the ability to initiate early mobilization, preventing adhesive capsulitis of the shoulder and stiffness of the elbow.
- Phase I (0-2 Weeks): The arm is supported in a sling for comfort. Begin immediate active-assisted range-of-motion (ROM) exercises for the shoulder (pendulum exercises) and active ROM for the elbow, wrist, and hands.
- Phase II (2-6 Weeks): Progress to active shoulder ROM as tolerated. Avoid heavy lifting or forceful rotation.
- Phase III (6+ Weeks): Once radiographic evidence of callus formation is observed, initiate progressive resistance and strengthening exercises. Full functional recovery is typically expected between 3 to 6 months.
MANAGEMENT OF CONCOMITANT RADIAL NERVE PALSY
The radial nerve is the most frequently injured peripheral nerve associated with humeral shaft fractures. Understanding its complex anatomical course is essential for both conservative management and surgical intervention.
Pathoanatomy of Radial Nerve Entrapment
The radial nerve's vulnerability stems from its spiral course across the posterior aspect of the midshaft of the humerus (within the spiral groove) and its relatively fixed position in the distal arm. Approximately 10 cm proximal to the lateral epicondyle, the nerve pierces the lateral intermuscular septum to transition from the posterior to the anterior compartment. This tethering point renders the nerve highly susceptible to traction, contusion, or entrapment, particularly in specific fracture patterns.
The classic "Holstein-Lewis" fracture—a spiral fracture of the distal third of the humeral shaft—carries a notoriously high risk of radial nerve entrapment.

As illustrated above, the nerve is least mobile as it passes through the lateral intermuscular septum in the distal third of the arm.
In these oblique or spiral fractures, the distal fragment is typically displaced proximally and angulated laterally. Because the radial nerve is fixed to the proximal fragment by the lateral intermuscular septum, it can easily become trapped between the sharp cortical edges of the bone fragments, especially when closed reduction is attempted.
Mechanism of Injury and Prognosis
In the vast majority of closed humeral shaft fractures, the radial nerve injury is a neurapraxia (a temporary conduction block due to stretching or bruising) or axonotmesis.
* Low-Energy Injuries: Spontaneous recovery rates approach 100%.
* High-Energy / Open Injuries: Recovery rates range from 71% to 94%. Bumbasirevic et al. reported a 94% recovery rate in a series of 16 open fractures.
Although it is anatomically possible for the nerve to be completely severed (neurotmesis) by the sharp edge of a bone fragment, this is exceedingly rare in closed injuries.
Evidence-Based Treatment Algorithm
The management of radial nerve palsy associated with humeral shaft fractures depends heavily on the fracture type (open vs. closed) and the timing of the deficit. Shao et al. conducted a comprehensive review of 21 scientific articles encompassing 4,517 humeral shaft fractures. They found an overall radial nerve palsy prevalence of almost 12% (n = 532). The palsy was most frequent in middle and middle-distal shaft fractures and was more common in transverse and spiral patterns than in oblique or comminuted ones. Overall, spontaneous recovery occurred in 88% of cases.
Based on current orthopedic literature, the following treatment algorithm is recommended:
1. Closed Fractures with Primary Radial Nerve Palsy
- Management: Nonoperative treatment is the standard of care. The fracture is managed with a functional brace (Sarmiento brace).
- Supportive Care: The wrist and fingers must be supported with a dynamic extension splint to prevent flexion contractures and maintain functional positioning of the hand.
- Observation: Watchful waiting is employed. Because the nerve is usually only bruised or stretched, spontaneous return of function is expected. Routine early exploration subjects the patient to unnecessary surgical risks and potential iatrogenic complications.
- Indications for Late Exploration: Exploration of the nerve is strictly reserved for instances where clinical and electromyographic (EMG) evidence shows absolutely no signs of functional return after 3 to 4 months, and the fracture has healed.
2. Open Fractures with Radial Nerve Palsy
- Management: Immediate surgical intervention is required.
- Exploration: The radial nerve must be formally explored at the time of the emergent irrigation and débridement (I&D) of the open wound. Complete transection of the radial nerve is much more common in open fractures and requires primary microsurgical epineural repair or nerve grafting.
- Intact Nerve: If the nerve is visualized and found to be in continuity (intact), no further nerve-specific intervention is required. Watchful waiting is instituted while the fracture heals.
3. Secondary (Iatrogenic) Radial Nerve Palsy
- Management: If a patient presents with an intact radial nerve initially, but develops a complete radial nerve palsy immediately following a closed reduction attempt or intramedullary nailing, this is a surgical emergency.
- Exploration: Early exploration is mandatory, as the clinical picture strongly suggests that the radial nerve has been impaled on a bone fragment, entrapped within the fracture site (as seen in the Holstein-Lewis pattern), or incarcerated by hardware.
4. Operative Fixation for Other Indications
- Management: In patients who present with a radial nerve palsy and have independent indications for operative fixation of the humeral shaft (e.g., polytrauma, floating elbow, failure of conservative management), the nerve should be routinely explored and protected at the time of fracture fixation.
Future Diagnostic Modalities: Advances in high-resolution ultrasonography have shown promise in diagnosing entrapped, compressed, or lacerated radial nerves non-invasively. If these diagnostic tools prove to be highly reproducible across large patient cohorts, the indications for early nerve exploration may become more specifically defined, potentially altering the traditional timeline of watchful waiting.
