INTRODUCTION TO ACROMIOCLAVICULAR JOINT INSTABILITY
Acromioclavicular (AC) joint dislocations are common injuries, particularly among young, active individuals and athletes. While low-grade injuries (Rockwood Types I and II) are typically managed non-operatively, high-grade separations (Types IV, V, and VI), as well as symptomatic chronic Type III injuries, often necessitate surgical intervention. The primary goal of surgery is to restore the native biomechanics of the shoulder girdle by addressing the disrupted coracoclavicular (CC) ligaments—specifically, the conoid and trapezoid ligaments.
Historically, non-anatomic reconstructions (such as the Weaver-Dunn procedure) were the gold standard. However, biomechanical studies have demonstrated that these non-anatomic repairs fail to restore native joint kinematics, often leading to residual anteroposterior instability and construct elongation. The advent of the anatomic coracoclavicular reconstruction, pioneered and popularized by Mazzocca and colleagues, represents a paradigm shift. By utilizing a free tendon allograft or autograft to recreate the distinct vectors of the conoid and trapezoid ligaments, surgeons can achieve superior load-to-failure strength, enhanced stiffness, and precise restoration of the scapulohumeral complex.
SURGICAL ANATOMY AND BIOMECHANICS
A profound understanding of the CC ligament complex is mandatory for successful anatomic reconstruction. The CC complex is the primary suspensory mechanism of the upper extremity and the primary restraint to superior and anteroposterior translation of the clavicle.
- The Conoid Ligament: Positioned posteromedially, the conoid ligament originates from the posteromedial base of the coracoid process and inserts onto the conoid tubercle of the clavicle. It is cone-shaped and serves as the primary restraint to superior translation of the clavicle.
- The Trapezoid Ligament: Positioned anterolaterally, the trapezoid ligament originates from the superior surface of the coracoid process and inserts onto the trapezoid line of the clavicle. It is broad and flat, serving as the primary restraint to axial compression and posterior translation of the distal clavicle.
Biomechanical Pearl: The native conoid and trapezoid ligaments do not function in isolation; they act synergistically. The Mazzocca technique respects this synergy by utilizing a dual-tunnel clavicular approach, recreating the V-shaped orientation of the native ligaments. This dual-vector reconstruction is critical for controlling both superior and horizontal instability.
PREOPERATIVE EVALUATION AND IMAGING
Thorough clinical and radiographic evaluation dictates the surgical strategy. Patients typically present with a prominent distal clavicle, localized tenderness, and a positive cross-body adduction test.
Standard radiographic evaluation must include:
* Anteroposterior (AP) View: To assess general shoulder anatomy.
* Zanca View: A 10- to 15-degree cephalad tilt view, which removes the superimposition of the spine of the scapula, providing an unobstructed view of the AC joint.
* Axillary View: Crucial for evaluating anteroposterior displacement (essential for diagnosing Type IV injuries).
* Cross-body Adduction View: Can be utilized to assess dynamic instability.
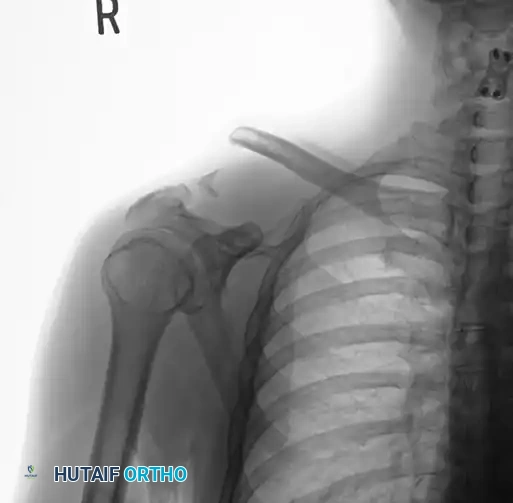
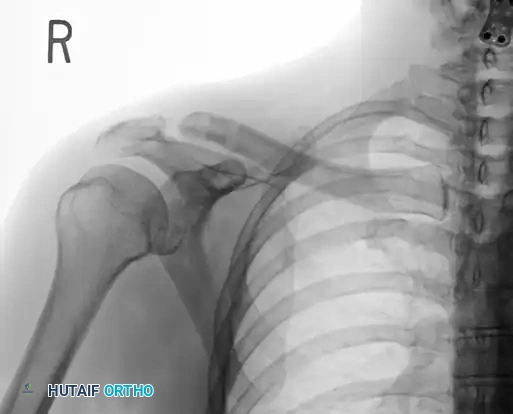
Preoperative Radiograph: Grade V acromioclavicular dislocation demonstrating severe superior displacement of the distal clavicle relative to the acromion, indicating complete rupture of the AC and CC ligaments.
SURGICAL TECHNIQUE: THE MAZZOCCA ANATOMIC RECONSTRUCTION
The Mazzocca anatomic coracoclavicular reconstruction utilizes a free tendon graft (commonly a semitendinosus allograft or autograft) passed beneath the coracoid and secured into two distinct clavicular tunnels using soft tissue interference screws.
1. Patient Positioning and Anesthesia
The patient is placed in the beach chair position with the head secured in a neutral position. A mechanical arm holder may be utilized to assist with reduction and positioning. General anesthesia is typically combined with an interscalene regional block for optimal postoperative pain control. Ensure the operative shoulder is draped free to allow full manipulation of the arm and scapula.
2. Surgical Approach and Exposure
- Incision: Make a 5 to 7 cm curved incision starting just posterior to the AC joint, extending anteriorly and medially toward the tip of the coracoid process. This follows Langer's lines for optimal cosmesis.
- Fascial Dissection: Raise full-thickness fasciocutaneous flaps anteriorly and posteriorly.
- Deltotrapezial Interval: Incise the deltotrapezial fascia in line with the clavicle. Subperiosteally elevate the anterior deltoid and posterior trapezius to skeletonize the distal clavicle and expose the AC joint.
- Joint Debridement: Expose the AC joint and meticulously remove the disrupted intra-articular meniscus, loose cartilaginous fragments, and any interposed debris that may impede reduction.
3. Distal Clavicle Resection (Mumford Procedure)
To prevent postoperative AC joint arthrosis and impingement, a distal clavicle excision is performed.
* Resect the distal 10 mm of the clavicle using an oscillating saw.
* Crucial Step: Bevel the inferior aspect of the resected clavicle. This prevents impingement of the clavicle against the acromion or the graft during shoulder elevation.
4. Coracoid Preparation
- Dissect inferiorly to expose the superior, medial, and lateral aspects of the base of the coracoid process.
- Retract the anterior deltoid laterally and the conjoint tendon medially.
- Using a right-angle clamp or a specialized curved passing instrument, carefully create a tunnel under the base of the coracoid from medial to lateral.
Surgical Warning: Dissection medial and inferior to the coracoid must be performed with extreme caution. The musculocutaneous nerve and the brachial plexus lie in close proximity. Always keep instruments directly on the bone of the coracoid to avoid neurovascular injury.
5. Clavicular Tunnel Placement
Accurate tunnel placement is the most critical step in recreating the native anatomy.
* Conoid Tunnel (Posterior/Medial): Drill the first tunnel 45 mm medial to the native distal clavicular articular surface. Note: If a 10 mm distal clavicular resection has already been performed, this tunnel should be placed 35 mm from the new cut edge. Position this tunnel slightly posterior on the clavicle to recreate the native conoid insertion.
* Trapezoid Tunnel (Anterior/Lateral): Drill the second tunnel 15 mm lateral to the conoid tunnel. Position this tunnel slightly anteriorly to recreate the native trapezoid insertion.
* Use an appropriate cannulated reamer (typically 5.0 mm to 6.0 mm, depending on graft diameter) over a guide pin.
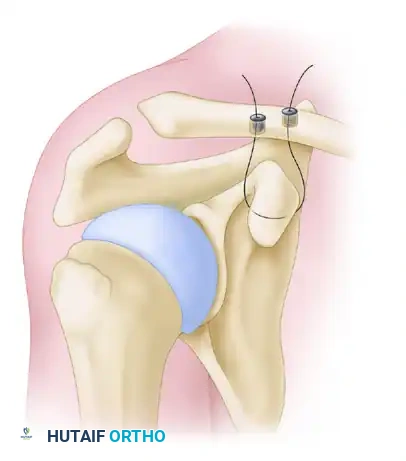
Mazzocca anatomic coracoclavicular reconstruction: Incision and precise tunnel placement. The posterior tunnel recreates the conoid ligament, while the anterior tunnel recreates the trapezoid ligament.
6. Graft Preparation and Passage
A robust graft, such as a semitendinosus allograft, is prepared with whipstitches at both ends using high-strength nonabsorbable suture.
* Pass a shuttling suture (e.g., a looped passing wire or heavy suture) beneath the coracoid using the previously created path.
* Shuttle the tendon graft beneath the base of the coracoid. Ensure the graft lies flat against the undersurface of the coracoid to maximize the contact area and prevent abrasion.
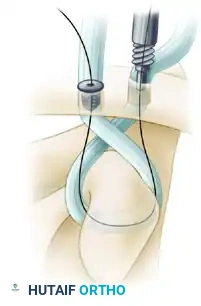
Graft passage beneath the base of the coracoid. The graft must be seated flush against the bone to ensure biomechanical stability and prevent neurovascular impingement.
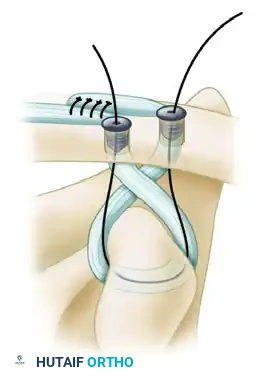
- Routing the Limbs:
- Pass the lateral limb of the graft (along with its sutures) superiorly through the first (posterior/conoid) tunnel. Cross it posteriorly so that it will ultimately form a figure-of-eight configuration.
- Feed the medial limb of the graft through the anterior (trapezoid) tunnel. Do not cross this suture; pass it directly so that it forms a circular configuration.
Graft crossing technique: The lateral limb is crossed posteriorly to create a figure-of-eight, mimicking the complex multi-planar vectors of the native CC ligaments.
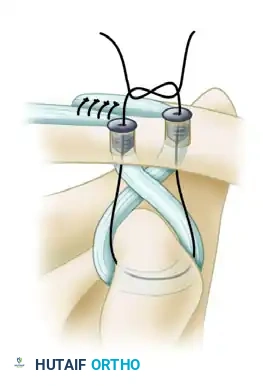
7. Reduction and Interference Screw Fixation
- Reduction: Elevate the arm and apply a superiorly directed force to the elbow to elevate the scapulohumeral complex. Simultaneously, apply a gentle downward force on the clavicle.
- Surgical Pearl: Slightly overreduce the acromioclavicular joint by 2 to 3 mm, as minor settling of the graft is expected postoperatively.
- Fixation: While maintaining the reduction, secure the graft limbs within the clavicular tunnels using soft tissue interference screws (typically 5.5 mm or 6.25 mm PEEK or biocomposite screws).
- Insert the first screw into the posterior (conoid) tunnel, bringing the whipstitch sutures up through the cannulation of the screw.
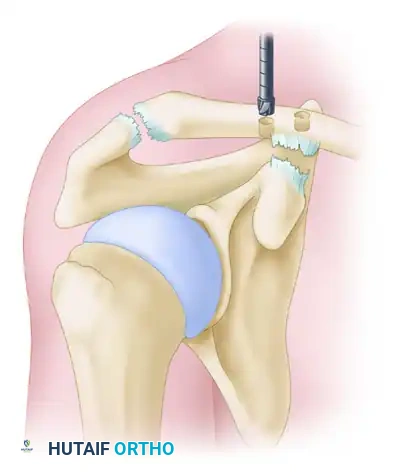
Secure the graft with a soft tissue interference screw in the posterior tunnel. The sutures are brought through the cannulated screw to allow for secondary fixation.
- Assess the reduction and screw placement. Once confirmed, place the second interference screw into the anterior (trapezoid) tunnel.
- Secondary Fixation: Tie the high-strength sutures from the medial and lateral limbs together over the bony bridge between the two tunnels to provide a secondary node of fixation and back up the interference screws.
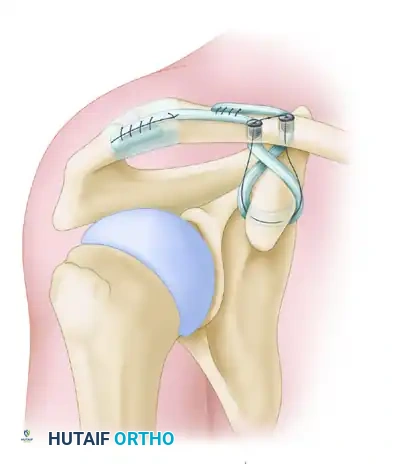
Interference screw fixation of the graft to the clavicle, followed by tying the high-strength sutures over the intervening bone bridge for augmented construct security.
8. Acromioclavicular (AC) Ligament Reconstruction
To address anteroposterior instability at the AC joint itself, the residual tail of the graft is utilized.
* Route the remaining lateral limb of the tendon graft over the AC joint.
* Secure it to the acromion using suture anchors or by passing it through drill holes in the acromion, effectively reconstructing the superior AC capsular ligaments.
Final placement of grafts. The residual lateral limb is routed and sutured to the acromion, completing the acromioclavicular ligament reconstruction and providing horizontal stability.
9. Radiographic Confirmation and Closure
- Obtain intraoperative fluoroscopy (C-arm Zanca view) to confirm anatomic reduction of the AC joint and proper hardware placement.
- Closure: The repair of the deltotrapezial fascia is as critical as the bony work. Imbricate and close the deltotrapezial interval securely over the clavicle using heavy absorbable sutures (e.g., #1 or #2 Vicryl). This dynamic muscle envelope provides significant secondary stability to the construct.
- Close the subcutaneous tissue and skin with absorbable monofilament sutures.
Postoperative Radiograph: Following Mazzocca anatomical reconstruction with a Mumford procedure. Note the anatomic reduction of the clavicle relative to the acromion and the precise placement of the clavicular tunnels.
ALTERNATIVE SUTURE-BASED RECONSTRUCTION (TECHNIQUE 60-6)
While the Mazzocca anatomic graft reconstruction is the modern gold standard for high-grade injuries, alternative or historical techniques utilizing heavy suture and temporary Kirschner wire (K-wire) fixation may still be encountered or utilized in specific resource-limited settings.
Surgical Steps for Suture-Based Repair
- Make a curved incision exposing the AC joint, distal clavicle, and coracoid process.
- Debride the AC joint of loose fragments.
- Place mattress sutures in the ruptured native coracoclavicular ligaments (if acute and repairable), but do not tie them yet.
- Using a 7/64-inch drill bit, create two holes in the clavicle directly above the coracoid in the anteroposterior plane.
- Pass a No. 5 nonabsorbable suture beneath the base of the coracoid and superiorly through the two clavicular holes.
- Reduce the joint and tie the heavy sutures. Note: The entire clavicle is not encircled by the sutures, as repetitive motion can cause the suture to erode through the bone (the "cheese-wire" effect).
- Adjunct Fixation: If severe anteroposterior instability persists, a small Kirschner wire can be passed percutaneously across the acromioclavicular joint and bent at its lateral end to prevent migration.
- Tie the previously placed sutures in the native CC ligaments.
- Repair the AC joint capsule and meticulously reattach the deltoid and trapezius origins.
- Apply a Velpeau dressing or sling-and-swath bandage.
Pitfall Warning: The use of trans-articular K-wires carries a well-documented risk of hardware migration, breakage, and AC joint arthrosis. If utilized, they must be removed at 6 to 8 weeks postoperatively. Modern practice heavily favors flexible, anatomic graft reconstructions over rigid trans-articular metallic fixation.
POSTOPERATIVE REHABILITATION PROTOCOL
A strict, phased rehabilitation protocol is paramount to protect the healing graft while preventing adhesive capsulitis. The timeline is dictated by the biology of tendon-to-bone healing.
Phase I: Maximum Protection (Weeks 0 to 6)
- Immobilization: The patient is placed in a specialized AC joint brace or a supportive sling for 6 weeks. The brace is worn continuously, including during sleep.
- Restrictions: No active shoulder elevation, abduction, or lifting. No cross-body adduction.
- Exercises: The brace is removed strictly for supervised therapy. Permitted exercises include gentle pendulum exercises, active range of motion (AROM) of the elbow, wrist, and hand, and passive/active-assisted range of motion (AAROM) of the shoulder limited to 90 degrees of forward flexion and 45 degrees of external rotation.
Phase II: Moderate Protection and Motion (Weeks 6 to 12)
- Immobilization: Discontinue the sling/brace.
- Exercises: Progress to full AROM in all planes. Begin isometric strengthening of the rotator cuff and periscapular stabilizers.
- Restrictions: Avoid heavy lifting or high-impact activities. Avoid end-range cross-body adduction to protect the AC capsular repair.
- Note for Technique 60-6: If a trans-articular K-wire was used, it is removed under local anesthesia at the 8-week mark before progressing to full AROM.
Phase III: Strengthening and Return to Play (Weeks 12 to 24+)
- Exercises: Initiate isotonic strengthening. Focus on the deltoid, trapezius, serratus anterior, and rotator cuff to restore dynamic stability.
- Advanced Rehab: Introduce sport-specific or occupation-specific plyometric and kinetic chain exercises.
- Return to Sports: Clearance for contact sports or heavy manual labor is typically granted at 6 months postoperatively, provided the patient has achieved full, painless ROM, symmetric strength, and radiographic maintenance of reduction.
COMPLICATIONS AND MANAGEMENT
Despite excellent clinical outcomes, surgeons must be vigilant regarding potential complications:
1. Loss of Reduction / Graft Elongation: Minor settling (1-2 mm) is common and usually asymptomatic. Significant loss of reduction may occur due to premature non-compliance with the sling, graft failure, or knot slippage.
2. Clavicle Fracture: The creation of dual tunnels creates stress risers in the clavicle. Fractures can occur through the tunnels, particularly if they are placed too close together (<10 mm apart) or if the tunnels are oversized.
3. Coracoid Fracture: Can occur if the graft is not seated flush against the base of the coracoid, or if excessive tension is applied during reduction.
4. Infection and Hardware Irritation: Prominent suture knots over the superior clavicle can cause skin irritation, occasionally requiring delayed knot excision after biologic healing is complete.
5. Neurovascular Injury: Rare, but catastrophic. Strict adherence to keeping instruments on the bone during sub-coracoid dissection minimizes the risk to the musculocutaneous nerve and brachial plexus.
